Kodak EasyShare C1013 User Manual
Hide thumbs
Also See for EasyShare C1013:
- Extended user manual (67 pages) ,
- Manual (27 pages) ,
- Extended user manual (67 pages)

Related Manuals for Kodak EasyShare C1013


Summary of Contents for Kodak EasyShare C1013
- Page 1 Kodak EasyShare Digital Camera • Appareil photo numerique Camara digital • Camera digital 1013 D1013 User guide • Guide d'utilisation Gufa del usuario • Guia do Usuario...
- Page 2 Follow the on-screen instructions. After installing the software, return to this User guide. • Loading the batteries • Kodak oxy-alkaline digital camera batteries AA • Kodak Ni-MH rechargeable digital camera batteries AA • Kodak Ni-MH rechargeable digital camera battery KAA2HR •...
- Page 3 Turning on the camera Setting the language, date/time Language: ,4/""" to change. to accept. Date/Time: At the prompt, press OK. AI... to change. for previous/next field. to accept. www.kodak.com/go/easysharecenter...
- Page 4 Press the Sh utter button halfway Press the Shutter button to focus and set exposure. completely down and release. When the framing marks turn To stop recording, press and green, press the Shutter button release the Shutter button again. completely down. kodak. eom/go/e 13support...
- Page 5 Play at 2X, 4X speed Play in reverse at 2X, 4X To hear audio, transfer the video to your computer. Transferring pictures/videos USB cable Kodak EasyShare printer dock or camera dock (May be sold separately.) For dock compatibility, visit www.kodak.com/go/dcickcompatibility. Turn on...
- Page 6 (Highlight a menu choice, then press the button.) Visit www.kodak.com/go/c1 013support for: • the extended user guide • interactive troubleshooting and repairs • interactive tutorials • FAQs • downloads • accessories • printing information • product registration www kodak. eam/ga/e 10 135Upport...
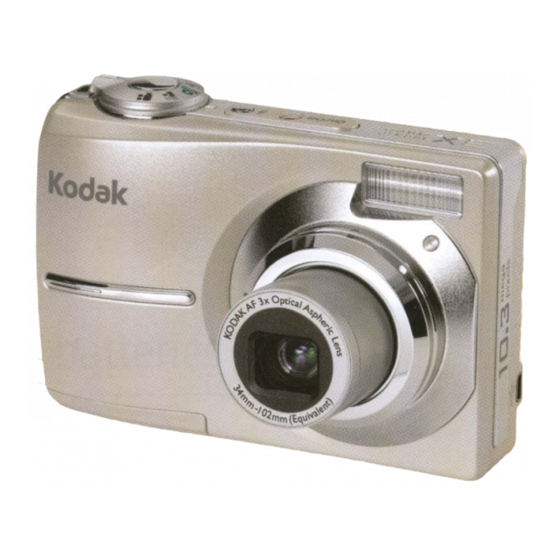
- Page 7 Front view 1 Mode dial 6 Self-timer light Shutter button Lens .<:, Flash button 4 On/Off button 9 Microphone Flash wwwkodak.com/go/easysharecenter...
- Page 8 1 LCD 2 Review button OK button 3 Menu button Share button 4 LCD/Info button Battery compartment Delete button Slot for optional SD or SDHC card 6 Zoom button (Telephoto/Wide) Dock connector Strap post 14 Tri pod socket kodak. eom/go/e 73support...
- Page 9 Doing more with your camera Storing pictures on an SO or SOHC card Your camera has internal memory. You can purchase an SD or SDHC card to store more pictures and videos (www.kodak.com/go/c 10 13accessories). We recommend Kodak SD/SDHC cards. Turn off the camera.
- Page 10 Release the button, then press it again. loom. NOTE: You may notice decreased image quality when using digital The slider on the zoom indicator turns red when the picture quality reaches the limit for an acceptable 4x6-in. (10 x15 cm) print. www kodak. eom/go/e 10 13support...
- Page 11 Doing more with your camera Using the flash button Use the flash when you take pictures at night, indoors, or outdoors in heavy shadows. Press the button repeatedly to scroll through flash modes (see Flash modes below). The current flash mode appears in the LCD screen. Flash Distance Wide angle: 0.6-3.2 m (2-10.5 ft) ISO 160...
- Page 12 Doing more with your camera Using different picture-taking modes Choose the mode that best suits your subjects and surroundings. Use this mode Scene Point-and-shoot simplicity when taking pictures under special conditions. (See page 12.) Close range. Use available light instead of flash if possible. The Close-up camera automatically sets the focus distance depending on the zoom position.
- Page 13 Doing more with your camera Scene modes Choose a Scene mode-for great pictures in practically any situation! SeN. 1 Turn the Mode dial to Scene 4,/~A,IV 2 Press to display Scene mode descriptions. If the mode description turns off before you finish reading it, press OK. 3 Press OK to choose a Scene mode.
- Page 14 3 Choose an option, then press OK. • Press the Menu button to exit the menu. NOTE: Some settings remain until you change them; others, until you change modes or turn off the camera. Some modes offer limited settings. www kodak. eom/go/e 10 13support...
- Page 15 Doing more with your camera Using camera Help To better understand each menu option, use camera Help. Highlight a menu choice, then press the 1010 button. :.-~~-n-IIOI Turn on/off Help Scroll up/down Understanding the picture-taking icons Picture size Flash - - - - - - - Pictures/time remaining Self-timer 8 @mJ 0&...
- Page 16 2 Press the OK button to select pictures/videos. A check mark appears on the picture. You can now print transfer, delete, etc. the selected pictures. You can press Selected OK asecond time to remove acheck mark. pictures kodak. com/go/c 13support...
- Page 17 The picture/video is protected and cannot be deleted. The Protect icon Q appears with the protected picture/video. • Press the Menu button to exit the menu. CAUTION: Formatting internal memory or an SD or SDHC card deletes all (including protected) pictures/videos. (Formatting internal memory also deletes email addresses, tag names, and favorites.) www.kodak.com/go/easysharecenter...
- Page 18 3 PressAA./'Y to highlight a setting, then press the OK button. 4 Highlight an option, then press the OK button. Using Kodak Perfect Touch technology Kodak Perfect Touch technology helps ensure better, brighter pictures. 1 Press the Review button, then to find previous/next picture.
- Page 19 Working with pictures/videos Cropping pictures You can crop a picture so that only the desired portion of the picture remains. then~1 ~ 1 Press the Review button, to find previous/ next picture. AI... 2 Press the Menu button. Press to highlight Edit Picture, then press OK.
- Page 20 Picture Video 4 Press OK to select avideo frame. S Follow the screen prompts to save the picture. A picture is created. (The original video is saved.) • Press the Menu button to exit the menu. kodak. com/go/c 10 13support...
- Page 21 (Telephoto) button to view the picture full-screen. Press the W (Wide Angle) button to return to multi-up view • For more about tags, see the extended user guide at www.kodak.com/go/cl 013support. • To select multiple pictures/videos, see page 15. wwwkodak. com/go/easysharecenter...
- Page 22 Working with pictures/videos Understanding the review icons Pictures Print tag/number of prints Blur warning Protected Koda k Perfect Touch tech. ~:~i~i~~~ag q~16 -.~r:i r~(~~~e~~~~:rlo(ation @,,--- . iJltliill:J1~ Tag name Review mode Scroll arrows Videos Protected - - - - - - - - , .
- Page 23 Solving camera problems Camera problems For step-by-step product support, visit www.kodak.com/go/e 10 13support and select Interactive Troubleshooting & Repairs. Try one or more of the followi ng • Camera does not turn on. Install new batteries (see page 1). •...
- Page 24 If the LCD breaks, do not touch the glass or liquid. Contact Kodak customer support. • The use of an accessory that is not recommended by Kodak may cause fire, electric shock, or injury. For approved accessories, visit www.kodak/go/accessories. •...
- Page 25 Warranty service will include all labor as well as any necessary adjustments and/or replacement parts. If Kodak is unable to repair or replace a Product, Kodak will, at its option, refund the purchase price paid for the Product provided the Product has been returned to Kodak along with proof of the purchase price paid.
- Page 26 In countries other than the United States and Canada, the terms and conditions of this warranty may be different. Unless a specific Kodak warranty is communicated to the purchaser in writing by a Kodak company, no warranty or liability exists beyond any minimum requirements imposed by law, even though defect, damage, or loss may be by negligence or other act.
- Page 27 In Europe: For human/environmental protection, it is your responsibility to dispose of this equipment at a collection facility established for this purpose (separate from municipal waste). For more information, contact your retailer, collection facility, or appropriate local authorities; or visit www.kodak.com/go/recycle. (Product weight: 137g.) Australian C-Tick N137...
- Page 28 $flf~~ 7\{fr-~ $m~~ $m=~M !{ft .li!Jfatll.lf!iI&t&3tf'f ~7J'~1f.1iW~JJl:fE~fllSf'fJn10:$JJilf;!*"-tjJ(l%tl:~tESJ/T 1l363-2006~~rr Rl.~~grf. ~~~1f.1i'ilf~JP{~~f£~~f1=(J9;¥;-~AI{f;!~*A9,*UtflSJ/T 11363-2006~~(J9Ill:l:~*. Kodak Eastman Kodak Company Rochester, New York 14650 © Eastman Kodak Company, 2008 Kodak, EasyShare, and Perfect Touch are trademarks of Eastman Kodak Company. 4F8273_en wwwkodak. eom/go/e 10 13support...
- Page 29 Kodak Just press EASTMAN KODAK COMPANY Rochester, NY 14650 © Kodak, 2008. TM/MC/MR: Kodak, EasyShare, Share button Printed in China PIN 4F8284...
-
Page 30: Digital Camera
Kodak EasyShare C1013/CD1013 digital camera Extended user guide www.kodak.com For interactive tutorials, www.kodak.com/go/howto For help with your camera, www.kodak.com/go/c1013support... - Page 31 Eastman Kodak Company Rochester, NY 14650 © Eastman Kodak Company, 2008 All screen images are simulated. Kodak, EasyShare, and Perfect Touch are trademarks of Eastman Kodak Company. P/N 4F8272_en...
- Page 32 Front view Mode dial Self-timer light Shutter button Lens Flash button On/Off button Microphone Flash...
- Page 33 Back view optional Review button OK button Menu button 10 Share button LCD/Info button 11 Battery compartment Delete button 12 Slot for optional SD or SDHC card Zoom button (Telephoto/Wide) 13 Dock connector Strap post 14 Tripod socket...
-
Page 34: Table Of Contents
Understanding the picture-taking icons............11 Reviewing pictures/videos ................12 Deleting pictures/videos ................14 Using the menu button in review..............15 Using Kodak Perfect Touch technology ............15 Cropping pictures..................16 Rotating pictures..................16 Editing videos ..................... 17 Running a slide show .................. 18 Copying pictures/videos................ -
Page 35: Table Of Contents
Customizing your camera ................27 Using exposure compensation to adjust picture brightness ......29 Using the framing grid to compose a picture..........30 Sharing your pictures................... 30 Installing the software................. 34 Transferring pictures with the USB cable............35 Printing pictures..................36 Dock compatibility for your camera.............. -
Page 36: Setting Up Your Camera
Setting up your camera Attaching the strap Loading the battery • Kodak oxy-alkaline digital camera batteries AA • Kodak Ni-MH rechargeable digital camera batteries AA • Kodak Ni-MH rechargeable digital camera battery KAA2HR • alkaline batteries AA • lithium batteries AA... -
Page 37: Turning On The Camera
Turning on the camera Setting the language, date/time Language: to change. to accept. Date/Time: At the prompt, press OK. to change. for previous/next field. to accept. NOTE: To change the date/time and language in the future, use the Menu button (page 27). -
Page 38: Storing Pictures On An Sd Or Sdhc Card
Storing pictures on an SD or SDHC card Your camera has internal memory. You can purchase an SD or SDHC card to conveniently store more pictures and videos (www.kodak.com/go/c1013accessories). We recommend Kodak SD/SDHC cards. NOTE: To choose a storage location for pictures and videos, see page Turn off the camera. -
Page 39: Taking Pictures/Videos
Taking pictures/videos Taking a picture Press the Shutter button halfway to focus and set exposure. When the framing marks turn green, press the Shutter button completely down. Framing marks Reviewing the picture just taken After you take a picture or video, the LCD displays a quickview for approximately 10 seconds. -
Page 40: Using The Framing Marks To Take Pictures
Using the framing marks to take pictures Framing marks indicate the camera focus area. The camera attempts to focus on foreground subjects, even if the subjects are not centered in the scene. 1 Press the Shutter button halfway. Framing marks 2 If the camera is not focusing on the desired subject (or if the framing marks disappear), release the Shutter button and recompose the scene. -
Page 41: Using Optical Zoom
Using optical zoom Use optical zoom to get up to 3X closer to your subject. 1 Use the LCD to frame your subject. 2 Press Telephoto (T) to zoom in. Press Wide Angle (W) to zoom out. 3 Take the picture or video. NOTE: For focus distances, see Camera specifications, page ■... -
Page 42: Using The Flash
Using the flash Use the flash when you take pictures at night, indoors, or outdoors in heavy shadows. button repeatedly to scroll Press the through flash modes (see Flash modes below). The current flash mode appears in the LCD screen. Flash-to-subject distance Zoom position Flash distance... -
Page 43: Scene Modes
Using different picture-taking modes Choose the mode that best suits your subjects and surroundings. Use this mode Scene Point-and-shoot simplicity when taking pictures under special conditions. (See page Close-up Close range. Use available light instead of flash if possible. The camera automatically sets the focus distance depending on the zoom position. - Page 44 3 Press OK to choose a Scene mode. Use this SCN mode Portrait Full-frame portraits of people. Night Reducing red eye of people in night scenes or low-light conditions. Place the Portrait camera on a flat, steady surface or use a tripod. Night Distant scenery at night.
-
Page 45: Using Camera Help
Using camera Help To better understand each menu option, use camera Help. Highlight a menu choice, then press the button. Turn on/off Help Scroll up/down... -
Page 46: Understanding The Picture-Taking Icons
Understanding the picture-taking icons Flash Picture size Pictures/time remaining Self-timer Storage location Date stamp Zoom: Wide Telephoto Digital Exposure metering White balance ISO speed Low battery Camera mode Exposure compensation Tag name Auto Exposure/ Auto Focus warning Low battery Exposure compensation... -
Page 47: Working With Pictures/Videos
1 Press the Review button. 2 Press to view previous/next picture/video. To save battery power, use an optional Kodak EasyShare dock. (Visit www.kodak.com/go/c1013accessories.) Review NOTE: Pictures taken at a 3:2 picture size have a black bar at the top and bottom. Pictures taken at 16:9 picture size have a black bar at the sides. -
Page 48: Playing Videos
Playing videos 1 Press the Review button. 2 Press to find previous/next video. Press to play/pause. Press during playback to play at 2X, 4X. Playback speed Press to reverse at 2X, 4X. NOTE: To hear audio, transfer the video to your computer (see Reverse Forward page... -
Page 49: Deleting Pictures/Videos
Deleting pictures/videos 1 Press the Review button. 2 Press to find previous/next picture/video. 3 Press the Delete button. 4 Follow the screen prompts. Protecting pictures/videos from deletion 1 Press the Review button. 2 Press to find previous/next picture/video. 3 Press the Menu button. 4 Press to highlight Protect, then press OK. -
Page 50: Using The Menu Button In Review
OK button. 3 Highlight an option, then press the OK button. Using Kodak Perfect Touch technology Kodak Perfect Touch technology helps ensure better, brighter pictures. 1 Press the Review button, then to find previous/next picture. -
Page 51: Cropping Pictures
Cropping pictures You can crop a picture so that only the desired portion of the picture remains. 1 Press the Review button, then to find a picture. 2 Press the Menu button. Press to highlight Edit Picture, then press OK. Cropped picture Picture 3 Press... -
Page 52: Editing Videos
Editing videos Making a picture from a video You can choose a single frame from a video, then make a picture suitable for printing. 1 Press the Review button, then to find a video. 2 Press the Menu button. Press to highlight Edit Video, then press OK. -
Page 53: Making A Video Action Print
Making a video action print From a video, you can make a 4-, 9-, or 16-up picture, suitable for a 4 x 6-inch (10 x 15 cm) print. 1 Press the Review button, then to find a video. 2 Press the Menu button. Press to highlight Edit Video, then press OK. -
Page 54: Changing The Slide Show Display Interval
Changing the slide show display interval The default interval setting displays each picture for 5 seconds. You can set the display interval from 3–60 seconds. 1 On the Slide Show menu, press to highlight Interval, then press OK. 2 Select a display interval. To scroll through the seconds quickly, press and hold 3 Press OK. -
Page 55: Viewing Pictures By Date, Favorites, Or Other Tag
Copy pictures/videos: 1 Press the Review button, then the Menu button. 2 Press to highlight Copy, then press OK. 3 Press to highlight an option. 4 Press OK. NOTE: Pictures/videos are copied, not moved. To remove pictures/videos from the original location after copying, delete them (see page 14). -
Page 56: Selecting Multiple Pictures/Videos
Selecting multiple pictures/videos Use the multi-select feature when you have two or more pictures/videos to print, transfer, delete, etc. Multi-select is used most effectively in Multi-Up mode, page 1 Press the Review button, then to find a picture/video. 2 Press the OK button to select pictures/videos. Selected pictures... -
Page 57: Understanding The Review Icons
Understanding the review icons Print tag/number of prints Blur warning Kodak Perfect Touch tech. Protected Favorite tag Picture number Image storage location Email tag Tag name Review mode Scroll arrows Protected Video length Favorite tag Video number Image storage Email tag... - Page 58 Understanding blur warning icons A picture blur warning icon is displayed during quickview and review. Green—Picture is sharp enough for an acceptable 4 x 6-inch (10 x 15 cm) print. Yellow—Picture may be sharp enough for an acceptable 4 x 6-inch (10 x 15 cm) print or sharpness is not determined.
-
Page 59: Doing More With Your Camera
Doing more with your camera Changing picture-taking settings You can change settings to get the best results from your camera. 1 Press the Menu button. 2 Press to highlight a setting, then press OK. 3 Choose an option, then press OK. ■... - Page 60 For recommended 7.6 MP (16:9) HDTV format in high resolution print sizes, visit: 5.0 MP Medium file size www.kodak.com/go/ printsizes 3.1 MP Medium file size 2.2 MP (3:2) Printing on EasyShare printer docks and photo printers (at a lower resolution than 8.9 MP) 2.1 MP (16:9)
- Page 61 Press Menu, Options , and OK to access settings ISO Speed Choose a lower ISO setting in brightly lit scenes; use a higher ISO for low-light scenes. Choose Auto (default), 80, 100, 200, 400, 800, Control the camera’s 1000. sensitivity to light. NOTE: ISO returns to Auto when the camera is set to SCN mode.
-
Page 62: Customizing Your Camera
Customizing your camera Use Setup to customize your camera settings. 1 In any mode, press the Menu button. 2 Press to highlight Setup, then press OK. 3 Press to highlight a setting, then press OK. 4 Choose an option, then press OK. 5 Press the Menu button to exit. - Page 63 Press Menu, to highlight Setup, Options then OK to access settings Set Tag Clear All Assign tag names to pictures/videos. Select Add Tag tag name(s) before you take pictures or Delete Tag videos. Then, new pictures/ videos are Exit assigned that tag name(s). Tag Name 1 page Tag Name 2...
-
Page 64: Using Exposure Compensation To Adjust Picture Brightness
Press Menu, to highlight Setup, Options then OK to access settings About View camera information. Using exposure compensation to adjust picture brightness Before you take a picture, you can adjust exposure compensation to make pictures darker or lighter. ■ Press to decrease exposure compensation. -
Page 65: Using The Framing Grid To Compose A Picture
Using the framing grid to compose a picture The framing grid divides the LCD into thirds—vertically and horizontally. This is helpful if, for example, you want to balance a picture between water, earth, and sky. To turn on the framing grid in Auto/SCN modes, press the LCD/Info button until the grid appears. - Page 66 Printing tagged pictures When you transfer the tagged pictures to your computer, the Kodak EasyShare software print screen opens. For details, click the Help button in EasyShare software. For more information on printing from your computer, printer dock, PictBridge enabled printer, or card, see page NOTE: For the best 4 x 6 in.
- Page 67 Third—transfer and email When you transfer these pictures/videos to your computer, EasyShare software prompts you to send them. For details, see Help in EasyShare software. Tagging pictures/videos with tags that you create Use the Tag feature to create tag names and assign them to pictures/videos. 1 Press the Review button, then find a picture/video.
- Page 68 Tagging pictures/videos as favorites Tag pictures as favorites 1 Press the Review button. Press to find a picture. 2 Press the Menu button, highlight Favorite, then press OK. View favorites on your camera 1 Press the Review button, then the Menu button. 2 Choose View By, then Favorites.
-
Page 69: Transferring And Printing Pictures
4 Follow the on-screen instructions to install the software. NOTE: When prompted, take few minutes to electronically register your camera and software. To register later, visit www.kodak.com/go/register. 5 If prompted, restart the computer. If you turned off anti-virus software, turn it back on. -
Page 70: Transferring Pictures With The Usb Cable
NOTE: Visit www.kodak.com/go/howto for an online tutorial on connecting. Also available for transferring You can also use these Kodak products to transfer your pictures and videos. ■ Kodak EasyShare camera dock, Kodak EasyShare printer dock ■ Kodak multi-card reader, Kodak SD/SDHC multimedia card reader-writer Purchase these and other accessories at a dealer of Kodak products or visit www.kodak.com/go/c1013accessories. -
Page 71: Printing Pictures
Printing pictures Direct printing with an EasyShare all-in-one printer Your camera is compatible with PictBridge technology, so you can print directly to PictBridge enabled printers. You need a camera with fully charged battery, a PictBridge enabled printer, and a USB cable. Connecting the camera to an EasyShare all-in-one printer 1 Turn off the camera and printer. -
Page 72: Ordering Prints Online
Take the card to your local photo retailer for professional printing. ■ Printing with an EasyShare print dock Dock your camera to the Kodak EasyShare printer dock and print directly—with or without a computer. To see which EasyShare camera and printer docks are compatible with your camera, visit www.kodak.com/go/dockcompatibility. -
Page 73: Dock Compatibility For Your Camera
Dock compatibility for your camera To see which Kodak EasyShare docks are compatible with your camera, visit www.kodak.com/go/dockcompatibility. Purchase camera docks, printer docks, and other accessories at a dealer of Kodak products or visit www.kodak.com/go/c1013accessories. -
Page 74: Troubleshooting
Short battery life ■ Wipe the contacts with a clean, dry cloth (see page 51) before loading with Kodak Ni-MH batteries in the camera. rechargeable ■ Limit the following activities that quickly deplete battery power: digital camera reviewing pictures/videos on the LCD;... - Page 75 If... Try one or more of the following In Review mode, a ■ Transfer the picture to the computer (see page 35). blue or black ■ Take another picture. If problem continues, try internal memory and/or screen is displayed another memory card. instead of a picture.
-
Page 76: Camera/Computer Communications
14), or insert a new card full. (see page Camera/computer communications If... Try one or more of the following The computer does ■ Visit www.kodak.com/go/c1013support. not communicate ■ Turn on the camera (see page with the camera. ■ Install new batteries (see page 1) or charge rechargeable batteries. -
Page 77: Lcd Screen Messages
(Formatting internal memory also deletes email Internal memory addresses, tag names, and Favorites. To restore them, see the cannot be read Kodak EasyShare software Help.) (Please format internal memory) No memory card ■ Insert a card (see... - Page 78 Date and time ■ Reset the clock (see page have been reset No address book ■ Create and copy address book from computer. See the Kodak on camera EasyShare software Help. (Connect with computer to import address book) High camera ■...
-
Page 79: Getting Help
Get help with the Windows operating system and www.kodak.com/go/pcbasics working with digital pictures Other Get support for other cameras, software, accessories www.kodak.com/go/support Get information on Kodak EasyShare printer docks www.kodak.com/go/printerdocks Get information on Kodak inkjet products www.kodak.com/go/inkjet Optimize your printer for truer, more vibrant colors www.kodak.com/go/onetouch Register your camera www.kodak.com/go/register... - Page 80 NOTE: If you have questions concerning this product, you may speak with Kodak customer support. Australia 1800 267 588 Netherlands 020 346 9372 Austria 0179 567 357 New Zealand 0800 880 120 Belgium 02 713 14 45 Norway 23 16 21 33...
-
Page 81: Appendix
Appendix Camera specifications For more specifications, visit www.kodak.com/go/c1013support. CCD—1/2.33 in. CCD, 4:3 aspect ratio; 10.3 MP (total), 10.3 MP (effective) Picture sizes— C1013/CD1013 10.1 MP: 3664 x 2748 pixels 8.9 MP (3:2): 3664 x 2442 pixels 7.6 MP (16:9): 3664 x 2062 pixels 5.0 MP: 2592 x 1944 pixels... - Page 82 Internal storage capacity—16 MB internal memory/11 MB available for image storage (1 MB equals one million bytes) Power—(2) Kodak oxy-alkaline digital camera batteries AA; (2) Kodak Ni-MH rechargeable digital camera batteries AA; (1) Kodak Ni-MH rechargeable digital camera battery KAA2HR; (2) alkaline batteries AA; (2) lithium batteries AA...
-
Page 83: Care And Maintenance
Do not use cleaning solutions unless designed specifically for camera lenses. Do not allow chemicals, such as suntan lotion, to contact painted surfaces. Service agreements may be available in your country. Contact a dealer of Kodak ■ products for more information. -
Page 84: Upgrading Your Software And Firmware
If the LCD breaks, do not touch the glass or liquid. Contact Kodak customer support. ■ The use of an accessory that is not recommended by Kodak may cause fire, electric shock, or injury. For approved accessories, visit www.kodak.com/go/accessories. ■... -
Page 85: Battery Life
■ Remove the battery when the product is stored for an extended period of time. In the unlikely event that battery fluid leaks inside the product, contact Kodak customer support. ■ In the unlikely event that battery fluid leaks onto your skin, wash immediately with water and contact your local health provider. -
Page 86: Extending Battery Life
If Kodak is unable to repair or replace a Product, Kodak will, at its option, refund the purchase price paid for the Product provided the Product has been returned to Kodak along with proof of the purchase price paid. - Page 87 (such as third party ink or ink tanks), failure to follow Kodak’s operation, maintenance, or repacking instructions, failure to use items supplied by Kodak (such as adapters and cables), or claims made after the duration of this warranty.
-
Page 88: Regulatory Compliance
Unless a specific Kodak warranty is communicated to the purchaser in writing by a Kodak company, no warranty or liability exists beyond any minimum requirements imposed by law, even though defect, damage, or loss may be by negligence or other act. -
Page 89: Canadian Doc Statement
In Europe: For human/environmental protection, it is your responsibility to dispose of this equipment at a collection facility established for this purpose (separate from municipal waste). For more information, contact your retailer, collection facility, or appropriate local authorities; or visit www.kodak.com/go/recycle. (Product weight: 137g.) Korean Class B ITE... - Page 90 China RoHS VCCI Class B ITE Russian GOST-R Eastman Kodak Company Rochester, NY 14650 AIO-40...
- Page 91 Index zoom, ii, 6 about picture, video, 13 about this camera, 29 cable, USB, 35 accessories, 35 camera sounds, 28 battery, 51 caring for your camera, 48 buying, 44 children, 9 SD/SDHC card, 3 clock, setting, 2 appendix, 46 color mode, 26 auto, 8 compatibility flash, 7...
- Page 92 49 tagging, 33 ISO speed, 26 filter pictures, videos, 20 fireworks, 9 firmware, upgrading, 49 Kodak flash EasyShare software, 34, 49 settings, 7 Perfect Touch technology, 15 flower, 9 web sites, 44 focus framing marks, 5...
- Page 93 batteries, 1 SD/SDHC card, 3 night landscape, 9 software, 34 night portrait, 9 Macintosh computers, installing ok button, ii software on, 34 on/off button, i maintenance, camera, 48 online prints, ordering, 37 manner/museum, 9 optical zoom, 6 memory inserting card, 3 Perfect Touch technology, 15 storage capacities, 49 PictBridge enabled printer, 36...
- Page 94 PictBridge, 36 search pictures, videos, 20 tagged pictures, 37 select multiple pictures/videos, 21 problem-solving, 39 self-portrait, 9 protecting pictures, videos, 14 self-timer light, i service and support telephone numbers, 45 quickview, using, 4 setting about, 29 blur warning, 28 recycling, disposal, 48, 54 camera sounds, 28 red-eye, flash, 7 color mode, 26...
- Page 95 9 URLs, Kodak web sites, 44 software USB cable, 35 installing, 34 upgrading, 49 VCCI compliance, 55 sounds, 28 video specifications, camera, 46 action print, 18 sports, 9 checking settings, 22 status copying, 19 blur, 23 deleting, 14 storage capacity, 49...
- Page 96 digital, 6 optical, 6 zoom button, ii...
- Page 97 Para recibir sugerencias de gran ayuda, ideas para proyectos, actualizaciones y mas, instale el software Kodak EasyShare que viene en este paquete y siga las instrucciones para registrarse. Tudo pronto para explorar sua nova camera KODAK? Registre sua camera agora e receba atualizac;::6es...
- Page 98 Kodak.com. To receive this accessories offer plus valuable tips, project ideas, updates, and more, just load the KODAK EASYSHARE software included in this box and follow the instructions for registration. Accessories offer valid only for residents of U.S. Pret...