Table of Contents
Advertisement
Advertisement
Table of Contents

Related Manuals for Zanussi ZKF 641 X


Summary of Contents for Zanussi ZKF 641 X
- Page 1 Ceramic glass hob ZKF 641 X Installation and Operating Instructions...
-
Page 3: Dear Customer
Dear customer, Please read these operating instructions carefully. Pay particular attention to the section “Safety infor- mation” on the first few pages. Please retain these operating instructions for later reference. Pass them on to possible new owners of the appliance. The following symbols are used in the text: Safety instructions... -
Page 4: Table Of Contents
Contents Operating Instructions ............. Safety . -
Page 5: Operating Instructions
Operating Instructions Safety The safety aspects of this appliance comply with ac- • Overheated fats and oils catch fire quickly. You cepted technical standards and the German Appli- should supervise cooking when preparing foods in ance Safety Law. However, as manufacturers we fat or oil (e.g. -
Page 6: Disposal
Disposal Disposing of the packaging material All materials used can be fully recycled. Plastics are marked as follows: • >PE< for polyethylene, as used for the outer wrap- ping and the bags inside. • >PS< for polystyrene foam, e.g., as used for the padding materials. -
Page 7: Description Of The Appliance
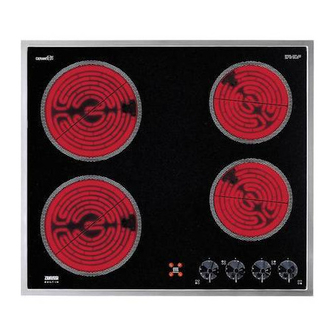
Description of the Appliance Cooking zones and control panel Single Cooking Zone 1700W Single Cooking Zone 1200W Single Single Cooking Zone Cooking Zone 1700W 1200W Control Four Residual Heat Indicators Knobs (separate for each zone) Control Knob Control Knob for Rear Left Cooking Zone for Rear Right Cooking Zone Control Knob Control Knob... -
Page 8: Before Using For The First Time
Before Using for the First Time Initial Cleaning Wipe the ceramic glass surface with a damp cloth. Important: Do not use any caustic, abrasive cleaners! The surface could be damaged. Operating the Hob When a cooking zone is switched on, it may hum briefly. -
Page 9: Residual Heat Indicator
Residual heat indicator The ceramic cooking zone is equipped with a residu- al heat indicator, a control lamp is allocated to each cooking zone. This lights up as soon the correspond- ing cooking zone is hot and warns against inadver- tant contact. -
Page 10: Uses, Tables And Tips
Uses, Tables and Tips Pans The better the pan, the better the results. • You can recognise good pans by their bases. The base should be as thick and flat as possible. • Pay particular attention when buying new pans to the diameter of the base. -
Page 11: Settings For Cooking On The Zones
Settings for Cooking on the Zones The setting position required for cooking processes is dependent on the quality of the pots and on the type and amount of the food. Heat Cooking method Examples setting Starting of cooking and roasting, cooking of large quantities of 9-10 Parboiling liquid, then switch-back to appropriate setting... -
Page 12: Cleaning And Care
Cleaning and Care Important: Cleaning agents must not come into contact with the hot ceramic glass sur- face! All cleaning agents must be removed with plenty of clean water after cleaning be- cause they can have a caustic effect when the rings are next heated! Do not use any aggressive cleaners such as grill or oven sprays, coarse scourers or abra-... -
Page 13: Hob Frame
Stubborn Soiling 1. To remove food that has boiled over or stubborn splashes, use a glass scraper. 2. Place the glass scraper at an angle to the ceramic glass surface. 3. Remove soiling by sliding the blade. You can obtain glass scrapers and ceramic glass cleaners from specialist retailers. -
Page 14: What To Do If
What to do if … Rectifying faults It is possible that faults have been caused by a minor error, which you can correct yourself with the help of the following instructions. Do not attempt any further repairs if the following instructions do not help in each specific case. -
Page 15: Installation Instructions
Installation Instructions Important! The new appliance may only be in- This appliance complies with the following EU stalled and connected by qualified person- Directives: nel. Please observe this instruction, otherwise the • 73/23/EWG dated 19.02.1973 (Low Voltage Direc- warranty will not cover any damage that may tive) occur. -
Page 16: Electrical Connection
Electrical Connection Before connecting, check that the nominal voltage of the appliance, that is the voltage stated on the rating plate, corresponds to the available supply voltage. The rating plate is located on the lower casing of the hob. The heating element voltage is AC230V~. The appli- ance also works perfectly on networks with AC220V~ or AC240V~. -
Page 17: Assembly
Assembly... -
Page 19: Service
Service In the “What to do if …” section a number of mal- functions are listed that you can rectify yourself. Look there first if a fault occurs. Is it a technical fault? If so, please contact your customer service centre. In Australia warranty, service and spare parts are handled by Electric Blue Pty Ltd. - Page 20 822 924 171-B-140503-02 Subject to change without notice The Electrolux Group. The world´s No.1 choice. The Electrolux Group is the world´s largest producer of powered appliances for kitchen, cleaning and outdoor use. More than 55 million Electrolux Group products (such as refrigerators, cookers, washing machines, vacuum cleaners, chain saws and lawn mowers) are sold each year to a value of approx. USD 14 billion in more than 150 countries around the world.