Table of Contents
Advertisement
Quick Links
Advertisement
Table of Contents

Related Manuals for Sennheiser L 1039-10


Summary of Contents for Sennheiser L 1039-10
- Page 1 L 1039-10 Charger Instruction manual...
-
Page 2: Table Of Contents
Connecting the charger to and disconnecting it from the mains ......7 Charging the receivers ...................... 8 Indications of the status LEDs ..................9 Charging times ........................ 9 Cleaning and maintaining the L 1039-10 ..............9 If a problem occurs ......................10 Specifications ........................11 Manufacturer Declarations .................... 12... -
Page 3: Important Safety Instructions
• Only clean the product when it is not connected to the mains. Use a cloth for cleaning. • Only use attachments/accessories recommended by Sennheiser. • Refer all servicing to qualified service personnel. Servicing is required if the product has been damaged in any way, liquid has been spilled, objects have fallen inside, the product has been exposed to rain or moisture, does not operate properly or has been dropped. -
Page 4: Package Contents
EK 1039 receiver with different transmitters, the system can be optimally adapted to your individual needs. The L 1039-10 charger can charge up to ten EK 1039 receivers with their BA 2015 accupacks installed. In addition, the charger allows you to charge all bodypack receivers or bodypack transmitters of the Sennheiser evolution wireless G3, evolution wireless G2 or 2000 series. -
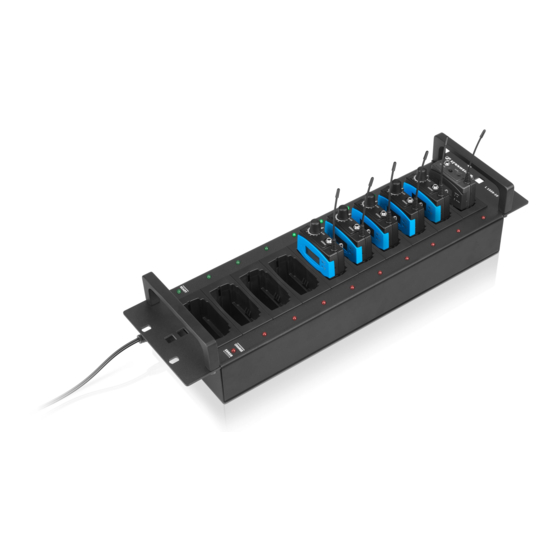
Page 5: Product Overview
Hollow jack socket for connection of receivers (with the BA 2015 accupacks NT 12-50C mains unit installed) Holes for optionally fixing/securing Status LED CHARGE/ERROR, red the receivers Mounting holes, e.g. for mounting the charger Status LED READY, green into a 19" rack 4 | L 1039-10... -
Page 6: Putting The Charger Into Operation
Putting the charger into operation Putting the charger into operation CAUTION Danger due to heat accumulation! The charger and the receivers can get very hot during charging. If the heat cannot dissipate, the products can be damaged. Provide sufficient ventilation so that the ambient temperature of the charger does not exceed the temperature limit specified in the specifications (see page 11). - Page 7 Putting the charger into operation You can install the charger fixedly, e.g. in a cabinet or transport case. For the dimensions required for fixed installation, please refer to the below installation drawing. 132.5 mm 70.0 mm 58.0 mm 57.0 mm 6 | L 1039-10...
-
Page 8: Connecting The Charger To And Disconnecting It From The Mains
Putting the charger into operation Connecting the charger to and disconnecting it from the mains To connect the charger to the mains and switch it on: Connect the hollow jack plug of the of the NT 12-50C mains unit to the hollow jack socket of the charger. -
Page 9: Charging The Receivers
Switch the charger off and on again. When the status LED of a charging compartment lights up green, the accupack of the corresponding bodypack receiver/transmitter is fully charged. When the status LED lights up red, the accupack is being charged. 8 | L 1039-10... -
Page 10: Indications Of The Status Leds
Cleaning and maintaining the L 1039-10 Indications of the status LEDs Status LED 3 Meaning lights up red receiver is being charged flashes red error, charging compartment is deactivated (see page 10) Status LED 8 Meaning lights up green receiver is fully charged... -
Page 11: If A Problem Occurs
The status Wrong accupack/indi- Only charge BA 2015 accupacks flashes vidual rechargeable (installed in a bodypack receiver/ batteries/batteries transmitter) with the L 1039-10 (primary cells) have charger. been inserted Accupack temperature is Always recharge the accupacks too low or too high... -
Page 12: Specifications
Specifications Specifications L 1039-10 charger Input voltage 12 ... 15 V max. 3.4 A Input current Pin assignment of DC input hollow jack socket Charging voltage per charging compartment 3.7 ... 4.1 V Charging current nom. 10 x 500 mA... -
Page 13: Manufacturer Declarations
Manufacturer Declarations Manufacturer Declarations Warranty Sennheiser GmbH & Co. KG gives a warranty of 24 months on this product. For the current warranty conditions, please visit our website at www.sennheiser.com or contact your Sennheiser partner. In compliance with the following requirements •... - Page 14 Sennheiser electronic GmbH & Co. KG Am Labor 1, 30900 Wedemark, Germany www.sennheiser.com Printed in Germany, Publ. 08/12, 549104/A01...