Table of Contents
Advertisement
Elektro-Glaskeramikkochfeld
Elektric Ceramic Glass Hob
Encimeras Vitroceramicas Electricas
Elektrisk Glaskeramiske Kogeplade
Elektrisk Glaskeramik Häll
ZKT 623 LX -- ZKT 623 LW
ZKT 623 LB -- ZKT 623 LN
Gebrauchs- und Installationsanweisung
Operating and Installation Instructions
Instrucciones para la installación, uso y mantenimiento
Brugs- og montageanvisning
Bruksanvisning
GB
Advertisement
Table of Contents

Related Manuals for Zanussi ZKT 623 LX


Summary of Contents for Zanussi ZKT 623 LX
- Page 1 Elektric Ceramic Glass Hob Encimeras Vitroceramicas Electricas Elektrisk Glaskeramiske Kogeplade Elektrisk Glaskeramik Häll ZKT 623 LX -- ZKT 623 LW ZKT 623 LB -- ZKT 623 LN Gebrauchs- und Installationsanweisung Operating and Installation Instructions Instrucciones para la installación, uso y mantenimiento...
-
Page 2: Dear Customer
Dear Customer Please read these instructions carefully for using your new appliance. Pay special attention to the chapter “Hints on safety”. Keep these instructions in a safe place for future refe- rence and pass them on to any subsequent owner of the appliance. -
Page 3: Table Of Contents
Content For the user For the installer Dear Customer ! Installation instructions Hints on safety Safety information Buit--in in the kichen--worktop Disposal Electrical connection of packaging material Hints of disposal Technical data, rating plate Before the first use Cleaning for the first time Description of the hob Digital indicators Special features of the appliance... -
Page 4: Important Safety Information
Important Safety Information The safety of this appliance corresponds to the Take care when plugging electrical items into acknowledged rules of technique and to the law on mains sockets near the hob. Connecting leads appliance safety. The safety measures existing as a must not come into connection with the hot matter of self-understanding would, however, not cover surface or vessels. -
Page 5: Before The First Use
Disposal Disposal of packaging material All parts of the packaging can be recycled and hard foam parts are appropriately marked. PE = Polyethylene (outer wrapping and the bag inside) PS = Polystyrene foam (eg. packing pieces) Please dispose of all packaing and old appliances with due regard for safety and the environment. -
Page 6: Description Of The Hob
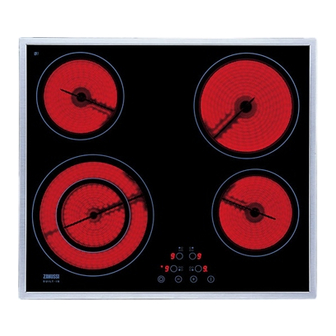
Description of the hob Cooking and control section features 145 mm 180 mm Cooking zone Cooking zone 1200 W 1800 W 145 mm Dual cooking zone Cooking zone 120- -180 mm 1200 W 750- -2200 W Control section Heat Setting selection Switching--on Control lamp Main switch ON/OFF... -
Page 7: Special Features Of The Appliance
Special features of the appliance Ceramic glass cooking area: The appliance is comprised of a ceramic glass cooking surface and 4 quick--heating cooking zo- nes. Due to especially efficient radiant heating elements the cooking zones will heat up very quickly. Touch controls: The appliance is controlled by TOUCH--CON- TROL. -
Page 8: Operating Instructions
Operating instructions General information The cooking surface is made of proven ceramic glass. and consists of 4 cooking zones. The rapid glowing cooking zones with that the especially efficient radiant heating elements will considerably reduce the duration of heating--up. The cooking surface is pore--free and also insen- sitive to rapid changes in temperature. -
Page 9: Cooking Zone Selection
Cooking zone selection To activate a cooking zone keep the correspon- ding control touched for about one second. A zero with digital point comes on in the correspon- ding cooking zone display. Setting selection For selecting or changing the setting for the coo- king zone from use the touch control to increase the setting. -
Page 10: Residual Heat Indicator
Residual heat indicator After switching off a single cooking zone or the entire hob any residual heat is indicated by (“hot”)showing in the display of the corresponding cooking zone. Even after switching off a cooking zone the residual heat indicator will go out only after sufficient cooling down of the cooking zone. -
Page 11: Safety Cut--Off After Time
Deacitivating the child- -safety device The child--safety device can only be deactivated when the hob is switched off. 1. Touch ON/OFF control, is indicated in the digital displays. 2. Touch controls at the same time for about 2 seconds and the release. 3. -
Page 12: Application, Charts, Tips
Application, Charts, Tips Cooking and frying utensils The better the pot or the pan, the better the boiling or frying result. You can recognise good quality pans by their base. The base should be thick and as flat as pos- sible. -
Page 13: Chart: Boiling And Frying
wherever possible, cover pots and pans with a lid. never place pots or pans on cooking zones with a higher diameter. because of wet or dirty cooking zones and pots energy will be wasted. switch off the cooking zone a few minutes before the end of the cooking time, in order to make use of the residual heat. -
Page 14: Cleaning And Care
Cleaning and care Attention! Cleaners must not get onto the hot ce- ramic glass surface! After cleaning all residues of cleaners must be removed with sufficient clean water, as they may be caustic when being rehea- ted. Never use aggressive or abrasive agents, such as oven sprays, stain or rust removers, scouring powder, or sponges with an abrasive effect. -
Page 15: Special Soilage
Special soilage Sugar Remove burnt--on sugar, melted plastics, alumi- num foil immedeiately -- when they are still warm -- using a glass scraper, otherwise damage may be caused. Warning! When using the cleaning scraper on the warm cooking zone care should be taken. Afterwards clean the cooking surface normally. -
Page 16: What To Do
What to do ... The overheating protection of the electronic con- trols has blocked the use of the hob. Once the cooking zone has cooled down it can be operated again. If the hob does not function correctly, please carry out the following checks, as it may be something you can if the display flashes? -
Page 17: Guarantee Conditions, Customer Care
Guarantee Conditions Standard guarantee conditions European Guarantee If you should move to another country within Europe We undertake that if within 12 months of the date of the then your guarantee moves with you to your new home purchase this appliance or any part thereof is proved subject to the following qualifications: to be defective by reason only of fault workmanship or D The guarantee starts from the date you first purcha-... -
Page 18: Dear Customer ! 2 Installation Instructions
Installation instructions Hints on safety This appliance must be installed and connec- ted by qualified personel. Please observe this instruction, otherwise the warranty will not cover any dmage which may occur. During the installation and in case of a service fai- lure the appliance must not be connected to the mains. -
Page 19: Hob Installation
With regard to the protection against overheating of surrounding furniture surfaces this appliance corresponds to type Y. This appliance or the built-- in cupboard for the appliance respectively may be located with the rear wall and one side wall to wha- tever high walls or furniture respectively and with the other side to another appliance or furniture of the same height as this appliance. -
Page 20: Of Packaging Material 5 Electrical Connection
Electrical connections Mains terminal in the base of the hob Before connecting the appliance, check that the voltage quoted on the rating plate - that is, the no- minal voltage of the appliance - corresponds to the available mains voltage. The rating plate can changing brid- be found on the lower housing of the ceramic ges of the ter-... -
Page 21: Hints Of Disposal 5 Technical Data, Rating Plate
ZANUSSI MADE IN GERMANY -- with technical queries. TYP: PEE2 019 PNC: 949 590 890 MODELL: ZKT 623 LX F.Nr.: ... . 230 V ~ Total max. 6,4 kW... - Page 23 3. Kochstufe einstellen Kochfeld ausschalten Setting selection Switch-off the appliance Valg af varmetrin Frakobling af kogefeltet Val av kokeffekt Stänga av hällen Selección potencia de cocción Desconectar el aparato ZKT 623 LX/LW/LB/ D/GB/DK/S/E - - 319 5208- -10 / 2000.02.22...