Table of Contents
Advertisement
Available languages
Available languages
K EN, RU, TH, AR, PE
© 2011 JVC KENWOOD Corporation
KD-R736BT
ﺩﯼ
ﺳﯽ
ﮔﻴﺮﻧﺪﻩ
ﻣﺸﻐﻞ
ﻣﻊ
/
CD
/ .
٤
ﺻﻔﺤﺔ
ﺭﺍﺟﻊ
،ﺍﻟﻌﺮﺽ
ﺷﺎﺷﺔ
ﺍﺳﺘﻌﺮﺍﺽ
.
ﻧﻤﺎﺋﻴﺪ
ﻣﺮﺍﺟﻌﻪ
۴
ﺻﻔﺤﻪ
ﺑﻪ
،ﻧﻤﺎﻳﺸﮕﺮ
.
ﺍﻟﻤﻨﻔﺼﻞ
ﺍﻟﺘﻌﻠﻴﻤﺎﺕ
ﻛﺘﻴﺐ
ﻣﺮﺍﺟﻌﺔ
ﻳﺮﺟﻰ
،ﻭﺍﻟﺘﻮﺻﻴﻼﺕ
ﺍﻟﺘﺮﻛﻴﺐ
.
ﺷﻮﺩ
ﺭﺟﻮﻉ
ﻣﺮﺑﻮﻃﻪ
ﺭﺍﻫﻨﻤﺎﯼ
ﺩﻓﺘﺮﭼﻪ
ﺑﻪ
،ﮐﺮﺩﻥ
ﻣﺘﺼﻞ
ﻭ
ﺍﻟﺘﻌﻠﻴﻤﺎﺕ
ﺩﻟﻴﻞ
ﻫﺎ
ﺩﺳﺘﻮﺭﺍﻟﻌﻤﻞ
1111DTSSANJEIN
KD-R736BT
ﺭﺍﺩﻳﻮ
CD RECEIVER / РЕСИВЕР С ПРОИГРЫВАТЕЛЕМ
КОМПАКТ-ДИСКОВ /
For canceling the display demonstration, see page 4. /
ﻹﻟﻐﺎء
Информацию об отмене демонстрации функций дисплея см. на стр. 4. /
ﻟﻐﻮ
ﺑﺮﺍﯼ
4
ﻟﻌﻤﻠﻴﺎﺕ
For installation and connections, refer to the separate manual.
ﻧﺼﺐ
ﺑﺮﺍﯼ
Указания по установке и выполнению соединений приводятся в отдельной инструкции.
CD
INSTRUCTIONS
ИНСТРУКЦИИ ПО ЭКСПЛУАТАЦИИ
ENGLISH
РУCCKИЙ
ไทย
GET0778-001A
[U]
Advertisement
Table of Contents

Related Manuals for JVC KD-R736BT


Summary of Contents for JVC KD-R736BT
- Page 1 ﻣﺮﺑﻮﻃﻪ ﺭﺍﻫﻨﻤﺎﯼ ﺩﻓﺘﺮﭼﻪ ﺑﻪ ،ﮐﺮﺩﻥ ﻣﺘﺼﻞ ﻭ ﻧﺼﺐ ﺑﺮﺍﯼ Указания по установке и выполнению соединений приводятся в отдельной инструкции. INSTRUCTIONS ﺍﻟﺘﻌﻠﻴﻤﺎﺕ ﺩﻟﻴﻞ ИНСТРУКЦИИ ПО ЭКСПЛУАТАЦИИ ﻫﺎ ﺩﺳﺘﻮﺭﺍﻟﻌﻤﻞ GET0778-001A K EN, RU, TH, AR, PE 1111DTSSANJEIN © 2011 JVC KENWOOD Corporation...
- Page 2 Thank you for purchasing a JVC product. Please read all instructions carefully before operation, to ensure your complete understanding and to obtain the best possible performance from the unit. IMPORTANT FOR LASER PRODUCTS 1. CLASS 1 LASER PRODUCT 2. CAUTION: Do not open the top cover. There are no user serviceable parts inside the unit;...
-
Page 3: Table Of Contents
How to attach/detach the Contents control panel Preparation ............4 Canceling the display demonstration Setting the clock Basic operations ........... 4 Radio ................ 6 CD/USB ..............8 How to reset your unit iPod/iPhone ............. 9 Your preset adjustments will Quick Search ............10 also be erased. -
Page 4: Preparation
Preparation Preparation Canceling the display Setting the clock demonstration (Hold) The display demonstration is always turned on unless you cancel it. 2 Select <CLOCK>. (Hold) 3 Select <CLOCK SET>. (Initial setting) 3 Select <DEMO OFF>. 4 Adjust the hour. 4 Press MENU to exit. 5 Adjust the minute. -
Page 5: Control Panel
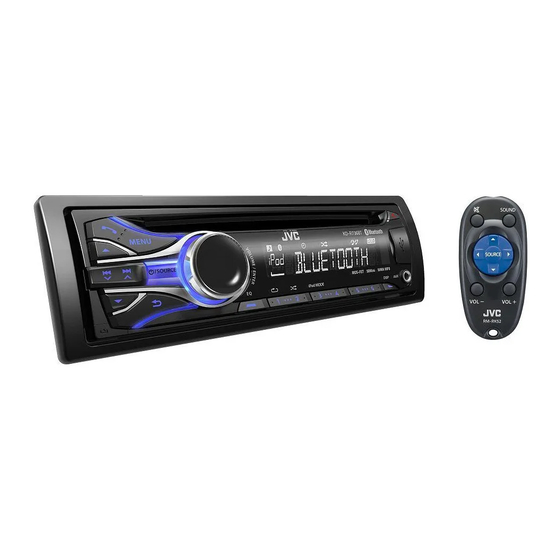
Basic operations Control panel Remote controller Control dial Display window Loading slot Ejects the disc Detaches the panel AUX input jack USB input terminal Remote sensor Aim the remote controller directly at the sensor. DO NOT expose to bright sunlight. When you press or hold the following button(s)... -
Page 6: Radio
Radio Radio Searching for a station Select <FM> or <AM>. Auto search. (Press) Manual search. (Hold) “M” flashes, then press the button repeatedly. “ST” lights up when receiving an FM stereo broadcast with sufficient signal strength. Auto presetting (FM only) Storing stations in memory SSM (Strong-station Sequential Memory) Manual presetting... -
Page 7: Setting The Radio Timer
Radio Setting the Radio Timer Naming the stations You can tune in to a preset station at a specific You can assign names for up to 30 station time regardless of the current source. frequencies (FM and AM) using a maximum of 8 characters for each name. -
Page 8: Cd/Usb
CD/USB CD/USB Playing a CD/USB device USB input terminal Label side USB 2.0 cable (not supplied) USB cable from the rear of the unit The source changes to “CD” and playback starts. The source changes to “USB” and playback starts. This unit can play MP3/WMA files stored in CD-R, CD-RW, and MP3/WMA/WAV files in USB mass storage device (such as a USB memory and Digital Audio Player). -
Page 9: Ipod/Iphone
“ALBUM RND” is not applicable for some iPod/ Applicable under <HEAD MODE> only. iPhone. iPod/iPhone application You can operate JVC original application with this 2 Select the desired list. unit in <APP MODE>. For more details, visit JVC website: <http://www3.jvckenwood.com/ english/car/index.html> (English website only). PLAYLISTS ARTISTS ALBUMS... -
Page 10: Quick Search
Quick Search Quick Search If you have many folders/tracks/contacts, you can search through them quickly according to the first character (A to Z, 0 to 9 and OTHERS). 1 Enter list menu or “Hands-Free” menu. CD (MP3/WMA)/ iPod/iPhone Bluetooth phonebook USB (MP3/WMA/WAV) Select <PHONEBOOK>. -
Page 11: Bluetooth Connection
(supplied) USB cable from the rear of the unit 2 Search and select “JVC Unit” on the Bluetooth device. “BT PAIRING” flashes on the display. For some Bluetooth devices, you may need to enter the Personal Identification Number (PIN) code immediately after searching. -
Page 12: Bluetooth Connection
Bluetooth connection 3 Perform (A) or (B) depending on what scrolls on the display. For some Bluetooth devices, pairing sequence may vary from the steps described below (A) If “[Device Name]” “XXXXXX” (B) If “[Device Name]” “VOL – YES” “BACK – NO” scrolls on the display, “VOL –... -
Page 13: Bluetooth Mobile Phone
Connecting to JVC original Deleting a registered device application (Hold) JVC original application is designed to view JVC car receiver status and perform simple control operations on Android smart phones. 2 Select <DELETE YES>. For JVC original application operations, visit JVC <BLUETOOTH>... - Page 14 Bluetooth mobile phone Adjustments during a call Text message notification Phone volume (00 — 50) When a text message is received, the unit rings [VOLUME 15]: Volume and “RCV MESSAGE” “[Device name]” appears. adjustments made during a call <MSG NOTICE> must be set to <ON>. will not affect the other page 16) sources.
-
Page 15: Using Voice Recognition
Bluetooth mobile phone Making a call from memory If two phones are connected, Select the desired phone Enter “phone list” You can store up to 6 contacts in the memory of (Hold) this unit for speed dialing. To store contacts in memory 1 Enter the “Hands-Free”... -
Page 16: Using The Settings Menu
Bluetooth mobile phone Using the SETTINGS menu 3 Repeat this step to perform the necessary 1 Enter the “Hands-Free” menu. settings. 2 Select <SETTINGS>. To return to the previous menu, press To exit from the menu, press MENU. The following settings are applicable to the paired device. If another device is paired, perform the settings again. -
Page 17: Bluetooth Audio Player
Bluetooth audio player Bluetooth audio player Playing a Bluetooth audio player Select <BT REAR> or <BT FRONT> depending on the location of the USB Bluetooth adapter KS-UBT1. Operate the Bluetooth audio player to start playback. Operations and display indications may differ according to their availability on the connected device. Basic operations Selecting the playback modes Starts or resumes playback. -
Page 18: Illumination Color Adjustments
Illumination color adjustments Button zone Display zone All zone: Includes both Button zone and Display zone. All zone Selecting the preset color Storing your own adjustments You can select a preset color for <BUTTON You can store your own day and night colors for ZONE>, <DISP ZONE>, and <ALL ZONE>... -
Page 19: Brightness Adjustments
Brightness adjustments Brightness adjustments You can select your preferred brightness for <BUTTON ZONE>, <DISP ZONE> separately. (Hold) <DIMMER> BUTTON ZONE BUTTON 00 to 31 <BRIGHTNESS> DISP ZONE DISP 00 to 31 <DAY>/<NIGHT> 4 Press MENU to exit. Sound adjustments This unit memorizes sound settings adjusted for each individual source. Selecting the preset sound Pro Equalizer You can select a preset sound mode, for each... -
Page 20: Menu Operations
Menu operations Menu operations 3 Repeat step 2 if necessary. (Hold) To return to the previous menu, press To exit from the menu, press DISP or MENU. If no operation is done for about 60 seconds, the operation will be canceled. Menu item Selectable setting (Initial: [XX]) DEMO... - Page 21 Menu operations Menu item Selectable setting (Initial: [XX]) FADER *3*4 R06 — F06 [00]: Adjusts the front and rear speaker output balance. BALANCE *4 L06 — R06 [00]: Adjusts the left and right speaker output balance. LOUD ON: Boosts low and high frequencies to produce a well-balanced sound at (Loudness) a low volume level.
- Page 22 INFORMATION PH CNNT DEV/AU CNNT DEV/APP CNT DEV *11: Displays connected phone/audio/application device name. MY BT NAME: Displays the unit name (JVC Unit). MY ADDRESS: Shows address of USB Bluetooth Adapter. AM *12 [ON]/OFF: Enables or disables “AM” in source selection.
-
Page 23: Remote Controller
Remote controller Remote controller Warning: Preparing Do not install any battery other than CR2025 or When you use the remote controller for the first its equivalent. time, pull out the insulation sheet. Do not leave the remote controller in places (such as dashboards) exposed to direct sunlight for a long time. -
Page 24: About Usb Device
Additional information About audio files About USB device Playable files When connecting a USB cable, use the USB 2.0 cable. File extensions: MP3(.mp3), WMA(.wma), You cannot connect a computer or portable WAV(.wav) HDD to the USB input terminal of the unit. For MP3/WMA discs: Connect only one USB device to the unit at a Bit rate:... -
Page 25: About Bluetooth
“Made for iPod” and “Made for iPhone” mean operations may not be performed correctly or that an electronic accessory has been designed as intended. In this case, visit the following JVC to connect specifically to iPod, or iPhone, website: respectively, and has been certified by the <http://www3.jvckenwood.com/english/car/... -
Page 26: Troubleshooting
RESET UNIT”/“WARNING CHK with tape before resetting the unit. ( page 3) WIRING THEN RESET UNIT” If the message does not disappear, consult your JVC car audio appears on the display and no dealer or kits supplying company. operations can be done. - Page 27 “HW ERROR” appears on the Reset the unit and try the operation again. If “HW ERROR” display. appears again, consult your nearest JVC car audio dealer. “BT DEVICE NOT FOUND” The unit failed to search for the registered Bluetooth devices appears on the display.
-
Page 28: Specifications
Specifications Specifications AUDIO AMPLIFIER SECTION Maximum Power Output 50 W per channel Continuous Power Output (RMS) 20 W per channel into 4Ω, 40 Hz to 20 000 Hz at less than 1% total harmonic distortion. Load Impedance 4Ω (4Ω to 8Ω allowance) Frequency Response 40 Hz to 20 000 Hz Signal-to-Noise Ratio... - Page 29 Specifications GENERAL Power Requirement (Operating Voltage) DC 14.4 V (11 V to 16 V allowance) Grounding System Negative ground Allowable Operating Temperature 0°C to +40°C Dimensions Installation Size approx. 182 mm × 52 mm × 158 mm (W × H × D) Panel Size approx.
- Page 30 | РУCCKИЙ...
- Page 31 Подготовка ............4 Отмена демонстрации функций дисплея Настройка часов Основные операции ........4 Радио ............... 6 CD/USB ..............8 iPod/iPhone ............9 Быстрый поиск ..........10 Внешние компоненты ........10 Соединение Bluetooth ........ 11 Мобильный телефон с Bluetooth ..... 13 Аудиопроигрыватель...
- Page 32 (Удерживать) Выберите <CLOCK>. (Удерживать) Выберите <CLOCK SET>. (Начальная настройка) Выберите <DEMO OFF>. Установите час. Нажмите , чтобы выйти. Установите минуты. Нажмите , чтобы выйти. “ ” “NO NAME” появляются, если у радиостанции нет названия. | РУCCKИЙ...
- Page 33 Панель управления Пульт дистанционного управления Диск управления Окно дисплея Загрузочный отсек Извлеките диск Отсоединение панели Разъём входа AUX Входной USB-разъем Телеметрический датчик Направьте пульт дистанционного управления на датчик. НЕ подвергайте его воздействию прямых солнечных лучей. “ ” РУCCKИЙ |...
- Page 34 Bыберите <FM> или <AM>. Автоматический поиск. (нажмите) Ручной поиск. (Удерживать) “ ” “ ” (Удерживать) (Удерживать) < > “ ” < > < > “ ” “ ” (Удерживать) “ ” Выбор запрограммированного номера. “ ” | РУCCKИЙ...
- Page 35 (Удерживать) Bыберите <FM> или <AM>. < > < > < > < > Войдите в меню “Введение имени”. < > (Удерживать) (Удерживать) Введите желаемое название. Выберите Переместите Выберите запрограммированную радиостанцию. < > < > < > < > < > < > Установите...
- Page 36 Входной USB-разъем Сторона с ярлыком Кабель USB 2.0 (не входит в комплект поставки) или Кабель USB, идущий от задней панели устройства “ ” “ ” (Удерживать) < > < > Выберите папку. (Для MP3/WMA/WAV) Выберите дорожку. * Для MP3/WMA/WAV | РУCCKИЙ...
- Page 37 Выберите необходимую дорожку. Входной USB-разъем Кабель USB 2.0 (дополнительная принадлежность для iPod или iPhone) или Кабель USB, идущий от задней панели устройства “ ” < > < > < > < > (Удерживать) < > < > < > “ ”...
- Page 38 Войдите в меню списка или меню “Hands-Free”. < > Выберите желаемый символ (от A до Z, Выберите желаемую папку/дорожку/ от 0 до 9 и OTHERS). контакт. “ ” Подключите к AUX на панели управления. Выберите <AUX IN>. Мини-стереоразъем 3,5 мм (не...
- Page 39 ” KS-UBT1 Микрофон Подключите USB-адаптер Bluetooth (KS-UBT1) к одному из входных USB- Входной USB-разъем разъемов. KS-UBT1 (входит в комплект поставки) или Кабель USB, идущий от задней панели устройства Найдите и выберите “JVC Unit” на устройстве Bluetooth. “ ” РУCCKИЙ |...
- Page 40 Выполните (A) или (B), в зависимости от того, что прокручивается на дисплее. Выберите “YES”, чтобы начать “ ” сопряжение. Удостоверьтесь, что ключ доступа на (1) Если на дисплее прокручивается данном изделии и устройстве “PAIRING” “PIN 0000”, введите PIN-код Bluetooth одинаков. “0000”...
- Page 41 (Удерживать) Выберите <DELETE YES>. < > < > < > (Удерживать) “ ” Выберите <CONNECT>. Нажмите , чтобы выйти. < > < > < > Выберите желаемый смартфон. “ ” “ ” Нажмите , чтобы выйти. “ ” (Удерживать) (Удерживать) или...
- Page 42 “ ” “ ” < > < > “ ” “ ” “ ” “ ” Войдите в меню “Hands-Free”. Выберите способ звонка. Выберите контакт и позвоните ему (имя/номера телефона). Вызов Выберите имя/номер телефона “ ” “ ” “ ” <...
- Page 43 Выберите нужный Войдите в “список В памяти данного изделия можно сохранить до телефон телефонов” 6 контактов для быстрого набора. (Удерживать) Войдите в меню “Hands-Free”. Когда на дисплее прокручивается “WAIT VOICE” “[Имя устройства]”, произнесите имя контакта, которому нужно Выберите способ вызова. позвонить...
- Page 44 Повторите данное действие для Войдите в меню “Hands-Free”. осуществления необходимых настроек. Выберите <SETTINGS>. < > “ ” “ ” * Выбор возможен, только когда подключенный телефон поддерживает профиль PBAP. | РУCCKИЙ...
- Page 45 Выберите <BT REAR> или <BT FRONT> в зависимости от расположения адаптера USB Bluetooth KS-UBT1. (Удерживать) < > < > РУCCKИЙ |...
- Page 46 Зона кнопок Зона дисплея Общая зона < > < > < > < > < > (Удерживать) (Удерживать) Выберите <COLOR SETUP>. Выберите <COLOR>. < > < > * Цвет изменяется с различной скоростью. < > “ ” < > Нажмите , чтобы...
- Page 47 < > < > (Удерживать) < > < > < > < > Нажмите , чтобы выйти. (Удерживать) < > < > < > < > (Удерживать) Настройте уровень. Повторите действия 2 и 3 для настройки других тонов. < > Нажмите...
- Page 48 При необходимости повторите действие (Удерживать) < > < > Необходимо подключение провода регулятора освещенности. (См. “Pуководство по установке/подключению”.) Эта настройка может работать неправильно в некоторых автомобилях (в особенности в тех, которые оснащены диском управления затемнением). В этом случае измените значение настройки на любое другое, отличное от <DIMMER AUTO>. Некоторые...
- Page 49 “ ” “ ” “ ” “ ” При использовании системы с двумя динамиками установите для уровня баланса значение “00”. Эта настройка не влияет на выходной сигнал сабвуфера. Отображается только в том случае, если параметр <SUB.W> имеет значение <ON>. При выборе <LOW POWER>, если громкость выше, чем “VOLUME 30”, автоматически устанавливается...
- Page 50 “ ” “ ” “ ” Отображается только в том случае, если в качестве источника выбрано “USB FRONT/ USB REAR”. Отображается только в том случае, если в качестве источника выбрано “IPOD-FRONT/ IPOD-REAR”. Если USB-адаптер Bluetooth не подключен к устройству, на дисплее отображается сообщение...
- Page 51 Изоляционный материал CR2025 “ ” “ ” РУCCKИЙ |...
- Page 52 “ ” “ ” “ ” “ ” | РУCCKИЙ...
- Page 53 < > < > < > “ ” < > РУCCKИЙ |...
- Page 54 “ ” “ ” < > “ ” “ ” “ ” “ ” “ ” “ ” “ ” < > | РУCCKИЙ...
- Page 55 < > < > “ ” “ ” “ ” < > < > “ ” “ ” “ ” “ ” “ ” “ ” “ ” “ ” “ ” “ ” “ ” “ ” РУCCKИЙ |...
- Page 56 | РУCCKИЙ...
- Page 57 РУCCKИЙ |...
- Page 61 แผงควบคุ ม รี โ มทคอนโทรล...
- Page 67 S UB ไมโครโ น K - T1...
- Page 79 CR2025...
- Page 86 iPhone iPod...
- Page 87 ..........................iPhone iPod ............< >...
- Page 88 < . CLOCK > < . CLOCK SET > < . DEMO OFF > MENU MENU HEAD MODE iPhone iPod “ NO NAME ” IPOD MODE APP MODE iPhone iPod APP MODE AUX IN “ NO NAME ”...
- Page 89 ﻟﻮﺣﺔ ﺍﻟﺘﺤﻜﻢ ﻭﺣﺪﺓ ﺍﻟﺘﺤﻜﻢ ﻋﻦ ﺑﻌﺪ — /SOURCE /SOURCE SOURCE VOL - / + — — — SOUND “ ” — —...
- Page 90 < . > < > “ ” “ ” < TUNER > < > “ . MEMORY ” < SSM 01 – 06 > 6 .( “ ” “ . ” - - - - - - - - - - - - - - - - <...
- Page 91 < . > < > < TUNER > < RADIO TIMER > “ ” < / ONCE > < / > < DAILY > ONCE DAILY < > < / > < > < > > ( < — < >...
- Page 92 USB 2.0 ﻛﺒﻞ ()ﻏﻴﺮ ﻣﺼﺎﺣﺐ “ ” “ ” REPEAT RANDOM - - - - - - - - - - - - - - - - < RANDOM > < REPEAT > REPEAT RPT OFF TRACK RPT FOLDER RPT RANDOM RND OFF FOLDER RND...
- Page 93 iPhone iPod iPhone iPod “ IPOD-REAR IPOD-FRONT ” < HEAD MODE > REPEAT < / IPOD MODE > < / HEAD MODE > RANDOM < APP MODE > - - - - - - - - - - - - - - - - iPod HEAD MODE...
- Page 94 OTHERS “ ” iPhone iPod < . PHONEBOOK > OTHERS iPhone iPod “ OTHERS ” iPhone iPod < . AUX IN >...
- Page 95 KS-UBT1 “ ” KS-UBT1 HFP 1.5 OPP 1.1 PBAP 1.0 A2DP 1.2 AVRCP 1.3 KS-UBT1 “ JVC Unit ” “ BT PAIRING ”...
- Page 96 “ VOL – YES ” [ “ ” ] “ XXXXXX ” [ “ ” ] “ BACK – NO ” “ BACK – NO ” “ VOL – YES ” “ XXXXXX ” “ ” “ PIN 0000 ” “...
- Page 97 < . DELETE YES > < http://www3.jvckenwood.com/english/car/index.html > < BLUETOOTH > < DELETE PAIR > < DELETE YES > < . CONNECT > “ DELETED ” < BLUETOOTH > MENU < APPLICATION > < CONNECT > [ “ ” ] “...
- Page 98 — VOLUME 15 [ “ . ” ] “ RCV MESSAGE ” < MSG NOTICE > < > — “ . ” “ ” “ ” “ . ” “ ” DIALED RECEIVED MISSED CALL PHONEBOOK “ NO HISTORY ” “...
- Page 99 )ﺗﺎﺑﻊ (ﺍﻟﻀﻐﻂ “ ” “ ” ] “ WAIT VOICE ” < / DIALED > < / RECEIVED > < / MISSED CALL > < / PHONEBOOK > < DIAL NUMBER > < P.BOOK SEL > < P.BOOK IN UNIT >...
- Page 100 SETTINGS “ ” < . SETTINGS > MENU PB IN PHONE P.BOOK SEL PB IN UNIT < P.BOOK WAIT > AUTO ANSWER IN UNIT RING TONE TONE 1 — 5 CALL – TONE 1 — 5 MESSAGE – IN PHONE RING COLOR COLOR 01 —...
- Page 101 < BT FRONT > < BT REAR > KS-UBT1 AVRCP 1.3 REPEAT RANDOM - - - - - - - - - - - - - - - - < RANDOM > < REPEAT > REPEAT RPT OFF TRACK RPT ALL RPT GROUP RPT RANDOM...
- Page 102 < BUTTON ZONE > < DISP ZONE > < BUTTON ZONE > < ALL ZONE > < DISP ZONE > < . COLOR SETUP > < . COLOR > BUTTON USER COLOR 01-29 GREEN > BUTTON ZONE ZONE < BLUE COLOR FLOW 01-03 DISP ZONE <...
- Page 103 < DISP ZONE > < BUTTON ZONE > < DIMMER > BUTTON BUTTON ZONE < BRIGHTNESS > DISP DISP ZONE < NIGHT > < / > MENU < PRO EQ > < / MIDDLE > < / BASS > < TREBLE >...
- Page 104 MENU DISP DEMO CLOCK COLOR COLOR SETUP < . COLOR SETUP > < / BRIGHTNESS > DIMMER SET AUTO NIGHT BRIGHTNESS — DISP ZONE BUTTON ZONE ONCE SCROLL AUTO TAG DISPLAY PRO EQ “ ” < . DIMMER AUTO >...
- Page 105 FADER — BALANCE — LOUD VOL ADJUST — “ VOL ADJ FIX ) . ” “ (. ” SUB. W HIGH 120Hz MID 85Hz LOW 55Hz SUB.W LPF SUB.W LEVEL — HIGH 150Hz MID 120Hz LOW 100Hz “ . High Pass Filter ”...
- Page 106 P. BOOK WAIT 0000 ) .( SET PINCODE AUTO CNNCT INITIALIZE APP CNT DEV AU CNNT DEV PH CNNT DEV INFORMATION JVC Unit MY BT NAME MY ADDRESS “ ” “ AUX IN ” AUX OFF AUX ON AUX IN “...
- Page 107 CR2025 CR2025 DualDisc “ DualDisc ” “ ”...
- Page 108 USB 2.0 (.wma) (.mp3) (.wav) MPEG-1 MPEG-2 MPEG-1 MPEG-2 MPEG-1 MPEG-2 – – – ) .( – – MP3 PRO MP3i Windows Media® Audio “ READING ” ATRAC3 AIFF Joliet Romeo Level 2 ISO 9660 Level 1 <.wav> <.wma> <.mp3>...
- Page 109 Microsoft iPod nano Microsoft iPod nano iPhone 4S iPhone 4 Bluetooth iPhone 3GS Bluetooth SIG, Inc. iPhone 3G JVC KENWOOD Corporation iPhone < APP MODE > < / IPOD MODE * > ”Made for iPod“ and ”Made for “ Videos ”...
- Page 110 “ / MISWIRING CHK WIRING THEN RESET UNIT ” “ WARNING CHK WIRING THEN RESET UNIT ” < SRC SELECT > iPhone iPod “ EJECT ” “ PLEASE ” “ IN DISC ” “ READING ” “ NO FILE ” iPhone iPod “...
- Page 111 “ / BT FRONT ” < SRC SELECT > < BT AUDIO > “ . BT REAR ” “ PAIRING FULL ” < MIC LEVEL > < NR/EC MODE > DISP ) .( AVRCP “ VOICE ” “ VOICE ” “...
- Page 112 ≥ USB 2.0 USB 1.1 +EDR PBAP 1.0 AVRCP 1.3 A2DP 1.2 OPP 1.1 HFP 1.5...
- Page 113 × × × × × ×...
- Page 114 iPhone iPod...
- Page 115 ..........................iPhone iPod ..........Bluetooth ..........Bluetooth ........ Bluetooth < >...
- Page 116 < CLOCK > < CLOCK SET > < DEMO OFF > MENU MENU Bluetooth HEAD MODE iPhone iPod “ ) NO NAME ” IPOD MODE APP MODE iPhone iPod APP MODE AUX IN “ NO NAME ”...
- Page 117 ﭘﺎﻧﻞ ﮐﻨﺘﺮﻝ ﺩﺳﺘﮕﺎه ﻛﻨﺘﺮﻝ ﺍﺯ ﺭﺍه ﺩﻭﺭ — /SOURCE /SOURCE SOURCE VOL - / + — — — SOUND “ ) ” — —...
- Page 118 < > < > “ ” “ ” < TUNER > < > < SSM 01 – 06 > “ MEMORY ” “ ” “ ” 6 .( < SSM 13 – 18 >/< SSM 07 – 12 > - - - - - - - - - - - - - - - - “...
- Page 119 < > < > < TUNER > “ ” < RADIO TIMER > < / ONCE > < / > < DAILY > ONCE DAILY < > < / > > ( < — < > < ... > < >...
- Page 120 “ ” “ ” CD-RW CD-R REPEAT RANDOM - - - - - - - - - - - - - - - - < RANDOM > < REPEAT > REPEAT RPT OFF TRACK RPT FOLDER RPT RANDOM RND OFF FOLDER RND ALL RND “...
- Page 121 iPhone iPod iPhone iPod “ ” “ IPOD-REAR IPOD-FRONT ” < HEAD MODE > < / IPOD MODE > < / HEAD MODE > REPEAT < APP MODE > RANDOM iPod HEAD MODE - - - - - - - - - - - - - - - - iPhone iPod...
- Page 122 OTHERS “ ” Bluetooth iPhone iPod < PHONEBOOK > OTHERS iPhone iPod “ OTHERS ” iPhone iPod < AUX IN >...
- Page 123 Bluetooth iPod/iPhone KS-UBT1 ” Bluetooth “ USB Bluetooth Bluetooth KS-UBT1 Bluetooth Bluetooth Bluetooth Bluetooth HFP 1.5 OPP 1.1 PBAP 1.0 A2DP 1.2 AVRCP 1.3 Bluetooth Bluetooth Bluetooth Bluetooth Bluetooth KS-UBT1 “ JVC Unit ” “ BT PAIRING ” Bluetooth...
- Page 124 Bluetooth Bluetooth [ “ ” ] “ XXXXXX ” [ “ ” ] “ BACK – NO ” “ VOL – YES ” “ BACK – NO ” “ VOL – YES ” “ XXXXXX ” “ ” Bluetooth “ PIN 0000 ”...
- Page 125 Bluetooth < DELETE YES > < http://www3.jvckenwood.com/english/car/index.html > < BLUETOOTH > < DELETE PAIR > < DELETE YES > < CONNECT > “ DELETED ” < BLUETOOTH > < APPLICATION > < CONNECT > MENU [ “ ” ] “ CONNECTED ”...
- Page 126 Bluetooth — VOLUME 15 [ “ ” ] “ RCV MESSAGE ” < > < MSG NOTICE > — “ ” “ ” “ ” “ ” “ ” DIALED RECEIVED MISSED CALL “ ) ” PHONEBOOK “ NO HISTORY ”...
- Page 127 Bluetooth ()ﻧﮕﻪ ﺩﺍﺭﯾﺪ “ ” “ ” ] “ WAIT VOICE ” < / DIALED > < / RECEIVED > < / MISSED CALL > < / PHONEBOOK > < DIAL NUMBER > < P.BOOK IN UNIT > < P.BOOK SEL >...
- Page 128 Bluetooth SETTINGS “ ” < SETTINGS > MENU PB IN PHONE P.BOOK SEL PB IN UNIT < P.BOOK WAIT > AUTO ANSWER IN UNIT RING TONE TONE 1 — 5 CALL – TONE 1 — 5 MESSAGE – IN PHONE COLOR 01 —...
- Page 129 Bluetooth Bluetooth Bluetooth KS-UBT1 < BT FRONT > < BT REAR > Bluetooth AVRCP 1.3 Bluetooth REPEAT RANDOM - - - - - - - - - - - - - - - - < RANDOM > < REPEAT > REPEAT RPT OFF TRACK RPT...
- Page 130 < DISP ZONE > < BUTTON ZONE > < DISP ZONE > < BUTTON ZONE > < ALL ZONE > < COLOR SETUP > < COLOR > > BUTTON < BLUE GREEN ZONE < > USER COLOR 01-29 BUTTON COLOR FLOW 01-03 ZONE COLOR DISP...
- Page 131 < DISP ZONE > < BUTTON ZONE > < DIMMER > BUTTON BUTTON ZONE < BRIGHTNESS > DISP DISP ZONE < NIGHT > < / > MENU < PRO EQ > < / MIDDLE > < / BASS > < TREBLE >...
- Page 132 MENU DISP DEMO CLOCK COLOR COLOR SETUP < / BRIGHTNESS > DIMMER SET < COLOR SETUP > AUTO NIGHT BRIGHTNESS — DISP ZONE BUTTON ZONE ONCE SCROLL AUTO TAG DISPLAY PRO EQ “ ” < DIMMER AUTO >...
- Page 133 — FADER BALANCE — LOUD VOL ADJUST — “ VOL ADJ FIX ) . ” “ ” SUB. W HIGH 120Hz MID 85Hz LOW 55Hz SUB.W LPF — SUB.W LEVEL High Pass “ ) ” HIGH 150Hz MID 120Hz LOW 100Hz BEEP VOLUME 30 —...
- Page 134 P. BOOK WAIT 0000 SET PINCODE Bluetooth AUTO CNNCT Bluetooth INITIALIZE APP CNT DEV AU CNNT DEV PH CNNT DEV INFORMATION JVC Unit MY BT NAME MY ADDRESS “ ” “ AUX IN ” AUX OFF AUX ON AUX IN “...
- Page 135 CR2025 CR2025 “ DualDisc ” “ Compact Disc Digital Audio ” DualDisc...
- Page 136 USB 2.0 (.wav) (.wma) (.mp3) MPEG-1 MPEG-2 MPEG-1 MPEG-2 MPEG-1 MPEG-2 – – – ) .( – – MP3 PRO MP3i Windows Media® Audio “ READING ” ATRAC3 AIFF ISO 9660 <.mp3> Joliet Romeo <.wav> <.wma>...
- Page 137 > < / IPOD MODE * > Bluetooth Bluetooth SIG, Inc. “ Videos ” JVC KENWOOD < HEAD MODE > iPod ”Made for iPod“ and ”Made for iPhone“ mean that an electronic accessory iPhone iPod has been designed to connect specifically...
- Page 138 “ MISWIRING CHK WIRING THEN RESET UNIT ” “ WARNING CHK WIRING THEN RESET UNIT / ” < SRC SELECT > iPhone iPod “ EJECT ” “ PLEASE ” “ IN DISC ” “ READING ” iPod “ NO FILE ”...
- Page 139 Bluetooth < SRC SELECT > < BT AUDIO > “ BT REAR ” “ / BT FRONT ” Bluetooth Bluetooth Bluetooth Bluetooth “ PAIRING FULL ” < MIC LEVEL > < NR/EC MODE > Bluetooth DISP Bluetooth Bluetooth Bluetooth Bluetooth Bluetooth AVRCP Bluetooth...
- Page 140 Ω Ω Ω Ω kΩ Ω ≥ Ω ( μV Ω ( μV μV USB 2.0 USB 1.1 BLUETOOTH +EDR Bluetooth 2.1 PBAP 1.0 AVRCP 1.3 A2DP 1.2 OPP 1.1 HFP 1.5...