Table of Contents
Advertisement
Quick Links
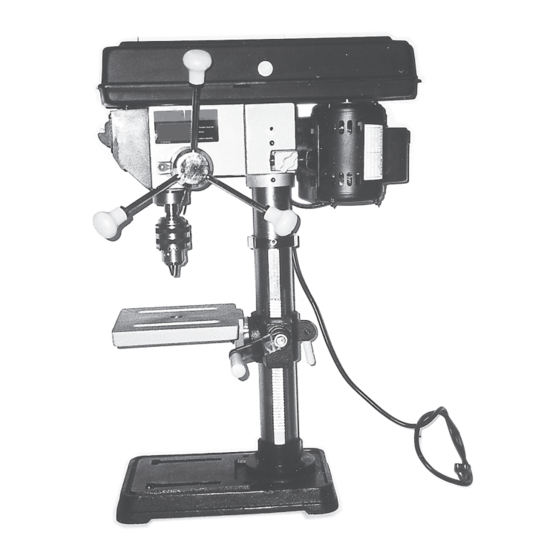
DRILL PRESS
10"
BENCH/12 SPEED
ASSEMBLY AND
OPERATING INFORMATION
3491 Mission Oaks Blvd., Camarillo, CA 93011
Visit our Web site at http://www.harborfreight.com
Copyright © 2001 by Harbor Freight Tools. All rights reserved. No portion of this
manual or any artwork contained herein may be reproduced in any shape or form
without the express written consent of Harbor Freight Tools.
For technical questions please call 1-800-444-3353
Advertisement
Table of Contents

Related Manuals for Harbor Freight Tools 44836


Summary of Contents for Harbor Freight Tools 44836
- Page 1 3491 Mission Oaks Blvd., Camarillo, CA 93011 Visit our Web site at http://www.harborfreight.com Copyright © 2001 by Harbor Freight Tools. All rights reserved. No portion of this manual or any artwork contained herein may be reproduced in any shape or form without the express written consent of Harbor Freight Tools.
-
Page 2: Specifications
DO NOT USE THIS PRODUCT IF UNDER THE INFLUENCE OF ALCOHOL OR DRUGS. Read warning labels on prescriptions to determine if your judgment or reflexes are impaired while taking drugs. If there is any doubt, do not attempt to use this product. SKU 44836 SPECIFICATIONS DESCRIPTION 132 Lbs. - Page 3 REPLACEMENT PARTS AND ACCESSORIES. When servicing, use only identi- cal replacement parts. Only use accessories intended for use with this product. Approved accessories are available from Harbor Freight Tools. MAINTAIN THIS PRODUCT WITH CARE. Keep this tool clean and dry, and keep drill bits clean and sharp for better and safer performance.
- Page 4 KEEP ALL GUARDS IN PLACE AND IN WORKING ORDER. REMOVE ALL ADJUSTING WRENCHES FROM THE DRILL PRESS BEFORE TURNING IT ON. AVOID UNINTENTIONAL STARTING. Make sure you are prepared to begin work before turning the START switch on.
- Page 5 THE WORKPIECE. When turning off the Drill Press, allow the drill bit to spin down and stop on its own. Do not press the drill bit against the workpiece to stop it. DO NOT FORCE THE DRILL BIT INTO THE WORKPIECE WHEN DRILLING.
- Page 6 With assistance, set the Drill Press aside. Use a 1/2” drill bit to drill the four holes through the workbench. Reposition the Drill Press on the workbench and secure the Drill Press to the workbench, using four 1/2”...
- Page 7 The Drill Press features 12 speed selections from which to choose. The two V-Belts (parts #21C, 26C), when positioned on the three Pulleys (parts #3C, 28C, 19C), will determine the speed at which the Drill Press will run. (See Assembly Diagram C and Figure B.)
- Page 8 C. The quality of cut desired. Generally, in soft material the speed should be higher than for hard materials. The following guide indicates the proper Drill Press speed (RPM) for a given drill bit size and the material being drilled. (See Figure C.)
- Page 9 (See Assembly Diagram B and Figure E.) To set a drilling depth, insert and secure a drill bit in the Chuck (part #8C). Lower the drill bit (with the power OFF) until it contacts the material to be drilled, and hold in that position.
- Page 10 The Drill Press is now set to drill holes to your pre-determined depth, provided the surface of the workpiece is flat and level. You may also drill a series of holes to the same depth. To Operate The Drill Press:...
-
Page 11: Cleaning, Inspection, And Maintenance
Set the depth of drill bit travel so that the drill bit cannot come into contact with the Table (part #9A), or align the Table so that the hole in its center is in line with the drill bit. The Drill Press is now ready to operate. - Page 12 FIGURE G SKU 44836 PAGE 12...
-
Page 13: Please Read The Following Carefully
Helical Gear Worm Gear Collar - Rack Hex Head Screw M6 x 1.0-10 Hex Head Socket Screw M6 x 1.0-10 SKU 44836 NOTE: Some parts are listed and shown for illustration purposes only, and are not available individually as replacement parts. -
Page 14: Parts List B
PART # SKU 44836 PARTS LIST B DESCRIPTION Head w/Pointer & Trim Motor Hex Nut M8 Washer 8 Cord - Motor Hex Nut M10 Lockwasher 10 Bracket - Motor Hex Head Screw M8 x 1.25-20 Support - Motor Bracket Roll Pin 6 x 16 Knob - Motor Adjusting Hex Screw Socket Set M8 x 1.25-8... - Page 15 SKU 44836 PAGE 15...
- Page 16 Key Chuck Tube Quill Gasket Quill Ring - Retaining Screw - Wash. Hd. M6 x 1.0-12 Bushing - Rubber Ring - Retaining SKU 44836 PART # DESCRIPTION Bearing - Ball 17mm Spacer Insert - Pulley (includes Key) Pulley - Spindle Nut - Pulley Belt - “V”...