Honeywell RLV430 User Manual
Programmable thermostat
Hide thumbs
Also See for RLV430:
- User manual (4 pages) ,
- User manual (9 pages) ,
- Owner's manual (36 pages)
Table of Contents
Advertisement
Available languages
Available languages
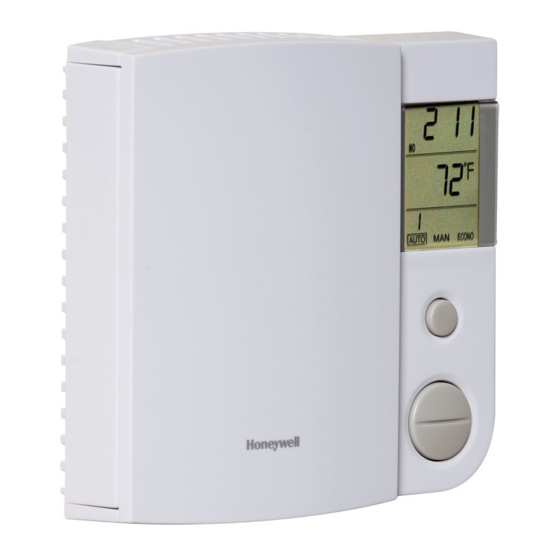
Mode button
Up/Down buttons
Reset opening
Description
The RLV430 thermostat can be used to control an electric heating
system such as a baseboard heater, a radiant floor, a radiant ceiling,
a convector or a fan-forced heater.
The thermostat cannot be used with the following:
•
a resistive load under 2 A
•
a resistive load over 14.6 A
•
systems driven by a contactor or a relay (inductive load)
•
central heating systems
SUPPLIED PARTS
•
One (1) thermostat
•
Two (2) 6-32 mounting screws
•
Two (2) solderless connectors
Installation
TURN OFF POWER TO THE HEATING SYSTEM AT THE MAIN
POWER PANEL TO AVOID ELECTRICAL SHOCK.
All cables and connections must comply with local electrical
codes.
This thermostat has tinned copper wires for line and load con-
nections. Special CO/ALR solderless connectors must be used if
these wires will be connected to aluminium conductors.
Install the thermostat onto an electrical box.
Install the thermostat about 5 feet (1.5 m) high, on an inside wall
facing the heater.
Avoid locations where there are air drafts (such as the top of a
staircase or an air outlet), dead air spots (such as behind a
door), or direct sunlight.
Do not install the thermostat on a wall that conceals chimney or
stove pipes.
The thermostat wires are not polarized; either wire can be con-
nected to the load or to the power supply.
RLV430
Day button
Hour button
Minute button
Program button
Return button
1.
2.
Time and day
Appears if the
thermostat is configured
for a fan-forced heater
Appears when the
setpoint is displayed
Heating power
indicator
Period no. in
Automatic mode
Automatic
mode
1) Connect the thermostat
Connect the thermostat wires to the power and to the load using
solderless connectors for copper wires.
2-wire installation
4-wire installation
RLV430
User Guide
Programmable Thermostat
Flashes when the
clock has been reset
Temperature
Appears during
a power failure
Setting no. in
Economy mode
Economy
Manual
mode
mode
69-1874ES-2
2008-01-31
1/4
Advertisement
Table of Contents

Related Manuals for Honeywell RLV430


Summary of Contents for Honeywell RLV430
-
Page 1: Installation
Connect the thermostat wires to the power and to the load using solderless connectors for copper wires. The RLV430 thermostat can be used to control an electric heating system such as a baseboard heater, a radiant floor, a radiant ceiling, 2-wire installation a convector or a fan-forced heater. -
Page 2: Modes Of Operation
(Monday to Friday) and another one Insert a pointed object (e.g., paperclip) in the reset opening. for the weekend (Saturday and Sunday). Remove it when the thermostat’s screen becomes blank. Wait one second and release the Day button. RLV430 69-1874ES-2 2008-01-31... -
Page 3: Power Outage
5 hours, only the thermostat’s clock must be up, the temperature returns to the economy level until re-adjusted. When power returns, the thermostat returns to the mode next weekend. of operation preceding the power outage. RLV430 69-1874ES-2 2008-01-31... -
Page 4: Specifications
This warranty does not cover removal or reinstallation costs. This above a heat source such as a warranty shall not apply if it is shown by Honeywell that the defect or light dimmer. malfunction was caused by damage which occurred while the prod-... -
Page 5: Instalación
Conectar los cables del termostato a la fuente de alimentación y a la carga, utilizando conectores sin soldadura para cables de cobre. El termostato RLV430 se puede utilizar para controlar un sistema de calefacción eléctrico, como un calentador de zócalo, un cielorraso o un piso radiante, un convector o un celefactor a aire forzado. -
Page 6: Modos De Funcionamiento
Para cancelar temporalmente el punto de ajuste en uso se debe fijar la temperatura deseada con los botones Up o Down. El nuevo punto Abrir la puerta del termostato. de ajuste se utilizará hasta el principio del período siguiente. Mantener presionado el botón Hour. RLV430 69-1874ES-2 2008-01-31... -
Page 7: Corte De Corriente
Establecer el día y la hora a los que se desea que la temperatura Fijarlo en un nivel comience a bajar a un nivel de de economía economía si nadie se presenta en la casa. El modo Economía debe usarse de la siguiente manera: RLV430 69-1874ES-2 2008-01-31... -
Page 8: Especificaciones Técnicas
Guía para la solución de problemas Garantía Honeywell garantiza por un período de un (1) año, a partir de la fecha de compra por el consumidor, que este producto, sin incluir las PROBLEMA SOLUCIONES baterías, no presentará defectos en los materiales ni en lo referente a la mano de obra, en condiciones normales de uso y de servicio.