Table of Contents
Advertisement
Advertisement
Table of Contents

Related Manuals for Echo AUDIOFIRE 8


Summary of Contents for Echo AUDIOFIRE 8
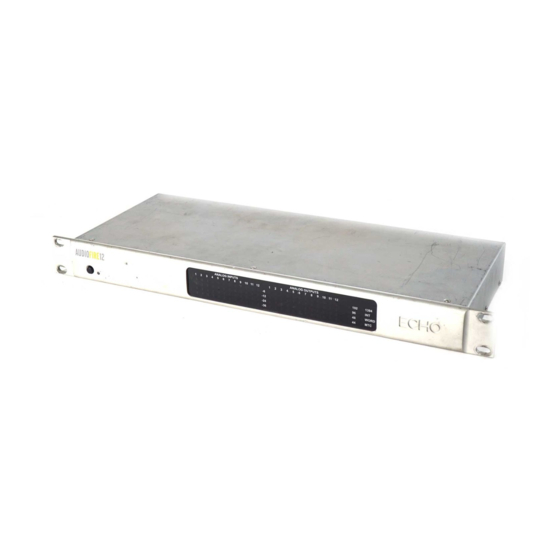
- Page 1 AUDIOFIRE AUDIOFIRE Owner’s Manual Version 1.1 for Macintosh...
-
Page 2: Important Safety Instructions
Important Safety Instructions 1. Read Instructions - Be sure to read all of the safety and operating instructions before operating this product. 2. Retain Instructions - The safety instructions and owner's manual should be retained for future reference. 3. Heed Warnings - All warnings on your Echo product and in the Owner's Manual should be followed. - Page 3 11. Damage Requiring Service - Unplug this unit and refer it to a qualified service technician when any of the following occur: a) Objects have fallen or liquid has spilled into the unit b) The product has been exposed to rain or water c) The product does not operate normally or when a marked change in performance is noticed d) The product has been dropped or damaged in any way...
-
Page 4: Limited Warranty
Registering your product online at http://www.echoaudio.com/support/register.php allows us to register key information so that we may handle problems faster and inform you of advance information on upgrades and other news. Thank you in advance for registering. We hope you enjoy your Echo product. Limited Warranty Echo Digital Audio Corporation warrants this product, when purchased at an Authorized Echo Dealer in the United States of America, to be free of defects in materials and manufacturing workmanship for a period of one year from... - Page 5 ©2005 by Echo Digital Audio Corporation 6309 Carpinteria Ave. #300 Carpinteria, CA 93013 ® Echo and AudioFire are trademarks of Echo Digital Audio Corporation. Tracktion is a trademark of LOUD Technologies Inc. ® ® ® ® ® ® ® ® ®...
-
Page 6: Table Of Contents
INTRODUCTION....................8 ..........8 HOULD ECEIVED IN THE ..................9 YSTEM EQUIREMENTS INSTALLATION ....................10 ................10 N AS DMINISTRATOR OS X V ..................10 HECK ERSION ..................10 OFTWARE PDATE ......... 11 NSTALLING THE UDIO ARDWARE AND OFTWARE ............. 12 ONNECTING TO THE UDIO NTERFACE... - Page 7 INDEX........................53...
-
Page 8: Introduction
Introduction Introduction Thank you for choosing Echo Digital Audio. We think you’ll find your Echo product to be an extremely flexible, high-performance tool for your computer- based hard disk recording system. What You Should Have Received in the Box When you opened the box, you should have found the following: •... -
Page 9: System Requirements
Introduction System Requirements In order to use AudioFire8 or AudioFire12 you’ll need the following: • An Apple brand Macintosh computer (desktop or notebook) with: • Mac OS X (10.3.9 or later) • An unused FireWire port • A G4 or better processor (G5 recommended) •... -
Page 10: Installation
Installation Installation To properly install your AudioFire product you will need to: log in as an administrator, check OS X version, run software update, connect the audio interface to a FireWire port and to your other audio hardware, install the Console software, and install Tracktion. -
Page 11: Installing The Audiofire Hardware And Software
Installation Installing the AudioFire Hardware and Software Now that you have logged in as an administrator, checked the OS X version, and updated your software, you are ready to install your AudioFire product in your computer. 1. Install the AudioFire Console. Insert the AudioFire Install CD-ROM into your machine. -
Page 12: Connecting To The Audio Interface
Connecting to the Audio Interface Connecting to the Audio Interface The AudioFire8 and AudioFire12 audio interfaces contain a wide variety of connections that allow great flexibility in operation. For optimal performance, it is critical to use the appropriate cabling and connectors. Analog Inputs and Outputs –... - Page 13 Connecting to the Audio Interface You can switch between +4dBu and –10dBV for each individual input and output via the console software (see section below). There are also two channel inserts on the rear panel where you can connect a serial effects device (compressor, EQ, etc.) for the universal inputs (#s 1 –...
- Page 14 Connecting to the Audio Interface light represents a signal greater than –12.5dBFS, and the green light represents a signal greater than –36.5dBFS. For optimal audio quality, you should adjust the input trim knob so that your loudest recorded signal lights up the yellow light, but not the red. When the red meter light shines extra bright –...
- Page 15 Connecting to the Audio Interface By default, the inputs and outputs are set to receive or send a +4dBu signal. You can switch between +4dBu and –10dBV for each individual input and output via the console software (see “Console” section below). The FireWire Connector On the rear panel of each AudioFire interface box is a pair of connectors with the FireWire symbol above them.
- Page 16 Connecting to the Audio Interface MIDI Both AudioFire8 and AudioFire12 are equipped with MIDI I/O connectors. The MIDI ports can be used for receiving MIDI time code (MTC), or sending and receiving MIDI signals between your digital audio/MIDI sequencing software and external sound modules, keyboards, MIDI controllers, etc.
-
Page 17: Software Configuration
Software Configuration Software Configuration Now that you have installed your AudioFire product, you can verify that everything is working properly. Open “System Preferences” from the Dock or Apple menu, select “Show All”, and select the “Sound” panel. Under the “Output” tab, you should see your AudioFire product listed as a sound output device. - Page 18 Software Configuration You can also check out your hardware with the “Audio MIDI Setup” application. Go to your Applications folder on your hard disk and from there to the Utilities folder. Open “Audio MIDI Setup.” In addition to listing all the audio devices in the system, Audio MIDI Setup lets you examine the various audio formats supported by the hardware in your Mac.
- Page 19 Software Configuration By clicking on the “MIDI Devices” tab, you will display the available CoreMIDI devices. You should see your AudioFire8 or AudioFire12 hardware shown as an icon here. Next, you’ll want to install Tracktion and learn about the AudioFire Console software.
-
Page 20: Installing Tracktion
Installing Tracktion Installing Tracktion Both AudioFire8 and AudioFire12 come bundled with the full version of Tracktion, audio multitrack recording, MIDI, editing, and sampling software. Install Tracktion from the AudioFire CDROM To install the software: 1. Insert the AudioFire CDROM into your CD-ROM drive. A CDROM icon will appear on your desktop called “AudioFire”. -
Page 21: Launching Tracktion And Assigning Inputs & Outputs
Installing Tracktion Launching Tracktion and Assigning Inputs & Outputs Now it’s time to launch the actual program and set a few options: • Locate and double-click the Tracktion icon in the “Applications” folder or wherever you copied it to earlier. You may also want to put it in the Dock for easy access. -
Page 22: Audio Settings
Installing Tracktion Audio Settings Click the “Settings” tab at the top of the screen. Select “Audio Devices” on the left. Where it says “Wave device:” click on the drop down menu and select your AudioFire product. Now you should be able to see a list of the available audio devices for your AudioFire product. -
Page 23: Console
Console Software Console If you followed the instructions in Step 1 of the “Installing the AudioFire Hardware and Software” section of this manual, then you installed a “virtual control surface” application called the AudioFire Console. The console allows you to control the audio I/O and clocking functions of your AudioFire product, and it brings these controls to a single easy-to-use location. -
Page 24: Bus Select Tabs
Console Software The AudioFire8 Console Window: Analog Out 1-2 Tab selected. Bus Select Tabs The output bus is selected by clicking on one of the tabs at the top of the Console window. The above example shows the Console window for AudioFire8. Five different output busses are shown here: four analog busses and one digital bus. -
Page 25: Master Output Bus Control
Console Software output bus tabs. AudioFire12 does not have S/PDIF, so it does not have a digital output bus; it has 6 analog output bus tabs instead. Master Output Bus Control The master bus control is the area on the far right of the Console window. At the top are the titles “ANALOG”, “OUT 1”, and “OUT 2.”... - Page 26 Console Software The input monitor controls are a little complicated. Basically, there is a different set of input monitor controls for each output bus, but only one set is viewable and changeable at a time. In the example above, the only set of input monitor controls that is viewable and changeable is the one for the output bus called “ANALOG OUT 1-2".
-
Page 27: Digital Inputs (Audiofire8 Only)
Console Software Note that since the ANALOG OUT 3-4 tab is selected you are no longer looking at the input monitor and output controls for analog outputs 1 and 2. You are now looking at the controls for analog outputs 3 and 4. You can still see the input signal on the input level meters, but the output level for analog outputs 1 and 2 is no longer visible since you have changed to the ANALOG OUT 3-4 bus. -
Page 28: Playback Controls
Console Software Playback Controls The playback controls are to the left of the master output controls and are similarly titled, except instead of “OUT” they are titled “PLAY”. The playback controls affect the level of audio being played by an application out the currently selected output bus. -
Page 29: Console Settings
Console Software Console Settings Clicking the Settings button above the playback strips opens a window for altering console settings. The Settings window gives you five different tabs to choose from: “Input,” “Output,” “Clock,” “Digital,” and “About.” Inputs: Nominal Levels The “Input” tab allows you to change the nominal level settings for the analog inputs. -
Page 30: Outputs: Nominal Levels
Console Software Outputs: Nominal Levels The “Output” tab allows you to change the nominal level settings for the analog outputs. By default, the outputs are set to send a +4dBu signal. You can switch between +4dBu (professional level) and –10dBV (consumer level) for each analog output by selecting the appropriate radio button. -
Page 31: Clock Settings
Console Software Clock Settings The “Clock” tab lets you select your clock rate and the input clock source. The clock rate, also known as sample rate, affects recording and playback. For more information please refer to Appendix B: An Introduction to Digital Recording. The input clock setting is used to synchronize your AudioFire hardware to another piece of audio hardware. -
Page 32: Digital: S/Pdif Settings
Console Software Digital: S/PDIF Settings The “Digital” tab lets you set the format of the S/PDIF outputs for AudioFire8. AudioFire8 can transmit digital information in either of two formats: “professional” or “consumer.” The primary difference between the two is in the implementation of the SCMS copy protection bit, which, in the Consumer format, prevents the user from making digital copies of a digital copy. -
Page 33: About
Console Software Select the appropriate format for your DAT, CD recorder, or Mini Disc recorder (if you don’t know which one to use and are having difficulties, simply try the one that is not currently checked). Note: No Echo hardware transmits the SCMS bit, regardless of which format is selected. -
Page 34: Console Sessions
Console Software Console Sessions Console settings can be saved as a console session to be reloaded later. To save a console session, click the “Save” button in the main console window. To load a previously saved session, press the Load button in the console. By default all sessions are saved to your user directory. -
Page 35: Synchronizing Multiple Devices
Console Software Synchronizing Multiple Devices AudioFire8 and AudioFire12 are designed to work alongside other audio equipment. If you are planning on using AudioFire8 or AudioFire12 with other audio equipment, please note the following: Echo hardware can peacefully coexist with audio equipment from other manufacturers, but be aware that operating alongside another product is not the same as operating with it. - Page 36 Console Software S/PDIF (AudioFire8 only) – The Sony/Phillips Digital Interchange Format is a serial bit-stream that has a clock signal embedded in the data stream. When recording from an S/PDIF source, AudioFire8 will utilize the synchronization clock that is embedded in the S/PDIF while it decodes the bit-stream. AudioFire8 can only sync to S/PDIF clock if the master device is set to a sample rate between 30kHz and 100kHz.
-
Page 37: Contacting Echo Customer Service
Customer Service Contacting Echo Customer Service If you experience any trouble with your Echo product please go to the support area of our website at www.echoaudio.com, and check out the FAQ’s we have there. If you can’t find a solution to your problem there, please fill out the provided technical support email form. -
Page 38: Appendix A: General Troubleshooting Guide
Appendix A: Troubleshooting Guide Appendix A: General Troubleshooting Guide Problem: You can’t get your AudioFire product to install properly under Mac OS 8, OS 9, or OS X (10.3.8 or lower). Solution: There is no driver support for AudioFire8 or AudioFire12 under Mac OS 8 or 9. - Page 39 Appendix A: Troubleshooting Guide Problem: You are unable to get your DAT recorder to recognize the S/PDIF output from AudioFire8. Solution: Digital information is transmitted in either of two modes, “professional” or “consumer.” The professional mode is usually implemented in devices that are likely to be used in professional recording environments, whereas the consumer mode is commonly implemented on equipment designed for home use in the consumer market.
- Page 40 Appendix A: Troubleshooting Guide Problem: When you play an audio file, it plays at an altered pitch. Solution: When your AudioFire product is set to synchronize with an external device, it will play back at the rate generated by that device. If the sound you are playing was sampled at 44.1kHz (for example), but you are synchronized with a device running at 96kHz, the sound will play back at this faster rate.
- Page 41 Appendix A: Troubleshooting Guide Problem: The sound cuts in and out, or the left or right channel doesn’t work. Solution: You may have a bad audio cable. Try using a different cable in the problem channel. Problem: There is no sound unless I pull the audio plug out a little. Solution: Not all ¼”...
-
Page 42: Appendix B: An Introduction To Digital Recording
Appendix B: An Introduction to Digital Recording Appendix B: An Introduction to Digital Recording Converting Sound into Numbers In a digital recording system, sound is represented as a series of numbers, with each number representing the voltage, or amplitude, of a sound wave at a particular moment in time. - Page 43 Appendix B: An Introduction to Digital Recording Each digit in the number is called a bit. The binary numbers expressed in Figure A are sixteen bits long, and have a maximum value of 65,535. The more bits that are used to store the sampled value, the more closely it will represent the source signal. In a 16-bit system, there are 65,535 possible combinations of zeroes and ones;...
- Page 44 Appendix B: An Introduction to Digital Recording Also important to the quality of a digital recording is the frequency with which the samples are stored, called the sample rate. In order for a waveform to be faithfully digitized, it must be sampled at a minimum of twice the highest frequency to be stored.
- Page 45 Appendix B: An Introduction to Digital Recording level of analog audio signals. The most common are dBu and dBV decibels. Both of these represent voltage levels and still double for every increase of 6dB. It is only the reference point, or 0dB level that is different. A 0dBV signal has a voltage level of 1.0 volts.
- Page 46 Appendix B: An Introduction to Digital Recording Unbalanced and Balanced Inputs and Outputs An unbalanced signal, commonly used for guitars and consumer electronics, contains two components, a ground signal and a “hot” or active signal. The ground is the barrel of a ¼” connector and the shell of an “RCA” style connector. A balanced signal contains two active signals instead of one in addition to the ground.
- Page 47 Appendix B: An Introduction to Digital Recording Balanced signals connect with either XLR connectors or TRS (tip, ring, sleeve) connectors. Your Echo product uses XLR connectors for microphones and TRS connectors for connecting balanced (and unbalanced) line level signals. The three sections of a TRS connector are used to transmit the three components of a balanced signal (T = plus, R = minus, S = ground).
- Page 48 Appendix B: An Introduction to Digital Recording In answering the second question, consider the fact that music is often compressed or amplified after it is recorded, and that some headroom is necessary when recording to avoid clipping. The only way that 96dB would be adequate is if all music were recorded so that the peaks were just under full-scale and no compression or amplification was going to be applied after recording.
-
Page 49: Appendix C: Specifications
Appendix C: Specifications Appendix C: Specifications AudioFire8 - Audio Performance Analog Inputs (x2 balanced universal XLR/TRS & x6 balanced TRS): Universal Inputs (x2 balanced XLR/TRS): Frequency Response: 10Hz to 20kHz, 0.2dB ± Microphone Input Level (balanced XLR): EIN: -129dBu Dynamic Range: 111dB A-weighted THD+n: <0.004% A-weighted Input Impedance: 1.5Kohms Gain Adjustment: +10 to +59dB... - Page 50 Appendix C: Specifications Analog Outputs (x8 balanced TRS): Frequency Response: 10Hz to 20kHz, 0.1dB ± Dynamic Range: 114dB A-weighted THD+n: <0.002% A-weighted Nominal Output Level: +4dBu or –10dBV Maximum Output Level: +17.2dBu AudioFire8 - Hardware Host Interface: 1394a (FireWire) Two high quality mic preamps with phantom power (+48v) Eight balanced ¼”...
- Page 51 Appendix C: Specifications AudioFire12 - Audio Performance Analog Inputs (x12 balanced TRS): Frequency Response: 20Hz to 20kHz, 0.1dB ± Dynamic Range: 113dB A-weighted THD+n: <0.002% A-weighted Nominal Input Level: +4dBu or –10dBV Input Impedance: 10Kohms Maximum Input Level: +17.5dBu Analog Outputs (x12 balanced TRS): Frequency Response: 10Hz to 20kHz, 0.1dB ±...
- Page 52 Appendix C: Specifications AudioFire12 - Hardware Host Interface: 1394a (FireWire) Twelve balanced ¼” analog inputs with precision 24-bit 128x oversampling analog-to-digital converters Twelve balanced ¼” analog outputs with high performance 24-bit 128x oversampling digital-to-analog converters Level meters on front panel for analog inputs and outputs, and sync On-board 32-bit / 1.6 gigaflop DSP 24-bit data resolution maintained throughout entire signal path Multiple sample rates from 32kHz to 192kHz...
- Page 53 Index Index MTC..........16 adjusting playback levels ....28 analog-to-digital converter.... 42 nominal levels......29, 30 balanced......... 46 phantom power ......13 professional mode......39 cd-rom, contents......8 clock settings......... 31 recording, pops or skips....40 Console.......... 23 console sessions ......34 S/PDIF ....15, 32, 36, 39, 40 consumer mode ......