Table of Contents
Advertisement
Advertisement
Table of Contents

Related Manuals for Emotiva Fusion 8100

Summary of Contents for Emotiva Fusion 8100
- Page 3 Do not install the Fusion 8100 on any stand, shelf, or other piece of furniture that is unable to support its weight. If a cart is used to move the Fusion 8100, use caution to avoid injury from tip-over.
- Page 4 The Fusion 8100 should only be cleaned as directed in the manual. Avoid spraying liquids directly onto the Fusion 8100 and NEVER spray liquids into the vents. Care should be taken so that small objects do not fall into the inside of the Fusion 8100.
-
Page 5: Fcc Interference Statement
Connect the equipment to an outlet on a circuit different from that of the receiver. Consult the manufacturer or an experienced radio/TV technician for help. For questions regarding service, please contact: Emotiva Audio Corporation Attn: Repair Department 135 Southeast Parkway Court... -
Page 7: Table Of Contents
About This Manual ......................3 Features ..........................4 Unpacking ...........................5 Fusion 8100 Front Panel ....................6 Fusion 8100 Rear Panel ....................8 Fusion 8100 Remote Control ..................16 Configuration and Operation ................... 20 Example Input Configuration ................... 50 Connectivity ........................51 Care and Maintenance ....................52 Troubleshooting ...................... -
Page 8: Introduction
The Fusion 8100 truly advances the state of the art for A/V receivers - and at a price that won’t break your budget. We’re sure that you’ll enjoy listening to the Fusion 8100 as much as we’ve enjoyed designing and building it. -
Page 9: About This Manual
This manual will provide you with all the information you need to install and configure the Fusion 8100 to achieve its optimum potential. The manual also includes a brief summary of the features offered by the Fusion 8100 and descriptions of how the controls work. -
Page 10: Features
Class A/B amplification, and a full set of preamp outputs for future expansion. The Fusion 8100 provides plenty of audio and video inputs for audio and video enthusiasts, supports all the current surround sound decoding options, and delivers enough real power to drive most speakers to satisfying levels in a typical small-to-medium-sized home theater or living room. -
Page 11: Unpacking
Fusion 8100: User Manual Unpacking Your Fusion 8100 was carefully packed and should reach you in perfect condition. If you notice any shipping damage or other issues when you unpack it, please contact Emotiva immediately. Gently remove your Fusion 8100 from the packing carton and remove all wrappings and shipping material. -
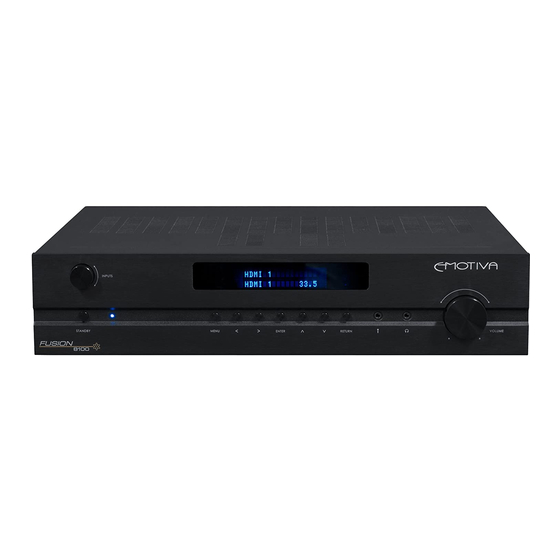
Page 12: Fusion 8100 Front Panel
Standby mode. (The rear panel AC power switch must be On.) 3. Standby LED This LED is red when the Fusion 8100 is in Standby mode, and blue when the Fusion 8100 is On. 4. Front Panel Display Large, clear, easy to read VFD status display. - Page 13 9. Volume Control The Volume Control on the Fusion 8100 is a rotary encoder that instructs the digitally controlled analog resistor ladder network volume control. (The dot on the knob does not indicate the volume setting.)
-
Page 14: Fusion 8100 Rear Panel
Fusion 8100: User Manual Fusion 8100 Rear Panel Bal. Stereo 7.1 Channel RS-232 Control Digital Unbalanced Unbalanced HDMI Inputs Inputs HDMI Power Inputs Inputs Output Indicators Switch SB / Trigger 7.1 Channel Unbalanced Outputs Zone 2 Zone Outputs & Outputs... - Page 15 3. IR Remote Input and Output Connect a remote IR detector (eye) to this input. This is especially useful if your Fusion 8100 is located in a cabinet or other area where the front panel IR detector is blocked. Connect a remote IR transmitter (“blaster”) to this output to control other equipment.
- Page 16 2. Power Switch Switches the AC main power to the Fusion 8100 On and Off. When this switch is Off, the Fusion 8100 will not respond to trigger signals or manual controls. 3. Standard IEC Power Inlet The Fusion 8100 can be used with either a two-wire or three-wire standard IEC power cable.
- Page 17 Fusion 8100: User Manual Rear Panel - Video Inputs and Outputs (HDMI) ANTENNAS SUB OUT AN 1 AN 2 AN 3 AN 4 230V 115V CO 1 CO 2 RS232 CONTROL HDMI 1 HDMI 2 HDMI 3 HDMI 4 HDMI OUT...
- Page 18 3. Digital Audio Inputs The Fusion 8100 provides four digital audio inputs. CO 1 and CO 2 are for standard Coaxial connectors carrying S/PDIF digital audio; OPT 1 and OPT 2 are for standard Toslink optical cables carrying optical S/PDIF digital audio.
- Page 19 (for example, you may connect just a sub to the unbalanced Sub output, or you may connect the power amp that runs your front mains to the preamp outputs on the Fusion 8100, while connecting your surround speakers directly to the speaker outputs on the Fusion 8100).
- Page 20 Connect up to seven 4 ohm or 8 ohm speakers to these outputs. Note: The Fusion 8100 can be configured for either 5.1 or 7.1 surround sound operation. If you configure the Fusion 8100 for 5.1 channel operation, use the FL, FR, CNT, SL, and SR speaker outputs (and NOT the SBL and SBR outputs).
- Page 21 Fusion 8100: User Manual Rear Panel - Zone and Mix Audio Outputs (Analog) ANTENNAS SUB OUT AN 1 AN 2 AN 3 AN 4 230V 115V CO 1 CO 2 RS232 CONTROL HDMI 1 HDMI 2 HDMI 3 HDMI 4...
-
Page 22: Fusion 8100 Remote Control
Fusion 8100: User Manual Fusion 8100 Remote Control 1. Standby Button STANDBY Press this button when the Fusion 8100 is On to MODES return it to Standby Mode. DIRECT STEREO MODE MODE DIRECT INPUTS 2. Mode Buttons HDMI 1 HDMI 2... - Page 23 Use these buttons to temporarily adjust the levels of your various surround speakers. The changes you make with these controls will not be retained when you turn the Fusion 8100 Off. You can separately adjust the levels of the Center Channel, the Surrounds, the Back Surrounds, and the Subwoofer with these controls.
- Page 24 (dim but not fully off ). 16. Mute Button Press this button to mute the audio output of the Fusion 8100; press it again to return to the previous Volume level. 17. Volume Buttons Press these buttons to turn the volume up or down on the Fusion 8100.
- Page 25 Note: Once the Fusion 8100 is paired to a Bluetooth device, they will remain paired as long as the Fusion 8100 is On, even if you change the selected input (if you switch back to the Bluetooth input you will not have to re-pair the device).
-
Page 26: Configuration And Operation
Fusion 8100: User Manual Configuration and Operation Configuring Inputs The Fusion 8100 allows any input connector to be assigned to any input source using the Input Setup configuration screen. Menus The Fusion 8100 is configured using a set of easy-to-use menus. When you first access the menu... - Page 27 Fusion 8100: User Manual Fusion 8100 Menu Tree MENU Input Input Config Tuner Setup Mode Playback Input Setup Parameter Remote Hot Key Zone Speaker Size / Setup Crossover Setup Auto Room EQ Noise Test Option Speaker Distance Load Default LFE Level...
-
Page 28: Input Menu
Fusion 8100: User Manual Input Menu Input Mode Parameter Zone Setup Tuner Preset : 87.50MHz HDMI 1 HDMI 2 HDMI 3 HDMI 4 CO 1 CO 2 On the Input Menu, use the Up and Down navigation keys to choose an input; press Enter to select the input (make it active). - Page 29 Dolby Digital mode for an analog input signal). By default, the Fusion 8100 will remember your choice, and will use it as the default choice the next time an input signal of the same format is received. You may change this behavior using the Setup / Playback Menu.
- Page 30 Changes made to speaker levels on this menu are temporary and will not be stored when the Fusion 8100 is turned Off. If you wish to make changes to speaker levels that will be retained between sessions, use the Setup / Speaker Setup / Noise Test Submenu.
- Page 31 Zone 2. Note: There is a switch on the rear panel of the Fusion 8100 that allows you to route the Zone 2 audio to the amplifier channels normally used by the Fusion 8100 to deliver audio to the Rear Surround Speakers.
- Page 32 Fusion 8100: User Manual Setup Menu (main setup menu) Input Mode Parameter Zone Setup Input Config Playback Speaker Setup Auto Room/EQ Option Load Default Version The Setup Menu is used to access most of the configuration options on the Fusion 8100. Page 26...
- Page 33 Version The Setup / Input Configuration Submenu is used to access most of the configuration options on the Fusion 8100 related to input selections and configuration of the hot keys on the remote control. Trigger 1 Mode and Trigger 2 Mode allow you to configure whether each trigger is activated by specific inputs or specific zones.
- Page 34 FM Mode Stereo Auto Scan Manual Scan Up Manual Scan Down Memory Trigger 1 Trigger 2 The Setup / Input Configuration / Tuner Setup Submenu is used to configure the tuner settings and memory presets for the Fusion 8100. Page 28...
- Page 35 Note: When the video source for an input is set to one of the HDMI inputs on the Fusion 8100, selecting HDMI as the audio source will automaticaly select the audio input from the same HDMI input as the video input.
- Page 36 Fusion 8100: User Manual Setup / Input Config / Remote Hot Key Submenu Input Mode Parameter Zone Setup REMOTE KEY: Assigned to: HOT KEY 1 HOT KEY 2 HDMI 1 HDMI 1 HOT KEY 3 HDMI 2 HDMI 2 HOT KEY 4...
- Page 37 Here you can configure which default mode the Fusion 8100 will use to decode each type of input source when it is received. If you set any of these to Last Used, then the Fusion 8100 will use the last mode you manually selected to decode this particular type of input signal as its default mode for that type.
- Page 38 If the Back Channel switch on the rear of the Fusion 8100 is IN, and Front Bi-Wire is set to Off in this menu, then the SBL and SBR speakers will be assigned to EITHER Surround Back Left and Surround Back Right, OR FvH (front vertical height) speakers, depending on the setting in the Setup / Speaker Setup / Size &...
- Page 39 Fusion 8100: User Manual Setup / Speaker Setup / Size & Crossover Submenu Input Mode Parameter Zone Setup Front L/R Large Center Small 80 Hz Surround L/R Small 80 Hz Back L/R Small 80 Hz None Back/FvH Channel Parameter 2 CH...
- Page 40 Note: To configure the Fusion 8100 as a “regular 7.1 channel receiver”, the Back Channel switch on the rear panel of the Fusion 8100 should be IN, Front Bi-Wire in the The Setup / Speaker Setup Submenu should be set to OFF, and FvH in the Setup / Speaker Setup / Size & Crossover Submenu should be set to NONE.
- Page 41 You may also use a sound level meter or real time audio analyzer to match the levels of each of your speakers. Note: Unlike level changes configured in the Parameters Menu, changes made in the Setup / Speaker Setup / Noise Test Submenu remain in effect when the Fusion 8100 is turned Off. Page 35...
- Page 42 Fusion 8100: User Manual Setup / Speaker Setup / Speaker Distance Submenu Input Mode Parameter Zone Setup Left Front 00.0 ft Center 00.0 ft Right Front 00.0 ft Left Surround 00.0 ft Right Surround 00.0 ft Left Back 00.0 ft Right Back 00.0 ft...
- Page 43 Fusion 8100: User Manual Setup / Speaker Setup / LFE Level Submenu Input Mode Parameter Zone Setup EXT 7.1CH 00 dB MULTI PCM 00 dB DOLBY D 00 dB DOLBY HD 00 dB 00 dB DTS-HD 00 dB Load Default The Setup / Speaker Setup / LFE Level Submenu allows you manually trim the subwoofer LFE level for each different type of input signal.
- Page 44 To run the Fusion Advanced Room Correction System, plug the calibrated microphone into the Cal jack on the front panel of the Fusion 8100, select Auto Room/EQ on the menu, and press Enter. Follow the onscreen prompts until the cailbration procedure is complete.
- Page 45 (included) calibrated microphone, and configures the Fusion 8100 to make your system sound its best. Even though the actual operation of the Fusion ARCS is very sophisticated, it is very simple to use and will deliver excellent results without manual tweaking in most situations.
- Page 46 Note: If the Fusion ARCS fails to run, ensure that your microphone is plugged in to the correct input (the Cal jack on the front of the Fusion 8100). The Fusion ARCS will now play a series of test tones through each of your speakers in turn. This will take several minutes;...
- Page 47 Fusion ARCS has created. On the current Menu screen, you can see the equalization settings that are currently applied by the Fusion 8100. The options include Auto EQ, Manual EQ 1, Manual EQ 2, Manual EQ 3, and Flat. By moving the highlight to each choice and pressing Enter, you change the current setting to that choice (and may hear what it sounds like).
- Page 48 Fusion 8100: User Manual Note: Moving the selector bar to an EQ choice that isn’t highlighted and pressing Enter selects that choice. At this point (if you have an active input which is subject to EQ) you will be able to preview what that choice sounds like.
- Page 49 Fusion 8100: User Manual The final results are then displayed, and you are prompted to save them. Note: The results displayed by the Fusion Advanced Room Correction System are provided to give you general insight into the areas where corrections have been implemented, and the frequency bands and ranges which are affected by those corrections, and should not be interpreted to literally represent the correction curve itself.
- Page 50 The Setup / EQ Submenus are used to manually configure the parametric equalizers in the Fusion 8100. The Fusion 8100 offers three separate “EQ banks” - named Manual 1, Manual 2, and Manual 3. For each of the three Manual EQ banks, you can configure separate EQ settings for each individual channel (speaker).
- Page 51 Fusion 8100: User Manual With an old style “graphic equalizer”, you were given ten (usually) separate frequency controls, each of which worked like a tone control (you could turn that band either up or down in level). A parametric equalizer is infinitely more flexible. For each channel in each EQ bank you are given eleven control bands.
- Page 52 HDMI Audio Output configures whether the audio output of the Fusion 8100 is active (set this to Amplifier if you want the Fusion 8100 to handle your audio).
- Page 53 Fusion 8100). CEC PWR Control will enable your Fusion 8100 and other components to switch each other on and off (so, for example, your TV will come on when you turn on the Fusion 8100). Page 47...
- Page 54 Option Load Default Version The Setup / Load Default Submenu is used to return the Fusion 8100 to factory default settings (and is also used to clear the Fusion 8100’s data and configuration buffers after a firmware update). Selecting Load Default and confirming the action will delete ALL user configuration settings from the Fusion 8100 and return it to the configuration it had when received from the factory.
- Page 55 Fusion 8100: User Manual Setup / Version Submenu Input Mode Parameter Zone Setup Input Config Main CPU: V1.52.02.51 Playback Bluetooth Module V1.000E Speaker Setup MAC: 00175348A63B Auto Room/EQ TV:HDMI VX2433wm Option Load Default Version The Setup / Version Submenu displays the versions of the various firmware modules in the Fusion 8100.
-
Page 56: Example Input Configuration
Obviously, this is an example, and your system may require different settings. The only configuration that will be required to start enjoying your Fusion 8100 at this point is to run the Fusion Advanced Room Equalization System (refer to Page 38 for details). -
Page 57: Connectivity
Fusion 8100: User Manual Connectivity • 4 – HDMI 1.4 inputs with 3D and CEC support. • 1 – HDMI 1.4 output with ARC support. • 4 – Line inputs (unbalanced, stereo). • 1 – 7.1 channel input (7 channels plus sub, unbalanced). -
Page 58: Care And Maintenance
If necessary, the Fusion 8100 should be cleaned gently with a soft rag. • If something sticky gets on the front panel or case of the Fusion 8100, it should be cleaned with a mild cleaning solution applied to a soft rag, followed by wiping with a clean rag dampened with plain water and drying with a soft dry rag or cloth. -
Page 59: Troubleshooting
Replace the batteries in the remote control. • If the Fusion 8100’s front panel is in direct sunlight, try moving it (sunlight can jam the signal). • Look for other sources of IR signal noise that may interfere with the signal (plasma TVs, certain CF or halogen lamps, and other sources of IR light). -
Page 60: Emotiva Audio Corporation Limited Warranty
Fusion 8100: User Manual Emotiva Audio Corporation Limited Warranty What does this warranty cover? Emotiva Audio Corporation (“Warrantor”) warrants its products against defects in materials and workmanship. How long does this coverage last? This warranty commences on the date of retail purchase by the original retail purchaser and... - Page 61 In order to make a claim under the warranty, you must: 1. Call or email a customer service representative at 1-877-EMO-TECH (1-877-366-8324) or support@emotiva.com. Provide a description of your problem and the serial number of the product for which the warranty claim is being made.
- Page 62 In keeping with our policy of ongoing product improvement, we reserve the right to make changes to the design and features of our products without prior notice. Fusion 8100 User Manual Revision 1.0 February 2014 Page 56...
-
Page 63: Notes
Notes...