
Related Manuals for Amprobe IR-750


Summary of Contents for Amprobe IR-750
-
Page 1: Users Manual
IR-750 50:1 IR Thermometer with memory Users Manual • Mode d’emploi • Bedienungshandbuch • Manual d’Uso • Manual de uso • Användarhandbok... - Page 3 IR-750 50:1 IR Thermometer with memory Users Manual October 2011, Rev.1 ©2011 Amprobe Test Tools. All rights reserved. Printed in China...
- Page 4 Amprobe® Test Tools distributor for an exchange for the same or like product. Please check the “Where to Buy” section on www.amprobe. com for a list of distributors near you. Additionally, in the United States and Canada In-Warranty repair and replacement units can also be sent to a Amprobe®...
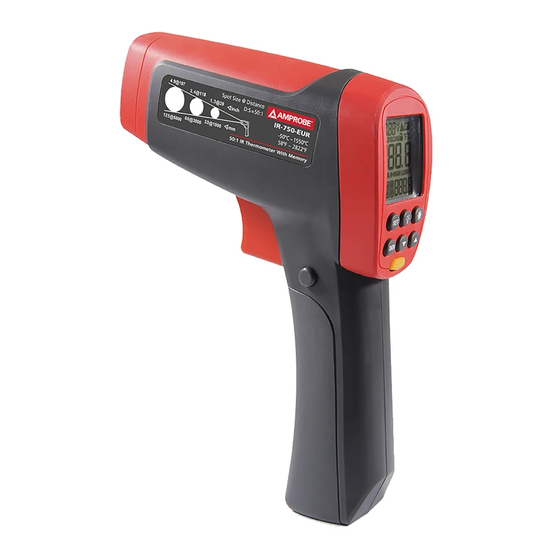
- Page 5 IR-750 50:1 IR Thermometer with memory Measurement lock (Continuous measurement) Temperature unit (Celsius / Fahrenheit) 8 seconds auto display hold Making measurement (Pulling the trigger) Built in memory up to 99 points Programmable high and low alarm Low battery indicator...
-
Page 6: Table Of Contents
IR-750 50:1 IR Thermometer with memory CONTENTS SYMBOL .........................2 SAFETY INFORMATION ..................2 UNPACKING AND INSPECTION ................3 FEATURES .......................4 HOW THE THERMOMETERS WORK ..............4 OPERATING THE THERMOMETER .................4 Temperature Measurement ................4 Locating a Hot or Cold Spot ................11 Distance and Spot Size ..................12 Field of View......................12... -
Page 7: Symbol
SYMBOLS � Caution! Refer to the explanation in this Manual. Warning! Laser light. Do not stare into laser beam. °C Celsius. °F Fahrenheit. Battery indication. � Complies with European Directives. Do not dispose of this product as unsorted municipal waste. Contact a qualified recycler. -
Page 8: Unpacking And Inspection
30 minutes for instrument to stabilize before use) • Do not leave the thermometer on or near objects of high temperature UNPACKING AND INSPECTION Your shipping carton should include: Thermometer (IR-750) USB cable K-type thermocouple probe Carrying bag Hard carrying case... -
Page 9: Features
-58°F to 2822°F or -50°C to 1550°C. The IR-750 is perfect for demanding quality and process control applications with extremely high accuracy and distance to spot. The IR-750 also features 99 data points recognition, thermocouple inputs, and USB download for advanced HVAC/R, electrical, industrial maintenance, automotive as well as quality control and fire prevention applications. - Page 10 The thermometer features an auto off function that automatically powers down the thermometer after 8 seconds of inactivity. To turn the thermometer on, pull the trigger. Rotary Switch Positions Button Description Press YELLOW button to toggle between MAX, MIN, DIF, AVG, HAL, LAL, DATA and T-C options.
- Page 11 Press to turn the laser light ON or OFF. symbol on the display Indicates laser light is ON. When the Thermometer enters the setup up mode (SET), press to select a set-up option (Emissivity, Trigger lock, Switching °C / °F). When the Thermometer enters HAL, LAL and DATA mode, press to select a set-up option (Emissivity,...
- Page 12 Table of Surface Emissivity Measure Surface Switch Setting METALS Aluminum Oxidized 0.2 – 0.4 Alloy A3003 Oxidized Roughened 0.1 – 0.3 Brass Burnished Oxidized Cooper Oxidized 0.4 – 0.8 Electrical Terminal Blocks Haynes Alloy 0.3 – 0.8 Inconel Oxidized 0.7 – 0.95 Sandblasted 0.3 –...
- Page 13 Iron Wrought Dull Lead Rough Oxidized 0.2 – 0.6 Molydbenum Oxidized 0.2 – 0.6 Nickel Oxidized 0.2 – 0.5 Platinum Black Steel Cold-Rolled 0.7 – 0.9 Ground Sheet 0.4 – 0.6 Polished Sheet Zinc Oxidized Measure Surface Switch Setting NON-METALS Asbestos 0.95 Asphalt...
-
Page 14: Trigger Lock
Ceramic 0.95 Clay 0.95 Concrete 0.95 Cloth 0.95 Glass Plate 0.85 Gravel 0.95 Gypsum 0.8 – 0.95 0.98 Limestone 0.98 Paper (any colour) 0.95 Plastic Opaque 0.95 Soil 0.9 – 0.98 Water 0.93 Wood, (natural) 0.9 – 0.95 Trigger Lock The thermometer trigger can be locked on for continuous measurement. - Page 15 DATA Memory The thermometer has 99 points data storage and the stored data can be downloaded via IR-750 software. To save the data: 1. Press YELLOW button to select DATA option. 2. Press to select data record number 3.
-
Page 16: Locating A Hot Or Cold Spot
K-Type Thermocouple Measurement X� To avoid electrical shock or personal injury, do not connect the thermocouple contact probe to live electrical circuits. The thermometer comes with a bead K-type thermocouple probe. K type thermocouple is connected to the thermometer via TC-K input connector located on right side of the thermometer. -
Page 17: Field Of View
Field of View Make sure that the target is larger than the spot size. The smaller the target, the closer you should be to it. -
Page 18: Emissivity
Emissivity Emissivity describes the energy-emitting characteristics of materials. Most organic materials and painted or oxidized surfaces have an emissivity of about 0.95. If possible, to compensate for inaccurate readings that may result from measuring shiny metal surfaces, cover the surface to be measured with masking tape or flat black paint (<150°C / 302°F ) and use the high emissivity setting. - Page 19 2. The instrument cannot measure through transparent surfaces such as glass. It will measure the surface temperature of the glass instead. 3. See table of Surface Emissivity for use in measuring shiny or polished metal surfaces (stainless steel, aluminum, etc.).
-
Page 20: Typical Measurements
4. Steam, dust, smoke, etc., can prevent accurate measurement by obstructing the instrument’s optics. TYPICAL MEASUREMENTS This section describes a variety of measurements often performed by technicians. Reminder: • User could select to turn on or off the backlight and laser whenever you are making readings with the Thermometer. -
Page 21: Testing Electrical Connections
2. Press YELLOW button to select MAX. 3. Start to scan. 4. Measure the relay casing, looking for hot spots. 5. Measure electrical connections on relay terminals looking for hot spots. Testing Fuses and Buss Connections 1. Press SET and then press to set emissivity to relatively high for paper covered fuse body or insulated connections. -
Page 22: Testing Bearings
3. Press YELLOW button to select MIN when opposite side of wall is at lower temperature and or select MAX when opposite side of wall is at higher temperature. 4. Measure an interior partition wall surface temperature. 5. Do not release the trigger. Record this temperature as your baseline (or benchmark) for a “perfectly”... -
Page 23: Checking Hydronic Radiant Heat Applications
Testing Belts and Sheaves 1. Press SET and then press to select relatively high emissivity. 2. Press SELECT to select MAX. 3. Enable the motor and allow it to reach a steady state operating temperatures. 4. Aim the Thermometer at the surface to be measured. 5. - Page 24 Measuring Grille, Register, or Diffuser Discharge Temperature 1. Press SET and then press to select relatively high emissivity. 2. Aim the Thermometer at the discharge air grille, register, or diffuser. 3. Measure discharge temperature. 4. Release trigger to freeze the temperature reading for 8 seconds and record this temperature.
-
Page 25: Operating Ir-750 Software
• Insert the provided CD disk into CD-ROM drive. • Double-click “IR-750_VX.XX.exe” (X can be 0 to 9 or blank, indicating the software version) • The pop-up windows will guide you through the program setup process. Connecting USB cable to IR-750 Thermometer... - Page 26 IR-750 thermometer and start measurement. Click “USB Connect” and is blinking indicates IR-750 Thermometer is successfully connected to the PC and IR-750 Thermometer will automatocally start taking measurements. Primary display screen shows current measurement temperatures,secondary display screen shows all...
- Page 27 Download Data enables you to download data saved in IR-750 Thermometer. Tick “Download Data” and click “USB Connect”, the saved data will automatically upload to PC and display on secondary display. Exit and close the program Print data Save data (*.txt, *.xls, *.xml) Open files (*.txt, *.xls, *.xml)
- Page 28 Test Report Test data can be saved as *.txt, *.xls, *.xml by clicking button. When opening data report, make sure selecting Font format as Amprobe-A1 or Amprobe-A2 in “Unit” column in order to display correct temperature unit °C or °F.
- Page 30 Zoom In Selected Graph To enlarge the particular part of the graph, use the mouse pointer to select area from upper-left point to lower-right point. You can use button to save the selected enlarged graph. To resume to its original full view, use the mouse pointer to select any area on the graph from lower-right point to upper-left point.
-
Page 32: Specification
SPECIFICATION Feature IR-750 Temperature Range -50°C to 1550°C (-58°F to 2822°F) Accuracy (Assumes >0°C to 1550°C (>32°F to 2822°F): ±1.8% or ±1.8°C ambient operating (±4°F), whichever is greater temperature of >-35°C to 0°C (-31°F to 32°F): ±1.8%+1°C (2°F) or 23°C to 25°C (73°F ±2.8°C (±6°F), whichever is greater... - Page 33 √ Indication Tripod mount √ Power 9V 6F22 alkaline battery or by Amprobe EPS-700-US (US plug) or EPS-700-EUR (European plug) power adaptor 10 hours with laser and backlight on Battery Life 30 hours with laser and backlight off Dimension (H x L x W) Approx.183 x 147 x 57 mm (7.2 x 5.8 x 2.3 in)
-
Page 34: Maintenance
MAINTENANCE Lens Cleaning: Blow off loose particles using clean compressed air. Gently brush remaining debris away with a camel’s hair brush. Carefully wipe the surface with a moist cotton swab. The swab may be moistened with water or rubbing alcohol. NOTE: DO NOT use solvents to clean the plastic lens. -
Page 35: Battery Replacement
Check and/or replace Low battery Battery indication battery Check and/or replace Blank display Possible dead battery battery 1.Low or dead battery 1.Replace battery Laser does not work 2.Ambient temperature 2.Use in area with lower above 40°C (104°F) ambient temperature Check if high/low alarm Re-set high/low alarm Beeper beeps has been set?