
Related Manuals for Harman Kardon HS 210


Summary of Contents for Harman Kardon HS 210
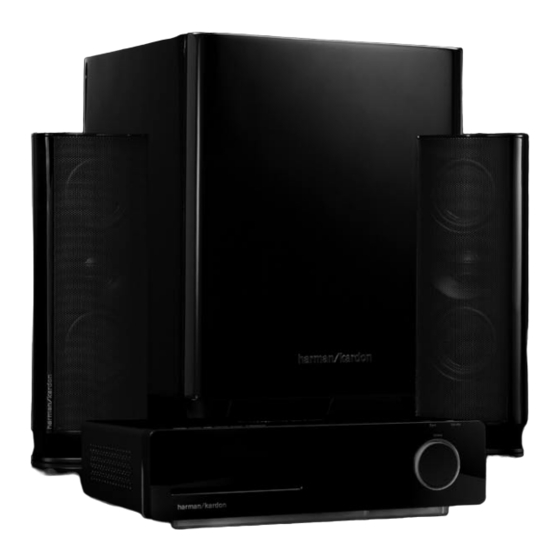
- Page 1 HS 280 / HS 210 2 x 65W 2.1-channel integrated Home-Theater System User Guide English Designed to Entertain. ™...
-
Page 2: Table Of Contents
Unpacking Installation Location Cleaning Moving the Unit Introduction Thank You for Choosing the Harman Kardon® HS 280/HS 210! HS 280/HS 210 Two-Channel DVD Receiver SAT TS60/SAT TS11 Satellite Speakers HKTS200SUB Subwoofer Supplied Accessories (for HS 280) Supplied Accessories (for HS 210) -
Page 3: Important Safety Instructions
• Avoid installation in extremely hot or cold locations, or in an area that is exposed Your HS 280/HS 210 receiver has been designed for use with 100 – 240 volt ~ to direct sunlight or heating equipment 50/60Hz AC power Your HKTS200SUB subwoofer has been designed for use with •... -
Page 4: Introduction
S-Video and composite video via SCART HS 210! Speaker Outputs In the years since Harman Kardon invented the high-fidelity receiver, we have taken to heart this philosophy: Bring the joy of home entertainment to as many people as • Front left and front right... -
Page 5: Supplied Accessories (For Hs 280)
The following accessory items are supplied with the HS 280 system If any of these The following accessory items are supplied with the HS 210 system If any of these items are missing, please contact Harman Kardon Customer Service via... -
Page 6: Receiver Front-Panel Controls
Information Display: Various messages appear on this display in response to Orient the other device’s plug so it fits all the way into the HS 280/HS 210’s USB commands In addition, a variety of indicators will light at various times to show the connector You may insert or remove the device at any time —... -
Page 7: Receiver Information Display
VCD Playback Control Indicator: Indicates that the playback-control function is station name when Radio is the selected input When a DVD or CD is playing, the turned on when the HS 280/HS 210 is playing a VCD indicators will display various text messages about the disc’s status... -
Page 8: Receiver Rear-Panel Connections
HS 280/HS 210 and the other device Orient the device’s plug component here The signal may be a Dolby Digital bitstream or a standard PCM so it fits all the way into the HS 280/HS 210’s USB connector You may insert or remove digital audio bitstream the device at any time –... -
Page 9: Subwoofer Controls And Connections
HS 280/HS 210 to a TV or set-top box (as well as a control signal for automatically controlling picture aspect ratio and other parameters) It also carries stereo audio An LED on the subwoofer’s top panel indicates whether the subwoofer is in the on or... -
Page 10: Remote Control Functions
See Playing Files from USB Devices, Bookmark Button: Displays the list of your stored bookmarks for easy access See on page 24, for details NOTE: Pressing this button when the HS 280/HS 210 is in the Bookmarks, on page 21, for details... - Page 11 Each press cycles through at 1x, 2x, 4x and 8x slow speed B/1 Press this button to play a disc loaded into the HS 280/HS 210’s DVD player When the disc is playing, press the button to pause the disc Pressing the...
-
Page 12: Placing The Speakers
Placing the Speakers Placing the Left and Right Satellite Speakers Wall-Mounting the HS 280 Satellite Speakers IMPORTANT: Read the Connecting the Satellite Speakers section, on page 14, before wall-mounting the left and right speakers using the supplied mounting hardware Left Right Place the left and right satellite speakers at the Front... -
Page 13: Wall-Mounting The Hs 210 Satellite Speakers
CAUTION: Before making speaker connections, ensure that the receiver is turned off and the receiver’s AC cord is unplugged from the receiver and the Wall-Mounting the HS 210 Satellite Speakers AC outlet. Unscrew the bolt that attaches the black shelf stand to the bottom of the speaker... -
Page 14: Connections
( – ) terminal Slide Base Straight onto Speaker Rails • HS 280/HS 210 receiver uses white to denote the left channel ( + ) terminal and red for the right channel ( + ) terminal • Black is used to denote the ( –... -
Page 15: Connecting The Subwoofer
Use the LFE (purple) connectors of the supplied combination LFE and trigger cable to connect the HKTS200SUB subwoofer’s Line-Level LFE In connector to the HS 280/ HS 210 receiver’s Subwoofer Output Use the trigger (black) connectors of the supplied combination LFE and trigger cable to connect the subwoofer’s External Trigger Input Connector to the HS 280/HS 210 receiver’s Sub Trigger Output... -
Page 16: Connecting The Fm Antenna
TV’s stereo audio output to the HS 280/ HS 210’s Line 1 In or Line 2 In jacks If you are using the supplied SCART cable to connect the HS 280/HS 210 to your TV, you don’t need to connect any additional wires –... -
Page 17: Connecting An Audio Recorder
If the remote seems to operate intermittently, or if pressing a button on the The HS 280/HS 210 receiver comes with a detachable AC power cord This type of cord remote does not cause one of the source buttons to illuminate, make sure that the makes it easier for you to install and connect all other system wiring to the receiver’s... -
Page 18: Teaching Codes To The Remote Control
Resume programming from Step 4 Repeat Step 3 and Step 4 for each command you want to teach the HS 280/HS 210 remote You can switch between programming TV and video component codes by pressing the TV or Video button before resuming Step 4 NOTE: If the Learn button’s LED goes out at any time, you will need to repeat Step 2 through Step 6... -
Page 19: Settings Menu
Scroll down the Activity menu until Settings is highlighted, then select it The Settings menu will appear You will use the various Settings menu items to configure your HS 280/HS 210 to work as you want it to with your TV and other components Bass, Treble: Increases or decreases the level of bass (low frequencies) or treble (high frequencies) You can select from –10dB to +10dB in 1dB increments... -
Page 20: Network Setings
Wired: If your ISP or network administrator instructs you to use a static IP address, gateway or DNS for the HS 280/HS 210, you must set this function to Enable after entering the static numbers in the appropriate screens The Wired (Disabled) listing... -
Page 21: Activity Menu
Screen Saver: Activates the HS 280/HS 210’s screen saver to prevent image burn-in on a video display If you connect the HS 280/HS 210 to a plasma display or CRT-based TV or video projector, we recommend that you activate the screen saver... -
Page 22: Supported Disc Formats
Disc Player Operation Disc Player Operation The HS 280/HS 210 can play the following disc formats in 5" (12 cm) and 3" (8 cm) size: DVD, DVD-R, DVD-RW, DVD+R, DVD+RW, CD, CD-R, CD-RW, VCD, S-VCD, MP3, and WMA (v7-v8) It can also play discs with JPEG picture files... -
Page 23: Using The Fm Tuner
Repeat-1, All, Off Random button: When the HS 280/HS 210 is playing a disc, this button will play all the tracks on the disc in random order Press once to skip to the beginning of the current track Press twice to... -
Page 24: Listening To Audio Sources
AVI, MP4 (up to 4Mbps bitrate) format video files stored on a USB device To access files on a device connected to one of the HS 280/HS 210’s USB If you used the Settings menu to assign input connections to the remote’s TV and... -
Page 25: Playing Files From Networked Devices
• To skip to the next or previous JPEG file, press the J or I button The HS 280/HS 210 can display JPEG picture files, play MP3 audio files (up to 320kbps • 0 button To exit and return to the file list screen, press the bitrate) and show AVI, MP4 (up to 4Mbps bitrate) video files stored on compatible devices that are on the network connected to the HS 280/HS 210’s Ethernet jack... -
Page 26: Playing Music
Allow, then select OK screen’s upper-right corner ) The device’s media should now be available to the HS 280/HS 210 NOTE: To enable media sharing with other types of computers, operating systems or UPnP media software, check the instructions for the computer, operating system or... -
Page 27: Troubleshooting
HS 280/HS 210 will play each one, in order as they appear on the OSD screen Troubleshooting If your HS 280/HS 210 system isn’t performing the way you think it should, check to see if the problem is covered in this section before calling your dealer or contacting Harman Kardon... -
Page 28: Dvd Language Code List
DVD Language Code List The availability of specific languages for a DVD’s main audio track or subtitles is dependent on the choices made by the disc’s producer You should always consult the disc’s jacket for information on languages for any disc You may be required to enter a code from the list below to access a particular language Language Code Language... -
Page 29: Specifications
Selectivity ±400kHz: 65dB Height measurement includes removable stands Image rejection: 40dB IF rejection: 70dB SAT-TS11 Satellites (for HS 210) Recommended power: 10 ~ 120 watts DVD Player Section Impedance: 8 ohms nominal Supported disc formats: 5-inch (12cm) or 3-inch (8cm) DVD Video, DVD-Audio,... - Page 30 Features, specifications and appearance are subject to change without notice Harman Kardon and CMMD are trademarks of Harman International Industries, Incorporated, registered in the United States and/or other countries Designed to Entertain is a trademark of Harman International Industries, Incorporated...