Table of Contents
Advertisement
Advertisement
Table of Contents

Related Manuals for Grundig RRCD 3400 MP3


Summary of Contents for Grundig RRCD 3400 MP3
- Page 1 RADIO CASSETTE RECORDER WITH CD RRCD 3400 MP3...
-
Page 2: General Information
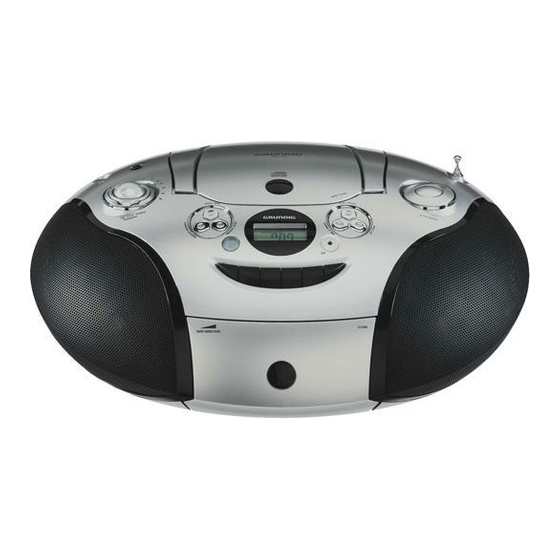
OVERVIEW ______________________________________________________ ENGLISH Controls General information Switches between the CD, TAPE and RADIO input sources. CD TAPE/OFF Switches off the device. RADIO Operation indicator. Lights up red during operation. Adjusts the volume. VOLUME Switches the Ultra Bass System on and off. Headphone jack for connecting a headphone set with a jack plug (ø... - Page 3 OVERVIEW ______________________________________________________ Tape unit CLOSE Press here to close the tape compartment. Pauses recording and playback. Ends playback/recording of the tape and opens the tape compartment. Rewinds the tape to the beginning. Fast forwards the tape to the end. Starts playback. •...
-
Page 4: Power Supply
OVERVIEW ______________________________________________________ Power supply Mains operation Note: Check that the mains voltage on the type plate (on the bottom of the device) corresponds to your local mains supply. If this is not the case, contact your specialist dealer. Plug the mains cable supplied (in the battery compartment) into the »AC «... -
Page 5: Additional Information For Units Sold In The Uk
OVERVIEW ______________________________________________________ Additional information for units sold in the UK. Units sold in the UK are suitable for operation from a 240V ac, 50Hz mains supply. The range of multi-system receivers is built to work in most European countries. However, the mains plug and socket system for the UK differs from many European countries. -
Page 6: Care And Safety
CARE AND SAFETY ________________________________________ To ensure that this device provides you with long-term satisfaction and enjoyment, please observe the following instructions. This device is designed for the recording and playback of audio signals. Any other use is expressly prohibited. Protect the device, the CDs and cassettes from rain, moisture (dripping or splashing water), sand and heat. -
Page 7: General Functions
GENERAL FUNCTIONS __________________________________ Switching on and off Switch on the device with the required input source by moving the switch to the »CD RADIO« position. TAPE/OFF To switch off the device, move the »CD TAPE/OFF RADIO« switch to the »TAPE/OFF« position and turn off the tape drive if necessary. Selecting the input source Select the input source (CD, TAPE or RADIO) using »CD TAPE/OFF... -
Page 8: Selecting The Cd Input Source
CD MODE ________________________________________________________ The device is suitable for music CDs bearing the logo shown here (CD-DA), and for CD-Rs and CD-RWs with audio data or MP3 formats. MP3 files must be created at a sampling frequency of 44.1 kHz. Multi-session CDs cannot be read. In MP3 mode, the terms “album”... - Page 9 CD MODE ________________________________________________________ Repeating the current file or track Press »R-SKIP « briefly during playback. – The file or track is repeated from the beginning. Selecting another file or track During playback, keep pressing »R-SKIP « or »F-SKIP « until you see the number of the file or track you want in the display.
- Page 10 CD MODE ________________________________________________________ Creating a track memory You can create a track memory of up to 20 files on different albums (MP3) or up to 20 tracks (CD-DA) for the current CD in any order you choose and then play them back in that sequence.
-
Page 11: Selecting The Tape Input Source
CD MODE ________________________________________________________ Deleting the track memory The CD must be in the stop position. Press »OPEN/CLOSE« to open the CD compartment In »PROGRAM« mode, press »STOP « Move the »CD TAPE/OFF RADIO« switch to the »TAPE/OFF« position. TAPE MODE _____________________________________________________ Selecting the tape input source Move the... -
Page 12: Recording From The Radio
TAPE MODE _____________________________________________________ Notes: Only use NORMAL-type cassettes (IEC I) for recording. CHROME (IEC II) or METAL (IEC IV) tapes are not suitable. The Ultra Bass System does not affect recording. Recording from the radio Insert a tape with the protection tabs intact and find the desired tape position by pressing »... -
Page 13: Cleaning The Tape Drive
INFORMATION _______________________________________________ Cleaning the tape drive To guarantee good recording and playback quality, clean the parts shown (1, 2, 3) after every 50 hours of use, or once a month. Open the tape compartment, moisten a cotton swab with alcohol or a special head-cleaning fluid and clean the idler (3), the capstan (2) and the magnetic heads (1). -
Page 14: Troubleshooting
INFORMATION _______________________________________________ Troubleshooting If a fault occurs, first refer to this information before you take the device for repair. If you are unable to rectify the fault using the information given here, contact your local deal- er or service specialist. Under no circumstances should you attempt to repair the radio recorder yourself, as this would invalidate the guarantee.