Table of Contents
Advertisement
Advertisement
Table of Contents

Related Manuals for AEG COMPETENCE B3140-1


Summary of Contents for AEG COMPETENCE B3140-1
- Page 1 COMPETENCE B3140-1 The Built-in Pyrolitic oven Operating Instructions...
-
Page 2: Dear Customer
Dear Customer, Please read these operating instructions carefully. In particular please note the "Safety"“ section on the first pages. Please retain these operating instructions for later reference and pass them on to any future owners of the appliance. The warning triangle and/or key words (Warning!, Caution!, Important!) highlight information that is important for your safety or the function of the appliance. -
Page 3: Table Of Contents
Contents Safety Instructions ..........Disposal . - Page 4 Cleaning and Care ..........38 Exterior of the Appliance .
-
Page 5: Safety Instructions
Where damage occurs the warranty will not apply if this instruction has not been adhered to. The safety features of AEG electrical appliances comply with recognised technical standards and the German law covering equipment safety. However, as manufacturers we also believe it is our responsibility to fa- miliarise you with the following safety instructions. -
Page 6: Intended Use
Intended Use • This appliance is intended to be used for cooking, frying and baking food in the home and must not be used for any other purpose. • Only use the appliance to prepare food. • Do not use the oven as a room heater. To Avoid Damaging Your Appliance •... -
Page 7: Disposal
• You can obtain information about collection dates or public refuse disposal sites from your local refuse department or council. • You can also take the appliance to your AEG dealer; they will dispose of it for you for a small contribution towards the costs. -
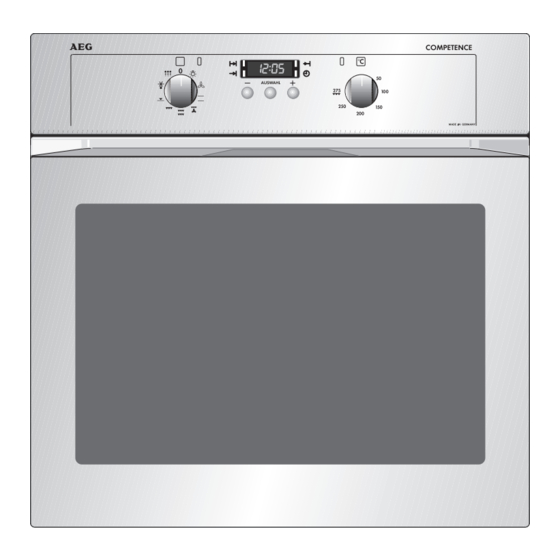
Page 8: Appliance Assembly
Appliance Assembly Control Panel Oven functions Rotary switch used for selecting the required oven function. Temperature selection Rotary switch for selecting the required oven temperature. Oven power indicator The yellow oven power indicator comes on as soon as the oven or rings are switched on. -
Page 9: Clock Functions
Clock Functions Your appliance has a programmable clock by which you can see the time, use the countdown timer as an "egg-timer“ or set baking and roasting times using the automatic functions. Time The current time is shown in the display window provided no other clock function has been selected. -
Page 10: Oven Features
Oven Features Shelf positions There is a shelf support rail on both sides of the oven, with 5 shelf posi- tions on which to insert the acces- sories. Anti-tip device All slide-in units are fitted with an anti-tip device to prevent them be- ing pulled out of the oven uninten- tionally. -
Page 11: Oven Accessories
Oven Accessories The following parts are supplied with the oven: Combination shelf For dishes, cake tins, items for roasting and grilling Universal baking tray For moist cakes, roasts or asa baking tray or as a container to catch fat... -
Page 12: Oven Functions
Oven Functions The oven has the following functions: H Hot air Hot air is particularly suitable for baking biscuits on 2 levels at the same time. The oven temperatures are usually 20-40 °C lower than with conven- tional. Top and bottom heat are used. In addition, a fan in the rear wall of the oven ensures constant circulation of hot air within the oven compart- ment. - Page 13 A Defrosting Using the defrost oven function you can partially- or completely and evenly defrost foods such as flans, butter, bread, fruit or other delicate foods. With this function only the fan is in operation; there is no heating. P Pyroluxe The pyroluxe function is a self-cleaning system.
-
Page 14: Before Using For The First Time
Before Using for the First Time Initial Cleaning Before using the oven for the first time you should clean it thoroughly. You can switch on the oven light to make cleaning easier. 1. Turn the oven function switch to Oven Lighting . 2. -
Page 15: Set The Time
Set the Time The oven will only operate when the time has been set. When the power supply is switched on, or after a power failure, the function indicator flashes on the clock display D. 1. Using buttons + or - set the cur- rent time. -
Page 16: Resetting The Time
Resetting the Time Press button b until the function indicator flashes on the clock display D . 3. Using buttons + or - set the cur- rent time. 4. Wait for 5 seconds. The flashing will stop and the set time will be displayed in the display window. -
Page 17: Using The Oven
Using the Oven Positioning the Shelf Unit and the Universal Baking Tray All slide-in units have a small bulge on the left and right. This bulge serves as an anti-tip device and must always point downwards. Inserting shelf unit Insert the shelf unit with both guide rails pointing upwards. -
Page 18: Switching The Oven On And Off
Switching the Oven On and Off 1. Turn the "oven functions“ switch to set the required function. 2. Turn the "temperature selection“ switch to set the required tempera- ture. The yellow oven power indicator comes on as soon as the oven or rings are switched on. -
Page 19: Using The Automatic Function
Using the Automatic Function The required oven function and temperature can be selected before or after setting the automatic function. You can select the following functions: Cook time < Using the cook time < function you can set the time for which the oven is required to operate. - Page 20 End time > Using the end time function > you can set the oven to switch off au- tomatically. 1. Keep pressing the button ] until the end time function indicator > flashes. 2. Using the + or - buttons set the time at which you require the oven to switch off.
- Page 21 Cook time < and end time > combined Cook time < and end time > can be used simultaneously if the oven is required to switch on and off automatically at a later time . 1. Using the cook time function < set the time for which the dish is requi- red to cook.
-
Page 22: Countdown
Countdown At the end of the countdown ] an acoustic signal will sound. 1. Keep pressing button ] until the countdown function indicator ] flashes. 2. Using buttons + or - set the re- quired countdown. (Max. 2 hours and 30 minutes.) 3. -
Page 23: Oven Safety Cut-Out
Oven safety cut-out If not switched off after a certain time, or the temperature is not changed, the oven switches off automatically. The red temperature indicator light flashes. The oven switches off at temperatures of: 30 - 120° C after 12.5 hours 120 - 200°... -
Page 24: Uses, Tables And Tips
Uses, Tables and Tips Baking For baking use the hot air H oven function or conventional O . Baking tins • When using conventional heat O coated baking tins or tins made of dark metal are most suitable. • For hot air H baking tins made of light metal are also suitable. Shelf positions •... - Page 25 General information • Always count the shelf positions from the bottom upwards. • Insert baking sheets with the bevelled edge to the front! • Always place cake tins in the middle of the shelf. • You can also bake with two tins at the same time using conventional O or hot air H .
-
Page 26: Baking Table
Baking Table Hot Air H Conventional O Type of Cake or Pastry Time Shelf Temper- Shelf Tempera- For Both Position ature Position ture Functions from ºC from ºC Hours: Bottom Bottom Mins. Baking in tins Ring-shaped or pudding-bowl shaped 150-170 160-180 0:50-1:10 cakes... - Page 27 Hot Air H Conventional O Type of Cake or Pastry Time Shelf Temper- Shelf Tempera- For Both Position ature Position ture Functions from ºC from ºC Hours: Bottom Bottom Mins. Fruit flan (with a yeast dough/sponge 140-160 170-190 0:25-0:50 base) Fruit flan with shortcrust 150- 170 170-190...
-
Page 28: Tips For Baking
Tips for Baking Push a wooden skewer into the highest point of the To tell if your cake is cooked cake. If the skewer comes out clean, you can switch through off the oven and utilise the residual heat. Check your recipe. Next time, use less liquid. Check The cake collapses (is sticky, that you have beaten the mixture for the correct not properly cooked through,... -
Page 29: Pies And Gratin Table
Pies and Gratin Table Conventional O Rotitherm I Time Shelf Shelf Temp. Temp. Hrs: Mins. position position °C °C from from bottom bottom Pasta bake 180-200 160-170 0:45-1:00 Lasagne 180-200 160-170 0:25-0:40 Vegetables au 200-220 160-170 0:15-0:30 gratin Pizza ba- 200-220 160-170 0:15-0:30... -
Page 30: Frozen Ready Meals Table
Frozen Ready Meals Table Food to be Shelf Temperature Time cooked position Oven function from bottom in accordance in accordance Conventional with the Frozen pizza with the maker's maker's instruc- instructions tions Chips Rotitherm I 200-220 °C 15-25 Mins. (300-600 g) in accordance in accordance Conventional... -
Page 31: Roasting
Roasting Use the rotitherm I oven function or conventional O when roasting. Ovenware for roasting • Any heat-resistant dish is suitable for roasting. • If the dish has plastic handles, check that they are heat-resistant. • Large joints can be roasted directly in the universal baking tray or on the shelf unit with the baking tray placed below (e.g., turkey, goose, 3-4 chickens, 3-4 knuckles of veal.) •... - Page 32 Notes on the roasting tables Information is given in the table on suitable oven functions, tempera- ture settings, cooking times and shelf positions for various types of meat. The cooking times are only for guidance. • We recommend that only meat and fish with a minimum weight of 1kg should be roasted or baked in the oven.
-
Page 33: Table For Roasting
Table for Roasting Conventional O Rotitherm I Type of Meat Quantity Time Hours: Weight Shelf Po- Tempera- Shelf Tempera- Mins. sition ture Position ture from ºC from ºC Bottom Bottom Beef Pot roast 1-1.5 kg 200-250 2:00-2:30 Roast beef or fil- per cm of thickness per cm of... - Page 34 Conventional O Rotitherm I Type of Meat Quantity Time Hours: Weight Shelf Po- Tempera- Shelf Tempera- Mins. sition ture Position ture from ºC from ºC Bottom Bottom Game Whole piece of hare, up to 1 160-170 0:25-0:40 220-250 haunch or jointed hare Saddle of venison 1.5-2 kg...
-
Page 35: Grilling
Grilling To grill, use oven function Z for dual grill or F for single grill with temperature setting z . Important: Always preheat the empty oven with the grill function for 5 minutes! Ovenware for grilling • Use the shelf unit and universal tray together for grilling. Shelf positions •... -
Page 36: Defrosting
Defrosting Use the defrost oven function for defrosting. Dishes for defrosting • Put the food on a plate and put the plate on the shelf unit. • Use only parchment paper or suitable cling film to cover the food. Do not cover with a plate or bowl as these considerably prolong the de- frosting time. -
Page 37: Preserving
Preserving When preserving use the hot air H oven function. Preserving jars • Only use commercially available preserving jars (preserving jars with a rubber ring and glass lid) for preserving. • Screw-top jars, jars with a bayonet fastening and metal containers are unsuitable. -
Page 38: Cleaning And Care
Cleaning and Care Exterior of the Appliance Wipe the front of the appliance with a soft cloth and warm, soapy wa- ter. • Do not use scourers, caustic cleaners or abrasive items. • You can use commercially available cleaning agents on stainless steel fronts. -
Page 39: Side Support Rails
Side Support Rails The side support rails on the left and right hand sides of the oven can be removed for cleaning the side walls. Removing the side support rails 1. Remove screw. 2. Pull the rail at the back away from the oven wall and pivot towards the front (1). - Page 40 Fitting the side support rails Take care when fitting the rails that the rounded ends of the guide rails are pointing forwards! 1. To replace, first insert and fit the rail at the front (1). 2. Pivot the rail towrds the back and insert (2).
-
Page 41: Cleaning With Pyroluxe
Cleaning with Pyroluxe Warning! The oven becomes very hot during pyroluxe self-cleaning. Keep young children well away from the oven. Important: Before carrying out pyroluxe cleaning the oven must be completely emptied with the exception of the shelf support rails. 1. -
Page 42: Oven Door
Oven Door The oven door of your appliance may be removed for cleaning. Removing the oven door 1. Open the oven door completely. 2. Completely fold back the brass- coloured clamping lever on both door hinges (1). 3. Grip the oven door with both hands on the sidesand close it by about 3/ 4 (2) past its resistance. -
Page 43: Oven Door Glass
Oven door glass The oven door is fitted with four sheets of glass set next to one an- other. The inner sheets can be removed for cleaning. Caution: The following steps are to be performed only when the oven door has been removed. If the glass is removed while the door is at- tached, the leighter weight may cause it to spring up and cause injury. - Page 44 Replacing the centre glass plates 1. From above, insert the centre plates obliquely into the retaining frame at the handle, one after another. 2. Lower the centre plates down and push them towards the lower edge of the door as far under the retain- ing frame as they will go.
-
Page 45: What To Do If
What to do if ..the oven does not heat up? Check whether – the appliance has been switched on, – the time has been set, – all the necessary settings have been made, – the mains fuse (fuse box) has blown or the cooker circuit breaker (at the household power distribution box) has tripped. - Page 46 If you call in customer service to resolve a problem listed in these notes, or to rectify a problem caused by incorrect operation of the appliance, the customer service engineer's visit will not be free of charge, even during the warranty period. Should you still have problems after reading this information, please contact your specialist dealer or customer service.
-
Page 47: Technical Data
Technical Data Oven Interior Dimensions Height x Width x Depth 31 cm x 41 cm x 41 cm Capacity (usable capacity) 52 l Regulations, Standards, Directives This appliance meets the following standards: • EN 60 335-1 and EN 60 335-2-6 relating to the safety of electric appliances for household use and similar purposes and •... -
Page 50: Index
Index Anti-tip device ..... . 10 Ready meals ......30 Repairs . -
Page 51: Service
Service The section "What do I do if...“ lists some faults that you can remedy yourself. Look there first if a fault occurs. Is it a technical fault? Then contact your nearest customer service centre. (Addresses and tele- phone numbers can be found under "Customer Service Centres“.) Always prepare in advance for the discussion. - Page 52 AEG Hausgeräte GmbH Postfach 1036 D-90327 Nürnberg http://www.aeg.hausgeraete.de © Copyright by AEG 822 947 483-H-130302-05 Subject to change without notice...