Salus ERT50 Instruction Manual
Digital room thermostat for underfloor heating applications
Hide thumbs
Also See for ERT50:
- Instruction manual (2 pages) ,
- Instruction manual (2 pages) ,
- Instruction manual (41 pages)

Related Manuals for Salus ERT50


Summary of Contents for Salus ERT50
- Page 1 ERT50 230v Digital Room Thermostat for Underfloor Heating Applications Instruction Manual Model No ERT50 230v...
-
Page 2: Product Compliance
Low Voltage Directive 2006/95/EEC • EC Marking directive 93/68/EEC SAFETY INFORMATION These instructions are applicable to the Salus Controls model stated on the front cover of this manual only, and must not be used with any other make or model. - Page 3 The ERT50 230v from Salus Controls is a stylish and accurate digital room thermostat that is fitted with a large easy to read Liquid Crystal Display (LCD). The ERT50 230v...
-
Page 4: Installation
Please read the important safety information at the start of this manual before you begin to install the device. The ideal position to locate the ERT50 230v digital room thermostat is about 1.5m above floor level. It should be mounted in a location where the thermostat is easily accessible, reasonably lit and free from extremes of temperature. -
Page 5: System Initial
/ heating system supplier for advice on how to continue. Do not remove or refit the ERT50 230v wiring without the mains supply to the system being isolated. SYSTEM INITIAL After connecting 230v or pressing reset button, please select the Language, Date and Time. -
Page 6: Date And Time
The last menu item is Daylight Saving – by default this is turned on. Change the setting using the PLUS or MINUS keys, then press the SELECT key to save the settings and return to the Program/Basic settings menu. ERT50 230v INSTRUCTION MANUAL... -
Page 7: Maintenance
Pressing CANCEL will return to the previous screen without saving any changes. MAINTENANCE: The Maintenance menu allows you to view operating times for the heating system. The ERT50 230v will record operating time up to a maximum of 99,999 hours. ERT50 230v INSTRUCTION MANUAL... - Page 8 The timers can be reset by selecting the Reset Operating Time item Select Yes and then press the SELECT key to reset the timers to 0. Press the CANCEL key to return to the previous menu. ERT50 230v INSTRUCTION MANUAL...
-
Page 9: Control Settings
Program menu. Temperature Span: The first setting that can be changed is Temperature Span. The default setting is 0.5 °C, but this can be changed to 1.0 °C. Press the SELECT key to save your changes. ERT50 230v INSTRUCTION MANUAL... - Page 10 The level of temperature reduction is selected in the ERT50 (via software) and ERT30 (manually). Please note that the ERT50 comes to you with the setback function enabled. If you require this function disabled please follow the steps below.
-
Page 11: Frost Protection
FROST PROTECTION: Selecting the Frost item in the menu allows you to turn the frost protection mode of the ERT50 230v on or off (the default setting is On). The Frost Protection mode temperature is preset at 5 ºC; this temperature is factory set and cannot be adjusted. -
Page 12: Valve Protection Function
When enabled, the VP function will turn on the thermostat output to operate the control valve for a period of 5 minutes every week - the Valve Protection function will still operate even if the room temperature is higher than 35 °C. ERT50 230v INSTRUCTION MANUAL... -
Page 13: Temperature Offset
Use the PLUS and MINUS keys to adjust the Offset setting, and save your changes by pressing the SELECT key. After saving the setting, the ERT50 230v will revert back to the Program menu. Pressing CANCEL will return you to the Program menu without saving your changes. - Page 14 Changing the operating mode will also exchange the Comfort with Reduced temperature settings. The ERT50 230v screen will look like this in Heating mode: …and like this when in Cooling mode. ERT50 230v INSTRUCTION MANUAL...
- Page 15 If the Reset Button is pressed, the ERT50 230v will behave in the same way as described above, except that most previously saved user setting will remain. Function Factory Default Value Operation Mode Normal Room Temperature 24 ºC, updated within 5 seconds...
-
Page 16: User Interface And Controls
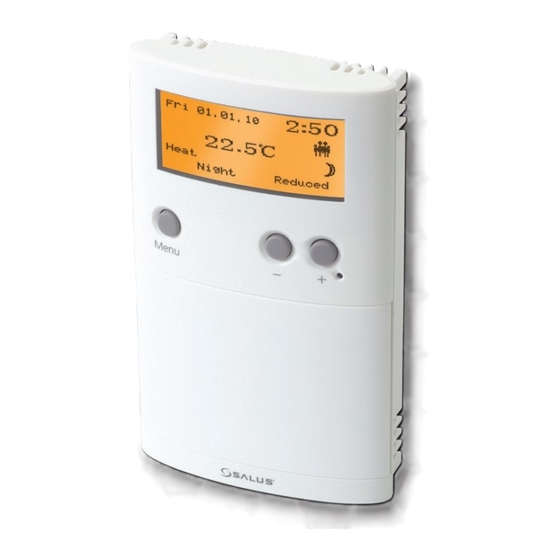
USER INTERFACE AND CONTROLS: The status and operation of the ERT50 230v can be clearly seen on the large orange backlit Liquid Crystal Display (LCD) - this display allows the user to see at a glance the current status of the heating system. -
Page 17: Operation
Cancels the current selection or exits the active menu OPERATION As previously described, the ERT50 230v is configured and adjusted by the use of an intuitive user interface with a minimal number of user controls, and the backlit LCD gives a highly visible, easily readable indication of the thermostat status. - Page 18 FAMILY Preset (predefined) profile for family environments. SINGLE Preset (predefined) profile for single user environments. OFFICE Preset (predefined) profile for office environments. NAME 1 User definable and re-nameable profile. NAME 2 User definable and re-nameable profile ERT50 230v INSTRUCTION MANUAL...
- Page 19 PROFILES: The ERT50 230v has a number of preset profiles that simplify installation and setup. The profiles contain default settings that should meet the majority of needs in a range of environments, meaning that the controller can work ‘out of the box’ with no reprogramming. The five...
- Page 20 06:30 Reduced EVERYDAY FUNCTIONS (EDF) The ERT50 230v gives the user the option of three different idle screen display modes, depending on the user’s preference: Full screen, Selected screen or Basic Screen. In all three idle screen modes, the displayed temperature is the current room temperature.
-
Page 21: Manual Changes
Pressing the CANCEL button twice will allow you to access the Menu screen as shown here. Pressing the PLUS or MINUS keys will allow you to change the set temperature up or down as shown in the examples below: ERT50 230v INSTRUCTION MANUAL... -
Page 22: Change Display
Change Display: Select an option by using the PLUS or MINUS keys and pressing the SELECT key. Change Profile: As previously, select an option by using the PLUS or MINUS keys and pressing the SELECT key. ERT50 230v INSTRUCTION MANUAL... - Page 23 Holiday period, normal programmed control will resume. After saving the Holiday settings, the display will return to the menu screen. If Holiday is turned On, the full screen display will show the Holiday function icon. ERT50 230v INSTRUCTION MANUAL...
- Page 24 PROGRAM ON/OFF: You have the option to turn off Program mode and use the ERT50 230v in Manual mode. To turn Program mode off, use the PLUS or MINUS keys to select the Program Off menu item, then press the SELECT key.
- Page 25 Use the PLUS or MINUS keys to select the profile that you want to work with, and press the SELECT key to open the setting menu for that profile. Press the CANCEL key to exit to the previous menu without making changes. ERT50 230v INSTRUCTION MANUAL...
- Page 26 Next, you can set the switching point for the time of day: For every time of day you need a Start and End time (there cannot be any gaps between each End time and the next Start time). ERT50 230v INSTRUCTION MANUAL...
- Page 27 SELECT key to confirm the setting and move to the next setting. Press the CANCEL key to exit to the previous menu without making changes. An example of setting changes is shown in the following images: ERT50 230v INSTRUCTION MANUAL...
- Page 28 Once an individual day has been programmed, you can copy the settings to other days very easily by using the Copy menu item. In this example, we will copy the settings we made earlier for Monday, and copy them to Sunday. ERT50 230v INSTRUCTION MANUAL...
- Page 29 In this example, we will copy the settings from the Office profile into the Family profile: Highlight the profile you want to copy from using the PLUS or MINUS keys then press the SELECT key to copy the profile settings. ERT50 230v INSTRUCTION MANUAL...
- Page 30 SELECT key. On reaching the last character, the option to save the new name will appear – press the SELECT key to save your changes, or CANCEL to exit without saving. ERT50 230v INSTRUCTION MANUAL...
-
Page 31: Temperature Zones
TEMPERATURE ZONES: The ERT50 230v has three pre-programmed temperature zone settings – the default settings of Heating Mode for each zone are: Temperature Zone Setting Standard 20.0 °C Comfort 24.0 °C Reduced 16.0 °C The settings for each zone can be changed by selecting the Temperature Zones menu item. -
Page 32: Control Status
The backlight will not illuminate if there is no mains supply to the controller. Control Status The ERT50 230v indicates on the LCD the control status by using a selection of display icons. Heating: The display will show the word ‘Heat’ and an animated flame icon when in HEATING mode. - Page 33 Cooling: The display will show the word ‘Cool’ and an animated snowflake icon when in COOLING mode. ERT50 230v INSTRUCTION MANUAL...
-
Page 34: Key Lock
KEY LOCK The ERT50 230v has a Key lock function that helps to prevent accidental changes to the controller settings. Key lock is turned on or off by pressing and holding the PLUS and MINUS keys together for a few seconds. -
Page 35: Power Monitor
POWER MONITOR The ERT50 230v monitors the incoming AC mains supply. If the power fails or is turned off, the controller will behave in the following way: • LCD display turn off • All outputs (triac and relay) will turn off •... -
Page 36: Warranty
Controls or their appointed agents. Should the ERT50 230v room thermostat fail to function correctly, check: • Mains supply to the ERT50 230v is switched on. • Heating system is switched on. • If the ERT50 230v is still not functioning correctly, press the Reset Button. -
Page 37: Product Specification
User selectable 12 or 24 hour format Accuracy: ± 1 minute per month Clock retention duration: typ. 8 hours Power Supply Power Source: 230v AC / 50Hz Memory Backup Type: Electrically Erasable Programmable Read Only Memory (EEPROM) ERT50 230v INSTRUCTION MANUAL... -
Page 38: Temperature Measurement
Temperature setting range: 10.0 ºC – 35.0 ºC Temperature setting resolution: 0.5 ºC Frost protection setting: 5.0 ºC Environment Operating Temperature: 0 ºC to + 40 ºC Storage Temperature: - 20 ºC to + 60 ºC ERT50 230v INSTRUCTION MANUAL... - Page 39 ERT50 230v Warranty Salus Controls warrants that this product will be free from any defect in materials or workmanship, and shall perform in accordance with its specification, for a period of two years from the date of purchase. Salus Controls sole liability for breach of this warranty will be (at its option) to repair or replace the defective product.
- Page 40 Sales Email: sales@salus-tech.com Tel: 01226 323961 Technical Email: tech@salus-tech.com Tel: 01226 323961 Salus Controls plc, Salus House, Dodworth Business Park South, Whinby Road, Dodworth, Barnsley S75 3SP...