Table of Contents
Advertisement
Quick Links
Download this manual
See also:
Operating Instructions
*Compatible projectors are listed below.
PT-DZ870 / DW830 / DX100 / DZ770 / DW740 / DX810 / DZ680 / DW640 / DX610 / DW730 / DX800 /
DZ6710 / DZ6700 / DW6300 / D6000 / D5000
Thank you for purchasing this Panasonic product.
■ To ensure correct use of this lens, please read the operating instructions supplied with the lens and the
projector carefully.
■ Before using this product, be sure to read "Read this first!" (
■ Please save this manual for future use.
Product information (for Turkey only)
EEE Yönetmeliğine Uygundur.
EEE Complies with Directive of Turkey.
Operating Instructions
Model No.
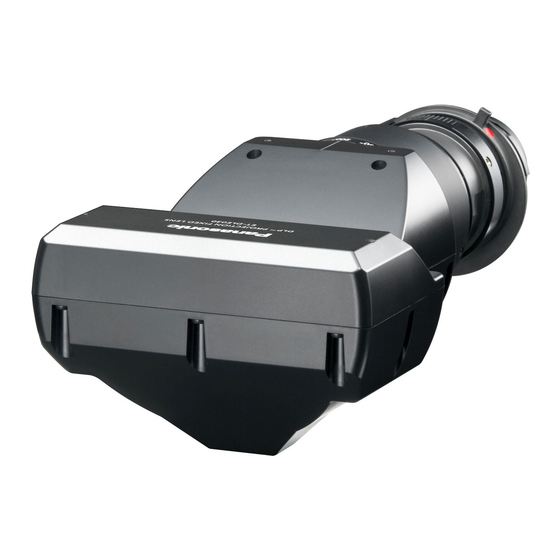
Fixed-focus lens
ET-DLE030
Page 3).
TQZJ548
Advertisement
Table of Contents

Related Manuals for Panasonic ET-DLE030


Summary of Contents for Panasonic ET-DLE030
- Page 1 Operating Instructions Fixed-focus lens ET-DLE030 Model No. *Compatible projectors are listed below. PT-DZ870 / DW830 / DX100 / DZ770 / DW740 / DX810 / DZ680 / DW640 / DX610 / DW730 / DX800 / DZ6710 / DZ6700 / DW6300 / D6000 / D5000 Thank you for purchasing this Panasonic product. ■ To ensure correct use of this lens, please read the operating instructions supplied with the lens and the projector carefully. ■ Before using this product, be sure to read “Read this first!” ( Page 3). ■ Please save this manual for future use. Product information (for Turkey only) EEE Yönetmeliğine Uygundur. EEE Complies with Directive of Turkey. TQZJ548...
-
Page 2: Table Of Contents
█ Contents Read this first! ..................3 Supplied Accessories ................4 Attaching the Lens / Detaching the Lens ...........4 Before replacing the projection lens ............4 Attaching the Lens................... 5 Detaching the Lens ................. 5 Making Adjustments ................6 Making lens shift adjustments (Using projector functions) ...... 6 Making lens shift adjustments (Using the supplied lens shift gauge) ..7 Focus Adjustment Function ..............7 Projection relationships...............8 Specifications ..................15 Dimensions ..................15 2-ENGLISH... -
Page 3: Read This First
Read this first! Always follow these precautions WARNING: Before replacing the zoom lens, be sure to turn the power off and disconnect the power plug from the wall outlet. z Otherwise, an electrical shock may result. Do not place objects near the light projecting surface. z This surface produces intense light. Failure to heed this warning could result in fire or burn injuries. -
Page 4: Supplied Accessories
Supplied Accessories Make sure that the following has been provided Part name Appearance (quantity) (The product is delivered with Lens cap a lens cap attached.) × 1 Lens shift gauge × 1 Attaching the Lens / Detaching the Lens Before replacing the projection lens Return the projection lens to the home position before replacing or removing it. For details on how to return the lens to the home position, refer to the operating instructions of the projector. Attention z Make sure that the projector power supply is switched off before attaching or detaching the projection lens. z After removing the projection lens, store it safely away from vibration or impacts. z Do not touch the electric contact points of the projection lens with your fingers. Dust and dirt on the contacts may cause contact malfunctions. z Before attaching the Fixed-focus lens, remove the protective film from the light projecting surface and the lens cap from the lens. protective film Lens cap Light Lens surface projecting surface z Be sure not to touch the light projecting surface or the surface of the lens. Any fingerprints or smudges on... -
Page 5: Attaching The Lens
Attaching the Lens / Detaching the Lens (continued) Attaching the Lens 1) With the lens mount cover that Guide groove Lens mount cover came with your projector attached, Positioning guide align the positioning guide on the lens with the guide groove on the projector, and insert the lens fully. zThere is a red dot at the bottom right end of the positioning guide. -
Page 6: Making Adjustments
Making Adjustments Making lens shift adjustments (Using projector functions) Use the projector to make vertical and horizontal adjustments of the lens. MAIN MENU 1) Turn on the projector to start the PICTURE projection. POSITION ADVANCED MENU DISPLAY LANGUAGE 2) Press the <MENU> button to open 3D SETTINGS the [MAIN MENU] screen. Then DISPLAY OPTION select [PROJECTOR SETUP] and PROJECTOR SETUP... -
Page 7: Making Lens Shift Adjustments (Using The Supplied Lens Shift Gauge)
Making Adjustments (continued) Making lens shift adjustments (Using the supplied lens shift gauge) Use the supplied lens shift gauge to adjust vertical lens position. * The illustrations in these operating instructions show the lens used with the PT-DZ770 projector. 1) As shown in the figure, fold the Lens shift gauge lens shift gauge at right angles along the dotted line. zAdjust so that the gauge plane of the lens shift Projected light gauge and the front panel of the projector are roughly in the same plane. Bottom edge of 2) Move the lens to the home position. projected image zFor details on how to return the lens to the home position, refer to the operating instructions... -
Page 8: Projection Relationships
Projection relationships The dimensional relationship between the screen and the projector is shown below. Projection area Screen *This illustration is not drawn to scale. Height of the projection area Width of the projection area Diagonal length of the projection area Projection distance (screen to mirror reflecting surface) Screen to lens front end Screen to projector front end Screen to projector rear end Bottom edge of the screen to the top of the projector Bottom edge of the screen to the bottom of the projector Note z The illustrations of projectors in this manual are for informational purposes only and do not represent a specific projector model. Configurations may vary with the model. z After adjusting the lens position on the projector or using the lens shift gauge, lens shift adjustments are possible within the range where the projector will not interfere with the edges of the projected image. Then dimensions A1 and A2 will change according to lens shift amount. z Dimension L4 is the distance from the projector rear panel to the screen. z Dimension A2 is the distance from the bottom edge of the screen to the bottom of the adjustable projector legs (with the legs fully screwed in). Attention z Dimension L4 is not the distance from the projector rear panel to a wall, but the distance from the projector rear panel to the screen. Provide at least 500 mm (19-11/16") of ventilation space between the projector rear panel and a wall or other object. When placing the projector in a confined space, a ventilation and/or air conditioning system is required. Exhaust heat may accumulate when the ventilation is not sufficient triggering the protection circuit of the projector. 8-ENGLISH... - Page 9 Projection relationships (continued) Projected range using "GEOMETRY(2D)" (PT-DZ870 only) In a standard configuration and when an optional upgrade kit (part number: ET-UK20) is used, vertical keystone can be corrected within a range of 0 to 5°. Horizontal keystone correction cannot be made. "Vertical keystone correction" (side view) 0 ~ 5° Screen Projected image size and projection distance Note z The listed projection distances involve an error of ±5%. z "GEOMETRY(2D)" and "VERTICAL KEYSTONE" tend to correct the projected image to a size that is smaller than regular size. z Throw ratio is based on the value during projection onto a 2.54 m (100") screen. z For PT-DZ870 Units: m (") Throw ratio 0.38:1 Projection distance Projector rear Top of projector (mirror reflecting end to screen...
- Page 10 Projection relationships (continued) Units: m (") Throw ratio 0.38:1 Projection distance Projector rear Top of projector (mirror reflecting end to screen to bottom edge of Projected image size (16:9) surface to screen) (L4) screen Diagonal (SD) Height (SH) Width (SW) (L1) (A1) 2.54 (100") 1.245 (49.016") 2.214 (87.165") 0.84 (31.89") 0.16 (6.30") 0.51 (20.08") 3.05 (120") 1.494 (58.819") 2.657 (104.606") 1.01 (39.76") 0.33 (12.99") 0.63 (24.80") 3.81 (150") 1.868 (73.543") 3.321 (130.748") 1.26 (49.61") 0.58 (22.83") 0.81 (31.89") 5.08 (200") 2.491 (98.071") 4.428 (174.331") 1.68 (66.14") 1.00 (39.37")
- Page 11 Projection relationships (continued) Units: m (") Throw ratio 0.48:1 Projection distance Projector rear Top of projector (mirror reflecting end to screen to bottom edge of Projected image size (4:3) surface to screen) (L4) screen Diagonal (SD) Height (SH) Width (SW) (L1) (A1) 2.54 (100") 1.524 (60.000") 2.032 (80.000") 0.97 (38.19") 0.29 (11.42") 0.67 (26.38") 3.05 (120") 1.829 (72.008") 2.438 (95.984") 1.17 (46.06") 0.49 (19.29") 0.82 (32.28") 3.81 (150") 2.286 (90.000") 3.048 (120.000") 1.46 (57.48") 0.78 (30.71") 1.05 (41.34") 5.08 (200") 3.048 (120.000") 4.064 (160.000") 1.94 (76.38") 1.26 (49.61")
- Page 12 Projection relationships (continued) Units: m (") Throw ratio 0.38:1 Projection distance Projector rear Top of projector (mirror reflecting end to screen to bottom edge of Projected image size (16:9) surface to screen) (L4) screen Diagonal (SD) Height (SH) Width (SW) (L1) (A1) 2.54 (100") 1.245 (49.016") 2.214 (87.165") 0.84 (33.07") 0.25 (9.84") 0.52 (20.47") 3.05 (120") 1.494 (58.819") 2.657 (104.606") 1.01 (39.76") 0.42 (16.54") 0.64 (25.20") 3.81 (150") 1.868 (73.543") 3.321 (130.748") 1.26 (49.61") 0.67 (26.38") 0.81 (31.89") 5.08 (200") 2.491 (98.071") 4.428 (174.331") 1.68 (66.14")
- Page 13 Projection relationships (continued) Units: m (") Throw ratio 0.48:1 Projection distance Projector rear Top of projector (mirror reflecting end to screen to bottom edge of Projected image size (4:3) surface to screen) (L4) screen Diagonal (SD) Height (SH) Width (SW) (L1) (A1) 2.54 (100") 1.524 (60.000) 2.032 (80.000) 0.97 (38.19) 0.38 (14.96) 0.68 (26.77) 3.05 (120") 1.829 (72.008) 2.438 (95.984) 1.17 (46.06) 0.58 (22.83) 0.83 (32.68) 3.81 (150") 2.286 (90.000) 3.048 (120.000) 1.46 (57.48) 0.87 (34.25) 1.05 (41.34) 5.08 (200") 3.048 (120.000) 4.064 (160.000) 1.94 (76.38)
- Page 14 Projection relationships (continued) If you are using a projection screen size not listed in these Operating Instructions, measure the diagonal screen size SD (m). Then use the calculation methods provided to determine projection distance (L1) and the distance from the top of the projector to the bottom edge of the screen (A1). Establishing dimensions L1 and A1 allows you to calculate all other dimensions. (Units for calculations: m) (Note that the values obtained in the following calculations are approximations.) Projection distance calculation method Unit: m z For PT-DZ870 For an aspect ratio of 16:10 For an aspect ratio of 16:9 For an aspect ratio of 4:3 Projection distance (L1) =0.3205×SD + 0.0047 =0.3294×SD + 0.0047 =0.3628×SD + 0.0047 Top of projector to bottom =0.1977×SD - 0.0721 =0.2304×SD - 0.0721 =0.2238×SD - 0.0721 edge of screen (A1) z For PT-DW830 For an aspect ratio of 16:10 For an aspect ratio of 16:9 For an aspect ratio of 4:3 Projection distance (L1) =0.3365×SD + 0.0047 =0.3459×SD + 0.0047 =0.3809×SD + 0.0047 Top of projector to bottom =0.2597×SD - 0.0740 =0.2942×SD - 0.0740 =0.2941×SD - 0.0740 edge of screen (A1) z For PT-DX100...
-
Page 15: Specifications
Specifications Lens Type Fixed-focus lens F value Focal Length (f) 5.3 mm (7/32") Width 132 mm (5-3/16") Dimensions Height 102 mm (4-1/32") Depth 311 mm (12-1/4") Net Weight Approx. 1.3 k (2.9 lb) Dimensions Unit: mm 311 (12-1/4") ENGLISH-15... - Page 16 Information for users in the European Union Importer’s name and address within the European Union Panasonic Marketing Europe GmbH Panasonic Testing Center Winsbergring 15, 22525 Hamburg, Germany Information on Disposal for Users of Waste Electrical & Electronic Equipment (private households) This symbol on the products and/or accompanying documents means that used electrical and electronic products should not be mixed with general household waste.