Table of Contents
Advertisement
Advertisement
Table of Contents

Related Manuals for M-Audio Torq Xponent


Summary of Contents for M-Audio Torq Xponent
- Page 1 English User Guide...
-
Page 2: Table Of Contents
Xponent User Guide Table of Contents Introduction ............. 3 What’s in the Box? . -
Page 3: Introduction
Introduction Thank you for choosing the M-Audio Xponent USB DJ controller and audio interface. This innovative device gives digital DJs all the familiar knobs, sliders, and wheels found on a DJ mixer and CD players while allowing users to harness the power of the latest DJ software. -
Page 4: Xponent Features
Macintosh G3**800 MHz/ G4**667MHz (higher speed CPU may be necessary for laptops) < 256MB RAM < One native USB port < *M-Audio suggests checking the minimum system requirements for your software, as they may be greater than the above specifications. **G3/G4 accelerator cards are not supported. -
Page 5: Installation
Torq Xponent User Guide Installation You must install drivers in order for Xponent to operate properly. Please consult the included Quick Start Guide for installation instructions. Once the drivers are installed, you may need to configure your audio software to route signals to and from Xponent. Refer to your program’s user guide to learn how to do this. -
Page 6: Rear Panel
Torq Xponent User Guide Rear Panel Booth Output – If a venue contains a separate DJ booth with its own speakers, connect these RCA outputs to the amplifier or powered speakers within the booth. The Booth knob (14) controls the volume of this output. -
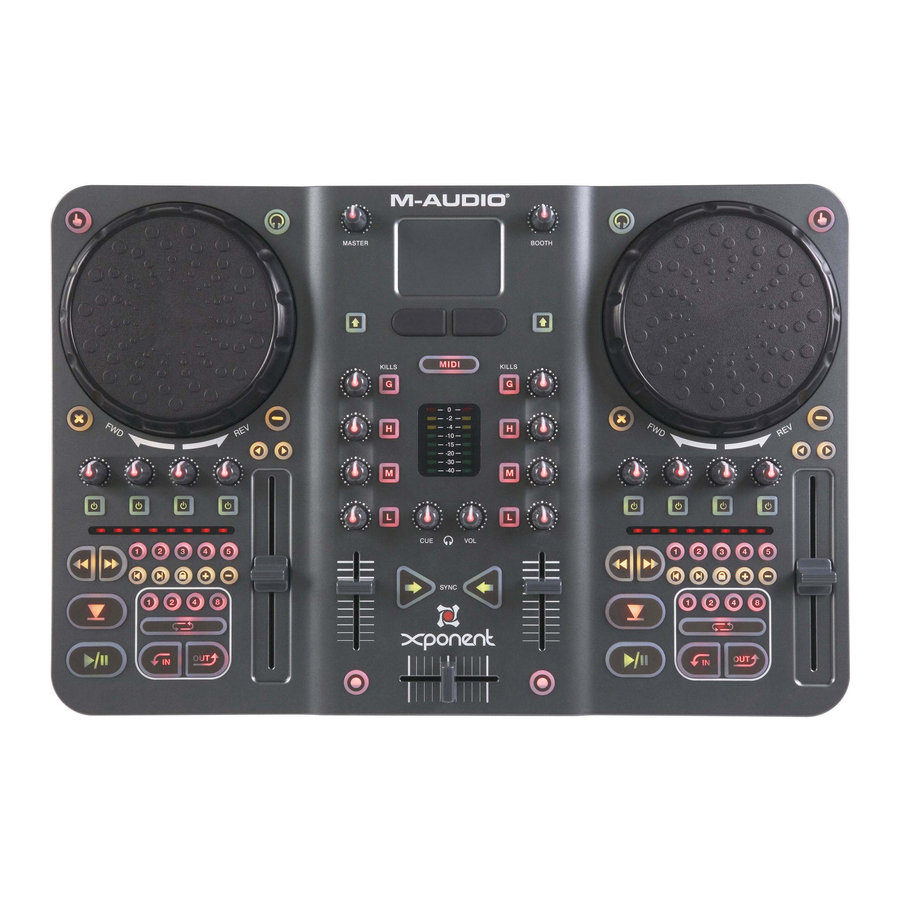
Page 7: Top Panel
Torq Xponent User Guide Top Panel NOTE: Xponent features identical controls on each side of its top panel. To simplify the diagram above, only the controls on the left hand side are numbered and identified; the corresponding controls on the right side are identical in function unless otherwise noted. - Page 8 Torq Xponent User Guide 11. Scratch Wheel – This is a dual-purpose control that responds to touch and/or movement: • This wheel has an optical encoder that outputs relative MIDI messages while it is turning. Torq uses this information to control the speed and/or direction of playback for each deck. These wheels can be used for cueing as well as for scratching.
- Page 9 Torq Xponent User Guide 23. Level Meters – These LED meters are used to display the audio levels of the Master Output (2). These meters are controlled by MIDI CC information generated by your music software and do not monitor the actual audio passing through Master Output of the interface.
-
Page 10: Front Panel
Torq Xponent User Guide 32. Speed Slider – This slider controls the playback speed of each deck within Torq. NOTE: Torq has a unique “time-stretching” ability that can change the speed of a song without changing its pitch. This is something that is impossible to do with traditional turntables and it is something that many DJs will find extremely useful. -
Page 11: Using Xponent
Torq Xponent User Guide Using Xponent Using Xponent with Torq Xponent ships with SyncroScience Torq, a powerful DJ application that works with Xponent out of the box. Once the Xponent drivers have been installed on your computer, Torq should automatically detect the controller and allow you to use the buttons, knobs, sliders, and wheels without any further configuration. -
Page 12: Using Xponent With Other Programs
For Mac users, the control panel simply displays version numbers of software components such as the audio driver and device firmware along with links to useful sections of the M-Audio website. Buffer size changes must be made through the host application on the Macintosh operating system. -
Page 13: Troubleshooting
• Click the plus sign (“+”) next to Sound, Video and Game Controllers, and locate the “M-Audio Xponent” listing. If you see a question mark or exclamation point next to this listing, you may need to reinstall the driver software. -
Page 14: Appendix A: Xponent Midi Cc Defaults
Torq Xponent User Guide Appendix A: Xponent MIDI CC defaults Control Section Message Type MIDI Channel MIDI Note/CC Touch button Left NOTE ON/OFF Headphone button Left NOTE ON/OFF Large “X” button Left NOTE ON/OFF Large “-” button Left NOTE ON/OFF <... - Page 15 Torq Xponent User Guide Appendix A: Xponent MIDI CC defaults (Continued) Control Section Message Type MIDI Channel MIDI Note/CC 3 button Right NOTE ON/OFF 4 button Right NOTE ON/OFF 5 button Right NOTE ON/OFF |< button Right NOTE ON/OFF >| button...
- Page 16 Torq Xponent User Guide Appendix A: Xponent MIDI CC defaults (Continued) Control Section Message Type MIDI Channel MIDI Note/CC Deck 4 knob Right CC-ABSOLUTE Pitch Slider Left PITCHBEND Left Low knob Middle CC-ABSOLUTE Left Mid knob Middle CC-ABSOLUTE Left High knob...
-
Page 17: Appendix B: Controlling Torq Effects Using The Trackpad
Torq Xponent User Guide Appendix B: Controlling Torq Effects Using the Trackpad When Xponent’s MIDI Mode button (19) is engaged, the Trackpad (16) can be used to control the effect parameters within Torq. In general, sliding your finger across the X-axis (i.e., left/right) controls one of the on-screen effect knobs while dragging along the Y-axis (up/down) controls the other knob. -
Page 18: Dual-Filter
Torq Xponent User Guide DUAL-FILTER: X-axis: Controls the filter’s cutoff frequency (parameter knob). When your finger is at the left of the pad, the parameter knob will be fully counter-clockwise. In this position, the effect acts as a low-pass filter and removes most of the high-frequency sounds playing from the associated deck. -
Page 19: Technical Information
Warranty Terms M-Audio warrants products to be free from defects in materials and workmanship, under normal use and provided that the product is owned by the original, registered user. Visit www.m-audio.com/warranty for terms and limitations applying to your specific product. -
Page 20: Technical Support
M-Audio USA M-Audio Germany 5795 Martin Rd., Irwindale, CA 91706 Kuhallmand 34, D-74613 Ohringen, Germany Technical Support Technical Support web: www.m-audio.com/tech e-mail: support@m-audio.de tel (pro products): (626) 633-9055 +49 (0)7941 - 9870030 tel (consumer products): (626) 633-9066 fax: +49 (0)7941 98 70070...