
Related Manuals for Viper Responder 350


Summary of Contents for Viper Responder 350
- Page 1 R R e e s s p p o o n n d d e e r r 3 3 5 5 0 0 ➤ O O w w n n e e r r ’ ’ s s G G u u i i d d e e...
-
Page 2: L L I I M M I I T T E E D D L L I I F F E E T T I I M M E E C C O O N N S S U U M M E E R R W W A A R R R R A A N N T T Y Y
L L i i m m i i t t e e d d l l i i f f e e t t i i m m e e c c o o n n s s u u m m e e r r w w a a r r r r a a n n t t y y Directed Electronics ("Directed") promises to the original purchaser to repair or replace with a comparable reconditioned model any Directed unit (hereafter the "unit"), exclud- ing without limitation the siren, the remote transmitters, the associated sensors and acces-... - Page 3 CONSEQUENTIAL DAMAGES OF ANY KIND. IN THE EVENT OF A CLAIM OR A DISPUTE INVOLVING DIRECTED OR ITS SUBSIDIARY, THE PROPER VENUE SHALL BE SAN DIEGO COUNTY IN THE STATE OF CALIFORNIA. CALIFORNIA STATE LAWS AND APPLICABLE FEDERAL LAWS SHALL APPLY AND GOVERN THE DISPUTE.
-
Page 4: Table Of Contents
T T a a b b l l e e o o f f c c o o n n t t e e n n t t s s L L i i m m i i t t e e d d l l i i f f e e t t i i m m e e c c o o n n s s u u m m e e r r w w a a r r r r a a n n t t y y ................i i 2 2 - - w w a a y y L L C C D D r r e e m m o o t t e e c c o o n n t t r r o o l l . - Page 5 O O w w n n e e r r r r e e c c o o g g n n i i t t i i o o n n ..................... . 3 3 1 1 R R a a p p i i d d r r e e s s u u m m e e l l o o g g i i c c .
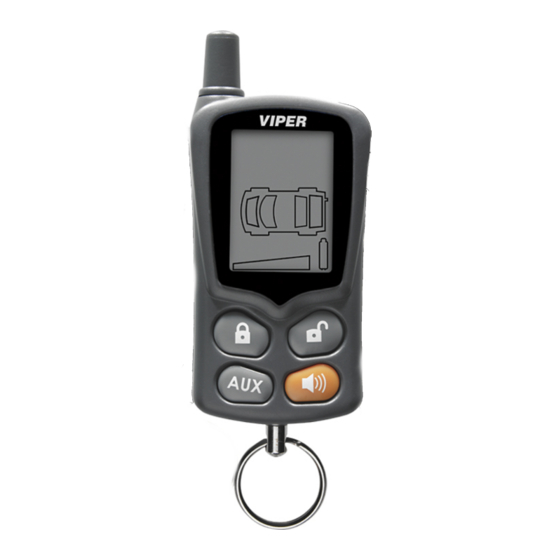
- Page 6 2 2 - - w w a a y y L L C C D D r r e e m m o o t t e e c c o o n n t t r r o o l l Auxiliary Channel Button Arm Button LCD Screen (see LCD Screen)
-
Page 7: L L C C D D S S C C R R E E E E N
L L C C D D s s c c r r e e e e n n 1. Transmit 10. Battery level indicator 2. Out of range 11. Remote sending 3. Receive 12. Vibrate mode 4. Aux Output 2 or 3 13. -
Page 8: S S T T A A N N D D A A R R D D R R E E M M O O T T E E C C O O N N F F I I G G U U R R A A T T I I O O N
S S t t a a n n d d a a r r d d r r e e m m o o t t e e c c o o n n f f i i g g u u r r a a t t i i o o n n controls the L L o o c c k k –... -
Page 9: W W H H A A T T I I S S I I N N C C L L U U D D E E D
W W h h a a t t i i s s i i n n c c l l u u d d e e d d ➤ Control module ➤ 1 four-button 2-way LCD transmitter ➤ 1 four-button transmitter note: On both remotes the panic button is the same color. -
Page 10: System Maintenance
➜ System maintenance This system needs no specific maintenance beyond remote control battery replacement. The 2-way remote is powered by a 1.5V AAA battery. The 1-way remote is powered by a pair of 3V, CR2016 batteries. B B a a t t t t e e r r y y L L e e v v e e l l I I n n d d i i c c a a t t o o r r ( ( 2 2 - - w w a a y y r r e e m m o o t t e e ) ) The Battery Level indicator has four level indicators that serve as a visual indication of battery charge. -
Page 11: Fcc/Id Notice
keep your proof of purchase, which reflects that the product was installed by an authorized dealer. Make sure that you receive the warranty registration from your dealer. ➜ FCC/ID notice This device complies with Part 15 of FCC rules. Operation is subject to the following two conditions: (1) This device may not cause harmful interference, and (2) This device must accept any interference received, including interference that may cause... -
Page 12: R R E E P P L L A A C C E E M M E E N N T T R R E E M M O O T T E E C C O O N N T T R R O O L L S
R R e e p p l l a a c c e e m m e e n n t t r r e e m m o o t t e e c c o o n n t t r r o o l l s s You can purchase replacement remote controls from your Authorized Dealer or on-line at the following web site: www.directedstore.com... - Page 13 Button Silent Mode™ and an optional auxiliary function are controlled by pressing this button. (Silent Mode™ works by pressing this button for less than one second before arming or disarming. An optional auxiliary function, such as trunk release, can be controlled by pressing this button for 1.5 seconds.) The auxiliary output controls __________________________.
-
Page 14: Standard Lcd Icon Configurations (2-Way Only)
➜ Standard LCD icon configurations (2-way only) Icon The transmit icon will be displayed while the remote control is transmitting a command to the vehicle. Icon The signal icon will be displayed if a command is transmitted to the vehicle but the command page is not received. Icon The receive icon will be displayed while the remote control is receiving a page from the vehicle. - Page 15 Icon The trunk icon will display for full alarm by flashing for a few seconds and then display continuously until the page is cleared. Icon The shock sensor icon will display for both Warn Away and full ® alarm by flashing for a few seconds and then display continu- ously until the page is cleared.
- Page 16 press and release the program button until the vehicle number is shown. For example, If the remote was originally on vehicle number 1 and a trigger page was received for vehicle number 2, the remote will show the trigger alarm and show number 2 on the display. After clearing the page, press and release the program button until number 1 is displayed.
-
Page 17: R R E E M M O O T T E E O O P P E E R R A A T T I I O O N
T T r r a a n n s s m m i i t t t t e e r r f f u u n n c c t t i i o o n n s s This system uses a computer-based learn routine to learn the transmitter buttons. -
Page 18: Out Of Range Notification
Alarm Page If the alarm system is triggered while armed, an Alarm Page will be sent to the remote control. When the remote receives an Alarm Page, the LCD icons will display the alarm system status informa- tion and the remote control will generate beeps and-or vibration. An Alarm Page alert is a series of 5 groups of 4 rapid beeps (shock, trunk, door, ignition, or hood trigger) and the LCD icon that caused the alarm will display. -
Page 19: P P R R O O G G R R A A M M M M I I N N G G L L C C D D R R E E M M O O T T E
P P r r o o g g r r a a m m m m i i n n g g L L C C D D r r e e m m o o t t e e ➜... -
Page 20: Illumination On/Off
➜ Illumination On/Off Press to select LCD backlight illumination On/Off. The LCD backlight will illuminate when a remote button is pressed, or an alarm status page is received. L L C C D D B B a a c c k k l l i i g g h h t t s s e e t t t t i i n n g g s s P P r r o o g g r r a a m m m m i i n n g g r r e e s s p p o o n n s s e e 1-beep, backlight ON 2-beeps, backlight OFF ➜... -
Page 21: U U S S I I N N G G Y Y O O U U R R S S Y Y S S T T E E M
U U s s i i n n g g y y o o u u r r s s y y s s t t e e m m The buttons described in this manual correspond to the standard configuration. -
Page 22: Passive Arming
Passive arming The system can be programmed to arm itself automatically (called passive arming). If the system is programmed for passive arming, it will automatically arm 30 seconds after the ignition is turned off and the system detects that you have left the vehicle by opening and closing a door. -
Page 23: Multi-Level Security Arming
chirping the siren and flashing the parking lights. Three seconds later, the siren output changes to a continuous blast. This progressive response gives you time to disarm the sys- tem with your LCD remote if you inadvertently open the door while the system is armed, while still providing instant response (even if the door is immediately closed). -
Page 24: Disarming
➤ Press a third time witihin 5 seconds, the siren chirps 3 times then followed by a long chirp. Zone 4 is now bypassed. ➤ Press a fourth time within five seconds: The siren cirps four times follwed by a long chirp. Zone 2 and 4 are now bypassed. - Page 25 The remote will indicate disarm notification with 2 beeps and 5 flashes of the icon. If disarming after the system has been triggered, the remote control will send a diagnostic notification as a reminder. These diagnostic notifications are: 1. If a sensor triggered the system, the remote will emit 4 quick beeps and the LCD screen will indicate which sensor (5- flashes) tripped the alarm.
-
Page 26: Disarming Without A Transmitter
➜ Disarming without a transmitter This feature allows you to disarm the security system without the remote transmitter should it be lost, damaged, or disabled. In order to disarm the system without a remote transmitter, you must have the vehicle’s ignition key and know where the Valet button is located. -
Page 27: Dome Light Control (Optional)
➜ Dome light control (optional) security only The dome light activates for 30 seconds after the system is disarmed. Ignition controlled The dome light activates for 30 seconds after the ignition is turned Off. door controlled The dome light activates for 30 seconds after the system sees a door has closed. -
Page 28: Panic Mode
The LCD remote responds with the normal arm/disarm notifi- cations in silent mode. (If the remote has beeps programmed On, the remote will beep.) ➜ Panic mode note: On both remotes the panic button is the same color. LCD remote If you are threatened in or near your vehicle, you can attract attention by triggering the system with your LCD remote. -
Page 29: Using Transmitter
➜ Valet mode You can prevent your security system from automatically arming and triggering by using Valet Mode. This is very useful when washing the vehicle or having it serviced. In Valet Mode, the security system will not arm, even with the remote transmitter, but all convenience functions (door locks, trunk release, etc.) will continue to work normally. -
Page 30: Nuisance Prevention Circuitry
➜ Nuisance Prevention ® Circuitry Your system has Directed’s Nuisance Prevention Circuitry ® (NPC ). It prevents annoying repetitive trigger sequences due to ® faulty door pin switches or environmental conditions such as thunder, jackhammers, airport noise, etc. Example If the alarm triggers three times within a 60-minute period and each time the same sensor or switch triggers the alarm, NPC will ®... -
Page 31: A A U U X X I I L L I I A A R R Y Y O O U U T T P P U U T T S S ( ( O O P P T T I I O O N N S
A A u u x x i i l l i i a a r r y y o o u u t t p p u u t t s s ( ( o o p p t t i i o o n n s s ) ) This system also supplies outputs that can control convenience options such as remote control trunk release and window automa- tion. -
Page 32: D D I I A A G G N N O O S S T T I I C C S
D D i i a a g g n n o o s s t t i i c c s s The microprocessor at the heart of your security system is constantly monitoring all of the switches and sensors that are connected to it. -
Page 33: Disarming Diagnostics
➜ Disarming diagnostics Extra disarm chirps are the Tamper Alert. If four chirps are heard when disarming, the system was triggered in your absence. If five chirps are heard, a zone was triggered so many times that Nuisance Prevention Circuitry has bypassed that zone (see NPC section of ®... -
Page 34: Table Of Zones
➜ Table of zones The zone number is the number of LED flashes used by the system to identify that input. The standard input assignments are listed below, along with spaces to write in any optional sensors or switches you have had installed. Zone - Number Dealer-Installed of LED Flashes... -
Page 35: Interpreting Zone Diagnostics
➜ Interpreting zone diagnostics Warn Away responses are not reported by arming or disarming diagnostics. If you receive a Bypass notification when arming or a Tamper Alert notification when disarming, look at the in- vehicle status LED. Active or triggered zones will be indicated by a pattern of blinks by this LED. - Page 36 the transmitter several times within range of the vehicle. The alarm will automatically re-sync and respond to the transmitters normally. O O w w n n e e r r r r e e c c o o g g n n i i t t i i o o n n Owner Recognition is a feature available exclusively from Directed.
-
Page 37: R R A A P P I I D D R R E E S S U U M M E E L L O O G G I I C
R R a a p p i i d d r r e e s s u u m m e e l l o o g g i i c c This Directed system will store its current state to non-volatile memory. -
Page 38: P P R R O O G G R R A A M M M M I I N N G
P P r r o o g g r r a a m m m m i i n n g g Programming options control what your system does during normal operation, and require few or no additional parts. However, some may require additional installation labor. The following is a list of the program settings, with the factory settings in B B o o l l d d : : ➤... - Page 39 note: When programmed for passive arming and active lock, if the system is disarmed without a door being opened, the system will relock the doors when it passive- ly rearms. ➤ Panic mode e e n n a a b b l l e e d d /disabled with the ignition on: Some states have laws against siren capability in a moving vehicle.
- Page 40 feature by turning the ignition key to the RUN position and pressing the Valet button the programmed number of ® times. AED is disabled when the system is in Valet Mode. ® note: This feature will only function if the Failsafe ®...
- Page 41 ➤ O O f f f f : : Windows will close upon locking the Comfort Closure vehicle. ➤ : If passive arming is on and a door Forced Passive Arming Off is left open the system will be armed after 30-seconds. ➤...
-
Page 42: I I N N S S T T A A L L L L A A T T I I O O N N O O P P T T I I O O N N S
I I n n s s t t a a l l l l a a t t i i o o n n o o p p t t i i o o n n s s The system has many options that may require extra parts and labor. -
Page 43: Arming The Vrs
Directed has engineered this vehicle security system, the Failsafe ® Starter Kill, and the VRS feature to provide the best combina- tion of personal safety and property protection available. When properly installed, the system can never inadvertently stop your vehicle in traffic or on railroad tracks while the vehicle is in oper- ation. -
Page 44: Triggered Sequence, Vrs
if someone takes your keys and remote transmitter by force in a parking lot. note: If the VRS system is armed while operating the vehi- ® cle and not disarmed prior to leaving the vehicle, it is still armed and will trigger the next time the vehicle is driven. ➜... -
Page 45: Disarming The Vrs
➜ Disarming the VRS Take the time to familiarize yourself with the VRS triggering se- quence and the disarm procedure. It is important to recognize and identify the VRS trigger sequence and know how to disarm it in case of accidental activation. Once the VRS is armed, it does not disarm automatically. - Page 46 S S e e c c u u r r i i t t y y & & c c o o n n v v e e n n i i e e n n c c e e e e x x p p a a n n s s i i o o n n s s Here we have listed only some of the many expansion options available.
- Page 47 can also be used to turn on your parking and headlights for a programmed time. The channel two output of the system can Power Trunk Release: operate a factory power release for the vehicle’s trunk or hatch. (An additional relay may be required.) If the factory release is not power activated, then Directed's 522T trunk release solenoid can often be added.
- Page 48 G G l l o o s s s s a a r r y y o o f f t t e e r r m m s s Amplitude Shift Keying—a method of transmitting data. The "brain" of your system. Usually hidden under Control Unit: the dash area of the vehicle.
- Page 49 "chirps" you hear, as well as the six tones you hear while the alarm is triggered. : Hand-held, remote control which operates the Transmitter various functions of your system. This is what happens when the Trigger or Triggered Sequence: alarm "goes off" or "trips". The triggered response of your system consists of the siren sounding and parking light flashing for the programmed duration.
-
Page 50: Quick Reference Guide
QUICK REFERENCE GUIDE To arm using your LCD remote You can activate, or arm, the system by pressing on your remote for one second. ➤ When the system arms, you will hear a short siren sound, or chirp, and the parking lights will flash once. - Page 51 The company behind this system is Directed Electronics Since its inception, Directed has had one purpose, to provide consumers with the finest vehicle security and car stereo products and accessories available. The recipient of more than 100 patents in the field of advanced electronic technology, Directed is ISO 9001 registered.