Edimax CV-7438nDM User Manual
Manual
Hide thumbs
Also See for CV-7438nDM:
- Quick installation manual (26 pages) ,
- Hardware (4 pages) ,
- Declaration of conformity (1 page)
Table of Contents

Related Manuals for Edimax CV-7438nDM


Summary of Contents for Edimax CV-7438nDM
- Page 1 CV-7438nDM User Manual 06-2013 / v1.0...
-
Page 2: Table Of Contents
Safety Information ......................... 5 II. Installation .................... 7 II-1. iQ Setup ..........................7 II-2. WPS Setup ..........................11 III. Using the CV-7438nDM ................ 14 III-1. Ethernet ..........................14 III-2. Audio Speakers ........................16 III-2-1. Connecting to your speakers ....................16 III-2-2. - Page 3 V-1-2. How to modify the IP address of your computer .............. 52 V-1-2-1. Windows XP ....................... 52 V-1-2-2. Windows Vista ......................53 V-1-2-3. Windows 7 ......................... 55 V-1-2-4. Windows 8 ......................... 59 V-1-2-5. Mac ..........................63 V-1-3. How to Find Your Network Security Key ................66 V-1-3-1.
-
Page 4: Product Information
I. Product Information I-1. Package Contents I-2. System Requirements - Ethernet-enabled device - Existing wireless network (2.4GHz or 5GHz) - Speaker with 3.5mm audio jack for music streaming ® ® - Web browser for software configuration: Microsoft Internet Explorer 8.0, ®... -
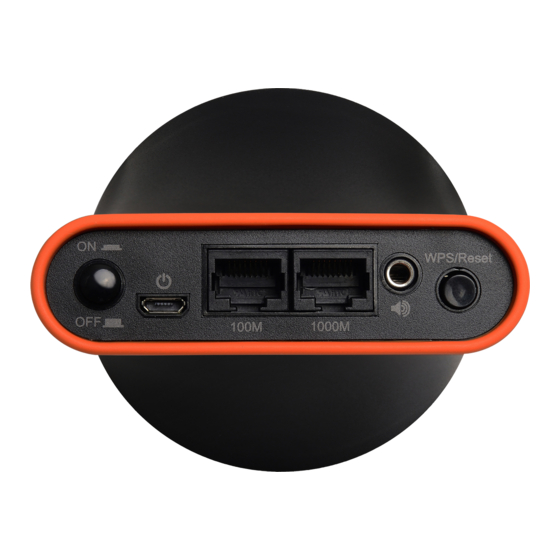
Page 5: Rear Panel
I-3. Rear Panel Power On/Off Power Port 3.5mm Audio Jack 100Mbps Port WPS/Reset Button 1000Mbps Port I-5. Safety Information In order to ensure the safe operation of the device and its users, please read and act in accordance with the following safety instructions. 1. - Page 6 5. The device contains small parts which are a danger to small children under 3 years old. Please keep the wireless bridge out of reach of children. 6. Do not place the wireless bridge on paper, cloth, or other flammable materials.
-
Page 7: Ii. Installation
Plug the power adapter into the device’s 5V power port, plug the adapter into a wall socket or available USB port, and press the power on/off button to switch the device on. The CV-7438nDM may take several minutes to boot up – the device is ready when the LED is flashing (red). - Page 8 Use a Wi-Fi device (e.g. computer, tablet, smartphone) to search for a Wi-Fi network with the SSID “Edimaxcv.Setup” and connect to it. Please disconnect any wired Ethernet connections from your computer before you continue. Open a web browser and enter the URL http://edimaxcv.setup and you will see the following screen.
- Page 9 iQ Setup will display all available 2.4GHz and 5GHz wireless networks. Click icons to display the next or previous page as desired. Select a network for the wireless bridge to connect to and click “Next”. If the Wi-Fi network you wish to connect to does not appear, try clicking “Refresh”.
- Page 10 When the connection test is complete, you will see the following screen. Check the details of your connection and click “Apply” to restart the CV-7438nDM and continue. If the wireless bridge cannot obtain an IP address from the router/access point then click the “Static IP” button to assign an IP address to the wireless bridge and then click “APPLY”.
-
Page 11: Ii-2. Wps Setup
Plug the power adapter into the device’s 5V power port, plug the adapter into a wall socket or available USB port, and press the power on/off button to switch the device on. The CV-7438nDM may take several minutes to boot up – the device is ready when the LED is flashing (red). - Page 12 WPS for 5GHz – in this case, please refer to II-1. iQ Setup instead. Within two minutes, press and hold the WPS button on the CV-7438nDM for 2 seconds to activate the WPS function. The LED should flash (white) to indicate that WPS is in progress.
- Page 13 Your wireless bridge is now ready for use with audio speakers or Ethernet devices such as smart TVs, set-top boxes or game consoles. Please see III. Using the CV-7438nDM.
-
Page 14: Iii. Using The Cv-7438Ndm
III. Using the CV-7438nDM Once your CV-7438nDM has established a connection with your wireless router/access point as described in Installation, you can connect the wireless bridge to any Ethernet device or audio speakers for wireless connectivity. III-1. Ethernet To “bridge” any Ethernet device to your Wi-Fi network, follow the instructions below. - Page 15 Connect the CV-7438nDM’s power supply to a wall socket or an available USB port, and press the power on/off button to switch the device on. Ensure the LED is on (white). The CV-7438nDM requires 1 A of current – please ensure that your USB port can provide sufficient power.
-
Page 16: Iii-2. Audio Speakers
Use an audio cable (not included) to connect the Wi-Fi bridge’s 3.5mm audio jack to the “audio in” port of your speakers. Connect the CV-7438nDM’s power supply to a wall socket or an available USB port, and press the power on/off button to switch the device on. -
Page 17: Iii-2-2-1. Itunes & Ios
III-2-2-1. iTunes & iOS Click the AirPlay icon in iTunes. Select the CV-7438nDM from the list of available AirPlay devices. Play music as usual and it should stream to your speakers wirelessly. -
Page 18: Iii-2-2-2. Other
III-2-2-2. Other For other users (Android, PC) a 3 party app is necessary to facilitate AirPlay streaming. Apps such as Twonky Beam for Android offer AirPlay streaming functionality and can be downloaded from Google Play. An example of AirPlay streaming using Twonky Beam is shown below: Twonky Beam requires Android OS 4.0 or above device. - Page 19 On the next screen, select “This Device” and then select “Music”. Select a track and then swipe the screen right to left.
- Page 20 You should see the CV-7438nDM listed as a “Display Device” amongst any other wireless displays or speakers connected to your network. Select the CV-7438nDM as the “Display Device”. Your music should stream wirelessly to the speakers connected to the CV-7438nDM.
-
Page 21: Iii-3. Reset
III-3. Reset If you experience problems with your wireless bridge, you can reset the device back to its factory settings. This resets all settings back to default. Press and hold the WPS/Reset button found on the back panel for at least 10 seconds. -
Page 22: Iv. Browser Based Configuration Interface
Wi-Fi network as the wireless bridge. If you can not access the browser based configuration following the instructions below, connect the CV-7438nDM to a computer using an Ethernet cable and try again. You will be prompted for a username and password. The default username is... - Page 23 Mac users can also use the “Bonjour” function of Safari to access the browser based configuration interface. Mac: Bonjour Open Safari web browser and open the “Bookmarks” menu across the top of the screen, and select “Show All Bookmarks”. Or you can click on the bookmarks icon under the URL bar.
- Page 24 If you see the screen below, there is a problem with your wireless bridge’s WAN connection. Please check your WAN connection. Click “Go to Web control panel” to continue to the browser based configuration interface. The wireless bridge will not function properly without a WAN connection.
-
Page 25: Iv-1. Home
IV-1. Home The “Home” page displays basic system information about the wireless bridge. Screenshots displayed are examples. The information shown on your screen will vary depending on your configuration. - Page 26 Uptime Displays the total time since the device was turned on. Hardware Displays the hardware version. Version Firmware Displays the firmware version. Version Mode Displays the operating mode. ESSID Displays the ESSID the wireless bridge is connected to. The ESSID is the name used to identify a wireless network.
-
Page 27: Iv-2. Iq Setup
IV-2. iQ Setup You can run iQ Setup again to reconfigure the wireless bridge. Click “Apply” to reset the wireless bridge back to its factory default, unconfigured state. Then connect to the “EdimaxCV.setup” SSID to start iQ Setup. Refer II. Installation for guidance on iQ Setup. -
Page 28: Iv-3. Wps Settings
IV-3. WPS Settings Wi-Fi Protected Setup is a simple way to establish connections between WPS compatible devices. WPS can be activated on compatible devices by pushing a WPS button on the device or from within the device’s firmware/configuration interface. When WPS is activated in the correct manner and at the correct time for two compatible devices, they will automatically connect. -
Page 29: Iv-4. Wireless Advanced
WPS Status Displays WPS status. If data encryption/security settings for the wireless bridge’s SSID have never been set, “unConfigured” will be shown here. If data encryption/security settings for the wireless bridge’s SSID have been set, “Configured” will be shown here. Device PIN Code Displays the WPS PIN code of the wireless bridge. - Page 30 Fragment Set the Fragment threshold of the wireless Threshold radio. The default value is 2346. RTS Threshold Set the RTS threshold of the wireless radio. The default value is 2347. WMM (Wi-Fi Multimedia) technology can improve the performance of certain network applications, such as audio/video streaming, network telephony (VoIP), and others.
-
Page 32: Iv-5. Administrator
IV-5. Administrator In “Administrator” you can change the login information for your wireless bridge, which you use to access the browser based configuration interface. Additionally, you can modify the IP address of the wireless bridge. If you change the administrator password, please make a note of the new password. - Page 33 Current Enter your current password. The default Password password is 1234. New Password Enter your desired new password here. You can use any combination of letters, numbers and symbols up to 20 characters. Re-Enter Confirm your new password. Password You can modify the IP address of the wireless bridge, enabling it to become a part of your local area network.
- Page 34 If you are unable to connect to the browser based configuration interface using http://edimaxcv.setup, it is possible that you assigned an incorrect IP address to the wireless bridge. In this case you can reset the wireless bridge back to its default IP address.
-
Page 35: Iv-6. Configuration Tool
IV-6. Configuration Tool On the “Configuration Tool” page you can back up the wireless bridge’s current settings, restore the settings to a previously saved version or restore the wireless bridge back to its original factory default state. Restoring settings to the factory default will restore all settings, configurations and passwords back to the factory default It is recommended that you backup your existing settings before restoring... -
Page 36: Iv-6-1. Upgrade Firmware
Tool” menu allows you to update the system firmware to a more recent version. You can download the latest firmware from the Edimax website. Do not switch off or disconnect the wireless bridge during a firmware upgrade, as this could damage the device. -
Page 37: Iv-6-2. Reboot
Choose File Click “Choose File” to open a new window, locate a firmware file on your computer, and confirm your selection. Click “Apply” to save and apply the changes, or click “Cancel” to discard changes. IV-6-2. Reboot If the wireless bridge malfunctions or is not responding, then it is recommended that you reboot the device. - Page 38 Apply Click “Apply” to reboot the device. A status bar will indicate the progress of the reboot and you will see a confirmation screen when the reboot is complete.
-
Page 39: Appendix
V. Appendix V-1. Configuring your IP address Before you run iQ Setup, please make sure your computer is set to use a dynamic IP address. This means your computer can obtain an IP address automatically from a DHCP server. This is a simple procedure, which is explained step by step in V-1-1. -
Page 40: V-1-1. How To Configure Your Computer To Use A Dynamic Ip Address
V-1-1. How to configure your computer to use a dynamic IP address Please follow the instructions appropriate for your operating system. V-1-1-1. Windows XP Click the “Start” button (it should be located in the lower-left corner of your computer), then click “Control Panel”. Double-click the “Network and Internet Connections”... -
Page 41: Windows Vista
V-1-1-2. Windows Vista Click the “Start” button (it should be located in the lower-left corner of your computer), then click “Control Panel”. Click “View Network Status and Tasks”, then click “Manage Network Connections”. Right-click “Local Area Network”, then select “Properties”. The “Local Area Connection Properties” window will then appear, select “Internet Protocol Version 4 (TCP / IPv4)”, and then click “Properties”. - Page 42 Select “Obtain an IP address automatically” and “Obtain DNS server address automatically”, then click “OK”.
-
Page 43: Windows 7
V-1-1-3. Windows 7 Click the “Start” button (it should be located in the lower-left corner of your computer), then click “Control Panel”. Under “Network and Internet” click “View network status and tasks”. Click “Local Area Connection”. - Page 44 Click “Properties”. Select “Internet Protocol Version 4 (TCP/IPv4) and then click “Properties”.
- Page 45 Select “Obtain an IP address automatically” and “Obtain DNS server address automatically”, then click “OK”.
-
Page 46: Windows 8
V-1-1-4. Windows 8 From the Windows 8 Start screen, you need to switch to desktop mode. Move your curser to the bottom left of the screen and click. In desktop mode, click the File Explorer icon in the bottom left of the screen, as shown below. - Page 47 Right click “Network” and then select “Properties”. In the window that opens, select “Change adapter settings” from the left side.
- Page 48 Choose your connection and right click, then select “Properties”. Select “Internet Protocol Version 4 (TCP/IPv4) and then click “Properties”.
-
Page 49: Mac Os
Select “Obtain an IP address automatically” and “Obtain DNS server address automatically”, then click “OK”. V-1-1-5. Mac OS Have your Macintosh computer operate as usual, and click on “System Preferences”. In System Preferences, click on “Network”. Click on “Wi-Fi” in the left panel and then click “Advanced” in the lower right corner. - Page 50 Select “TCP/IP” from the top menu and select “Using DHCP” from the drop down menu labeled “Configure IPv4”, then click “OK”. Click on “Apply” to save the changes.
-
Page 52: V-1-2. How To Modify The Ip Address Of Your Computer
V-1-2. How to modify the IP address of your computer Please follow the instructions appropriate for your operating system. In the following examples we use the IP address 192.168.9.20 though you can use any IP address in the range 192.168.9.x (x = 3 – 254) in order to access iQ Setup/browser based configuration interface. -
Page 53: Windows Vista
address, subnet mask, default gateway and DNS server addresses. IP address: 192.168.9.20 Subnet Mask: 255.255.255.0 Click ‘OK’ when finished. V-1-2-2. Windows Vista Click the “Start” button (it should be located in the lower-left corner of your computer), then click “Control Panel”. Click “View Network Status and Tasks”, then click “Manage Network Connections”. - Page 54 Select “Use the following IP address”, then input the following values: Your existing static IP address will be displayed in the “IP address” field before you replace it. Please make a note of this IP address, subnet mask, default gateway and DNS server addresses.
-
Page 55: Windows 7
V-1-2-3. Windows 7 Click the “Start” button (it should be located in the lower-left corner of your computer), then click “Control Panel”. - Page 56 Under “Network and Internet” click “View network status and tasks”. Click “Local Area Connection”.
- Page 57 Click “Properties”. Select “Internet Protocol Version 4 (TCP/IPv4) and then click “Properties”.
- Page 58 Select “Use the following IP address”, then input the following values: Your existing static IP address will be displayed in the “IP address” field before you replace it. Please make a note of this IP address, subnet mask, default gateway and DNS server addresses.
-
Page 59: Windows 8
V-1-2-4. Windows 8 From the Windows 8 Start screen, you need to switch to desktop mode. Move your curser to the bottom left of the screen and click. - Page 60 In desktop mode, click the File Explorer icon in the bottom left of the screen, as shown below. Right click “Network” and then select “Properties”.
- Page 61 In the window that opens, select “Change adapter settings” from the left side.
- Page 62 Choose your connection and right click, then select “Properties”. Select “Internet Protocol Version 4 (TCP/IPv4) and then click “Properties”.
-
Page 63: Mac
Select “Use the following IP address”, then input the following values: Your existing static IP address will be displayed in the “IP address” field before you replace it. Please make a note of this IP address, subnet mask, default gateway and DNS server addresses. - Page 64 Select “TCP/IP” from the top menu and select “Manually” from the drop down menu labeled “Configure IPv4”, then click “OK”. Your existing static IP address will be displayed in the “IP address” field before you replace it. Please make a note of this IP address, subnet mask, default gateway and DNS server addresses.
- Page 65 In the “IPv4 Address” and “Subnet Mask” field enter IP address 192.168.9.20 and subnet mask 255.255.255.0. Click on “OK”. Click “Apply” to save the changes.
-
Page 66: V-1-3. How To Find Your Network Security Key
V-1-3. How to Find Your Network Security Key To find your network security key, please follow the instructions appropriate for your operating system. If you are using Windows XP or earlier, please contact your ISP or router manufacturer to find your network security key. V-1-3-1. - Page 67 You should see the profile of your Wi-Fi network in the list. Right click on your Wi-Fi network and then click on “Properties”. Click on the “Security” tab, and then check the box labeled “Show characters”. This will show your network security key. Click the “Cancel” button to close the window.
-
Page 68: Mac
V-1-3-2. Open a new Finder window, and select “Applications” from the menu on the left side. Open the folder labeled “Utilities” and then open the application “Keychain Access”. Select “Passwords” from the sub-menu labeled “Category” on the left side, as shown below. Then search the list in the main panel for the SSID of your network. - Page 69 Double click the SSID of your network and you will see the following window. Check the box labeled “Show password” and you will be asked to enter your administrative password, which you use to log into your Mac. Enter your password and click “Allow”.
- Page 70 Your network security password will now be displayed in the field next to the box labeled “Show password”. In the example below, the network security password is “edimax1234”. Please make a note of your network security password.
-
Page 71: V-1-4. How To Find Your Router's Ip Address
V-1-4. How to Find Your Router’s IP Address To find your router’s IP address, please follow the instructions appropriate for your operating system. V-1-4-1. Windows XP, Vista & 7 Go to “Start”, select “Run” and type “cmd”, then press Enter or click “OK”. A new window will open, type “ipconfig”... - Page 72 Your router’s IP address will be displayed next to “Default Gateway”.
-
Page 73: Windows 8
V-1-4-2. Windows 8 From the Windows 8 Start screen, move your curser to the top right corner of the screen to display the Charms bar. Click “Search” and enter “cmd” into the search bar. Click the “Command Prompt” app which be displayed on the left side. - Page 74 A new window will open, type “ipconfig” and press Enter. Your router’s IP address will be displayed next to “Default Gateway”.
-
Page 75: Mac
V-1-4-3. Launch “System Preferences” and click on “Network”. If you are using an Ethernet cable to connect to your network, your router’s IP address will be displayed next to “Router”. - Page 76 If you are using Wi-Fi, click “Wi-Fi” in the left panel, and then “Advanced” in the bottom right corner.
- Page 77 Click the “TCP/IP” tab and your router’s IP address will be displayed next to “Router”.
-
Page 78: V-1-4. Troubleshooting
If you are experiencing problems after a firmware upgrade, please contact your dealer of purchase for help. Streaming is slow or a. The CV-7438nDM is a dual-band device, if your frequently home network has two frequency bands (2.4Ghz and interrupted. - Page 79 Ensure that the wireless bridge is powered on (check the LED) and that the Ethernet cable is properly connected to the network device. d. Use a computer to access the CV-7438nDM’s browser based configuration interface. If something is wrong, you will see an error page before the home page.
- Page 80 Internet connection speed is consistently fast when connected directly to your router then the problem may be related to the CV-7438nDM – the connection between the wireless bridge and wireless router is not optimal. Try to re-locate the wireless bridge to improve the connection.
-
Page 81: V-1-5. Glossary
find the wireless connection with your wireless network during setup, or bridge listed as an the connection has been broken. Please check the AirPlay device, and wireless bridge’s LED: for a successful connection the LED will display on (white). If no connection has been “Edimaxcv.setup”... - Page 82 IP Address and Network (Subnet) Mask: IP stands for Internet Protocol. An IP address consists of a series of four numbers separated by periods, that identifies a single, unique Internet computer host in an IP network. Example: 192.168.2.1. It consists of 2 portions: the IP network address, and the host identifier.
- Page 83 two parts: 3 bytes of data that corresponds to the Manufacturer ID (unique for each manufacturer), plus 3 bytes that are often used as the product’s serial number. NAT: Network Address Translation. This process allows all of the computers on your home network to use one IP address. Using the broadband access point’s NAT capability, you can access the Internet from any computer on your home network without having to purchase more IP addresses from your ISP.
- Page 84 TCP performs proper error detection and error recovery, and thus is reliable. UDP on the other hand is not reliable. They both run on top of the IP (Internet Protocol), a network layer protocol. WAN: Wide Area Network. A network that connects computers located in geographically separate areas (e.g.
- Page 85 COPYRIGHT Copyright Edimax Technology Co., Ltd. all rights reserved. No part of this publication may be reproduced, transmitted, transcribed, stored in a retrieval system, or translated into any language or computer language, in any form or by any means, electronic, mechanical, magnetic, optical, chemical, manual or otherwise, without the prior written permission from Edimax Technology Co., Ltd.
-
Page 86: Federal Communication Commission Interference Statement
Federal Communication Commission Interference Statement This equipment has been tested and found to comply with the limits for a Class B digital device, pursuant to Part 15 of FCC Rules. These limits are designed to provide reasonable protection against harmful interference in a residential installation. -
Page 87: Eu Declaration Of Conformity
EU Declaration of Conformity English: This equipment is in compliance with the essential requirements and other relevant provisions of Directive 1999/5/EC, 2009/125/EC, 2006/95/EC, 2011/65/EC. French: Cet équipement est conforme aux exigences essentielles et autres dispositions de la directive 1999/5/CE, 2009/125/CE, 2006/95/CE, 2011/65/CE. Czechian: Toto zařízení... -
Page 88: Declaration Of Conformity
Declaration of Conformity We, Edimax Technology Co., Ltd., declare under our sole responsibility, that the equipment described below complies with the requirements of the European R&TTE directive 1999/5/EC, and 2009/125/EC, 2006/95/EC, 2011/65/EC. Equipment: N600 Universal Dual-Band Wi-Fi Bridge Model No.:...