Table of Contents
Advertisement
Owner's Manual & Safety Instructions
Save This Manual
inspection, maintenance and cleaning procedures. Write the product's serial number in the back of the manual
near the assembly diagram (or month and year of purchase if product has no number). Keep this manual and
the receipt in a safe and dry place for future reference.
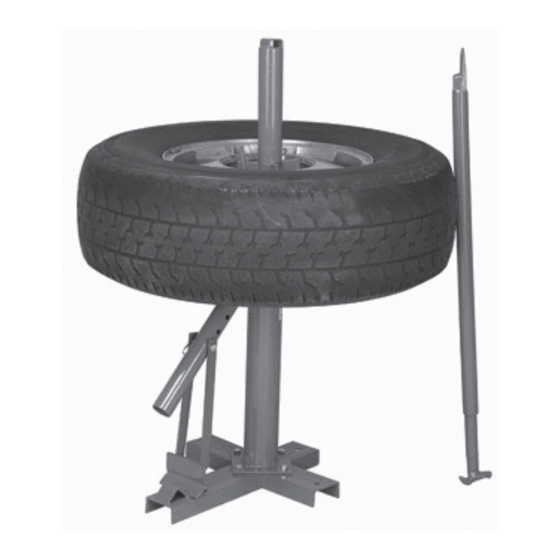
Portable Tire Changer
When unpacking, make sure that the product is intact
and undamaged. If any parts are missing or broken,
please call 1-800-444-3353 as soon as possible.
©
Copyright
2012 by Harbor Freight Tools
No portion of this manual or any artwork contained herein may be reproduced in
any shape or form without the express written consent of Harbor Freight Tools.
Diagrams within this manual may not be drawn proportionally. Due to continuing
improvements, actual product may differ slightly from the product described herein.
Tools required for assembly and service may not be included.
Keep this manual for the safety warnings and precautions, assembly, operating,
Visit our website at: http://www.harborfreight.com
Email our technical support at: tech@harborfreight.com
®
. All rights reserved.
Read this material before using this product.
Failure to do so can result in serious injury.
SaVE thiS manual.
ITEM 69686
Advertisement
Table of Contents

Summary of Contents for Pittsburgh Pittsburgh Automotive Portable Tire Changer
- Page 1 No portion of this manual or any artwork contained herein may be reproduced in Failure to do so can result in serious injury. any shape or form without the express written consent of Harbor Freight Tools. Diagrams within this manual may not be drawn proportionally. Due to continuing SaVE thiS manual.
-
Page 2: Specifications
Do not modify Tire Changer to perform If unreadable or missing, contact tasks for which it was not designed. Harbor Freight Tools for a replacement. Use only with accessories included with the Tire Changer. Page 2 For technical questions, please call 1-800-444-3353. -
Page 3: Safety Information
nOtE: Assembly of the Base assembly/mounting units (9, 13) to the Center Post (1) will be easier if done on a worktable. instructions Set the bottom of the Center Post diagonally across the middle of the Read the EntiRE impORtant Post Base. - Page 4 Set each of the Side Bases (9) along Drill four holes in the floor surface either side of the Post Base until the equal to the length of four 7/16 IN. holes align. Fasten together using diameter anchors (not included) the Hex Bolts (6), Washers (11), and to secure the Tire Changer.
-
Page 5: Operation
14. Slide the end slots of Bead Breaker Operation Shoe (10) over the mounting holes along the middle of the Bead Breaker Handle. Align with the end or middle holes (depending on which tire size, the Breaking the tire Bead closest hole to the Center Post being for smaller tires). - Page 6 Lift Bead Breaker Handle up and 13. Thread Spider Post over Center slide tire around so that Bead Post with tapered side going into Breaker Show can be set against wheel hub. See Figure 9, below. the opposite end of rim. 14.
- Page 7 17. Slide bar down and, using the Post Cap as leverage, pull the Bar around, continuing to separate the bead from rim. See Figure 11, below. Figure 13 Figure 11 20. Continue pulling Bar around tire until bead is fully separated from rim. Then lift tire off of Center Post.
- Page 8 Push down on tire with free hand as nOtE: Be sure to apply more you work bead behind rim. If needed bead lubricant, if needed.. push Bar along Center Post for added Continue to work around rim until leverage. See Figure 15, below. tire mounts over edge of bead.
-
Page 9: Maintenance
For changing smaller tires, use the mini-tire Changer (SKu 34552) that is After each use, wipe any excess also available from Harbor Freight Tools. bead oil off of Tire Changer. Regularly inspect Tire Changer to ensure that all connections are secure. -
Page 10: Parts List
parts list part Description Qty. Center Post Post Cap Lug Pin Spider Post Clevis Pin (7/16”) Bolt (3/8” x 16 x 1”) Bead Breaker Handle R-Clip Side Base Bead Breaker Shoe Lock Washer (3/8”) Nut (3/8” x 16) Post Base Mount/Demount Bar Page 10 For technical questions, please call 1-800-444-3353. -
Page 11: Assembly Diagram
assembly Diagram SKU 69686 For technical questions, please call 1-800-444-3353. Page 11... -
Page 12: Limited 90-Day Warranty
90 Day Warranty Harbor Freight Tools Co. makes every effort to assure that its products meet high quality and durability standards, and warrants to the original purchaser that this product is free from defects in materials and workmanship for the period of 90 days from the date of purchase.