
Related Manuals for VTech Go Go Smart Wheels Train Station Playset


Summary of Contents for VTech Go Go Smart Wheels Train Station Playset
- Page 1 User’s Manual Train Station Playset © 2013 VTech Printed in China 91-002858-007...
- Page 2 SmartPoint™ location with singing, sound effects and fun phrases. ® Our Go! Go! Smart Wheels ® Go! Go! Smart Wheels playsets your child can do! ® With Go! Go! Smart Wheels Sincerely, VTech® To learn more about VTech...
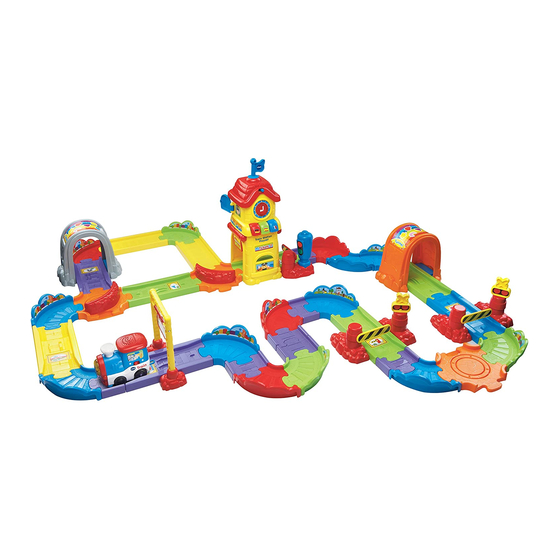
- Page 3 INTRODUCTION Thank you for purchasing the VTech Go! Go! Smart Wheels Train ® ® Station Playset learning toy! The Go! Go! Smart Wheels Train Station Playset™ by VTech lets ® ® your child play like a real conductor! Spark your child’s imagination as they combine 32 tracks into different configurations.
-
Page 4: In The Box
INCLUDED IN THIS PACKAGE One VTech Go! Go! Smart Wheels Motorized Train with • ® ® SmartPoint cargo car One VTech Go! Go! Smart Wheels • electronic train station with ® ® one SmartPoint track • One incline • One storage tower Two SmartPoint •... - Page 5 • Four 90-degree tracks, male • Three 90-degree tracks, female • Four cross tracks • Eight short tracks • Five straight tracks Two straight SmartPoint • tracks One SmartPoint • track for the storage tower One SmartPoint • tunnel track One spiral ramp with SmartPoint •...
-
Page 6: Assembly Instructions
Unlock the packaging locks: Rotate the packaging lock counter-clockwise 90 degrees Pull out the packaging lock ASSEMBLY INSTRUCTIONS With the VTech Go! Go! Smart Wheels Train Station Playset, ® ® safety comes first. To ensure your child’s safety, adult assembly is required. -
Page 7: Battery Installation - Train
STORAGE TOWER 1. Attach the storage tower structure to its SmartPoint track. You will hear a ‘click’ sound to indicate the structure is secure. After the above steps, connect these pieces to the included track pieces. You can configure them into different arrangements. GETTING STARTED BATTERY INSTALLATION - TRAIN 1. - Page 8 BATTERY INSTALLATION – STATION 1. Make sure the unit is turned OFF. 2. Locate the battery cover on the back of the station. Use a coin or a screwdriver to loosen the screw. 3. Install 2 new ‘AAA’ (AM-4/LR03) batteries following the diagram inside the battery box.
- Page 9 2. SMOKESTACK MOTOR BUTTON Press the SMOKESTACK MOTOR BUTTON to activate the motor. Press the button again to stop the motor. 3. AUTOMATIC SHUT-OFF To preserve battery life, the VTech Go! Go! Smart Wheels ® ® Motorized Train will automatically power-down after approximately 30 seconds without input while the motor is off.
- Page 10 The light will flash with the sounds. The train also interacts with SmartPoint locations on other VTech ® Go! Smart Wheels playsets (each playset sold separately). The ®...
- Page 11 My train is really strong! MELODY LIST: 1. I’ve Been Working on the Railroad 2. Jack & Jill 3. It’s Raining, It’s Pouring 4. Old King Cole 5. London Bridge 6. Hey Diddle Diddle 7. Polly Wolly Doodle 8. Humpty Dumpty 9.
- Page 12 SWITCH to the OFF ( ) position. 2. AUTOMATIC SHUT-OFF To preserve battery life, the VTech Go! Go! Smart Wheels Train ® ® Station Playset will automatically power-down after approximately 30 seconds without input. The unit can be turned on again by any input.
-
Page 13: Troubleshooting
sleep mode. The unit can be re-activated by pressing any button. SING-ALONG SONG LYRICS SONG 1 Welcome to the station, here comes the train. Rolling here, rolling there, rolling everywhere! Toot-toot, chug-chug, hello, train! SONG 2 Chug-chug, toot-toot, The train is coming! Hello, hello, Have your tickets ready! CARE &... - Page 14 If the problem persists, please call our Consumer Services Department at 1-800-521-2010 in the U.S. or 1-877-352-8697 in Canada, and a service representative will be happy to help you. For information on this product’s warranty, please call VTech at 1-800- ®...
- Page 15 • Reorient or relocate the receiving antenna. • Increase the separation between the equipment and receiver. • Connect the equipment into an outlet on a circuit different from that to which the receiver is connected. • Consult the dealer or an experienced radio/TV technician for help. Caution : changes or modifications not expressly approved by the party responsible for compliance could void the user’s authority to operate the equipment.