Table of Contents
Advertisement
Available languages
Available languages
Read BeforeUsing
Lire avant usage
Leer antesdeusar
Operating/Safety I nstructions
Consignes d e fonctionnement/s6curit6
Instrucciones d e funcionamiento y seguridad
34612
34614
34618
Call Toll Free for
ConsumerInformation
& ServiceLocations
Pour obtenirdes informations
et les adressesde nos centres
de serviceapr_s-vente,
appelezce num_rogratuit
Llame gratispara
obtenerinformaci6n
para el consumidor y
ubicaciones de servicio
For EnglishVersion
Version
fran_;aise
Versi6n en espafiol
See page2
Voir page 18
Vet la p_gina34
Advertisement
Table of Contents

Related Manuals for Bosch 34612 - 12 Volt Compact Tough Drill Driver


Summary of Contents for Bosch 34612 - 12 Volt Compact Tough Drill Driver
- Page 1 Read BeforeUsing Lire avant usage Leer antesdeusar Operating/Safety I nstructions Consignes d e fonctionnement/s6curit6 Instrucciones d e funcionamiento y seguridad 34612 34614 34618 Call Toll Free for Pour obtenirdes informations Llame gratispara ConsumerInformation et les adressesde nos centres obtenerinformaci6n & ServiceLocations de serviceapr_s-vente, para el consumidor y ubicaciones de servicio...
-
Page 2: Work Area Safety
Read all instructions. Failure to follow all instructions listed below may result in electric shock, fire and/or serious injury. The term "power tool" in all of the warnings listed below refers to your mains-operated (corded) power tool or battery-operated (cordless) power tool. SAVETHESEINSTRUCTIONS Work area safety If operating... - Page 3 Keep handles dry, clean and free from clamps or other practical and grease. Slippery hands cannot safely secure support the workpiece to a control the power tool. stable platform. Holding the work by hand or against your body is unstable and may Power tool use and care lead to loss of control.
- Page 4 Hold power tools by insulated gripping Do not grasp the tool or place your hands surfaces when performing an operation too close to the spinning chuck or drill where the cutting tools may contact bit. Your hand may be lacerated. hidden wiring.
- Page 5 Description and do not use the battery pack or charger. Specifications. Other types of batteries attachment recom- burst causing personal injury and damage. mended or sold by Bosch result in a Charge battery pack in temperatures risk of fire, electric...
- Page 6 Ni-Cd battery recycling disposal NICKEL-CADMIUM BATTERIES bans/restrictions in your area, or return your If equipped with a nickel-cadmium battery, the batteries to a Skil/Bosch/Dremel Service battery must be collected, recycled disposed of in an environmentally sound Center recycling. Robert Bosch Tool manner.
- Page 7 IMPORTANT: Some of the following symbols may be used on your tool. Please study them and learn their meaning. Proper interpretation of these symbols will allow you to operate tool better and safer. Symbol Name Designation/Explanation Volts Voltage (potential) Current Amperes Hertz Frequency...
-
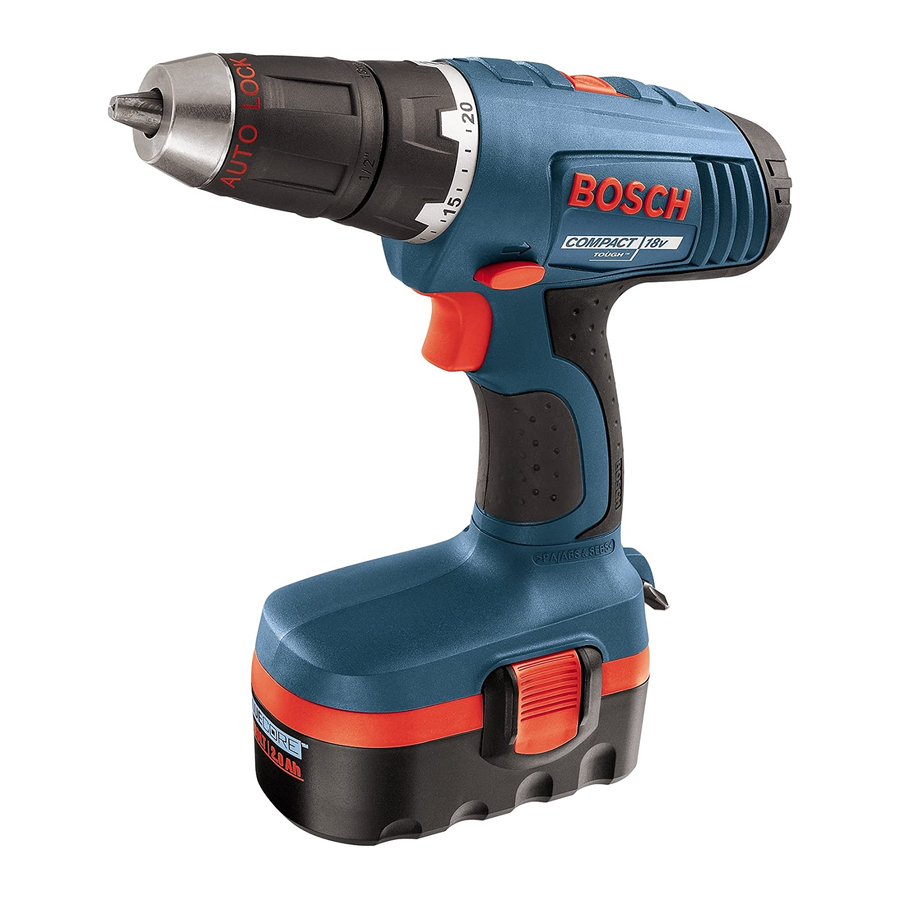
Page 8: Variable Speed Trigger S Witch
I_i__ Disconnect battery pack from tool before making any assembly, adjustments or changing accessories. Such preventive safety measures reduce the risk of starting the tool accidentally. Cordless Drill/Driver VENTILATION OPENINGS FORWARD/REVERSING CHUCK LEVER& TRIGGERLOCK RUBBERIZED GRIP VARIABLE SPEED TRIGGER S WITCH BIT STORAGE AREA BATTERY... - Page 9 VARIABLE SPEED CONTROLLED Do not change direction of rotation until tool TRIGGER SWITCH comes to a complete stop. Shifting during Your tool is equipped with a variable speed rotation of the chuck can cause damage to trigger switch. The tool can be turned "ON" or the tool.
- Page 10 INSERTING BITS CHUCKSLEEVE Move reverse switch lever to the center "OFF" position. Remove battery pack and rotate the clutch ring drill symbol SCREWDRIVER " ,ILlll ". Rotate the chuck sleeve counter- clockwise viewing from chuck end, and open chuck to approximate drill bit diameter. Insert a clean bit up to the drill bit flutes for small bits, or as far as it will go for large bits.
-
Page 11: Important Charging Notes
Pages for names period of storage, the capacity at first recharge addresses. will be lower. Normal capacity will be restored in two or three charge/discharge cycles. Note: Use of chargers or battery packs sold by Bosch will void the warranty. -11-... -
Page 12: Charging Battery Pack
CHARGING BATTERY PACK (30 MINUTE SINGLE BAY-BC130) INDICATORS, SYMBOLS AND MEANING If the indicator lights are "OFF", the charger the battery pack is too hot or [,+,,. _i1=j If the red indicatorlight is "ON", is not receiving power from power supply cold fast-charging. - Page 13 CHARGING BATTERY PACK (30 MINUTE DUAL BAY-BC230) contaminated. Clean the contacts of the INDICATORS, SYMBOLS AND MEANING If the indicator lights are "OFF", the charger is charger or battery pack only as directed not receiving power from power supply outlet. these operating instructions or those supplied...
- Page 14 CHARGING BATTERY PACK (1 HOUR CHARGER) INDICATORS, SYMBOLS AND MEANING switch to trickle charge, until a suitable If the indicator lights are "OFF", the charger temperature is reached, at which time is not receiving power from power supply charger will switch automatically to fast- outlet,...
- Page 15 Operating Tips You will extend the life of your bits and do allows you to slowly increase RPM. By using neater work if you always put the bit in a slow starting speed, you are able to keep contact with the work before pulling...
- Page 16 When drilling holes in wood, twist bits can be Here are a couple of tips for drilling in metal. used. Twist bits may overheat unless pulled out Lubricate the tip of the bit occasionally with cutting oil except when drilling soft metals such frequently to clear chips from flutes.
- Page 17 TOOL LUBRICATION Your Bosch tool has been properly lubricated and is ready for use. Accessories RECOMMENDED SIZES OF EXTENSION CORDS __J_ If an extension cord 120 VOLT ALTERNATING...
- Page 18 Veuillezlire et comprendre t outesles consignes.Si on n'observe pastoutesles consignes d 6crites ci-dessous, il y a risque dechoc _lectrique, d'incendie et/oude blessures corporelles graves. Danstouteslesmisesen gardeci-dessous, l e terme<< outil _lectroportatif > > se rapporte &des outilsbranch_s sur lesecteur(avecfil) ou &des outilsailment, s parpiles(sansfil). CONSERVEZ C ESCONSIGNES S_curit_ du lieudetravail disjoncteur diff_rentieldefuite _ la terre (DDFT).
- Page 19 Utilisezdesbridesoud'autres moyenspratiques d e Maintenez les poign6ess_cheset exemptesd'huile et briderou desupporter l a piece suruneplate-forme de graisse. On ne pas maftriser un outil _lectroportatif stable. Tenirla piece_ la mainou contrelecorpsest en toute s_curit_ quand on ales mains glissantes. instable et risqueder6sulter enunepertedecontr61e. Utilisation et entretien desoutils Utilisation et entretien des outils _ piles dlectroportatifs...
- Page 20 Consignes de s6curit6 pour perceuses/tournevis sans cordon Tenez les outils _lectroportatifs par les surfaces En installant un foret, ins_rez la tige de ce dernier isol_es de pr6hension en ex6cutant une op6ration bien _ I'int6rieur de la pince du mandrin. Si le foret au cours de laquelle les outils de coupe peuvent n'est pas ins_r_ assez profond_ment, la prise de la venir en contact avec les fils cach6s.
- Page 21 N'utiliser que les chargeurs approuv_s est caustique et pourrait causer des brQlures par Bosch avec votre produit. Voir Description chimiques aux tissus. Si le liquide vient en contact fonctionnelle et Specifications. avec la peau, lavez rapidement & I'eau savonneuse, puis au jus de citron ou au vinaigre.
- Page 22 & un Centre de Service I'environnement. Skil/Bosch/Dremel pour recyclage. La participation de Robert Bosch Tool Corporation & ce programme s'ins_re darts le contexte de notre engagement piles, homologu_ I'EPA preserver notre environnement et _ conserver nos (Agence pour la protection ressources naturelles."...
- Page 23 IMPORTANT : Certains des symboles suivants peuvent etre utilis_s sur votre outil. Veuillez les _tudier et apprendre leur signification. Une interpretation appropri_e de ces symboles vous permettra d'utiliser I'outil de fa(_onplus efficace et plus sQre. Symbole D_signation/Explication Volts Tension (potentielle) Courant Amperes Hertz...
- Page 24 _branchez le bloc-pilesde I'outil avant d'eflectuertout assemblage ou r6glage, ou de changer des accessoires. Ces mesures de s_curit_ preventives r_duisent le risque d'une mise en marcheaccidentelle de I'outil. Perceuse/visseuse sansfil CHANGEMENT PRISES D'AIR EMBRAYAGE RI_GLABLE LEVIERDEMARCHEAVANT/ARRli:RE SANS CL¢ ETVERROUILLAGE DE GACHETTE POIGNI_E CAOUTCHOUTI_E GACHETTE...
-
Page 25: Consignes De Fonctionnement
Consignes de fonctionnement GACHETTE DECOMMANDE A VITESSE VARIABLE Ne changez pas le sens de Votre outil est _quip_ d'une g&chette de commande rotation avant que I'outil vitesse variable. Vous pouvez mettre le tournevis en ne se soit compl_tement immobilis6. marche ou & I'arret en appuyant sur la g&chetteou en la changement durant la rotation du mandrin pourrait rel&chant, suivant le cas. - Page 26 INSERTIONDESFORETS Placez le levier inverseur de marche & la position centrale << OFF _. Retirez le bloc-piles et tournez I'anneau de I'embrayage jusqu'au symbole de foret EMBOUT D E << _ll'm >>. T ournez le manchon du mandrin dans le TOURNEVIS sens oppos_ &...
- Page 27 La Remarque : L'utilisation de chargeurs ou de bloc- capacit_ normale sera r_tablie en deux ou trois cycles piles non vendus par Bosch annule la garantie. de charge/d_charge. N'oubliez pas de d_brancher le chargeur durant la p_riode de remisage.
- Page 28 CHARGEMENT DUBLOC-PILES (30MN, UNEBAlE - BC130) TCMOINS, SYMBOLES ETSIGNIFICATION Si let_moinlumineux vertest_teint,cecisignifiequele piles est trop chaud ou trop froid pour ,,+s !_it=] Si le voyant rouge est allum_, le bloc- chargeur ne re(;oit pas de courant de la prise de prendre la charge rapide.
- Page 29 CHARGEMENT DUBLOC-PILES (30 MN,DEUXBALES - BC230) TEMOINS, SYMBOLESET SIGNIFICATION souilles. Nettoyez les contacts du chargeur ou du Sile temoin lumineux vertest eteint, ceci signifie que le bloc-piles conformement aux recommandations des chargeur ne re(;oit pas de courant de la prise de presentes instructions ou celles qui accompagnaient courant.
- Page 30 CHARGE DUBLOC-PILES (CHARGEUR DE1 HEURE) TflVIOINS, SYIVIBOLES ET SIGNIFICATION est trop chaud ou trop froid pour prendre la charge Sile t_moin lumineux vert est _teint, ceci signifie que le rapide. Le chargeur adoptera la charge de maintien chargeur ne re(_oit pas de courant de la prise de jusqu'&...
- Page 31 Consignes d efonctionnement Vous prolongerez la dur_e de vos forets et accomplirez utilisant une vitesse lente au d@art, vous pouvez un travail plus net si vous mettez toujours le foret en emp_cher le foret d'<< errer _. Vous pouvez augmenter contact avecle mat_riau avant d'appuyer sur la g&chette.
- Page 32 fr_quemment pour enlever les copeaux sur les de coupe, sauf Iorsquevous percez des m_taux tendres cannelures. tels que raluminium, le cuivre ou la fonte de fer. Si le trou & percer est assez grand, percez d'abord un plus Utilisez un bloc d'appui en bois pour les mat_riaux sus- petit trou, puis agrandissez-le aux dimensions ceptibles de voler en _clats tels que les mat_riaux...
-
Page 33: Entretien
Nous recommandons de confier toute intervention remplacement Bosch authentique, con(_usp_cialement d'entretiensur I'outil &un centrede service-usine Bosch pour votre outil, dolt etre utilis_. ou & un centre de service apr_s-vente Bosch agree. Nettoyage TECHNICIENS : D_branchezI'outil et/ou le chargeur de la source de courant avant d'entretenir. -
Page 34: Seguridad Personal
Lea todas las instrucciones.Si no se siguen todas las instruccionesque aparecen a continuacibn,el resultadopodriaser sacudidaselOctricas,incendioy/o lesiones graves. La expresiOn "herramienta mec_nica" en todas las advertencias que aparecen a continuaciOn se refiere a su herramientamec_nica alimentada por la red el_ctrica (herramienta al_mbrica) o su herramientamec_nica alimentada por baterias (herramienta inal_mbrica). - Page 35 Si se proporcionandispositivospara la conexi6nde operaciones distintas a aqu_llas para las que fue instalaciones de extracci6n y recolecci6n de polvo, dise_adapodria causar una situaci6n peligrosa. aseghrese de que dichas instalaciones est_n Use abrazaderas u otro modo pr;ictico de sujetar y conectadasy se usen correctamente.
- Page 36 Normas de seguridad para taladros/destornilladores sin cord6n Sujete las herramientas mecAnicas por las AI instalar una l]roca taladradora, introduzca el superficies de agarre aisladas cuando realice una cuerpo de la l]roca l]ien a fondoen el mandril. Si la operaci6n en la que las herramientas de corte broca no se introduce hasta una profundidad puedan entrar en contacto con cables ocultos.
- Page 37 Evite el contacto con la piel y los ojos. ningQn otro cargador. Utilice Qnicamentecargadores El liquido de la bateria es c_ustico y podria causar aprobados Bosch con su producto. Consulte quemaduras quimicas en los tejidos. Si el liquido Descripci6n funcional y especificaciones.
- Page 38 Skil/Bosch/Dremel para reciclarlas. La participaci6n de medio ambiente. Robert Bosch Tool Corporation en este programa es parte de nuestro compromiso hacia preservar nuestro medio ambiente y conservar nuestros recursos RBRC certificado por la EPA que se naturales."...
- Page 39 IMPORTANTE: Es posible que algunos de los simbolos siguientes se usen en su herramienta. Por favor, estt_dielos y aprenda su significado. La interpretaci6n adecuada de estos simbolos le permitir_ utilizar la herramienta mejor y con mAsseguridad. Simbolo Nombre Designaci6n/explicaci6n Volt Tensi6n (potencial) Corriente Ampere...
- Page 40 Descripci6n funcional y especificaciones esconecte el paquete de bateria de la herramienta antes de realizar cualquier ensamblaje, ajuste o cambio de accesorios. Dichas medidas preventivas de seguridad reducen el riesgo de arrancar la herramientaaccidentalmente. Taladro/destornillador s in cord6n I=[_il CAMBIADOR D E ABERTURAS DE VENTILACION PALANCADE AVANCE/INVERSION...
- Page 41 INTERRUPTOR GATILLO DEVELOCIDAD No cambieel sentidode giro VARIABLE CONTROLADA hasta que la herramientase hayadetenidopor completo. El cambioduranteel La herramientaest_ provista de un interruptor gatillo de girodel mandril p uedecausarda_os a laherramienta. velocidad variable. La herramienta se puede encender (posici6n "ON") o apagar (posici6n "OFF")al apretar o soltar el gatillo.
- Page 42 COLOCACION DE LASBROCAS MANGUITO D EL la[_L_ MANDRIL Mueva la palanca del interruptor de inversion hacia la posiciOn central "OFF" (desconectado). Quite el paquete de baterfas y gire la anilla del embrague hasta BROCA el simbolo de broca taladradora "Q,'L'Lm". Gire el DESTORNILLADORA manguito del mandril en sentido contrario al de las...
- Page 43 4. Si espera que haya largos periodos (es decir, un Ileve o envie la herramienta, el paquete de baterias y mes o m_s) en los que no se use la herramienta, Io el cargador al Centro de servicio Bosch local. Busque mejor es hacerla...
- Page 44 CARGA DELPAQUETE D EBATERIAS ( CON BAHIAUNICA DE 30 MINUTOS BC130) I'-'" s,,a,oziod,ca INDICADORES, SIMBOLOS Y SIGNIFICADO Si laluz indicadora v erdeest_apagada, elcargadorno DA", el paquete de baterias est_ ST" demasiado caliente o demasiado frio estA recibiendo energia del tomacorriente de alimentaciOn.
- Page 45 CARGA DELPAQUETEDE BATERIAS(CON DOS BAHIASDE 30 MINUTOS BC230) INDICADORES, S IMBOLOSY SIGNIFICADO Limpie los contactos del cargador o del paquete de baterias t_nicamente tal como se indica en estas Si la luz indicadora verde est_ apagada, el cargador no est_ recibiendo energia del tomacorriente instrucciones...
- Page 46 CARGA DELPAQUETEDE BATERIAS(CARGADOR DE 1 HORA) INDICADORES,SIMBOLOSY SIGNIFICADO caliente o demasiado frio para la carga r_pida. El Si la luz indicadora verde estA apagada,el cargador no cargador cambiarAa cargacontinua y lenta hasta que se estA recibiendo energia del tomacorriente alcance una temperatura adecuada,momento en el cual alimentaciOn, elcargador cambiarAautomAticamentea carga rApida.
- Page 47 Consejos d efuncionamiento Usted prolongar_ la vida de las brocas y realizar_ un permitea usted aumentar las RPM lentamente.Mediante trabajo mejor ejecutado si siempre pone la broca en la utilizaci6n de una velocidad inicial lenta, usted puede contacto con la pieza de trabajo antes de apretar el evitar que la broca se desvie.
- Page 48 Utilice un bloque de maderade "refuerzo" para piezasde con aceite para cortar, excepto al taladrar metales blandos tales como aluminio, cobre o hierro fundido. Si trabajo que es posible que se astillen, tales como materialesdelgados. el agujero que se va a taladrar es bastante grande, primero taladre un agujero m_s pequeSo y luego Usted taladrar_ un agujero mejor hecbo si disminuye la agr_ndelo hasta el tama5o requerido;...
-
Page 49: Mantenimiento
SOlose debe usar un servicio de las herramientas sea realizadoen un Centro motor de repuesto Bosch genuino diseSado de servicio de f_brica Bosch o en una EstaciOn de especialmentepara la herramienta. servicio Bosch autorizada. TECNICOS Limpieza... - Page 50 Notes: -50-...
- Page 51 Remarques • Notas: -51-...
- Page 52 Robert Bosch Tool Corporation ("el Vendedor") garantiza, tJnicamente al comprador original, que todas las herramientas mec_nicas port,tiles y para tablero de banco BOSCH estar_n libres de defectos de material o de fabricaci6n durante un periodo de un a_o a partir de la fecha de compra.