Table of Contents
Advertisement
Advertisement
Table of Contents

Related Manuals for Brookstone Rover

Summary of Contents for Brookstone Rover
- Page 1 Now you ’ re in command Rover RePORtINg fOR duty, SIR. For ages 14+...
-
Page 2: Table Of Contents
Table of conTenTs Warnings and Cautions . . . . . . . . . . . . . . . . . . . . . . . . . . . . . . . . . . . . . . . . . . . . . . . . . . . . . . . . 3 Location of Controls . -
Page 3: Quick Start
Wi-Fi connection in the settings menu on your device to sync . Open the Rover App . The driving controls and live video will roLL! appear on your device’s screen . You are now ready to... -
Page 4: Warnings And Cautions
IMPorTanT safeTy InsTrucTIons All of the safety and operating instructions should be read, adhered to and followed before the unit is operated . WarnIng Close supervision is necessary when this unit is used by or near children or mentally disabled individuals . 2 . - Page 5 • For ages 14 and up . • Keep the Rover away from face, eyes and hair at all times . Keep fingers away from wheels and trac-belts while they are in motion . • Make sure there are no insurmountable obstacles or breakable objects in the Rover’s path .
- Page 6 fcc InforMaTIon FCC ID : ZRB719302 This device complies with Part 15 of the FCC Rules . Operation is subject to the following two conditions: 1) This device may not cause harmful interference . 2) This device must accept any interference received including interference that may cause undesired operation .
-
Page 7: Location Of Controls
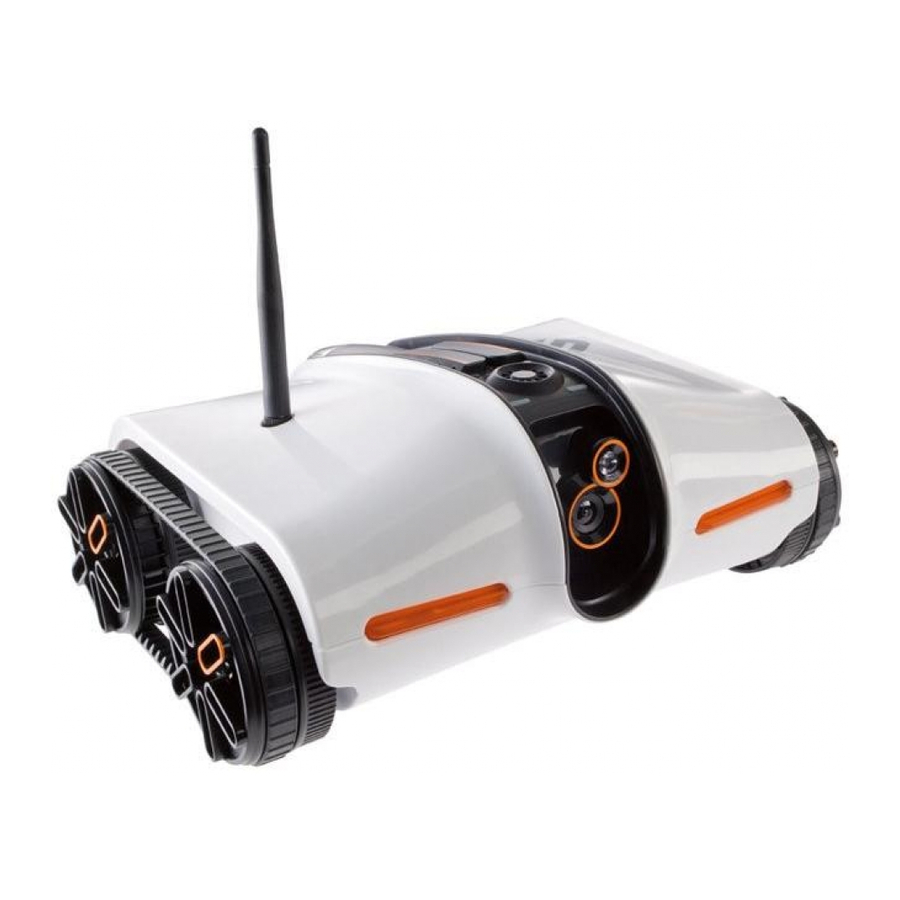
ParTs and conTrols (ROVER) Antenna Tank Body Night Vision Light Wheel (4) Trac-Belt (2) Camera Microphone... - Page 8 ParTs and conTrols (ROVER) Antenna Port Orange Power LED Blue Connection LED Battery Compartment Access Screw (2) Battery Compartment Reset Button On/Off Switch SSID Number Bottom...
-
Page 9: Control Layout
conTrol layouT (YOUR DEVICE’S TOUCH-SCREEN) Driving Controls (4 Arrows) Information Night Vision Video Screen Audio Volume Zoom In Play Path 10 . Zoom Ratio Make Path 11 . Camera G-Drive 12 . Zoom Out 100% Note: the control layout may not appear exactly as shown, depending upon your device. -
Page 10: Made For Models
3GS seT uP dOWNlOAdINg fRee APP Go to the iTunes App Store ® to download the Rover App . rover ANteNNA See the illustration below for Insert the Antenna in the Antenna instruction on how to install Port and twist the Antenna in a the Rover’s antenna . -
Page 11: Inserting The Batteries
InserTIng The baTTerIes 1 . Remove the BATTERY COMPARTMENT COVER by unscrewing the two access screws on the cover with a small screwdriver . 2 . Remove the cover and insert 6 AA batteries (included) according to the polarity indicators inside the compartment . 3 . -
Page 12: Power Up And Connect
Wi-fi connections on your device. Select your Rover’s SSId address. 3 . Select the Rover to confirm the connection . Ensure there is a check mark to the left of the SSID address and the Wi-Fi connection logo appears at the top of your device’s screen . -
Page 13: Driving
dRIvINg • Drive Forward Straight - use both arrow buttons on your device’s screen 100% • Back Up Straight – Use both arrow buttons on your device’s screen 100%... - Page 14 • Turn Right Driving Forward – Use the arrow button on the left of your device’s screen 100% • Turn Left Moving Forward – Use the arrow button on the right of your device’s screen 100%...
- Page 15 • Turn Right Driving Backward – Use the arrow button on the left of your device’s screen 100% • Turn Left Moving Backward – Use the arrow button on the right of your device’s screen 100%...
- Page 16 • 360º circle to the left – Use the arrow button on the left of your device’s screen and the arrow button on the right of your device’s screen at the same time 100% • 360º circle to the right – Use the arrow button on the left of your device’s screen and the arrow button on the right of your device’s screen at the...
-
Page 17: Driving Using Your Device's Accelerometer
. The manual drive button graphics will disappear from your device’s screen . To drive the Rover, tilt your device in the direction you would like to drive . To turn this function off, press the button, and the drive graphics will reappear on your device’s screen . -
Page 18: Camera
The Rover can take snapshots! Press the camera to take a snapshot . The photo will be saved in the Photos folder on your device . ZOOm To zoom in on a subject, press the on your device’s screen . To zoom... -
Page 19: Recording A Path
RecORdINg A PAtH The Rover can record up to 30 seconds of a driving route, and then repeat it all by itself! 1 . To record a path, press the Make Path button and drive the Rover on the route you want to record . -
Page 20: Reset
To reset the Rover, use the end of a paperclip to press the RESET button for five seconds . care and MaInTenance • Turn the Rover off before cleaning . • Wipe the Rover with a soft, dry cloth . -
Page 21: Specifications
sPecIfIcaTIons Weight: . . . . . . . . . . . . . . . . . . . . . . . . . . . . . . . . . . . . . . 2 . 3 0 lbs . Dimensions with Antenna: . -
Page 22: Faq
While in Stealth Night Vision mode, rover transmits video in black and white. Can I use multiple Rovers in the same area? Yes. Each rover has a unique SSID address (printed on the underside of the unit). If there are multiple rovers being used, the individual SSID addresses will appear... - Page 23 What happens if I receive a phone call on my device while I am using my Rover? If a phone call is received on your device while rover is in use, the app will exit. Use airplane mode on your device to avoid interruption.
- Page 24 Why does the audio on my Rover have feedback? Your device may be too close to rover or your volume setting may be too high. Can I record video or audio with my Rover? rover captures still pictures only.
- Page 25 Why does my Rover drift to the left or right? rover is designed to drive like a tank. There are independent steering controls for the left and right wheels so some drifting is normal. Uneven surfaces may also cause drifting.
-
Page 26: Warranty
(“Warranty Period”) . If a defect arises and a valid claim is received within the Warranty Period, at its option, Brookstone will either 1) repair the defect at no charge, using new or refurbished replacement parts, or 2) replace the product with a new product that is at least functionally equivalent to the original product, or 3) provide a store credit in the amount of the purchase price of the original product . - Page 27 Brookstone may provide their own warranties to the purchaser, but Brookstone, in so far as permitted by law, provides these products “as is . ” This warranty does not apply to: a) damage caused by failure to follow instructions relating to product’s use or the installation of components;...
- Page 28 Find thousands more great ideas online 719302 Merrimack, New Hampshire USA 03054 • 800-846-3000 • Brookstone . c om...