Table of Contents
Advertisement
Advertisement
Table of Contents

Related Manuals for Blaupunkt Antares T60

Summary of Contents for Blaupunkt Antares T60
- Page 1 Radiophone Antares T60 Operating instructions...
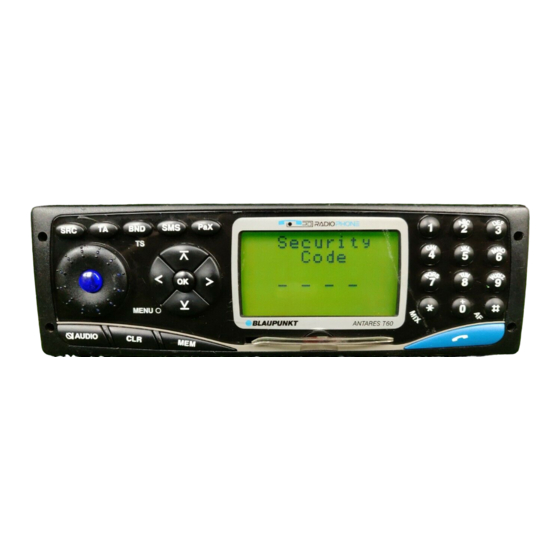
- Page 2 EQUIPMENT ILLUSTRATION...
-
Page 3: Radiophone Antares T 60 - And You Can Be Sure Safety Is First
EQUIPMENT DESCRIPTION RADIOPHONE ANTARES T 60 Volume control, on/off switch Radiophone Antares T 60 - SRC button, source selection between and you can be sure safety radio, CD changer (if connected) or is first auxiliary equipment/AUX (if con- nected) Because the Antares T 60 is the symbiosis Switch from telephone to radio or CD consisting of a powerful GSM mobile tel- changer operation (CD changer op-... -
Page 4: Table Of Contents
CONTENTS Radiophone Antares T 60 - and Radio operation ......15 you can be sure safety is first ..3 Selecting the radio mode ....15 RDS convenience functions Safety information ...... 7 (AF, REG) ........15 Safety standards ....... 8 Selecting the memory bank/ Installation ......... - Page 5 CONTENTS Selecting the phone number from General information ....21 the list of missed calls ...... 28 Emergency call ........ 21 Selecting the phone number from Starting telephone operation ..21 the list of calls received ....28 Selecting the telephone mode ..21 Deleting an entry from the incoming/ Inserting the SIM card .....
- Page 6 CONTENTS Call forwarding ........ 32 Messages (SMS) / Mailbox ..38 Registering call forwarding ....33 Reading new messages ....38 Activating call forwarding ....33 Sending messages ......38 Deactivating call forwarding ....33 Entering the service number ....38 Displaying call forwarding status ..
-
Page 7: Safety Information
SAFETY INFORMATION Using the telephone can result in interfer- Safety information ence with the correct functioning of medi- cal equipment that is not sufficiently Traffic safety shielded, particularly near the antenna. Traffic safety always has the highest prior- Please consult a doctor or the manufac- ity. -
Page 8: Safety Standards
SIM card CD changers This Radiophone has been equipped for tel- The Blaupunkt CDC A 08 and the IDC A 09 ephone operation using modern 3-V SIM CD changers can be connected to the Ra- cards. Please ask your dealer for more infor- diophone. -
Page 9: Operating The Radiophone
OPERATING THE RADIOPHONE appear in the display. Also refer to “Switching Operating the Radiophone the PIN code on/off”. Audio operation (without the Removing the SIM card telephone) Never just pull out the SIM card. Press ON. You could destroy it. Note: Push the SIM card in gently, towards the If the card tongue is not pushed in when you... -
Page 10: Switching On The Radiophone When The Ignition Is Switched Off
OPERATING THE RADIOPHONE BASIC FUNCTIONS Press OK. Basic functions Press / to select the desired setting from between 0 (no delay) and 90 min . Selecting the audio mode Press OK. You can switch between radio, CD changer operation and the operation of an auxiliary Press SRC to exit the DSC menu. -
Page 11: Controlling/Adjusting The Volume
BASIC FUNCTIONS Press OK to access the DSC menu. Activating the PaX function Press to select the menu item To activate the function you have programmed Setup . on the PaX button, Press OK. press the PaX button briefly. Press to select the menu item Controlling/adjusting the volume Beep . -
Page 12: Tone And Balance/Fader
BASIC FUNCTIONS Press OK. Tone and balance/fader Press / to select the desired setting. Treble Press OK to confirm your selection. Press AUDIO. Press SRC to exit the DSC menu. To adjust the treble, press Loudness Bass Press AUDIO. Switching Loudness on/off To adjust the bass, press or . -
Page 13: Adjusting Brightness, Colour And Legibility
BASIC FUNCTIONS Adjusting brightness, colour and Optimising display legibility (Angle) legibility You can adjust the legibility of the display to the best angle. Adjusting the colour of the Radiophone Press OK to access the DSC menu. lighting Press to select the menu item You can adjust the equipment lighting in Setup . -
Page 14: Optical Theft Protection
To connect an external audio source, you Setup . need an adapter cable. You can purchase an Press OK. adapter cable from any authorised Blaupunkt Press to select the menu item dealer. Change code . -
Page 15: Code Theft Protection
BASIC FUNCTIONS RADIO OPERATION CODE theft protection Radio operation The Radiophone has been equipped with a This Radiophone has been equipped with an code for effective protection against theft. The RDS radio receiver. Many FM stations now code must be entered each time the unit is transmit a signal along with their regular pro- disconnected from its power supply. -
Page 16: Selecting The Memory Bank/ Waveband
RADIO OPERATION Press to select the menu item Switching REG on/off Sensitivity . Press /AF for approx. 1 second until Press OK. REGIONAL ON or REGIONAL OFF ap- pears in the display. Press to select the menu item DX or LO . REG will appear in the display when this RDS function has been activated. -
Page 17: Storing The Stations With The Strongest Signals Automatically (Travelstore)
RADIO OPERATION For the station presets 1 - 9 Menu press one of the buttons 1 - 9 for approx. Press BND to select the memory bank 1 second until you hear a beep. or waveband. For the station presets 10 - 19 (for FM only) Press MEM. -
Page 18: Traffic Radio Reception
TRAFFIC RADIO RECEPTION CD CHANGER OPERATION Traffic radio reception CD changer operation Switching priority for traffic Selecting the CD changer mode announcements on/off If the Radiophone is currently in the telephone or radio mode, Press TA. press SRC repeatedly until the CD When traffic announcement priority is changer functions appear in the display. -
Page 19: Playing Tracks In Random Order (Mix)
CD CHANGER OPERATION To continue to name other CDs, proceed as Playing tracks in random order follows. (MIX) Press to select the next CD you Press /MIX briefly. want to name. All of the tracks on the CD currently playing Press OK. - Page 20 CD CHANGER OPERATION Deleting CD names Press OK to access the DSC menu. Press to select the menu item Radio . Press OK. Press to select the menu item Disc Naming . Press OK. Press to select the menu item Clear name .
-
Page 21: General Information
TELEPHONE FUNCTIONS STARTING TELEPHONE OPERATION General information Starting telephone operation Emergency call Using the Antares T 60 telephone, you can Selecting the telephone mode make emergency calls at any time anywhere If you have already inserted a valid SIM card, in the world. -
Page 22: Switching The Pin Code On/Off
STARTING TELEPHONE OPERATION Important: Press to select the PIN code you Be sure to memorise your PIN code and want to switch on or off (normally do not reveal it to any unauthorised per- PIN 1). sons. Press OK. A menu PIN 1 containing all the functions When ENTER PIN appears in the display, available will appear in the display. -
Page 23: Unblocking The Sim Card
STARTING TELEPHONE TELEPHONE SETTINGS OPERATION Unblocking the SIM card Basic functions If you enter an incorrect PIN three times in Adjusting the volume succession, the SIM card will be locked. To unblock the SIM card, you have to enter the You can adjust the volume for the ringing tone, PUK. -
Page 24: Adjusting The Hands-Free Volume
TELEPHONE SETTINGS Press CLR repeatedly until you return Press to select Handset . to the main menu or press and hold Press OK. down CLR for longer than one second On the handset, you will hear the phone ring to return to the DSC menu. at the volume currently selected. -
Page 25: Selecting The Ringing Tone
TELEPHONE SETTINGS Selecting the ringing tone Service functions You can select from among six different ring- Audible call timer ing tones: Up and down, With the audible call timer you can have a signal sound at selected intervals during a Oktave, phone call. -
Page 26: Displaying Call Charges/Time
TELEPHONE SETTINGS Displaying call charges/time Press OK. Press to select the desired setting for If this function is supported by your service Charge or Time . provider, you can display the call time and the charges for the last call and for all calls. Press OK. -
Page 27: Using The Telephone
USING THE TELEPHONE Speed-dial (from the SIM card memory) Using the telephone You can dial the phone numbers stored for Dialing phone numbers keys 1 to 9 on your SIM card at the touch of a button. You can dial phone numbers in four different Press ways: Press down the corresponding key from... -
Page 28: Selecting The Phone Number From The List Of Last Numbers Dialed
USING THE TELEPHONE Selecting the phone number from The list indicating the numbers of the calls that have been received will appear in the dis- the list of last numbers dialed play. If the caller’s number has been stored The last numbers you dialed will automati- along with the name in the phone book, the cally be stored on the SIM card. -
Page 29: Automatic Answer
USING THE TELEPHONE Automatic answer Automatic redial In the Setup menu, you can make a setting In the Setup menu, you can make a setting so that all incoming calls are answered auto- so that the number is redialled automatically matically. -
Page 30: Hold/Broker's Calls
USING THE TELEPHONE Hold/broker’s calls Note: During a conference call you can also answer Hold means that you place or receive a sec- a call from a third caller. Press OK to answer ond call, while you are already using the tel- the call or CLR to reject it. -
Page 31: What Do You Have To Do Before Travelling To A Foreign Country
Press OK. Area code: 05121 Hildesheim The NETWORK SELECTION menu will ap- Phone number: 49 ..Blaupunkt pear in the display. The number you to select Available . Press enter: +49512149 ..Press OK. -
Page 32: Editing The Network List
USING THE TELEPHONE You will return to the NETWORK SELEC- Moving an entry on the list TION menu. Select the menu item Move in the Press CLR as often as necessary until PREF. LIST menu. you return to the main menu or press Press OK. -
Page 33: Registering Call Forwarding
USING THE TELEPHONE Registering call forwarding Displaying call forwarding status In the telephone mode, press OK. Proceed as described for “Registering call forwarding” Press to select Menu . For your last selection, select Status . Press OK. The status of the call forwarding function will to select Forwarding . -
Page 34: Deactivating Call Barring
USING THE TELEPHONE Locking the Phone Press to select call barring for incom- ing or outgoing calls. There are different ways in which you can lock Press OK. your Radiophone. Press to select whether you want to No calls possible except for emergency activate call forwarding for any or all of calls ( All ) the following services: telephone calls,... -
Page 35: Phone Book
PHONE BOOK Storing names / telephone Phone book numbers Entering names and telephone Press OK in the telephone mode. numbers The DSC menu will appear in the display. The will mark Setup . Names and telephone numbers are entered cursor using the buttons 0 - 9. -
Page 36: Finding Entries
PHONE BOOK Finding entries Use the buttons 0 - 9 to make any changes, press CLR to delete charac- You can search for entries in the phone book ters. by either name or memory number. Once you have made all the changes, Press MEM in the telephone mode. -
Page 37: Capacity Query
PHONE BOOK Entering your own phone number Press to move the entry to the po- sition in which you want to copy it. You can enter up to three phone numbers for Press OK. yourself and the mailbox number. The entry will be copied. You will return to the Press OK in the telephone mode. -
Page 38: Messages (Sms) / Mailbox
MESSAGES / MAILBOX Press to select New . Messages (SMS) / Mailbox Press OK. You can send and receive SMS messages Now use the buttons 0 - 9 to enter the with your Radiophone. message. For more information on how Reading new messages to enter text, refer to “Entering names/ telephone numbers”... -
Page 39: Setting Message Validity
MESSAGES / MAILBOX A selection will appear in the display. You can Setting message validity choose whether or not to delete the message. You can select a setting to determine how long Press with the desired option. the Service Center should try and send the message to its recipient. -
Page 40: Cell Broadcast Messages
SPECIAL FUNCTIONS MESSAGES / MAILBOX If no number has been entered as yet, Special functions enter the mailbox number with the but- tons 0 - 9. Determining the user group Press OK. User group is a function that is available from your provider. -
Page 41: Specifications
SPECIAL FUNCTIONS SPECIFICATIONS Press OK. Specifications Use the buttons 0 - 9 to enter the phone access code or PIN2. Amplifier Press to select between Charge to Output power: 4 x 23 watts RMS have the charges per unit indicated and according to the input of a Credit . -
Page 42: Operating The Radiophone With The Rct 07 Remote Control Unit (Optional)
REMOTE CONTROL (OPTIONAL) CD changer operation (optional) Operating the Radiophone with the RCT 07 remote Activates the telephone mode Decreases the volume control unit (optional) Increases the volume With the optional RCT 07 remote control unit, Switches traffic radio standby on/off you can operate the most important functions Plays next track, moves cursor in lists of the Antares T 60 conveniently and safely... -
Page 43: Telephone Menu Overview
TELEPHONE MENU OVERVIEW DSC menu – Telephone Setup Menu select with Phone book back with back to radio Setup Volume Ringing tone Handfree Auto. answer On / Off Auto. redial On / Off Ring. tones Ringing tone Up and down Oktave Trill 2x Oktave... - Page 44 TELEPHONE MENU OVERVIEW DSC menu – Telephone Setup Menu select with Phone book back with back to radio Menu Mailbox Call Messages Input Output Patterns Return call Delay Meeting Appointment Confirmat. Edit Storage No more messages Broadcast On / Off Parameters Validity 1 ...
- Page 45 TELEPHONE MENU OVERVIEW Menu Forwarding All calls Speech Status Service If busy Data Delete If no answer Register unreachable All service Activate Clear all Yes / No Deactivate Barring Outgoing all calls Speech Internation Data Roaming net All service Incoming all calls Roaming net Status...
- Page 46 TELEPHONE MENU OVERVIEW DSC menu – Telephone Setup Menu select with Phone book back with back to radio Phone book Find name Name? (use 10-key keypad - ABC) Find Pos. Position? (use 10-key keypad - 1 ... 0) Add entry SIM card Number? Phone...
-
Page 47: Radio Menu Overview
RADIO MENU OVERVIEW DSC menu – Radio Setup Radio select with back with back to radio Setup Language Deutsch English Italiano Français Español Nederlands Svenska Português Automatic Card LED On / Off Beep Volume Off / 1 ... 9 Keytones Volume Off / 1 ... - Page 48 RADIO MENU OVERVIEW DSC menu – Radio Setup Radio select with back with back to radio Radio Radiotext Off / On / On/Eng. off Loudness Level 1 ... 6 TA volume Level 0 ... 63 Volume FIX Level 0 ... 63 Sensitivity DX Low / Middle / High LO Low / Middle / High...
-
Page 49: Glossary Of Technical Terms
GLOSSARY Call waiting Glossary of Technical A quiet beep during a telephone call informs Terms you that another caller is trying to reach you. Access code Cell Broadcast Barred functions can be operated after the access code has been entered. Cell Broadcast is a short message service which operates in numbered “channels”. - Page 50 GLOSSARY Handset PIN code - Personal Identification Number Telephone receiver complete with cradle (ac- PIN 1 cessory). Prevents your SIM card from being used by unauthorised persons. You must enter the PIN IMEI - International Mobile Equipment Iden- code each time you insert the SIM card. tity PIN 2 International identity for mobile equipment.
- Page 51 GLOSSARY Scrolling TS - Travelstore Moves you through a directory. Automatically stores the radio stations with the strongest reception signals, can be re- SIM card - Subscriber Identification Module trieved by pressing the station preset buttons. Very useful on trips. For radio and telephone operation.
-
Page 52: Installation Instructions
Antares T60 7 649 980 010 / 310 (DE) Sicherheitshinweis Das Gerät Antares T60 entspricht der „GSM Power Class 2 (8 Watt)“. Zu Ihrer Sicherheit darf das Gerät nur im eingebauten Zustand im Fahrzeug betrieben wer- den. Die GSM Telefonantenne muss außen an der Fahrzeugkarosserie befestigt sein. Die Benut- zung einer Scheibenantenne ist nicht zulässig. - Page 53 01-324 8756 Poland (PL) 0800-118922 022-8771260 Turkey (TR) 0212-3350677 0212-3460040 (USA) 800-2662528 708-6817188 Brasil (Mercosur) (BR) +55-19 3745 2769 +55-19 3745 2773 Malaysia (Asia Pacific) (MAL) +604-6382 474 +604-6413 640 Blaupunkt GmbH 02/04 TRO CM/PSS2 - 8 622 402 456 (GB)