
Related Manuals for Bissell 58F8


Summary of Contents for Bissell 58F8
- Page 1 U S E R ’ S G U I D E 58F8/18M9P SERIES Safety Instructions Product View Assembly Operation 8-12 Maintenance and Care 13-14 Troubleshooting Consumer Services Replacement Parts Accessories Warranty ®...
- Page 2 BISSELL Rewind SmartClean We’re glad you purchased a BISSELL vacuum. Everything we know about floor care went into the design and construction of this complete, high-tech home cleaning system. By purchasing this product you are helping BISSELL with our commitment to reducing our impact on the environment through an expanding range of sustainable design efforts.
-
Page 3: Important Safety Instructions
MPORTANT SAFETY INSTRUCTIONS When using an electrical appliance, basic precautions should be observed, including the following: REaD all InStRUctIonS bEFoRE USInG yoUR UPRIGht VacUUM. Always connect to a polarized outlet (left slot is wider than right). Unplug from outlet when not in use and before con- ducting maintenance. -
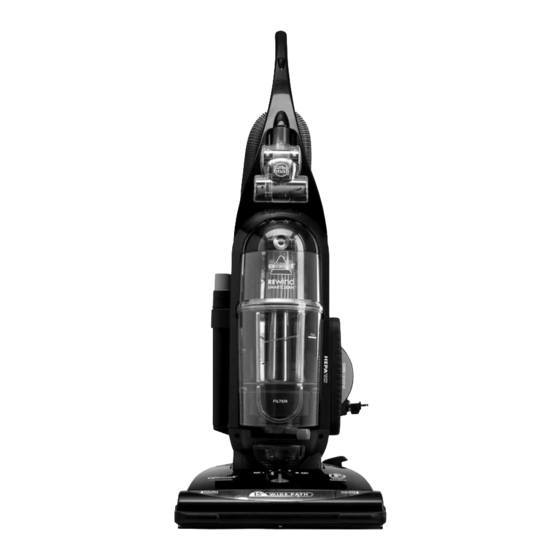
Page 4: Product View
roduct view Stretch Hose TurboBrush ® Clean Carpet Sensor (select models only) Clean Filter Indicator (select models only) Crevice Tool Extension Wand Dirt Container Filter Cup Lock ’n Seal ™ Lever Headlight Height Adjustment Knob Furniture Protection Guard caUtIon: Do not plug in your vacuum cleaner until you are familiar with all instructions and operating procedures. -
Page 5: Attach Handle To Vacuum
ssembly the only tool you’ll need to assemble your vacu- um cleaner is a Philips head screwdriver. Attach handle to vacuum Locate the vacuum handle and remove the screw packet taped to the base of the handle. Stand the vacuum upright and slide the base of the handle firmly into the grooves at the top of the vacuum body. -
Page 6: Operation
Handle position Press the handle release pedal with your foot to place your BISSELL vacuum into one of three cleaning positions. Upright For storage and above floor cleaning with tools. normal cleaning Press handle release pedal once. Use for most household floor cleaning tasks. -
Page 7: Special Tools
12 to check for and clear clogs. Special tools your bISSEll vacuum is not only a powerful carpet and rug vacuum cleaner, it’s also a versatile above floor vacuum cleaner when you select one of the special tools. -
Page 8: Maintenance And Care
peration Power cord the power cord is located on the right of the vacuum. Gently pull out the power cord, watching for the yellow line. Stop pulling the power cord once the yellow line is visible. there is also a red line, which indicates the end of the usable cord. - Page 9 Do not PUt In DIShWaShER. Cleaning the inner & outer circular filter Use only genuine bISSEll style 16 replacement filters in your bISSEll vacuum. Turn power off. Unplug the cleaner from electrical outlet.
-
Page 10: Checking Rotating Floor Brush/Drive Belt
Rinse well under warm water, then air dry thoroughly before replacing. Replacing the post-motor filter Use only genuine bISSEll style 16 (#32076) replacement filters in your bISSEll vacuum. Unplug the cleaner from electrical outlet. The post-motor filter assists in the filtration process to return clean air to the room. -
Page 11: Replace Drive Belt
Check air passageway for obstructions. Remove debris from this area. Replace drive belt Use only genuine bISSEll style 9 replacement belts (#32074) in your bISSEll vacuum. Turn power off. Unplug cleaner from electri- cal outlet. With rotating floor brush removed from... -
Page 12: Replace Light Bulb
11 and inspect the air passageway for obstructions. Replace light bulb Use only bISSEll Replacement bulbs in your bISSEll vacuum. Unplug cleaner from electrical outlet Using a flat screwdriver, table knife or coin,... - Page 13 . b i s s e l l . c o m Remedies 1. Check electrical plug 2. Check/replace fuse or reset breaker 3. Refer to a BISSELL authorize service center for repair or replacement Remedies 1. Adjust powerfoot to correct height setting 2.
-
Page 14: Troubleshooting
Please do not return this product to the store. For any questions or concerns, bISSEll is happy to be of service. ISSELL Consumer Services For information about repairs or replacement parts, or questions about your warranty, call: Or visit the BISSELL website - www.bissell.com... -
Page 15: Replacement Parts
BISSELL Consumer Services or by vis- iting our website. To locate a retailer near you, or to place an order using visa, masterCard, Discover or American Express, call... -
Page 16: Limited Three Year Warranty
Subject to the *EXcEPtIonS anD EXclUSIonS identified below, upon receipt of the product BISSELL Homecare, Inc. will repair or replace (with new or remanufactured components or products), at BISSELL’s option, free of charge from the date of purchase by the original purchaser, for three years any defective or malfunctioning part.