Table of Contents
Advertisement
Quick Links
Introducing the SATA II PCIe RAID
The SATA II PCIe RAID is an ultra high-speed two
channel Serial ATA Generation II RAID controller for use
in PCI Express enabled systems.
Features and Benefits
•
Compliant with PCI Express Base Specification 1.0A
•
Compliant with Serial ATA 1.0 specifications with
support for full complement of SATA II optional
features
•
PCI Express 1-lane (x1) SATA II adapter works with
PCI Express slots with different lane width
•
Installs in any available PCI Express slot and
supports data transfer rates up to 3.0Gbps (300MBps)
•
Supports Native Command Queuing (NCQ),
Non-zero offsets NCQ, and Out-of-order data
delivery NCQ
•
Independent command fetch, scatter/gather, and
command execution
•
Supports RAID 0 (striping) and RAID 1 (mirroring)
for speed and data protection respectively
System Requirements
•
PCI Express-enabled system with one available PCI
Express slot
•
Windows
XP (32-/64-bit) / Server 2003 & 2008 (32-/64-bit) /
2000
04-0389C
SATA II PCIe RAID
Quick Installation Guide
®
7 (32-/64-bit) / Vista (32-/64-bit) /
1
Advertisement
Table of Contents

Related Manuals for SIIG SATA II PCIe RAID


Summary of Contents for SIIG SATA II PCIe RAID
-
Page 1: Quick Installation Guide
SATA II PCIe RAID Quick Installation Guide Introducing the SATA II PCIe RAID The SATA II PCIe RAID is an ultra high-speed two channel Serial ATA Generation II RAID controller for use in PCI Express enabled systems. Features and Benefits •... -
Page 2: Package Contents
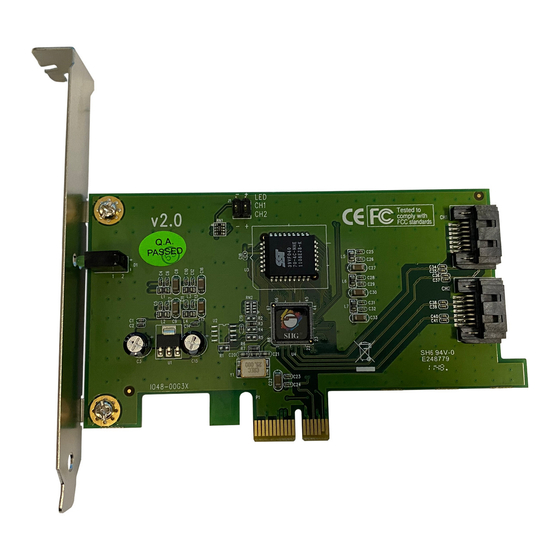
Quick Installation Guide Layout Hard Disk LED Pins Serial ATA (optional)* Connectors HDD Activity Figure 1. SATA II PCIe RAID layout * Note: Connect the hard disk drive activity LED of the system case to the pins horizontally. This connection is optional. -
Page 3: Hardware Installation
Now go to Device Connection to connect your Serial ATA hard disk drives. Device Connection The SATA II PCIe RAID is a two channel Serial ATA controller that supports two Serial ATA hard disk drives. It is recommended to use identical hard drives for all RAID configurations, however, it's possible to combine hard drives of different sizes and makes. -
Page 4: Disk Drive
Power cable Figure 2. Hard disk drive connections Attach the other end of the Serial ATA data cable to the Serial ATA connector on the SATA II PCIe RAID. Serial ATA cable Figure 3. Connecting the Serial ATA data cable(s) -
Page 5: Table Of Contents
Go to RAID Arrays to configure the RAID BIOS. RAID Arrays RAID Arrays are setup in the SATA II PCIe RAID BIOS. Find your RAID set from the table of contents. Table of Contents RAID 0 (striping) ..........page 6-7 RAID 1 (mirroring) ......... -
Page 6: Raid 0 (Striping)
RAID 0 (Striping) This RAID array to be used on New/Blank hard drives. Striping will destroy existing data on the hard drive. Auto Configuration is recommended. For applications that require custom chunk size, Manual Configuration is offered. Auto Configuration (recommended) The default chunk size is 64k when selecting Auto configuration. -
Page 7: Raid 1 (Mirroring)
Select chunk size from 8k, 16k, 32k, 64k or 128k, then press Enter. Select the first drive, press Enter. Select the second drive, press Enter. Input the RAID size, press Enter. When asked Are You Sure (Y/N)?, press Y to accept. 10. -
Page 8: Rebuilding A Failed Mirror Set
At the next screen select Create RAID Set, then press Enter. At the next screen select RAID1 then press Enter. Select Manual configuration, then press Enter. Select the Source drive, press Enter. Select the Target drive, press Enter. Select Create with data copy, then press Enter. Select online copy, then press Enter. -
Page 9: Deleting Raid Arrays
Input the RAID size, press Enter. When asked Are You Sure (Y/N)?, press Y to confirm. Select Rebuild Raid 1 Set, press Enter. When asked Are you sure (Y/N)?, press Y confirm. The mirror will begin rebuilding. Do not interfere with the process. -
Page 10: Resolving Conflicts
Resolving Conflicts When a RAID set is created, the metadata written to the disk includes drive connection information. If, after a disk failure, the replacement disk was previously part of a RAID set (or used in another system), it may have conflicting metadata. -
Page 11: Software Installation
Software Installation This section provides information on how to install the SATA II PCIe RAID drivers. Windows 7 For A New Installation Setup the RAID array prior to Windows installation. Follow Windows installation procedure. At Where do you want to install Windows?, click Load Driver. - Page 12 For 32-bit system: Type D:\32bit, then click Next. (Change D: to match your CD-ROM drive letter) For 64-bit system: Type D:\64bit, then click Next. (Change D: to match your CD-ROM drive letter) Click Close to complete the installation. When Windows resumes, go to SATARaid5 GUI on page 19 and install the RAID utility.
- Page 13 When Windows installation completes, go to SATARaid5 GUI on page 19 and install the RAID utility. For An Existing Installation Setup the RAID array prior to driver installation and boot up to Windows. At the Found New Hardware window, click Locate and install the driver automatically (recommended).
- Page 14 Select Silicon Image SiI 3132 SoftRaid5 Controller..., then click Next. Follow the on-screen instructions to complete Windows Vista operating system installation. When Windows installation completes, go to SATARaid5 GUI on page 19 and install the RAID utility. For An Existing Installation Setup the RAID array prior to driver installation and boot up to Windows.
- Page 15 Setup the RAID array prior to Windows installation. Follow Windows installation procedure. At the Windows Setup screen, press F6 to install the RAID driver. When prompted, press S to specify the location of the driver. Insert the floppy disk, then press Enter. Select Silicon Image SiI 3132 SoftRaid 5 Controller for Windows XP/Server 2003, then press Enter.
- Page 16 Windows XP / Server 2003 (64-bit ) For A New Installation A new installation requires a floppy disk for the driver installation. To make this floppy disk, copy the contents of the 64bit folder, found on the driver CD, onto a blank floppy disk then follow the directions below.
- Page 17 Insert the driver CD, select Install the software automatically (Recommended), and click Next. Accept the default entry, then click Next. Click Finish. Repeat steps 2-5. Click Yes to restart to complete the installation. When Windows resumes, go to SATARaid5 GUI on page 19 and install the RAID utility.
- Page 18 For An Existing Installation Setup the RAID array prior to driver installation and boot up to Windows. At Found New Hardware Wizard, click Next. Select Search for a suitable driver for my device (recommended), then click Next. Insert the driver CD, check CD-ROM drives, uncheck the other boxes, click Next, click Next again, then click Finish.
- Page 19 SATARaid5 GUI The SATARaid5 GUI provides the user an easy way to monitor your RAID set. SATARaid5 GUI Installation Note: Windows 2000 SP4 or later is required for installation. Insert the driver installation CD. At the Windows desktop click Start, then Run. For Windows 7/ Vista / Server 2008: In the Start Search box, type D:\gui\setup.msi, press Enter.
- Page 20 Device Configuration RAID Groups window window RAID Groups window This window identifies SATA host adapters and configured RAID groups. Selecting each RAID group in the RAID Groups window, members consisting of the RAID group will be highlighted in the Device Configuration window.
- Page 21 SATARAID5 Configuration Menu SATARAID5 configuration menu includes customization of the settings for Log File, Popup and Advanced Options. By clicking on File, then Configuration, the user may customize the settings for Log File, Popup and Advanced Options tabs. Log File The log file is used to store event information received from all the RAID drivers.
- Page 22 Popup The popup window is a visual notification that an event has occurred. The popup window can be disabled or set to popup for only certain event levels. The different levels are: Informational - The popup window will be displayed for the following events: - Informational - Warnings...
- Page 23 This command displays a dialog box to let the user create or delete a spare drive. This feature is not used with the SATA II PCIe RAID. Delete Member (see Advanced Options) This command displays a dialog box to let the user choose RAID groups' members to delete.
- Page 24 RAID Group Menu Commands Create RAID Group This command displays a dialog box to let user create a RAID group, the user needs to specify the following parameters: RAID Group Label: Provides a name for the RAID group. RAID Group: Select a group ID from the available ID list. Configuration: Striped: for RAID 0;...
- Page 25 RAID Group Summary This command displays a dialog box to show all RAID groups' group ID, configuration and status. The RAID Group Summary window has it's own menu bar. All options available via the menu bar are shown below. Sorting: This command displays a dialog box to let the user choose up to 3 items to sort RAID group items in the RAID Group Summary window.
- Page 26 Resume: This command allows the user to resume the suspended task items. Cancel: This command allows the user to cancel the selected task items. Delete: This command displays a dialog box to let the user delete the selected task items. Event Log This command displays the Event Log window.
- Page 27 RAID type. This item is disabled if no legacy RAID group exists. Create/Delete/Convert Legacy Spare These commands display a dialog box to let the user configure a legacy spare. These features are not used with the SATA II PCIe RAID.
- Page 28 Blank Page...
- Page 29 Blank Page...
- Page 30 Blank Page...
-
Page 31: Technical Support And Warranty
Step 1: Submit your RMA request. Go to www.siig.com, click Support, then RMA to submit a request to SIIG RMA. If the product is determined to be defective, an RMA number will be issued. Step 2: After obtaining an RMA number, ship the product. - Page 32 Fremont, CA 94538-3152, USA Phone: 510-657-8688 SATA II PCIe RAID is a trademark of SIIG, Inc. SIIG and the SIIG logo are registered trademarks of SIIG, Inc. Microsoft, Windows and Windows Vista are either registered trademarks or trademarks of Microsoft Corporation in the United States and/or other countries. Other names used in this publication are for identification only and may be trademarks of their respective companies.