Table of Contents

Related Manuals for Russell Hobbs RHWM61200B


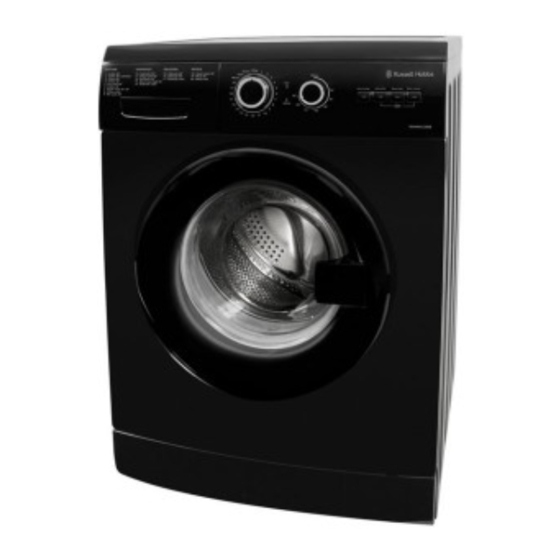
Summary of Contents for Russell Hobbs RHWM61200B
-
Page 1: Instruction Manual
6KG 1200 Spin Speed Washing Machine Instruction Manual Model number: RHWM61200B For Customer Services & Spare Parts please call 0845 208 8750 Opening times: Monday - Friday 8am – 6pm & Saturday 9am – 1pm or visit us at www.productcareuk.com... -
Page 2: Table Of Contents
Contents …………………………………………………………………… 3 - 4 Safety Instructions …………………………………………………………………… 5 - 6 Before using the appliance …………………………………………………………………… 6 - 10 Installation How to use …………………………………………………………………… 11 - 18 Washing procedure & program …………………………………………………………………… 19 - 20 selection …………………………………………………………………… 21 - 24 Maintenance Removing stains ……………………………………………………………………... -
Page 3: Safety Instructions
Safety Instructions • Do not use an extension lead for this appliance. Only plug directly into a wall socket. • Do not plug in damaged plug sockets • In case the power cable becomes damaged, contact 0845 208 8750 for advice. •... - Page 4 Safety Instructions • The appliance is not intended for use by people (including children) with reduced physical, sensory or mental capabilities, or lack of experience and knowledge unless they have been given supervision or instruction concerning use of the appliance by a person responsible for their safety.
-
Page 5: Before Using The Appliance
Before using the appliance • Transportation screws which are located at the back of the machine, must be removed before using or running the machine. You will void the manufacturer’s guarantee if these are not removed before using or running the machine •... - Page 6 Before using the appliance The Back of the machine Water inlet valve Transport bolts Discharging hose Power cable For Customer Services & Spare Parts please call 0845 208 8750 Opening times: Monday - Friday 8am – 6pm & Saturday 9am – 1pm or visit us at www.productcareuk.com...
-
Page 7: Installation
Installation 1. Before operating the washing machine, remove the 4 transportation screws and rubber spacers from the back of the machine. If the screws are not removed, it may cause heavy vibration, noise and product malfunction, (voiding the guarantee). 2. Unscrew the 4 screws with a wrench, spanner or cross-tip screwdriver. Keep the 3 screw as they will need to be re-used if the machine has to be transported. - Page 8 Installation 4. Adjust the level of washing machine by the adjustable feet. Please check if there is a gap between the four adjustable feet and the floor. If there is then adjust the level of the washing machine by turning the adjustable feet. Make sure that the machine does not sway and that it is completely level.
- Page 9 Installation Electrical connection • Your washing machine is set to 220-240V and 50Hz. • The mains cord of your washing machine is equipped with a specific earthed plug. This plug should always be inserted to a earthed socket of 13 amps. The current value of the fuse should be 10 amps.
- Page 10 Installation Ordinary tap (not included) Screw-shaped tap For Customer Services & Spare Parts please call 0845 208 8750 Opening times: Monday - Friday 8am – 6pm & Saturday 9am – 1pm or visit us at www.productcareuk.com...
- Page 11 Installation Water drainage • Never forget to install drain hose before operating your washer. • The water drain hose should be mounted at a height of minimum 60 cm, maximum 100 cm from the ground. • The end of the water drain hose can be fitted directly to the drainage hole on the back side of the washer.
-
Page 12: How To Use
How to use To obtain the best washing results, you must operate your washer properly. This section gives you this important information. Preparing clothes for washing • Close zippers, snaps, and hooks to avoid snagging other items. • Remove pin, buckles, and other hard objects to avoid scratching the washer interior. •... - Page 13 How to use • Reduce wash time when using a small load size setting. A load with only a few small items needs less wash time. • Use a large load size setting to reduce wrinkling with permanent press clothes and some synthetic knits.
- Page 14 How to use Adding detergent • Please use only the powder detergent for the front loader washing machine. • Please use the correct amount of detergent in conformity with the instruction of the detergent manufacturer. • Using a large amount of detergent, more than the recommended amount, can cause lots of soapsuds and will overload to the motor.
- Page 15 How to use Detergent drawer Program dial Temperature dial Auxiliary functions Select the required washing programme by rotating the programme dial in either direction (clockwise or anti-clockwise). Ensure that the programme dial is aligned with the required programme. The washing water temperature of a selected programme can be changed by using the Temperature dial.
- Page 16 How to use Start/pause button Used to start a selected program or pause during operation. Important note • If you want to cancel/reset a programme after it has started, press the Start/pause button, turn the programme dial to the stop. •...
- Page 17 How to use • The Easy iron and Rinse hold functions cannot be used in conjunction Function indicator lights • When the Start/pause button or any function button is pressed, the corresponding light turns on. • The light turns off when the function button or start/pause button is re-pressed, or when the process that has been selected is complete.
- Page 18 How to use Before Use • Plug in the machine • Ensure the inlet hose is connected correctly and turn the inlet valve from its closed position to the open position. • Check that the drainage pipe is connected correctly. •...
- Page 19 How to use Child lock • Child lock is used in order to protect the washing cycle from the effects of unwanted button activations during the cycle. The Child lock is activated by pressing the Extra rinse and Start/pause buttons on the control panel at the same for more than 3 seconds. •...
-
Page 20: Washing Procedure & Program
Washing procedure & programme selection... - Page 21 Washing procedure & programme selection Error Messages Your machine is equipped with systems that continually self-check during washing operations and then take the necessary precautions and warn you in case of any breakdown. Failure Failure indicator Probable failure The process to be done code Shut the door properly so that you hear the The door is not shut...
-
Page 22: Maintenance
Maintenance The correct care of your washer can extend its life. This section explains how to care for your washer properly and safely. • When cleaning your machine, ensure that the machine is unplugged and the water supply is closed off. Cleaning your Washing Machine Exterior •... - Page 23 Maintenance Non-use or vacation care Operate your washer only when you are at home. If you are on vacation or don’t use your washer for an extended period of time, you should: • Unplug the power supply cord or turn off electrical power to the washer. •...
- Page 24 Maintenance Cleaning the drain filter • This drain filter is used to screen foreign objects such as threads, coins, pins, buttons etc. • If the drain filter is not cleaned regularly (after every 10 times of use), a drain problem could be caused.
- Page 25 Maintenance Cleaning the detergent case • After a while detergent and fabric softeners leave a deposit in the case; • It should be cleaned from time to time with a jet of running water. If necessary it can be removed completely from the machine by pressing the catch downwards and by pulling it out.
-
Page 26: Removing Stains
Removing stains Stained, heavily-soiled, or greasy items may need to be prewashed or soaked for best results. Soaking helps remove protein-type stains like blood, milk or grass. Prewashing helps loosen soil before washing. Stain removal rules • Use warm water for soaking or prewashing stained laundry. Hot water can set stains. •... -
Page 27: Trouble Shooting
Trouble shooting • All repairs to your machine should be carried out by a qualified engineer or by an appointed engineer from Product Care, (0845 208 8750). • Before contacting a qualified engineer or Product Care, please see if the problem your machine has developed can be solved with the help of the below: Fault Possible cause... - Page 28 Trouble shooting • All repairs to your machine should be carried out by a qualified engineer or by an appointed engineer from Product Care, (0845 208 8750). • Before contacting a qualified engineer or Product Care, please see if the problem your machine has developed can be solved with the help of the below: Fault Possible cause...
-
Page 29: Specification
Specification Specification Model RHWM61200B Dimension (mm) (H)845 X (W)597 X (D) 527 Maximum mass of dry close (kg) Unit Weight (kg) 68.5 (Net) / 71.5 (Gross) Water pressure (Mpa) Maximum: 1 Mpa / Minimum: 0.1 Mpa Spin Speed (RPM) 1200 Operating Water Pressure 0.03MPa ~ 0.8MPa (0.3kgf/cm2 ~ 8kgf/cm2) - Page 30 Connection to the mains supply WARNING- THIS APPLIANCE MUST BE EARTHED This appliance is designed to operate from a mains supply of AC230V ~ 50HZ. Check that the voltage marked on the product corresponds with your supply voltage. This product is fitted with a 13A plug complying with BS1363. If this plug is unsuitable or needs to be replaced, please note the following: Important: The wires in the mains lead are Coloured in accordance with the following code:...
-
Page 31: Spare Parts
Spare parts Spare parts Contact details Detergent drawer Available at www.productcareuk.com call 0845 208 8750 Door Available at www.productcareuk.com call 0845 208 8750 Door seal Available at www.productcareuk.com call 0845 208 8750 Adjustable leg(s) Available at www.productcareuk.com call 0845 208 8750 Inlet hose Available at www.productcareuk.com... - Page 32 For Customer Services & Spare Parts please call 0845 208 8750 Opening times: Monday - Friday 8am – 6pm & Saturday 9am – 1pm or visit us at www.productcareuk.com Revision 1 This symbol is known as the 'Crossed-out wheelie bin Symbol'. When this symbol is marked on a product/batteries, it means that the product/batteries should not be disposed of with your general household waste.