Table of Contents
Advertisement
Quick Links
Download this manual
See also:
User Manual
Advertisement
Table of Contents

Related Manuals for Ematic eGlide XL Pro II


Summary of Contents for Ematic eGlide XL Pro II
- Page 2 eGlide XL Pro II 10” Tablet PC User Manual Please read this manual before operating your device. Keep it for future reference.
- Page 3 Personal information you submit may be read, collected or used by the service or application provider and/or other users of those forums. Ematic is not responsible for any information, content or services you access, download, or use from the Internet. You are responsible for maintaining virus and other Internet security protections when accessing the internet.
-
Page 4: Table Of Contents
Table of Contents Section 1: Getting Started ........1 App Shortcuts ............ 9 Understanding this User Manual ......1 Applications ............. 10 Section 3: Settings..........11 Special Text ............1 Battery Management ..........2 Display ............11 Battery Indicator ..........2 Applications ............. 12 Charging the battery...........2 Email ............... -
Page 5: Section 1: Getting Started
Section 1: Getting Started This section helps you to quickly start using your Special Text device. Notes, Cautions, and Warnings Understanding this User Manual NOTE: Indicates important information This manual gives operation instructions that helps you make better use of your according to the default factory settings. -
Page 6: Battery Management
Battery Management Battery Indicator This device is powered by a rechargeable battery The battery icon in the System Bar shows battery and is designed and manufactured to be used power level. and recharged frequently. As with all batteries, the capacity of the battery reduces each time it is In the event the battery becomes low on power, charged/depleted. -
Page 7: Turning The Device On/Off
b. When fully charged, the battery Press and hold the POWER button for 3 indicator light is green. seconds. Release the POWER button. NOTE: The device can be used while the battery is charging, although the charging NOTE: It may take a few minutes for the time is longer when operating and system to start-up. -
Page 8: Micro Sd Card
SD Card Removing an Micro SD Card CAUTION: Use care to properly remove Installing a Micro SD Card the Micro SD Card. Any sudden removal Carefully insert a Micro SD card until it may cause damage to the device or to clicks into place. -
Page 9: Section 2: Understanding Your Device
Section 2: Understanding Your Device This section outlines the key features of your • Volume Key: Press Volume Button “+” or device, including keys, displays, and icons. “-” for volume adjustment. • Camera Lens: Use when taking pictures Features and recording video. •... -
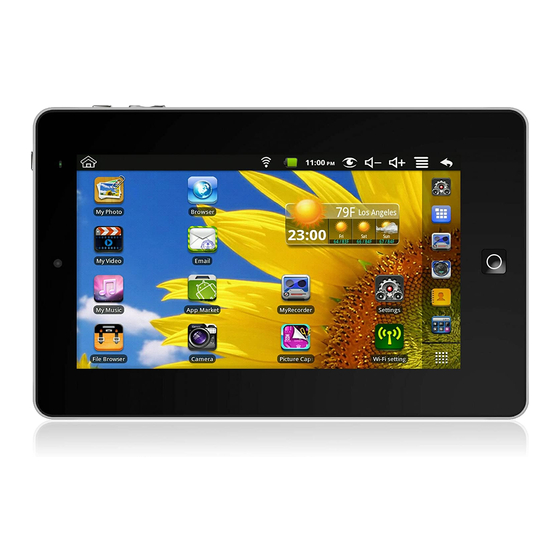
Page 10: Home Screen
The display settings can be customized to your your device. After powering ON the device, the preferences. “Ematic” logo will be displayed and then the HOME screen below: Application - Software which allows you to perform a specific task. Your device is preloaded with a variety of applications, and additional ones can be downloaded from the App Shop. -
Page 11: Navigation
Swipe: Touch and slide your finger across the Navigation screen and then release. Your device has a multi-touch screen that allows • Moves items such as images and icons on quick, easy and convenient navigation for all the screen. applications. •... -
Page 12: System Bar
System Bar Charging Indicator: Battery is charging. The System Bar offers navigation tools, plus information about your device’s current status. Device Power Critical: Charge immediately to avoid device shut down. HOME Home to display the HOME screen. USB Charging Indicator: Connected to PC via USB cable. -
Page 13: App Shortcuts
New Email Message: You have new App Shortcuts email. Touch the icon for additional Use App shortcuts to quickly access applications information. from the HOME screen, Configure input methods: When the Adding Shortcuts from the HOME Screen keyboard is displayed, touch for a menu of Touch and Hold on the screen quick keyboard settings. -
Page 14: Applications
Applications Calendar: Record events and appointments The ALL APPLICATION screen holds all to manage your schedule. applications installed on your device. From the HOME screen, touch Camera: Take pictures or record videos. Apps. Swipe your finger left or right to browse the Clock: Schedule alarms to remind you of available applications. -
Page 15: Section 3: Settings
Section 3: Settings • Lock screen: Touch Wallpaper to select Display a photo from the Super-HD player. Brightness Set the default screen brightness. Auto-rotate screen When enabled, the screen’s orientation changes From the Home screen, touch Apps automatically when you rotate the device. Settings ... -
Page 16: Applications
Manage applications Applications Manage and remove applications from your device. You can download and install applications from the From the HOME screen, touch Settings App Shop. Apps Manage applications. Tap an application to view and update information about Downloaded, All or Running applications, including memory usage, default settings and permissions. -
Page 17: Email
Email Composing and Sending Email Configuring Email Accounts From the Home screen, touch Apps ➔ You can configure Email for most accounts in Email. just a few steps. Select an account, then touch Compose. Tap entry fields to enter recipients and the Configuring the first email account email text. -
Page 18: Backup & Reset
Backup & Reset Language & input Select a language for your device’s screens, manage a dictionary of words you’ve added to the device, and configure other input options. Select language From the Home screen, touch Apps Settings Personal Language & input ... -
Page 19: Date & Time
Date & time • Set time: Enter the current time (only available when the Automatic setting is By default, your device receives date and time disabled). information from the wireless network. When you are outside network coverage, you may want to •... -
Page 20: Section 4: Care And Maintenance
Section 4: Care and Maintenance Your device is a product of superior design and • Microwaves Do not try to dry your device in a microwave craftsmanship and should be treated with care. The suggestions below will help you fulfill any oven. -
Page 21: Section 5: Troubleshooting
Section 5: Troubleshooting Device fails to turn on. Copy function is not working, fails to play music. • Check battery power level. • Connect to adaptor and re-check. • Check if device is properly connected to • If device fail to start up after charging, please contact distributors or service •... -
Page 22: Section 6: Specifications
Section 6: Specifications Android 4.0 Storage Micro SD Support up to 32G Display 800*480 pixels Mini USB 2.0 OTG 3D G-sensor 4 directions Recorder Built in MIC Video MKV(H.264HP), AVI, RM/BMVB, FLV, MPEG-1/2 MP3, WMA, APE, FLAC, AAC, AC3, WAV Audio Photo JPEG, BMP, GIF, PNG, TIF... -
Page 23: Section 7: Warranty Information
To the maximum extent permitted by applicable these other sites. Ematic makes law, Ematic shall not be liable for any damages representations or claims whatsoever about any suffered as a result of using, modifying, other website which you may access through this contributing, copying,... - Page 24 Wi-Fi , the Wi-Fi CERTIFIED logo, and the Wi-Fi Ematic, the use of The Ematic User Manual or logo are registered trademarks of the Wi-Fi any Ematic product and/or software. Some Alliance.