KitchenAid Pro Line KPCG100 Use & Care Manual
Pro line series burr coffee mill
Hide thumbs
Also See for Pro Line KPCG100:
- Owner's manual (38 pages) ,
- Instructions manual (63 pages) ,
- Service manual (16 pages)

Related Manuals for KitchenAid Pro Line KPCG100


Summary of Contents for KitchenAid Pro Line KPCG100
- Page 1 ® LINE SERIES MODEL ii ii ii I iiiiiiiiiiiiiiiiiiiiiiiiiiiiiiiiiiiiiiiiiiiiiiiiiiiiiiiiiiiiiiiiiiiiiiiiiiiiiiiiiiiiiiiiiiiiiiiiiiiiiiiiiiiiiiiiiiiiiiiiii _¸...
-
Page 2: Introduction
of commercia d® Mill is your key to possible. I grind your coffee _inimize the fictional heatinc tain!essste The KitchenAid_! home chef. Fro... -
Page 3: Table Of Contents
HTRO©UCT Introduction Proof of Purchase & Product Registration Coffee Maker Safety Important Safeguards Electrical Requirements FEAi[URES As_}_ OPERK[/OH Coffee Mill Features Using the Coffee Mill Before First Use Operating the Mill Grind Setting Table Adjusting the Cutting Burrs Coffee Mill Tips How the Grind Affects... - Page 4 Warranty for the 50 United States & District of Columbia Warranty for Puerto Rico Arranging Hassle-Free Replacement Ordering Accessories and Replacement Parts Arranging for Service After the Warranty Expires Arranging for Service Outside the 50 United States & Puerto Rico...
-
Page 5: Proof Of Purchase & Product Registration
Always keep a copy of the sales receipt showing the date of purchase of your Coffee Mill. Proof of purchase will assure you of in-warranty service. Before you use your Coffee Mill, please fill out and mail your product registration card packed with the unit. This card will enable us to contact you in the unlikely event of a product safety notification and assist us in complying with the provisions of the Consumer Product Safety Act. -
Page 6: Coffee Maker Safety
Your safety and the safety of others are very important. We have providedmany importantsafety messagesin thismanualand on your appliance.Alwaysread and obey all safety messages. This symbolalerts youto potentialhazardsthat can kill or hurt you and others. This is the safety alert symbol. All safety messageswill followthe safety alert symboland either the word "DANGER"... -
Page 7: Important Safeguards
The use of attachments not recommended or sold by KitchenAid may cause fire, electric shock, or injury. Do not use outdoors. Do not let cord hang over edge of table or counter, or touch hot surfaces. -
Page 8: Electrical Requirements
Volts:120V.A.C. o nly. Hertz:60 Hz NOTE: This Coffee Millhas a 3 prong grounded p lug. Toreduce t he Electrical S hockHazard risk ofelectrical Pluginto a grounded shock, thisplug 3 prongoutlet. willfit inan Donot removeground outlet o nlyone way. I ftheplugdoes notfit prong. - Page 9 N E'" SERIES .._iiii i _iiiii...
-
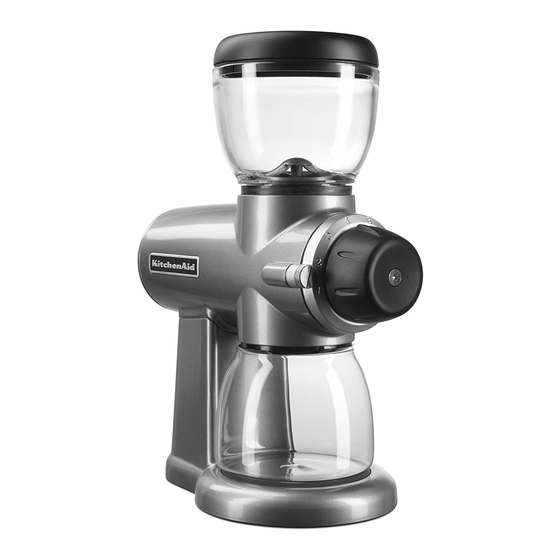
Page 10: Coffee Mill Features
¸,_o Model KPCGIO0 Burr Coffee Mill... - Page 11 Bin Seal Plate Motor Housing Die-cast metal housing is stable, Plate helps position the coffee bin under durable, and easy to clean. the grinding spout and Bean Hopper prevents coffee grinds 7 oz. capacity bean from escaping. hopper unscrews from the motor Grind Control Dial housing for simple...
- Page 12 Faceplate Assembly Low-RPM Operation & Screws A special DC motor and gear Assembly includes the reduction system slows the rotation grind control dial and of the cutting burrs, minimizing grind level ring. Two the frictional heating of the grinds faceplate screws attach the and preserving coffee flavor and faceplate assembly to the motor aroma.
-
Page 13: Before First Use
2 Slide the coffee bin onto the bin Before First Use platform; the bin seal plate on Before using the coffee mill, wipe the motor housing will compress the motor housing and cord with a slightly to accommodate the bin. clean damp cloth. - Page 14 _III_,,L, 6_ Select the grind by turning the grind control dial to the desired setting on the grind level ring. See the grind setting table on the next page to match the grind level to your brewing process. With use, you'll be able to refine the settings Electrical Shock Hazard...
- Page 15 Togrindcoffee, f liptheOn/Off Switch to the"On" position. S When thedesired amount o f coffee hasbeen ground, f lip theOn/Off S witch to the"Off" position, remove t hecoffee container, andscoop outthe ground coffee.
-
Page 16: Grind Setting Table
Grind Setting Table Coarse French Press 1250 microns Adjusting for Maximum Adjusting the Cutting Burrs Grind Fineness From the factory, the PROLINE Adjusting the mill to provide SeriesBurr Coffee Mill will provide maximum fineness will slightly grinds suitable for almost all types of decrease the grind sizes throughout brewing. - Page 17 Using a _2-inch a llen wrench o r Rotate t hegrind control gear clockwise 1 "click" o rdetent a ta hex-head screwdriver, remove t he screw located i nthefrontof the timeuntil y ouhear t heburrs grind control dialbyturning it touching oneanother - when they counter-clockwise.
- Page 18 Re-attach thegrindcontrol d ial, screw isfree,remove t hegrind making certain thedialindicator control d ial.The w hite grind points to grindlevel " 8". control gear s hould bevisible o nce thedialisremoved. NOTE: Ifthecoffee millproduces a grating or"rubbing" s ound during Rotate thegrindcontrol g ear counter-clockwise 1 "click"or use, theburrs have been improperly...
-
Page 19: Coffee Mill Tips
_:_:_C_I_ LI _'J.._ _ _°_ _'°_ _ _°°_::_ _ _ L_..Select the correct grind for the brew process you are using. 1 5 grind levels are available in half-step increments from 1 to 8. Level 8 produces a very fine grind perfect for espresso, 4_ to 6 are medium grinds appropriate for automatic drip coffee makers, and 1 is a coarse grind suited to French Press brewing. - Page 20 results, grind only as much as you intend to immediately use. To retain freshness,coffee beansshould be stored in an airtight container and kept in a cool, dark place. It is not recommended that you store beans in the grinder's bean hopper for a prolonged period. Clean the coffee bin and cutting burrs frequently.
-
Page 21: How The Grind Affects Flavor
Theflavorof coffee depends o na oilsandessences, resulting in avery thinandweakflavor. I f thecorrect variety of factors, i ncluding the quality, freshness, androast o fthe grindisused, a dding morecoffee beans, the purityof thebrewwater, simply makes a brewstronger thecleanliness of the brewing withoutmaking it excessively bitter. - Page 22 Coffee grindquality isdirectly related to thetypeof grinder u sed. H igh speed grinders w ith small b urrsets areusually n otableto produce thefineness or consistency required forthe best e spresso. They also excessively heat t he beans w hile grinding, r esulting in lostflavor andaroma.
-
Page 24: Cleaning The Motor Housing & Hoppers
Cleaning Motor Housing Hoppers Make sure the coffee mill is switched off and unplugged before cleaning. Do not immerse the motor housing in water. Never immerse the cutting burrs, burr-shaft assembly, or face-plate assembly in water. Keep them dry at all times. Do not use abrasive cleansers or scouring pads. -
Page 25: Cutting Burrs
2 Using a flat-head screwdriver, turn Cleaning the Cutting Burrs the two faceplate screws counter- If themillis used frequently, the clockwise until the faceplate cuttingburrsneed to becleaned assembly is free. (The faceplate every fewweeks f or bestperformance. screws have retaining clips that Cleaning enables the burrs to achieve prevent them from being removed the finest, most consistent grinds... - Page 26 • _ • _ ¸ _ Carefully slide the faceplate assembly away from the motor housing. A separate burr-shaft assembly on the inside of the motor housing will usually slide out with the face plate assembly. Place a hand under the burr-shaft assembly to prevent it from falling as the faceplate assembly is removed.
- Page 27 Aftercleaning, tilt thegrinder backward s othefrontofthe motor housing faces upward. Once theburr-shaft assembly isin the motorhousing, rotate the assembly untilit fallsintoplace. Whencorrectly p ositioned, the burr- Withthe corkscrew-shaped auger shaftassembly cannot b erotated. shaftfacing intothemotorhousing, insert t heburr-shaft assembly into thegrinder.
-
Page 28: Adjusting For Wear
S Placethe faceplate assembly onto Adjusting The Cutting Burrs For Wear the motor housing. Make sure the numbers on grind level ring are The cutting burrs are made of high- positioned across the top of the quality stainless steel for exceptional assembly. -
Page 29: Replacing
Remove theburrfromthe motor Replacing the Cutting Burrs housing byturningthetwo burr- If thecuttingburrs aredamaged, or mounting screws c ounter-clockwise have reached t heendof theirlife untilfree. (usually a ftergrinding 600-800Ibs. of coffee), theycanbereplaced e asily. Contact K itchenAid at 1-800-541-6390 to ordera setof replacement burrs. Toreplacethe burrs: i Remove thefaceplate a ndburr-shaft assemblies. -
Page 30: Troubleshooting
See "Adjusting the Cutting Burrs" on page 16 or "Replacing the Cutting Burrs" on page 29 for more information. If the problem cannot be fixed with the steps above, see the KitchenAid Warranty and Service section on the following page.*... - Page 31 • 7 I_tchel SERIES INE'"...
- Page 32 KITCHENAID DOES NOT ASSUME ANY RESPONSIBILITYFOR INCIDENTAL OR CONSEQUENTIAL DAMAGES. Some states do not allow the exclusion or limitation of incidental or consequential damages, so this exclusion may not apply to you. This warranty gwes...
- Page 33 PRO LINE Series Burr Coffee Mills operated in Puerto Rico. During the warranty period, all service must be handled by an Authorized KitchenAid Service Center. Please bring the Coffee Mill, or ship it prepaid and insured, to the nearest Authorized Service Center.
- Page 34 ..<,,.,o<,o,_ /< ..,,.,,_, ¢_,.,o<_-,?,., IF YOU RESIDE IN THE 50 UNITED STATES and your KitchenAid _R' PRO LINET" Series Burr Coffee Mill should fail within two years of ownership, simply call our toll-free Customer Satisfaction Center at 1-800-541-6390 Monday through Friday, 8 a.m.
- Page 35 ]]:t' L,I,= Electrical S hockHazard Unplugbeforeservicing. Failureto do so can result in deathor electricalshock. (:Zt <s Consult your local KitchenAid dealer or the store where you purchased your PROLINE Series Burr Coffee Mill for information on how to obtain service.