
Related Manuals for Pfaff Cover style 4850


Summary of Contents for Pfaff Cover style 4850
- Page 5 This houshold sewing machine is designed to comply with IEC/EN 6O335228 and UL1594 iVhen using an electrical appliance, basic safety precautions should always be followed, ricluding the following: -ead all instructions before using this household sewing machine. risk A sewing machine should never be left unattended when plugged in. Always unplug this sewing machine from the electric outlet immediately after using and before cleaning.
- Page 7 Ijet projects!
- Page 8 • •-- ‘-‘ •...
- Page 10 Accessory box e tot ards jI the box r op t e tire c’sso )vcilock needle ystern El X 05, o 2002 hreod unreeling d sos t5) 141L vor t fib Frinsparent pies er foot (El fort d two thv id nun titc h n th ead guide lean ng brush rewdrver...
- Page 11 connecti on Connect ing the foot control ,‘ot Ot 01 tO :0t 0 OOt h-’d.
- Page 12 1 her hs a a i ‘u- iris:rl liar PFAFF he sowing urrtauar, “stir -‘i r’r’’o tin-i -vaste “i ‘ ruV’trse urtei. r,r, bsaate C -5rt Clot l;ck into ii -war slots...
- Page 13 ‘S...
- Page 14 ‘‘ .“ —i •‘- -‘. ‘ “...
- Page 15 01!ilIi -o’er ---j li— ihroq stitch usod nuiahI ill -ole 13” otong tout -i0 0 proast r foot ía temove: lion ny ii Pig ‘0 5-Sen ° i.iirds iOn rd 04,3 from ntilOiYiati 3 it presser foot —o.l- -vuy ‘ I i,0-o ‘nt p’rpeniIi i...
- Page 17 Changing the needle Switch off the electrical power To remove: Lovvür the presser P ot the higlinsi p. stion trove the needle(s) to by turning the handwheei owai ds Push the needle nsertinO no) Fury accessory box 47) from below inward over the needle.
- Page 19 looper (pink) overedge Threading the upper ’ ou or trl urn the hridwheI towards upper overcdge looper 18 of I to 8 positron Thread n a sequence ,nt thruoh f e of es I to 1 fr rr the h •...
- Page 24 Exception: Threading the two-thread chanstitch looper and cover stitch looper for the cover stitch (violet) (Prog. 02) until the Turn the h indwhee towards on the 20 s two-thread chainstitch loocer e,ctrerne right. 1 to 10 sequence Thread in...
- Page 27 r’i 1’ -‘ (JOt.
- Page 29 Needle threeder u,n( nresr-er nnh nrer [r’11 n.,s r [hi endc r t he nnid in Ore n [he ‘vo pwid nir -he r encile Shin -meUmi n nih-. i-[i[U di l1 III I 1 e ed be CII. Shr-nI...
- Page 30 threadirq sequences he thradmq pdths ‘ Program 02: gram cover vtitch 2 thread rhainsttch 1212 1 212 Program u4 gram u3: 2 thread Ia bck, wide thread flatk,ck, arrow rogr m 2 thr ad sergmq, iarrow Prgram nread rl!ed rigram 13: rülled em iirIed 2 thrP3(j...
- Page 31 —‘...
- Page 32 -— -:...
- Page 33 .tei railing -l:l I’ ‘tV, ‘...
- Page 35 3wioehng stitch fodth Fitch For ,tandard ovrsrtcnk sesrns. ‘vi’JoFlo t’h 5’tr vcth lie [elsie tiOi ivI”-O VIl[ ,tntdtiJ t(’djt ‘t [tt)’S’tt itieli(it t rograin 01 021. For rolled hems ill keen A) t o re fruit -f1it.h v’[th nh [.irs—n. In-eli 151 ii ty ,en il[ow...
- Page 36 °...
- Page 37 Hustration A ops or cetting the seam wrdth .$ini it if irovibic ccc, move the he workpr upper .eam width can he adjusted T’P iqurert ‘dade 23 to the dght by turning the scare inywhere b3tween 3 5 and 6 mm by turn vidth adjusting knob upwards.
- Page 38 tipper tins’itctt wpcr ‘:ap OIe3 13 .1N1I1t) 5j 5Cr; n...
- Page 40 5’ \‘ .‘...
- Page 41 /555 ‘.5 • ‘ ‘‘, ‘ ,‘ ,.s- ‘ 55,555 •5 ,\s•...
- Page 42 Adjusting the stitch length You can set the desired stoch length he tween 05 mm to 4.0 mm by turning the tch length adjustment knob (42). Note For the twothread chanmtcn he scttnq shoud he 3.0 or hgher, Removing the needle plate Rajse the presser foot end move the nesd ct d to the highest position.
- Page 43 ‘...
- Page 44 —— — “ — —. -“- — — —...
- Page 45 øperPotth5O Erteri1hreadflS40 h width latch 22 bottom bt#e z zzz...
- Page 46 ‘ IttI’ ’ — II’’ Ui.,I 14,- .‘ ‘— —I’ ‘‘-‘ • ‘- •I ‘- — — .,‘ — — — ‘1...
- Page 47 — .—.I. 01’ .r•1 -... -.!-.I- .O.::..—...—. —..—. —. •o r—...
- Page 49 the second “click” turn the handwheel 2. If sewing on a tubular tern, e. pant or After away from you until the needles are in their sleeve hem: highest position. Raise the presser foot (this Sew around tubular item, oversewing 4 5 will release the tension on the threads).
- Page 50 measures Stitch formation correction — cover stitch Top side — Program 02 tensions are correctly set, the need’ VVhen all threads (green bluel are Just slightly the underside of the fabric. The visible ooper thread iviolet) is situated loosely in between.
- Page 51 — —...
- Page 53 —...
- Page 54 ‘\‘ —...
- Page 55 nsoqs ite 5( ti see page ;ain ‘ aide 0 31 .ion...
- Page 58 pSLlJLfl-3 WifiOQ 800(1 8iJDfL10 880) peLLT4 )LT)J Otfl paau (UDOJ jacido J8WO mloJh OJLfl U0SULJ4 MOWE/’ PU8J4I UOISL U’ 8pioJopuii aIvoI adooi toeA) piq; PUUJLp UOSUUj E31f1 MUIf3 — p?iq CSLILU JO’[)UU LiL) JLiII)L flj-r’...
- Page 61 -——--- -—. ———- ---—---— —.—— -—-.—: - _ _...
- Page 62 ‘0 ‘f a’ ‘ ‘ ,;‘:n;t.
- Page 64 Changing the light bulb Switch off the electrical power lismg the screw Idver in the accessory box nosen the rastenirig screw to the sewmg ight cover 16 until the cover can e re moved. Push the light bulb fully into its socket, Ro tate counter clockwise through half a turn md remove, Guide the new light bulb (max.
- Page 65 > ‘ • *:.— — • —- — — ..‘ — .-—...
- Page 67 trot — ‘ ‘r ‘ -‘...
- Page 68 Spec(fications n m se ç oecl 700 mm t4 mm S.earn width 5• mm Dryer stitch width 070 mm 4 mm Stitch (ength xch.sngeah;Ie Presser tPrst mnanua( Lubrication 470 mm Presser foot heiciht 270 mm yL 4 705 0se 70 (cc e 70.3.
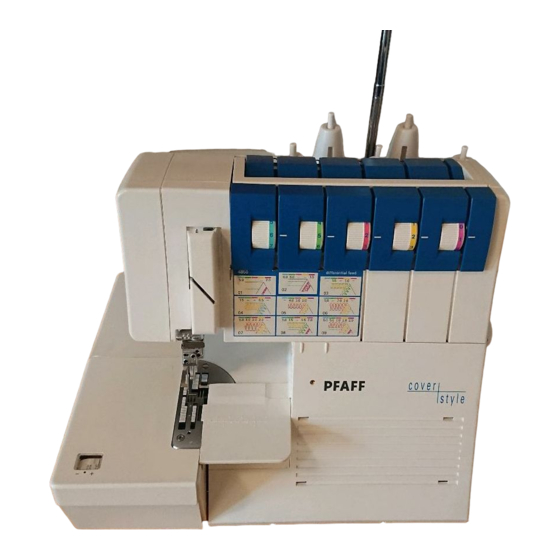
- Page 70 Parts of the coverstyle Thread guides with color coding Telescoping thread guide Thread chain cutter Thread spool stand Thread spool pin Cone thread adapter Spool disc Electrical power master switch Machine socket. foot control Handwheel Regulator wheel for differential feed Stitch length adjustment knob Presser foot lifter Rear thread guides...