Table of Contents
Advertisement
Available languages
Available languages
Operator's Manual
®
3000 PSi MAX
2.7 GPiVIMAX
_odei No. 580.752070
PRESSURE WASHER
CUSTOMER HELPLINE
HOUriS: Non. - Fri. 8 a.m. to 5 p.m. (CT)
wAReeeG
Before using this product, read this
manual and follow atI Safety Rutes
and Operating Instructions.
ADVER'rENCmA
Antes de utiiizar el producto, Iea este
manuai y siga todas Ias Reglas de
Seguridad e Instrucciones de Uso.
Sears, Roebuck and Ca., Hoffman Estates, [L 68179 U.S.A.
Visit our Craftsman website: www.craftsman.eom
Part No. 203793GS Draft - (03/30/2007)
®Safety
®AssembJy
®Operation
,, Maintenance
,, Parts
,, Espa_oi, p. 34
3
Advertisement
Table of Contents

Related Manuals for Craftsman 580.752070


Summary of Contents for Craftsman 580.752070
- Page 1 Safety Rutes manuai y siga todas Ias Reglas de and Operating Instructions. Seguridad e Instrucciones de Uso. ,, Espa_oi, p. 34 Sears, Roebuck and Ca., Hoffman Estates, [L 68179 U.S.A. Visit our Craftsman website: www.craftsman.eom Part No. 203793GS Draft - (03/30/2007)
- Page 2 If this pressure washer faiis due to a defect in materiai or workmanship within one year from the date of purchase, return it to any Searsstore, other Craftsman outlet, or Sears Parts & Repair Center in the United States or Canadafor free repair (or replacementif repair proves impossible).
- Page 3 WARNING Fuet and its vapors are extremely flammable and explosive. death. Fire or explosion can cause severe burns or Contents are harmful or fatai if swalIowed. Avoid WHEN ARRmNG OR BRAINING FUEL contact to eyes, skin or clothing. DO NOTtake o Turn pressure wasber OFFand let it cool at least 2 minutes internaliy.
- Page 4 WARNING Starter cord kickback (rapid retraction) can result pressure stream of water th_(ttlsJ_'_ in bodily injury. Kickback will pulI hand and arm equipment produces through can cut skin and its toward engine faster than you can Iet go. ,underlying tissues, ieading to serious injury and Broken bones, fractures, bruises, or sprains possible amputation.
- Page 5 WARNING NOTICE High pressure spray may damage fragiie items including Starter and other rotating parts can entangie glass. sands, hair, clothing, or accessories. • DO NOT point spray gun at glass when using MAX (0°) nozzle. NEVERaim spray gun at plants. •...
-
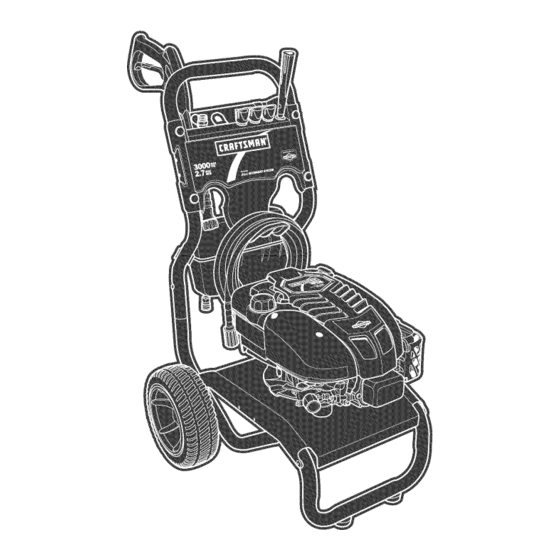
Page 6: Know Your Pressure Washer
KNOWYOURPRESSURE WASHER ,r' F I_Read the Operator's Manual and safety rubs before operatingyour pressurewasher..Compare the illustrations withyour pressure washer to familiarize yourself withthe locations o fvarious controls and adjustments. Save this manuaI for future reference, Spray Nozzle Extension with Quick Connect ProjectPro@Nozzles Cleaning Tank... -
Page 7: Unpackthe Pressure Washer
Becomefamiiiar with each piece before assembling the pressure washer. Identify ali contents with the iiiustration on page 6. if any parts are missing or damaged, call the pressure washer helpline at 1=888=222=3136. ASSEMBLING CLEANING SYSTEM Your Craftsman cJeaning system wJJJ need assembJy before operation: Insert multi-colored ProjectPro@nozzlesand other Fiii out and send in registration card. - Page 8 Add Fuel Attach Detergent Siphon Hose te Pemp The pressure washer is equipped with two detergent Fuel must meet these requirements: siphoning hoses. One is attached to the cleaning tank and o Clean,fresh, unleaded gasoline. one is loose for siphoning pressure washer safe detergents .
-
Page 9: Warranty
Reinstall fue! cap on fuel tank. CAUTJSN!AtcohoI-blended fuels (caiied gasohoi, ethanol or methanoi) can attract moisture, which ieads to separation and formation of acids during storage. Acidic gas can damagethe fuei system of an engine whiie in storage. To avoid engine problems,the fueI system should be treated with a fuet preserver or emptied beforestorage of 30 days or longer, if adding a fue! preserver, fiii the fue! tank with fresh fuei. - Page 10 Attach other end of high pressure hose to high pressure Connectgarden hose (not to exceed 50 feet in length) to outlet on pump. Tighten by hand. water inlet. Tighten by hand. NOTICE Using a One Way Valve (vacuum breaker or check valve) at pump inlet can cause pump or inlet connector damage.
- Page 11 HOWTO USEYOUR CLEANING SYSTEM To Start Your Cleaning System To start your engine=poweredcleaning system for the first If you haveany probbms operating your pressure washer, time, foiiow these instructions step=by=step. T his information please call the pressure washer heJpfineat 1-800-222-3136, also applies whenever you start the engine after you have let Pressure Washer Lecation the pressure washer sit idle for at bast a day.
- Page 12 Move throttie lever (A) to "Fast" position, shown here as 12. Return recoii starter siowiy. DO riOT let rope "snap a rabbit. back" against starter. 13. When engine starts, siowiy move choke iever to "Run" position, as engine warms, if engine falters, move choke lever to "Choke"...
- Page 13 How to Stop Your CJeaningSystem Mace spray gun through hole on accessory tray on right side of unit. 1= Reieasespray gun trigger and let engine idte for two Insert multi-coIored ProjectPro@nozzles in spaces minutes. provided in accessory tray. Move throttie to SLOW position, then STOPposition. Insert HydroFoam iauncher in space provided in WARNING...
- Page 14 Select desired ProjectPro® nozzle: Pull back on collar, insert selected ProjectPro@ nozzle and releasecollar. Tug on ProjectPro@nozzle to make Fordelicate rinse (lower pressure and higher flow), sure it is secureiy in ptace. for gentb cleaning of cars/trucks, boats, RV's, patio furniture, lawn equipment, etc.
- Page 15 7. Make sure garden h ose is connected towater i nlet. For best resuits, scrub the HydroFoam wash covered Check thathigh pressure hose isconnected tospray gun surface to heip remove stubborn dirt, grime and stains. For and pump. Turn onwater. vehicles, use a soft car wash brush or mitt.
-
Page 16: Product Specifications
PRODUCT S PECiFiCATiONS ENGINETECHNICALiNFORtViATION This is a single cylinder, overhead valve (OHV), air cooled PressureWasherSpecifications engine, it is a iow emissions engine. Max Outbt Pressure ....... 3,000 PSi In the State of Caiifornia, Model 120000 engines are certified Max Ftow Rate ......2.7 GPM by the California Air Resources Board to meet emissions Chemicat Mix...... -
Page 17: Owner's Responsibilities
OWNER'SRESPONSiBiLiTIES Follow the hourly or calendar intervals, whichever occurs first. More frequent service is required when operating in adverse conditions noted below. MABNTENANCE SCHEBULE OPERATINGINTERVALS SERVICEDATES Every 1O0 FILL IN DATESAS YOU COMPLETE Before _ABNTENANCE TASK Hours or Hours or Hours or REGULARSERVICE Each Use... -
Page 18: Pressure Washer Maintenance
PRESSURE WASHER MAINTENANCE Hezzle Maintenance A pulsing sensation felt while squeezing the spray gun trigger Cmean Debris may be caused by excessivepump pressure. The principal Daily or before use, clean accumuiated debris from cleaning cause of excessive pump pressure is a nozzleclogged or system. -
Page 19: Engine Maintenance
ENGINEMAINTENANCE Checking Oil Level OiI level should be checked prior to each use or at least every WARNING 5 hours of operation. Keep oii ievei maintained. Make sure pressure washer is on a ievei surface. Remove oii dipstick and wipe dipstick with clean cioth. Unintentional sparking can result in fire or Reptaceand tigilten dipstick. -
Page 20: Specifications
3. Clean a rea around o ilfill,remove oilfill cap/dipstick. Service Spark Plu9 Wipe dipstick c lean. Service the spark piug every 1O0hours of operation or 4. Tip yourpressure washer todrain elifromelifiiiintoa yearly, whichever occurs first. suitabie container making s ure youtipyourunit a way Cleanarea around spark piug. -
Page 21: After Each Use
Air Ceomin9 System Disconnect hose from spray gun and high pressure outbt on pump. Drain water from hose, gun, and nozzie Overtime debris may accumulate in cylinder cooiing fins and extension. Use a rag to wipe off the hose. cannot be observed without partiai engine disassembly. For this reason, we recommend you have an qualified Sears Empty pump of aii pumped iiquids by puIiing recoii service dealer clean the cooling system per recommended... -
Page 22: Winter Storage
WINTERSTORAGE Checkievei of fueI preserver cartridge. Fuei preserver is dark in color. ° If cartridge is almost empty or empty, reptacewith a new fue! preservercartridge foliowing the instructions in Fresh StartTM Fue/Capon page9. If fuet preserver is not used, remove ali fuel from tank and run engine until it stops from lack of fuel. - Page 23 CaU$8' HydroFoam launcherinstaIled. Replace HydroFoam launcher with high pressure nozzb. Water inlet is blocked. Clearinlet. 3= Inadequate water suppiy. Provide adequatewater flow. Inlet hose is kinked or baking. Straighten inlet hose, patch ieak. Pump hasfollowing p roblems: Checkand clean inlet hose strainer. Clogged inlet hose strainer.
- Page 24 CRAFTSMAN3000 PSi CJeanJngSystem 580_752070 Main Unit _ ExpJodedView _---16 -- 17...
- Page 25 CRAFTSMAN3000 PSi Ctear_ingSystem 580,752070 Main Unit _ Parts List item Part # item Part # Description Description 202947GS ASSY, Base 198423GS ASSY, Nozzle, Foaming B196526GS HANDLE 75246GS HHS,Trilobular, 3/8=16x 1=1/4 199!17GS 202948GS ASSY, Biiiboard/Decalswith Clips 199229GS 195964GS Ctip, Tree ASSY, Tank, Chem 30809GS Grommet 192980GS...
- Page 26 CRAFTSMAN3000 PSi CJeaningSystem 580_752070 Pump -- Exploded View ©...
- Page 27 CRAFTSMAN3000 PSi CJear_Jng S ystem 580,752070 Pump _ Parts List item Part # Description 190571GS CAP,Oil MANIFOLD 190574GS 190578GS 190581GS CAP,!/8 THERMAL RELIEF 194298GS KIT,UNLOADER 190594GS 190588GS KIT,WATER H'JLET, ANODIZED 190589GS KIT,OUTLET, ANODIZED 19380BGS KIT,HEAD BRASS 193806GS KIT,CHECK VALVES KIT,INLET CHECK 190592GS KIT,CHEMICAL I NJECTION 190593GS...
- Page 28 ENIINE, lri!gs and Stratten, 12Sf12 - Explotet View 10225! 1029 1227 I 615 0 5o5® 24 [_ s2_ _ 1102 1095 VALVEGASKET SET 15 8 20...
- Page 29 ENGINE, Briggs and Stratten, 12S512 - Exploded View 276 Q 525i 977 CARBURETOR G ASKET SET 633 @) 633A G 524 A_ 51_51...
- Page 30 ENGINE, Briggs and Stratten, 12S512 - Exploded View 65 2 121CARBURETOR OVERHAUL K IT 592 ® 276 _ 104 %_ 633 _ 633A 121_ 127 (_ 597 8 592 ® 332 @ A:'F _:}_- 1005 1022 1_7528A42...
- Page 31 ENGINE, Briggs and $tratten, 12S512 - Parts List Item Part # Item Part # Bescdption Bescription 802574 697893 Cylinder Assembly Armature-Magneto 691061 399269 Kit-Bushing/Seal (Magneto Side) Screw (Magneto Armature) 692051 299819S £ Seal-Oil (Magneto Side) Plug-Spark 692390 498983 Sump-Engine Wire-Stop 792384 792381 Bead-Cylinder...
-
Page 32: Replacement Parts
Sears, Roebuck and Co., &S,A, (Sears), the California Air Resources Board ICARB) and the United States Environmental Protection Agency {U,S,EPA) Emissions CentromSystem Warranty Statement ISwneCs Defect Warranty Rights and 8hmigations) The California Air Resources Board (CARB), U.S. EPA and Sears are Carburetor and hrternal parts pleased to explain the Emissions Centre[ System Warranty on your Fuel Pump... - Page 33 EmJ_ion information Certain engines wiii be certified to meet the United States Environmental Protection Agency (USEPA)Phase 2 emission Enginesthat are certified to meet the California Air Resources standards. For phase 2 certified engines, the Emissions Board (CARB) Tier 2 Emission Standards must display Compiiance Period referred to on the Emissions Compliance information regarding the Emissions Durabiiity Period and Air label indicates the number of operating hours for which the...
- Page 34 Sila limpiadora a presiOn falls debido a defectos de materiales o rnalsode obra en el plazo de un aiio a partir de la fecha de compra, devu61vala a cualquier almac@ Sears_punto de vents de Craftsman o centro de reparaci@ y repuestos de Sears de los Estados Unidos o Canad_ pars su reparaci@ gratuita o en caso de que 6sta no sea posibb, pars su sustituci6n.
- Page 35 ADVERTENCiA La gasolina y sus vapores son extrernadamente inflamables y exp!osivos. severas e inclusive la muerte. EI fuego o una explosion pueden causar quernaduras PELiGRO VACiEELDEP6SmTO CUANDO ANADA cor_IBUSTmBLE 0 Su 6ontenidoes NOGIVO 0 FATAL ENCASO DESER Apague el limpiadora a presi(_n(posici6n OFF)y d_jelo enfriar al menos por 2 minutos antes de remover la tapa de la combustible.
- Page 36 ADVERTENCJA ADVEBTENCJA El retroceso (repliegue r_pido) del cable del arrancador El chorro de agua a alta presi6n que este equipo puede producir lesiones. El retroceso impedirA que el produce puede atravesar la piel y los tejidos usuario sueIte e! cable a tiernpo y tirar_ de su mano y brazo Isacia el motor.
- Page 37 AVl$O ADVERTENCJA El rociado de alta presi6n puede da_ar elementos fr_giles, incluyendo El arrancador y otras piezas que rotan pueden enredar el vidrio. pelo, las manos, el la ropa, o los accesorios. NO dirija la pistola rociadora hacia un cristal cuando utilice la boquilla MAX (punta de alfiler).
- Page 38 CONOZCA $ U iViAQUJNA $JSTEiVIA D ELUVIPJEZA ..Compare las ilustraciolses con su sistema de Ilrnpieza pare familiarizarse con las ubicaciones de los dlfereotes controles y ajustes. Guarde este manual pare referencias futures. Extensi6n pareBoquillascon Pistola de Rociado R_pida Lanzador HydroFoarn Dep6sito de Lirnpieza BoquillasProjectPro®...
- Page 39 Su sistema de lirnpieza requiere de cierto ensambIe y estar_ lista Conecte manguera aatta presiOna pistola rociadoray a bomba. para ser usado OnicamentedespuOsde haber depositado el Conecte e! suministro de agua a bomba. combustible y el aceite recomendado. Conecte boquiIIa la extension al pistola rociadora. Si tiene probRemas conem ensambmede su m_quina Hmpiadora a Selecto/conecta rdpido conecta boquilla a la extensi6n de la presiOn,Hame a RamJnea de ayuda de mam_quina Hmpiadora a...
- Page 40 Mentaje de mangeera de sif6n deJdetergente a ADVERTENCiA Ja homha La lirnpiadoraa presi6n est_ equipadacon dos rnanguerasde La gasolina y sus vaporus son extremadarnente inyecciOnde detergente.U_sa de elias estAconectadaa! depOsitode inflamables y explosivos. limpieza,y la otra est_ sueItay se utiliza para i_lyectardetergentes aptos para la limpiadora a presiOndesde una botella u otro recipier_te.
- Page 41 Granaliilud Tap6n de combustiblepara mejerar el arranque El uso de colsservante de combustible rnantiene el combustible en Enaltitudessuperiores a 1.524metros(5.000pies),sedeber_ buen estado y limpia los carburadores, Io que facilita el arranque en uti[izargaso%aconun minimode 85 octanos/ 85 AKI(89 RON). todas las estaciones del a_o. El nuevo tap6n de combustible gotea Paraseguircumplielsdo la normativasobreemisiones, e s necesario autom_ticamente conservalsteconcentrado en el depOsito de ajustarla unidadparasu usoa granaltitud.Deno realizarse este...
- Page 42 Conecte e! otro extremo de la manguera a alta presiOn,a la Conecte la rnanguera de jardin (no exceder 50 pies en la Iongitud) a la entrada del agua. Apriete con B rnann. salida de alta presi6n de la bornba. Apriete con la mano. AVIS8 El uso de una%lvula unidireccional (igualador de presi6n o vAIvula de retenciOn)en la entrada de la bornba puede producir...
- Page 43 COMOUSAR$[J $JSTEMA#E LJMPJEZA Para porter en mar€ha el sistema de Hmpieza Para darIe arranque a su sistema de limpieza movido a rnotor pot Si tiene probIemas cor_el funcionamier_tode su m_qui_a B_npiadora primera vez siga estas instrucciones paso a paso, Esta informaciOn a presi6n, por favor !lamea la B_eade ayuda de la rn_quina acerca de la puesta en marcha inicial tambi6n es vAlida para cuando Iimpiadora a presi6n al 1-888-222-3136.
- Page 44 Mueva el control do la %lvula de admisiOn (A) a la posiciCn ADVERTENCJA "R_pido" ("Fast"), que se distingue con la figura de un conejo. El retroceso (repliegue rApido) del cable dol arrancador puede producir lesiooes. El retroceso impedir_ qee el usuario suelto el cable a tiernpo y tirar_ de su rnanoy brazo hacia el motor.
- Page 45 UtilizatiOn de la handeja de acceseries ADVERTENCJA La unidadest_equipada con una bandeja de accesorios con compartirnentos p araguardarlas boquillasProiectPro®, e l lanzador Elcontactocon la zonadel silenciador puedeproducir HydroFoamTM_ la pistolarociadora y etpro!ongador d e la boquilla.La quemaduras g raves. partedelantera de la bandeja tambi_nincluyeun ganchopara Losgases y el calorde escape pueden inflamarlos sujetarla rnanguera dealtapresiOn.
- Page 46 Par++ memb++++ J+s+m+qmiJJa+ Preje+tPr+®, ++_ja e +tm++ in+f_r+c+i+n++: DespIace haciaatr_sel anillo,insertela boquiIlaProjectPro@ eIegida y suelteel aniflo.Tiredela boquillaProjectPro® para Ooloque el pestillode seguridad de la pistolade rociado. comprobar queest_bienmontada. Desplace haciaarrase! anillodel co!lectorrApido y tire de las Parauna lirnpieza m_s efectivarnantenga la boquiIIade boquillasProjectPro®.
- Page 47 Aseg0rese de que la rnangueradel jardin est_ conectada a la Para Lm mejor resultado, friegue la superficie recubielta cots entrada de agua. Cornpruebe que la rnanguera de alta presi0n HydroFoam detergente para eliminar mAs f_cilmente la suciedad y est_ conectada a la pistola rociadora y a la bornba. Abra la las rnanchas mAs resistentes.
- Page 48 JNFORMACI6NTECNmCA $ OBREEL MOTOR ESPECJFJCACJONE$ DEL PRODUCTO El motor es de uno cilindros, de vA[vulasen cabeza (OHV), Especificacienes de _a_a_quina Limpiadora a rdrigerado por aire y de baja emisiOn. Presi6n En el Estado de California, los motores de la 120000 ban obtenido la PresiOnde salida maxima 3,000 PSI certificaciOn del California Air Resources Board (Conseio de...
- Page 49 RESPONSABJLIDADE$ # EL PRSPIETARJO Siga el programa de mantenimiento seg@ e] ROrnero de I_oraso segOnel calendario, [o que suceda pr[mero. Se requbre de servicio con mayor frecuencia cuando opere la uRldad enlas condiciones adversas descritas a continuaci6o TAREA DE MANTENIMIENTO INTERVALO DE OPERACIONPOR HeRA FECHAS DE SERVICIO Antes de...
- Page 50 MANTENJMJENTO DE LA MAQUiNA Mantenimiente de la RequHla LAVADORA A PRESJON Si siente una sensaciOnpuIsante al momento de apretar e! gatiI[o de la pistoIa rociadora puede que sea causada pot la presiOnexcesiva Lhnpie los Residues en la bomba. La causa principal de [a presi6n excesiva en la bomba es cuando la boquilla se encuentra atascada o tapada con materiales Lirnpie a diario, o antes de cada uso, los residuos acumulados en e[ extra_os tales como tierra, etc.
- Page 51 MANTENJMJENTO DELMOTOR Compm'obaci_o del oivel de aceite Comproebe el nivel de aceite antes de coda uso o coda 5 horas de ADVEBTENCJA funcionamiento, como minimo. ReIIenesi es necesario. Coloque e! limpiadora a presiOn sobre una superficie nivelada. Retire la variIla de medici6n y limpie la varflla de medici6n. Chispear involuntario puedetener corno resultado el InstaIe e] varflla de mediciOn, apriete firmemente.
- Page 52 Remplacela Buj a Incline su rnaqLfinalimpiadora a presiOn para drenar el aceite a trav_s del orificio de IIenado en Lm recipiente adecuado Remplacela bujia anLlalrnenteu cada 100 horas de uperaciOn asegurandose de incIinar la unidad hacia el lade opuesto de la Limpie el area ahededor de la bu]iay retirela.
- Page 53 DESPUE$DE CADA U$0 Si el motor ha estado funcionar_do,el silenciador estar_ bastar_te caliente. De]e que el silenciador se enfrfe para poder darle servicio al No deber_ haber agua en la un[dad pot [argospedodos de t[empo apagachispas. Los sedimentos de minerales se pueden depositar en partes de la bombay "congelar"...
- Page 54 ALMACENAMJENTO PARAJNVJERNO Compruebe el niveide!cartuchode aditivoparae!combustible. E!aditivo esde coloroscuro. AVI$O Si el cartuchoestAvacioo casivacio,c_mbielo por otto nuevo conformealas iostrucciones de la secci6oTapdnde Usted deber_ proteger su uoidad de las temperaturas de combustible FreshStartTrl e n la pdgioa 4!. _elamiento. Si no usaaditivo paracombustible,retiretodo el combustible del si no Io hace, d a_ar_i permanentemente la bombayla unidadno podr_ funcionar.
- Page 55 Prebmema Seiuci_n Cause LanzadorHydroFoam Cambie el lanzador HydroFoam par la T MinstaladO. boquilla de alta presi6n. La entrada de agua est_ bloqueada. Limpie la entrada. Suministro de agua inadecuado. Proporcione flujo de ague adecuado. La maeguera de entrada est_ doblada o Estire la rnanguera de entrada, coloque ue presenta fugas.
- Page 58 California Air Resources Board (CARB) U.S. EPAy Sears le explican a continuaci6n Carburador y partes internas la garantia del sistema de control de emisiones de su pequ@o motor para mdquinas Bomba de combustible de servicio (SORE, Small Offroad Engine). En California, los modelos de peque_os Tube de combustible, acoplamientos del tube de combustible,...
- Page 59 [nfermac[6n sehre emisiones Algunos rnotores cuentan con la certificaciOn de curnplimiento de la fase 2 de las normas sobre emisioees de la United States Los motores con certificacl6n de cumplhnieeto de la normativa Environmental Protection Agency (USEPA Ageecia estadourfideese sobre emisioees de nivel 2 del California Air Resources Board de protecciOndel medioambiente ).
- Page 60 iiiiiiiiiiiiiiiii!! Voor Home ::::::::::: For repair-in your home all major brand appliances, lawn and garden equipment, or heating and cooling systems, no matter who made it, no matter who sold it! ....For the replacement parts, accessories owner's manuals that you need to do-it-yourself....