Table of Contents
Advertisement
Available languages
Available languages
Quick Links
Instruction Manual
I CRRFTSMRN°J
3.8 Amp Motor
12 Inch Cutting Path /0.065
In. Line
ELECTRIC
WEEDWACKER
®
Model No.
358,745121
• Safety
• Assembly
• Operation
• Maintenance
• Espahol
®
WARNING:
Read and follow all Safety Rules and Operating
Instructions
before first use of this product.
i_
For answers
to your questions
about this product:
Call 7 am-7
pm, Mon-Sat;
Sun, 10 am-7
pm
•
1-800-235-5878
(Hours listed are Central Time)
Sears, Roebuck
and Co., Hoffman
Estates,
IL 60179 U.S.A.
530086671
1/4/02
Advertisement
Table of Contents

Related Manuals for Craftsman WEEDWACKER 358.745121


Summary of Contents for Craftsman WEEDWACKER 358.745121
- Page 1 Instruction Manual I CRRFTSMRN°J 3.8 Amp Motor 12 Inch Cutting Path /0.065 In. Line ELECTRIC WEEDWACKER ® Model No. 358,745121 • Safety • Assembly • Operation • Maintenance • Espahol ® Read and follow all Safety Rules and Operating WARNING: Instructions before first use of this product.
- Page 2 FULL ONE YEAR WARRANTY ON CRAFTSMAN ELECTRIC WEEDWACKER ® LINE TRIMMER If this Craftsman Electric Weedwacker _> Line Trimmer fails to perform properly due to a defect in material or workmanship within (1) one year from the date of purchase, Sears will replace it free of charge.
- Page 3 glasses are available.) Always wear receptacle, or extension cord plug in face or dust mask if operation is any way. dusty. Always wear heavy, long • To reduce risk of electrical shock, pants, long sleeves, boots, and use extension cords specifically gloves.
- Page 4 • Store unit indoors in a high, dry • Use only Craftsman replacement place out of the reach of children. parts and accessories as recom- Store unit unplugged.
- Page 5 CARTON CONTENTS ATTACHING THE SHIELD Check carton contents against the fol- WARNING: The shield must be lowinglist, Model 358,745121 properly installed. The shield provides • Trimmer partial protection from the risk of • Shield thrown objects to the operator and Examine parts for damage.
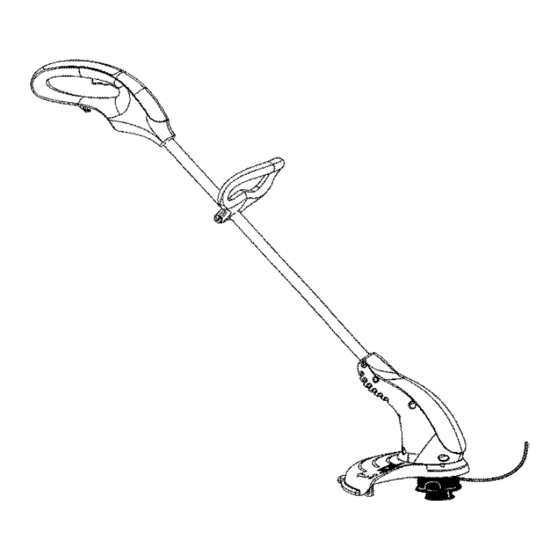
- Page 6 KNOW YOUR TRIMMER READTHIS INSTRUCTIONMANUALAND SAFETY RULES BEFOREOPERATING YOUR UNIT.Compare the illustrations with your unit to familiarize yourseff with the location of the various controls and adjustments. Save this manual for future reference. Cord Retainer Assist Handle Recessed Piug Motor Housing with 0.065 in.
- Page 7 CORRECT OPERATING POSITION Trimming 3 in. (8 cm) Trimming Above Ground SCALPING The scalping technique removes un- wanted vegetation down to the ground. Hold the bottom of the trimmer head about 3 inches (8 cm) above the ground and at an angle. Allow the tip of the line to strike the ground around trees, posts, monuments, etc.
- Page 8 3. Replace with a pre-wound spool notch; otherwise, the unit will not (71-85837), or cut a length of 30 function properly. feet of 0.065" (1.65 mm) diameter Craftsman ® Pro Trimmer line. Use of heavier lines could overload Smal__ Hole Spool and damage unit.
- Page 9 USER REPLACEABLE SERVICE PARTS REPLACEMENT PART PARTNUMBER 71-85837 Spool with 0.065 inch Trimmer Line Assist Handle 530403805 530403886 Bolt Carri&qe, 1/4-20 530016118 Wing Nut 530403916 Shield Assembly • Store unit and extension cord in- _JkWARNING: Perform the follow- doors in a high, dry place out of the ing steps after each use.
- Page 10 EL SERVICIO BAJO GARANTIA ESTAA SU DISPOSICION CON SOLO DEVOLVER LA CORTADORA A LINEA ELECTRICA WEEDWACKER CRAFTSMAN AL TIENDA CE SEARS O CENTRO DE SERVICIO SEARS MAS CERCANO EN LOS ESTADOS UNIDOS. Esta garantia le confiere derechos juridicos especificos ademas ud.
- Page 11 SEGURIDAD DEL USUARIO rizado del cable de extension. este enchufe no entrara completa- • Vitese de forma apropiada. Siempre mente dentro del enchufe del cable use anteojos de seguridad o protec- de extensi6n, invierta el enchufe. ci6n de ojos similar al hacer uso o continQa sin entrar, obtenga el cable mantenimiento del aparato.
- Page 12 • Guarde el aparato de modo que el accesorios recomendados de la cuchilla limitadora de linea (debajo marca Craftsman. de la protector) no pueda causar SEGURIDAD AL CORTAR heridas accidentalmente. • Guarde el aparato al abrigo de la in- •...
- Page 13 [_as herramientas y los electrodom_sti- este aparato, incluyendo a la caja, el cos con aislamiento doble no necesitan interrupter, el motor, etc., deber&n ser cable a tierra. No se le ha provisto efectuados por personal de servicio ningQn medic de conexi6n a tierra a capacitado.
- Page 14 ALINEE LAS FLECHAS 3. Gire el protector como se ilustra hasta que encaje firmemente en lu- gar. AsegQrese que el protector este mirando hacia la parte trasera de la aparato como se muestra en la portada de este manual. Gire el escudo _rotector en la flecha.
- Page 15 CABEZAL DE CORTE BOTON DE TOQUE El CABEZAL DE CORTE sostiene la linea El BOTON DE TOQUE se utiliza para avanzar la linea del corte durante la op- de corte y gira durante el uso. eraci6n y para retire el bobina durante el reemplazo de la linea.
- Page 16 se mantiene la linea paralela a la tier- Para recortar ra. Evite presionar el cabezal contra la tierra, ya que hacerlo puede escalpar la tierra y daSar el aparato..Para cortar cesped 3 in. (8 cm) arriba dei suelo PARA ESCALPAR La tecnica de escalpado retira la vegetaci6n no deseada abajo a la tier-...
- Page 17 DESPUES DE CADA VERIFIQUE QUE NO HAYA PIEZAS A DANADAS NI GASTADAS INSPECClONE Y UMPIAR EL APA- Entre en contacto con el Centre de Ser_ RATO Y LAS PLACAS vicio Sears para el reemplazo de piezas • Despu_s de que cada use, inspec_ dafiadas o desgastadas.
- Page 18 • Guarde el aparato y el cable de exten- _IWADVERTENCIA: Realice los si6n al abrigo de la intemperie, desen- siguientes pasos despues de cada chufados, en un lugar alto, seco y fuera del alcance de los niSos. uso: • Guarde el aparato con todos los pro- •...