Table of Contents
Advertisement
Quick Links
Advertisement
Table of Contents

Related Manuals for Ericsson R310s


Summary of Contents for Ericsson R310s
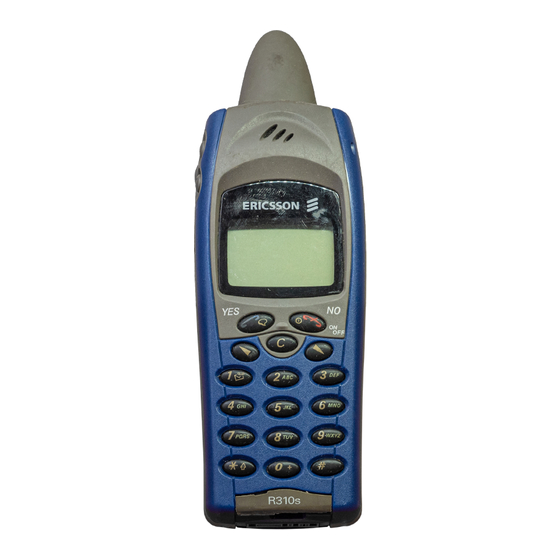
- Page 1 User’s Guide Mobile Phone R310s...
-
Page 2: Table Of Contents
Extras 101 The Profile Concept 106 Accessories 109 Online Services 116 Quick Keys 120 Troubleshooting 123 Ericsson Mobile Internet 126 Product Care and Maintenance 127 Guidelines for Safe and Efficient Use 129 Warranty 134 Declaration of Conformity 137 Index 139... - Page 3 Standard. Ericsson R310s First edition (November 1999) This manual is published by Ericsson Mobile Communications AB, without any warranty. Improvements and changes to this manual necessitated by typo- graphical errors, inaccuracies of current information, or improvements to pro- grams and/or equipment, may be made by Ericsson Mobile Communications AB at any time and without notice.
-
Page 4: Preparing Your Phone For Use
Preparing Your Phone for Use Front Volume keys Display Keypad Wash the phone gently in cold water under a water tap. Do not immerse the phone in water. Antenna Indicator light Earpiece Power On/Off Microphone... -
Page 5: The Sim Card
Back Hook for clip Back cover lid Rubber plug (to Security screws protect system connector) Assembly You need to do the following to use your phone: • insert the SIM card • attach the battery to the phone • charge the battery The SIM Card When you register as a subscriber with a network operator, you get a SIM (Subscriber Identity Module) card. - Page 6 Inserting the SIM Card Before you can insert the SIM card you need to remove the back cover and the battery. 1. Release the back cover by screwing the secu- rity screws anti-clock- wise. Remove the cover from the phone. 2.
- Page 7 5. Slide the SIM card into the holder. Make certain that the cut cor- ner is in the top right- hand corner. 6. Lock the holder by pressing it down and sliding it in the direc- tion of the arrow in the picture.
-
Page 8: The Battery
If you have an Ericsson-approved battery, you can check the remaining talk and standby times in the Status menu by pressing any of the volume keys in standby mode. You can move downwards in the menu by pressing d. - Page 9 Note! The mains plug may look different depending on the mains socket in your country. The mains plug may not be used for other products than Ericsson chargers. To indicate charging: • the battery meter in the display pulses continuously •...
-
Page 10: Taking Care Of Your Phone
An Ericsson-approved battery is indicated by each time you start charging the battery. For the best charging, talk and standby times in the long run, we recommend that you use only Ericsson-approved batter- ies with your phone. Batteries that are not Ericsson-approved are charged slowly for safety reasons. - Page 11 Washing the phone Wash the phone gently in cold water under a water tap. Do not immerse the phone in water! Note! If water gets behind the back cover, or inside the rubber plug, open the cover or plug and shake the water out.
-
Page 12: Turning Your Phone On And Off
Turning Your Phone On and Off Turning your Phone on • Press and hold the key until you hear a tone. If “PIN:” Appears in the Display Some SIM cards are protected with a PIN code. If appears in the display after you have turned on the phone: 1. -
Page 13: Initial Settings
Initial Settings The first time you turn on your phone, you may want to choose the ring signal type and set the clock and date. For more information about these and other settings, see “Per- sonalizing Your Phone” on page 44. Display Language Most modern SIM cards automatically set the display lan- guage to the language of the country where you bought... -
Page 14: Display Information And Key Functions
Display Information and Key Functions In standby mode, the display shows the name of your oper- ator, the time, the signal strength and the battery power. Other icons appear if you receive any messages, divert all your incoming calls, set the alarm clock and so on. In this chapter, you will also learn about the key functions. -
Page 15: Key Functions
Silent indicator All audible signals are turned off, except the alarm and timer. SMS indicator You have received a text message. Voice mail indicator You have received a voice message, depending on your subscription. Line 1 indicator Line 1 is in use for outgo- ing calls –... - Page 16 Key: Use: To enter the menu system. To move (scroll) through menus, lists and text. To erase numbers and letters from the dis- (Clear) play. To mute the microphone during a call, press and hold down the key. To set the phone silent, press and hold the key from standby.
-
Page 17: Making And Receiving Calls
Making and Receiving Calls In this chapter, we assume that you have turned on your phone and that you are within range of a network. If you are abroad, you may use other networks, provided your home network has an agreement that allows you to do this. See “Setting Network Preferences”... -
Page 18: Making International Calls
For more information, see “Using the Call List” on page Automatic Re-Dialling If the connection failed when you first called and the display shows , you can re-dial the number by pressing Y E S Your phone automatically re-dials (up to 10 times) •... -
Page 19: Receiving A Call
Receiving a Call When you receive a call, the phone rings and the display shows Answer? If your subscription includes the Calling Line Identification (CLI) service and the caller’s network sends the number, you see the caller’s number in the dis- play. -
Page 20: During A Call
During a Call Your phone has several functions, which you might find helpful while a call is in progress. Changing the Listening Volume You can easily change the listening volume during a call by pressing any of the volume keys on the side of the phone. To change the listening volume during a call •... - Page 21 Banking Services” on page 35. However, it may be a risk to save your codes in the phone in case it is stolen. The Notepad If you want to make a note of a phone number during a call, you can use your phone display as a notepad. To use the notepad during a call •...
-
Page 22: Using The Menus
Using the Menus You can find all your phone functions in the menus. You use the menus every time you want to change a setting in your phone, such as the ring signal. You also use the menus to get the most out of your phone: to set the alarm clock, send text messages, save important phone numbers, etc. - Page 23 Symbol: Name: Description: My Shortcuts A selection of your most fre- menu quently used functions. Ongoing call You have an ongoing call. indicator Missed Calls Indicates a missed call in the indicator call list, in the missed call list and in standby. Answered call Indicates an answered call in indicator...
-
Page 24: Moving Through The Menus
Symbol: Name: Description: Preferred net- Indicates that a network is pre- work indicator ferred and can be used. Forbidden net- Indicates that a network is for- work indicator bidden and cannot be used. Home zone Indicates that you are in your indicator home zone. - Page 25 Using Shortcuts A quicker way to move through the menus is to use the shortcuts. You simply enter the number of the menu or sub- menu to which you want to go, but you first need to enter the menus by pressing u u or d d .
-
Page 26: Display Text
3. Press to select the Y E S sub-menu. (You do not need to scroll with the arrow keys since this is the first sub- menu in the main menu 4. Use d d or u u to scroll to the sub-menu. - Page 27 • Grey text indicates a function that is temporarily unavailable, for example due to your subscription or due to a certain setting which is not on. • Text marked with a tick indicates the current setting or settings selected. • Text marked with a filled button indi- cates the current setting selected.
-
Page 28: Help Texts
Help texts To help you use the functions and settings of the menus, your phone includes pop-up help texts that explain the sub- menus. These help texts are set to On when you buy your phone, but you may turn them off at any time. To turn the help texts on or off 1. -
Page 30: Your Personal Phone Book
Your Personal Phone Book You can create a personal phone book by saving phone numbers and accompanying names (an entry). An easy way to make calls is by recalling the phone numbers or names saved in your phone book. Creating a Personal Phone Book Before you start creating your personal phone book, there are a few things you need to know. -
Page 31: Entering Letters
replaces the international dialling prefix for the country you are calling from) followed by the country code, the area code and the phone number. To enter an international phone number Press and hold 0 to enter the + sign. • Exclude the leading zero in the area code. - Page 32 • To delete letters and numbers, press the You may also use the volume keys as a shortcut to certain letters: To enter a ‘B’, press the upper volume key and press 2. • To enter a ‘C’, press the lower volume key and press 2. •...
- Page 33 can enter position number 201 to save a number in the phone memory. If you have turned Voice Dialling on, you are asked if you want to add a voice label to your phone book entry. See “Voice Control” on page 92. Ask to Save If you wish to be asked to save any dialled or answered number that is not already saved in your phone book you...
-
Page 34: Speed Dialling
u or d d until you find the correct name and number. 4. Press to make the call. Y E S Tip! A quicker way to enter the ‘Find and Call’ function is to press and hold d Shortcuts to Phone Book Entries When in standby, you can find an entry by: entering the position number followed by #. -
Page 35: Overwrite Protection
To edit an entry 1. Scroll to Y E S Y E S 2. Enter the position number or the name of the entry that you wish to edit. Press Y E S If the name displayed is not the one you want, press u or d d until you find the correct name and number. -
Page 36: Telephone Banking Services
To delete an entry from the memory 1. Scroll to Y E S Y E S 2. Enter the position number or the name of the number that you want to delete and press . (This depends Y E S on the sort order, i.e. - Page 37 4. Enter the name that you want to associate with the phone number and code and press Y E S 5. Press to save. Y E S If you want to save the number in a different position than the one suggested, see “Saving a Number Together with a Name”...
- Page 38 To create a new group 1. Scroll to Y E S Y E S 2. Enter a name for the group and press Y E S 3. Scroll to Y E S 4. Select an entry in your phone book. 5.
-
Page 39: Checking The Status Of The Memories
Tip! The @ sign is accessed by pressing the 0 key three times. To edit an e-mail address 1. Scroll to Y E S 2. Select the entry that you want to edit. 3. Select 4. Edit the e-mail address and press Y E S 5. -
Page 40: Using The Call List
Using the Call List The Call List is a phone number log that saves information (time, date, phone number and name) about the last 30 incoming and outgoing calls. Once your list exceeds 30 calls, the oldest one is deleted. What Calls Are Saved? The numbers that you have dialled are always saved. - Page 41 Note! If you change SIM cards or turn the Call List off, the list is cleared. Called numbers may remain in the SIM card memory though. To call a number from the call list 1. Scroll to Y E S Y E S 2.
- Page 42 Note! You can also see the Missed Calls List in the ‘Call Info’ menu. Missed calls are also saved in the Call List. To be able to see if you have missed a call, the call list must be on. Showing And Hiding Your Number Some operators offer subscriptions where your phone number is normally hidden.
-
Page 43: Your Voice Mail Service
Your Voice Mail Service Note! This service depends on your subscription and operator. The answering service of your network allows callers to leave a voice message when you cannot answer your calls. Depending on your network operator, you will be informed that you have received a voice message in different ways. -
Page 44: Calling Your Voice Mail
Calling your Voice Mail When you receive a voice mail, an alert signal sounds and the message appears in the display (only if you receive the specific voice mail indication). If you want to check your voice mail now, press to call your Voice Y E S Mail Service. -
Page 45: Personalizing Your Phone
Personalizing Your Phone Silent You can choose to set your phone completely silent so that all signals except the alarm and timer signals are turned off. To set the phone silent 1. From standby, press and hold 2. Select An icon appears in standby. To cancel, repeat step 1 and press Y E S Ring Signal Volume... - Page 46 To set the ring signal to Increasing Ring 1. Scroll to Y E S Y E S Y E S 2. Select The Increasing Ring must be Off for the ring signal vol- ume to apply. Note! If the phone is set to silent, the increasing ring sig- nal is not heard.
- Page 47 If the last seven digits of a caller’s number correspond to a number you have specified, then that caller’s ring signal is used. You can include question marks (?) in a phone number. For example, 012345??? means that calls from phone num- bers between 012345000 and 012345999 will have the same personal ring signal.
-
Page 48: Vibrating Alert
• Press and hold a key to enter a long note. • Press 0 to raise the note one octave. Press # once to raise the note one • semitone. Press # twice to lower the note • one semitone. 5. -
Page 49: Alarm Signal
You can also find the Message Alert in Options in the Messages menu. Alarm Signal To change the alarm signal for the alarm clock 1. Scroll to Y E S Y E S Y E S Y E S 2. Select the signal you want. Key Sound You can choose whether to hear clicks, tones or nothing (silent) when you press the keys. -
Page 50: Display Language
You can always choose Automatic by pressing in standby. Greeting Text When you turn on your phone, ‘Ericsson’ appears in the display. Instead of this, you can write your own greeting. Note! Some operators may have their own greeting. Y E S... - Page 51 To write a new greeting 1. Scroll to Y E S Y E S 2. Select 3. Write your new greeting, using the number keys. For information on how to enter letters, see “Entering Let- ters” on page 30. You may also edit your greeting. 4.
- Page 52 To set the clock 1. Scroll to Y E S Y E S 2. Enter the time in hours and minutes, and press Move from number to number by pressing u If you select the 12-hour clock, you can alternate between am and pm by pressing #.
-
Page 53: Master Reset
• Menu Help – help texts appear by some sub- menus or settings. • Ask to Save – you will be asked whether to save a used number. These functions are set to On when you buy your phone, but you can turn them off at any time. To turn a help function off 1. -
Page 54: Text Messages (Sms)
Text Messages (SMS) The Short Message Service (SMS) allows you to send and receive text messages consisting of up to 160 characters. A useful feature in your phone is that you can send text messages to a group which you have defined in your phone book. -
Page 55: Composing A Text Message
To enter the phone number to your service centre 1. Scroll to Y E S Y E S Y E S Y E S 2. Enter the number, including the international (+) sign and country code and press Y E S Composing a Text Message For more information on how to enter text and the letters, see “Entering Letters”... - Page 56 you need to make these choices before entering the phone number. See “Customizing your Text Messages” on page Saving the Message for Later Use If you do not want to send the message now, you can save it in the phone memory and send it later: •...
-
Page 57: Customizing Your Text Messages
4. Scroll to and press Y E S 5. Select the group you want and press to send the message. Y E S Note! When you send text messages to a group, you will be charged for each member included in that group. - Page 58 Validity Period If your message cannot be delivered because the recipient has turned off the phone, your service centre can save the message to send it later. If the service centre has not been able to reach the recipient within a certain time, the mes- sage will be deleted.
-
Page 59: Receiving A Message
you want. You can save up to 5 templates which can consist of 30 characters each. Your templates are saved in the phone memory. To save a template 1. Scroll to Y E S Y E S 2. Enter the message and press Y E S For more information on how to enter text, “Composing a Text Message”... - Page 60 To read the message now 1. Press when you see the question Y E S The display shows when the message was received and from what number it was sent, if your network supports the Calling Line Identification service (CLI). If you have saved the number together with a name in the phone book, the name is shown instead.
- Page 61 Calling a Phone Number Found in a Message 1. Press when the number is Y E S highlighted. 2. Select Calling the Sender of the Message 1. When you have read the message, press 2. Select in the option list. If you have saved the number together with a name in the phone book, the name of the person who sent the message appears together with...
-
Page 62: Saving Incoming Messages
Tip! You can also delete a message by pressing reading it. The message appears in the display. Press to delete the message. Y E S You can delete a message from the list of messages in the Inbox menu without having to open it. To delete a message from the list in the Inbox menu 1. -
Page 63: Area Information
To save a received message in the SIM card memory 1. When you have read the message, press 2. Select in the option list. The message automatically moves from the phone memory to the SIM card memory. The display shows the position of the message and the number of saved messages, for example the third message of fifteen that can be saved on the SIM card. - Page 64 To turn Area Information on or off 1. Scroll to Y E S Y E S Y E S 2. Select Area Information Message Types Each type of Area Information message is identified by a three-digit code. The list below shows examples of the Area information codes that exist today.
-
Page 65: Cell Information
Area Information Message List You can decide which types of area information messages you wish to receive. The number of Area Info codes that can be saved depends on your SIM card. To insert an Area Information code 1. Scroll to Y E S Y E S Y E S... -
Page 66: Diverting Incoming Calls
Diverting Incoming Calls If you want to make certain that your incoming calls are correctly handled when you are unable to answer them, you can use the Divert Calls service to divert them to another phone number. Note! The Divert Calls service may not be available on all networks. -
Page 67: Activating Divert Calls
Activating Divert Calls To divert a call 1. Scroll to Y E S Y E S Y E S 2. Scroll to the divert you want to turn on ( press Y E S 3. Select 4. A phone number recently used for the divert function or a number recently present in the display will be sug- gested as a divert number. - Page 68 Checking the Divert Status To check the status of a certain Divert Calls 1. Scroll to Y E S Y E S Y E S 2. Scroll to the divert you want to check and press 3. Select The message appears, followed by a message which informs you whether the Divert Calls is on or not.
-
Page 69: Security For Your Phone And Subscription
Security for Your Phone and Subscription There are several ways to protect your phone and subscrip- tion from unauthorized use. Anything from a SIM card lock to full phone number control. The SIM Card Lock The SIM card lock only protects your subscription and not your phone itself from unauthorized use. - Page 70 To change your PIN code 1. Scroll to Y E S Y E S Y E S 2. Enter your old (current) PIN and press 3. Enter your new PIN and press Y E S The phone asks you to repeat the PIN. 4.
-
Page 71: The Phone Lock
Note! It is important that you remember your new code. If you should forget it, you have to hand in your phone to your local Ericsson retailer. To set the phone lock to on, automatic or off 1. Scroll to... -
Page 72: The Keypad Lock
The Keypad Lock The keypad lock feature helps you to avoid accidental dial- ling, which can happen if you keep your phone in your pocket. You can choose between manual and automatic keylock. An icon in the shape of a key in the display informs you that the keypad is locked. - Page 73 Note! This service may not be available on all networks or may require a separate subscription. The following calls can be restricted: • all outgoing calls, • all outgoing international calls, • all outgoing international calls except to your home country, •...
-
Page 74: Fixed Dialling
To check the status of a call restriction 1. Scroll to Y E S Y E S Y E S 2. Scroll to the option you want and press 3. Select The message appears, followed by a message which informs you whether the call restriction is on or not. - Page 75 Numbers which include question marks can be saved. A question mark should be read as a wild card, i.e. it can rep- resent any number (0-9). To enter a question mark press and hold #. Note! The Fixed Dialling service does not prohibit calls to the international emergency number 112.
-
Page 76: Closed User Groups
Closed User Groups The Closed User Group (CUG) function is another way of lowering call costs. It depends entirely on your operator and subscription. Not all networks support this function. Your network operator can place certain numbers in groups. On some networks it is cheaper to make calls within a call group. -
Page 77: Accept Calls
To delete a group from the CUG List 1. Scroll to Y E S Y E S Y E S Y E S 2. Scroll to the group that you want to delete and press Y E S 3. Select Accept Calls With the Accept Calls service, you can choose to receive calls only from certain numbers. - Page 78 Now you will only receive calls from the par- ticipants in the . An icon is shown in standby. To reject all calls 1. Scroll to Y E S Y E S Y E S Y E S 2. Select All incoming calls will now be rejected.
-
Page 79: Handling More Than One Call Simultaneously
Handling More than One Call Simultaneously Your phone allows you to handle more than one call simul- taneously. This means that you can put a call that is in progress on hold, while you make or answer a second call, and then switch between the two calls. -
Page 80: Making A Second Call
To check whether the Call Waiting service is on or not • Scroll to Y E S Y E S Y E S Y E S Making a Second Call 1. Put the current call on hold by pressing 2. Enter the number you wish to call and press You may also retrieve the number from your phone book, by pressing and holding d. -
Page 81: One Active Call And One Call On Hold
One Active Call and One Call On Hold When you have one active call and one call on hold, you can do one of the following: Switch between the two calls • Press Y E S End the active call and return to the call on hold 1. -
Page 82: Conference Calls
End the current call and accept the waiting call • Select The waiting call becomes active and the call on hold remains on hold. Reject the waiting call • Select The third call is rejected. Provided the caller’s network supports this function, the caller hears a busy tone. Create a conference call •... - Page 83 3. Scroll to Y E S Y E S You can include up to five participants in the confer- ence group by repeating steps 1 to 3 above. To check the participants in the conference group 1. Scroll to Y E S The first participant’s phone number is displayed, if available.
- Page 84 Making a Call while a Conference Call Is in Progress You can put the conference group on hold and make another call. You can then switch between the new call and the conference call. To put the conference group on hold and make a new call 1.
-
Page 85: Setting Network Preferences
Setting Network Preferences Searching for Networks When you turn on the phone, it searches for the last accessed network. If this is not within range, you may use another network, provided your home network has an agreement that allows you to do so. This is called roaming. The order of preference in which the phone chooses a net- work is determined by a list of preferred networks on your SIM card. -
Page 86: Forbidden Networks
Display Information The currently used network is marked with a filled button. Together with the network name, you also get the following information in the display: The display meaning... shows... You are in your home zone. Does not appear on all networks. The name of the network is included in a list of preferred networks on your SIM card. - Page 87 The number of networks that can be stored in the list depends on your SIM card. You can review the network list and rearrange the order of the networks. You can also add new networks to the list and delete networks from it. To review the list of networks 1.
-
Page 88: Search Modes
To rearrange the list 1. Scroll to Y E S Y E S Y E S 2. Scroll to the network that you want to move and press Y E S 3. Select 4. Enter the new position within the list and press Search Modes When you turn on your phone, it searches for a network. -
Page 89: Knowing The Call Time/Call Cost
Knowing the Call Time/ Call Cost During a call, the duration of the call is shown in the dis- play. When you end the call, the call duration information is shown for another three seconds. If you subscribe to cost information, the call cost (or the number of call units) is displayed instead of the call duration. -
Page 90: Determining The Call Cost
Determining the Call Cost The Tariff function lets you enter and specify the price per call unit. The price entered is stored on your SIM card. Note! This service must be supported by your subscription and your network. If you do not specify a price per call unit, the number of call units is displayed during a call, and in Last Call and Total Cost in the Call Info menu. - Page 91 To set a specific credit limit 1. Scroll to Y E S Y E S 2. Enter your PIN2 and press Y E S 3. Select 4. Enter the amount, for example 30 pounds, and then press Y E S To set unlimited credit 1.
-
Page 92: Using Two Voice Lines
Using Two Voice Lines If your subscription supports the Two Line Service, your phone will have two voice lines with different phone num- bers, separate bills and perhaps different subscription serv- ices. This is useful for example if you want to keep business calls and private calls on separate lines. -
Page 93: Voice Control
Voice Control Your phone allows you to: • voice dial - call someone by simply saying the name • answer and reject calls using your voice when con- nected to a handsfree kit To call someone, you only need to press Y E S a tone, say the name (voice label) associated with that per- son and your phone automatically dials the number. - Page 94 To record voice labels for existing phone book entries 1. Scroll to Y E S Y E S Y E S 2. Select a phone book entry to which you want to add a voice label. 3. Wait for the tone and say the name (voice label) that you want to save.
- Page 95 Listening to and Editing Voice Labels Your phone allows you to listen to and edit a list of the phone book entries that have voice labels. To listen to and/or edit the voice labels saved in your phone book 1. Scroll to Y E S Y E S 2.
-
Page 96: Voice Answering
Voice Answering When connected to a portable or vehicle handsfree unit, you can answer or reject incoming calls by using your voice. Before you can use voice answering, you need to turn on the voice answering function and record your voice com- mands. -
Page 97: Calling Card Calls
Calling Card Calls When making international or long distance calls, you may not want your operator to charge you for these calls on your normal account. If you have a credit card or a calling card, you may want to redirect the charges to one of these accounts instead. -
Page 98: Choosing A Card
3. Select 4. Enter the access number of the calling card server and press Y E S 5. Enter a name that you want to associate with your call- ing card server and press Y E S 6. Enter the verification code of the calling card server and press Y E S 7. -
Page 99: Making A Calling Card Call
To select a card 1. Scroll to Y E S 2. Enter your phone lock code and press Y E S 3. Select the card that you want to use. 4. Select Making a Calling Card Call 1. Enter the phone number of your calling card server or retrieve it from the Phone Book by pressing and hold- ing d 2. -
Page 100: Fax And Data Calls
Fax and Data Calls Note! To be able to use various communications services you need the appropriate software such as a fax program, an e-mail program or an Internet browser. Sending Fax and Data Calls All fax and data calls are initiated from the appropriate computer software. - Page 101 Note! You cannot answer an incoming fax or data call by pressing the key on the phone but you may reject the Y E S call by pressing Receiving Fax and Data Calls – Single Numbering If you have a SIM card that does not support separate fax and data numbers, the phone does not recognize the type of incoming call.
-
Page 102: Extras
Extras Alarm Clock The phone has an alarm clock, which you may find useful when travelling. When it is on, an icon is shown in the display. The alarm rings at the time set and the display flashes, even if the phone is turned off. The volume of the alarm signal is always increasing, provided the battery is attached and charged. - Page 103 Calculator The phone has a built-in calculator, which can add, sub- tract, divide and multiply. Press # to get , , , . • • Press to erase a figure to the left of the cursor. Press * to enter a decimal point. •...
- Page 104 Timer The phone has a built-in 24-hour timer. You set the time you want and when that time is out, an alert signal sounds. To set the timer 1. Scroll to Y E S Y E S 2. Enter the time and press Y E S The countdown begins.
- Page 105 4. Press any key to start. Instead of choosing Start you can scroll with d • to select High-score, Help or Quit (at step 2 above). To control the game 8 or press the lower volume key = move left •...
- Page 106 To control the game 1 = Select card/pile, Confirm move, Flip card • • 2 = Turn up new card from game deck 3 = Put card on ace pile • 4 = View a pile (selection and move is possible) •...
-
Page 107: The Profile Concept
The Profile Concept Your phone includes a number of pre-programmed profiles. A profile is a group of settings which are set to suit a cer- tain environment. For example, when you go to a meeting, you can just choose the Meeting profile and a number of settings that suit a meeting are set. - Page 108 Tip! To find out which profile you are using, press any of the volume keys in standby mode. The table below shows the settings of each profile. 5(6) 0(6) 6(6) 6(6) On if silent From From From From None None None None Auto...
-
Page 109: Changing The Profile Settings
You can also find Select Profile in the My Shortcuts menu. The quickest way to reach this sub-menu is to press and hold u. If you choose a profile other than Normal, an icon is shown in standby. Note! A profile which is not associated with any acces- sory, such as ‘Meeting’... -
Page 110: Accessories
Accessories By using your phone together with Ericsson original acces- sories, you have access to a large range of useful features, in addition to those you have when the phone is used sepa- rately. • Portable handsfree calling • Handsfree calling in your car •... -
Page 111: Portable Handsfree
See “The Pro- files” on page 106. Portable Handsfree When you connect a specific Ericsson Portable Handsfree to the phone, the Port H-free profile is set automatically. This means that all profile settings are set to the values specified for the Port H-free profile. - Page 112 Vehicle Handsfree When you connect an Ericsson Advanced Vehicle Hands- free to the phone, the In Car profile is set automatically. This means that all profile settings are set to the values specified for the In Car profile.
- Page 113 Before you can use voice dialling, you need to record voice labels to entries in your phone book and the Voice Dialling function needs to be on. See “Preparing your Phone for Voice Dialling” on page 92. To use voice dialling with the Vehicle Handsfree unit, you need to record the voice labels in the car.
-
Page 114: Answering Mode
Full Handsfree Full Handsfree means that the phone handles the call in full duplex mode. This considerably increases the quality of speech, since you do not have to wait until it is your turn to speak. For Full Handsfree to work properly, your phone adapts to the sound environment around the handsfree equipment. -
Page 115: Adding Accessories To A Profile
Tip! You can also answer calls by using the Voice Answering function. See “Voice Answering” on page 95. Infrared modem With an Ericsson infrared modem you can connect your phone to a computer via an infrared link. This makes the cable and PC card obsolete. - Page 116 Before you can add an accessory to a profile, you must choose the profile manually to which you want to add the accessory. See “To select a profile manually” on page 107. To add an accessory to a profile 1. Scroll to Y E S Y E S Now you are in the list of the accessories which have...
-
Page 117: Online Services
• a mobile phone that supports the Online Services. Your Ericsson phone is such a phone. • a network operator offering the Online Services. Note! The Online Services on the SIM are designed and run by network operators and not by mobile phone manu- facturers. - Page 118 When you have inserted your SIM card and turned on your phone, your network operator may download data to your SIM card. After the first data download and after restarting your phone, the proactive SIM offers a new menu in the phone.
- Page 119 Resetting your SIM Card When the operator updates your SIM card over the air, the phone notifies you by showing a message in your display. You also hear a beep. In order for your new SIM settings to take effect, you have to turn off your phone and then turn it on again.
- Page 120 Send a SIM Card Initiated SMS The SIM card may set up an SMS (text message) and ask you to send this message, for example by the question Send now?. Press if you want to send the SMS. Y E S Details of Services Offered All services and functions that come with the Online Serv- ices are network dependent.
-
Page 121: Quick Keys
Quick Keys Several keys on your phone can be used to optimize the phone’s functionality and decrease the number of times you need to press a key. Some of the key combinations demand that your phone is in a certain mode and some can be made from the standby mode. - Page 122 To... Do this: press and hold d Find and enter Call put a call on hold press Y E S retrieve a call press Y E S again reject a call double click the vol- ume key (up or down) press u or d enter the menu system...
- Page 123 To... Do this: change between press and hold lower-and upper- case letters enter numbers press and hold any of the number keys enter a space press once enter a question press the lower vol- mark ume key and press press the lower vol- enter the -sign ume key and press...
-
Page 124: Troubleshooting
Troubleshooting This chapter lists some problems that you might encounter while using your phone. Some problems require that you call your service provider, but most of the problems you encounter are easy to correct yourself. Error Messages Insert Card There is no SIM card in the phone or you may have inserted it incorrectly. - Page 125 Codes do not match When you want to change a security code (for example your PIN) you have to con- firm the new code by entering it again. The two codes that you have entered do not match. See “The SIM Card Lock” on page 68. PIN/PIN2 Blocked You have entered your PIN or PIN2 incorrectly three times in a row.
-
Page 126: Other Problems
The Phone Cannot Be Switched on Handheld Phone • Recharge or replace the battery. See “The Battery” on page 7. Handsfree Phone in Vehicle • Make sure that the phone is properly inserted into its holder. See “Vehicle Handsfree” on page 111. Other Problems No Indication of Charging When you start charging a battery that is empty or a battery... -
Page 127: Ericsson Mobile Internet
With the Mobile Internet you can also download communications software to ensure you get the best out of your Ericsson products. The Ericsson Mobile Internet address is http://mobile.ericsson.com/mobileinternet... -
Page 128: Product Care And Maintenance
• Do not expose your product to extreme temperatures. • Do not use any other accessories than Ericsson origi- nals. Failure to do so may result in leakage, loss of per- formance, fire, electric shock or injury. The warranty does not cover product failures which have been caused by use of non-Ericsson original accessories. -
Page 129: Efficient Phone Operation
Unauthorized antennas, modifications, or attachments could damage the phone and may violate the appropriate regulations and will void the warranty and Ericsson can not guarantee the phone being water resistant. Efficient Phone Operation To enjoy optimum performance with minimum power con- sumption please: •... -
Page 130: Guidelines For Safe And Efficient Use
According to ICNIRP statement, which is based on the available body of research, there is no evidence that mobile terminals meeting the recommended limits can cause any adverse health effects. All Ericsson telephones conform to the ICNIRP guidelines and other international exposure standards, such as: •... -
Page 131: Electronic Devices
• Give full attention to driving. • Use an Ericsson Vehicle Handsfree Solution, if availa- ble. Law in many countries requires vehicle Handsfree Solution. Read the installation instructions carefully before installing a vehicle Handsfree Solution. •... -
Page 132: Blasting Areas
mobile phone very close to a pacemaker might cause the device to malfunction. Avoid placing the phone over the pacemaker, i.e. in your breast pocket. When using the phone, place it at your ear opposite the pacemaker. If a min- imum distance of 15 cm is kept between the phone and the pacemaker, the risk of interference is limited. -
Page 133: Power Supply
• It is not allowed to connect the AC-plug-in unit to any other item than your Ericsson power supply unit. • To reduce risk of damage to the electric cord, remove it from the outlet by holding onto the AC adapter rather than the cord. - Page 134 grammed functions, which cannot guarantee connection under all conditions. Therefore you should never rely solely upon any mobile phone for essential communica- tions (e.g. medical emergencies). Remember, in order to make or receive calls the phone must be switched on and in a service area with adequate cellular signal strength.
-
Page 135: Warranty
• Read the Guidelines for safe and efficient use. • Read all the terms and conditions of your Ericsson War- ranty. • Save your original receipt. You will need it for warranty repair claims. - Page 136 2. If Ericsson repairs or replaces the Product, the repaired or replaced Product shall be warranted for the remain- ing time of the original warranty period or for ninety (90) days from the date of repair, whichever is longer.
- Page 137 MERCHANTABILITY OR FITNESS FOR A PAR- TICULAR PURPOSE, ARE LIMITED TO THE DURATION OF THIS LIMITED WARRANTY. IN NO EVENT SHALL ERICSSON BE LIABLE FOR INCIDENTAL OR CONSEQUENTIAL DAMAGES OF ANY NATURE WHATSOEVER, INCLUDING BUT NOT LIMITED TO LOST PROFITS OR COM- MERCIAL LOSS.
-
Page 138: Declaration Of Conformity
Declaration of Conformity We, Ericsson Mobile Communications AB of Nya Vattentornet 221 83 Lund, Sweden declare under our sole responsibility that our product Ericsson type 110 1101-BV to which this declaration relates, conforms to the appropri- ate standards TBR 19, TBR 20, TBR31, TBR32, ETS 300... -
Page 140: Index
Index...