Table of Contents
Advertisement
Available languages
Available languages
Quick Links
Owner's Manual
CRRFTSMRN °
6.5 HORSEPOWER
2400 PSI
2.2 GPM
PRESSUR
WASHER
Model No. 580.767302
HOURS:
Mon.- Fri. 8 a.m. to 5 p.m. (CT)
CAUTION"
Before using this product,
read this manual
and follow all Safety
Rules and Operating
Instructions.
• Safety
• Assembly
• Operation
• Maintenance
• Parts
• Espahol
SEARS,
ROEBUCK
and CO.,
Hoffman
Estates,
IL 60179
U.S.A.
Visit our Craftsman website: www.sears.com/craftsman
Part No. 190821GS
Draft 2 (06/10/2002)
Advertisement
Table of Contents

Related Manuals for Craftsman 580.767302


Summary of Contents for Craftsman 580.767302
- Page 1 CAUTION" Before using this product, • Parts read this manual and follow all Safety • Espahol Rules and Operating Instructions. SEARS, ROEBUCK and CO., Hoffman Estates, IL 60179 U.S.A. Visit our Craftsman website: www.sears.com/craftsman Part No. 190821GS Draft 2 (06/10/2002)
- Page 2 ON CRAFTSMAN PRESSURE WASHER For one year from the date of purchase, when this Craftsman pressure washer is maintained and operated according to the instructions in the owner's manual, Sears will repair, free of charge, any defect in material and workmanship.
- Page 3 • Somechemicals o rdetergents m aybe harmful if • DoNot operate the pressure w asher above the inhaled or ingested, causing severe nausea, ratedpressure. fainting or poisoning. Theharmful elements may • Nevermovethemachine by pulling onthe high causeproperty damage or severe injury. pressure hose.
- Page 4 Insert the other "L" bolt (gun hook) through the hole WASHER just under the billboard on the right side of the Your Craftsman pressure washer was mostly handle (viewing from rear of unit). Hold the hook in assembled at the factory. However, you will need to...
- Page 5 * The use of multi-viscosity oils (5W-30, 10W-30, etc.) Assembling Hose Reel in temperatures above 40°F (4°C) will result in higher IMPORTANT: You must take the hose off the reel than normal oil consumption. When using a multi- when operating your pressure washer. The reel is for viscosity oil, check oil more frequently.
- Page 6 Connect the garden hose to the water inlet. Tighten Connect Hose and Water Supply to Pump by hand. IMPORTANT: You must attach all hoses before you Inspect inlet start engine. Starting engine without all hoses screen. Do connected and water supplied will damage pump. use if •...
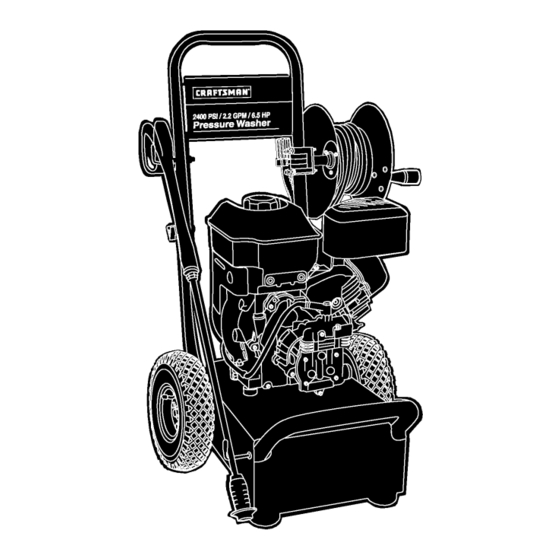
- Page 7 KNOW YOUR PRESSURE WASHER Read the owner's manual and safety rules before operating your pressure washer. Compare the illustrations with your pressure washer to familiarize yourself with the locations of various controls and adjustments. Save this manual for future reference. Spray Gun Detergent Pick-Up Tube and Filter...
- Page 8 HOW TO USE YOUR PRESSURE • Rotate the fuel shut-off valve to the "On" position (fully counter-clockwise). WASHER If you have any problems operating your pressure Fuel Valve shown in washer, please call the pressure washer helpline at 1-800-222-3136. "On" position To Start Your Pressure Washer To start your engine-powered...
- Page 9 • For most effective cleaning, keep the spray nozzle How To Use the Adjustable Nozzle between 8 to 24 inches away from cleaning Now that you know how to START and STOP your surface. pressure washer, the information in this section will tell •...
- Page 10 After each use: Pressure Washer Rinsing • Disconnect hose from spray gun and high pressure WARNING! Be extremely careful if you use the outlet on pump. pressure washer from a ladder, scaffolding or • Drain water from hose. any other relatively unstable location. Pressure •...
- Page 11 OWNER'S RESPONSIBILITIES Follow the hourly or calendar intervals, whichever occurs first. More frequent service is required when operating in adverse conditions noted below. MAINTENANCE SCHEDULE HOURLY OPERATING FILL IN DATES AS YOU COMPLETE SERVICE DATES REGULAR SERVICE INTERVAL Every 50 Every 100 Before MAINTENANCETASK...
- Page 12 BEFORE EACH USE Place the in-line filter screen into the threaded end of the nozzle extension. Direction does not matter. • Check engine oil level. Push the screen in with the eraser end of a pencil • Check water inlet screen for damage. until it rests flat at the bottom of the opening.
- Page 13 • 1 o-ring, yellow, (p/n B2264) for the end of the high pressure hose. Insert wire into nozzle and turn back and forth to clear obstruction. Using a garden hose, remove additional debris by back flushing water through the nozzle extension. Back flush between 30 to 60 seconds.
- Page 14 Service Air Cleaner Service Spark Plug Your engine will not run properly and may be Service the spark plug every 100 hours of operation or damaged if you run it with a dirty air cleaner. yearly, whichever occurs first. Replace the air cleaner every 100 hours of operation or once each year, whichever comes first.
- Page 15 Do Not attempt to repair a damaged hose. Replace the hose with the genuine • If pump saver is not available, connect a 3-foot Craftsman part. section of garden hose to the water inlet adapter. Pour RV-antifreeze (antifreeze without alcohol) into •...
- Page 16 LONG TERM STORAGE Oil Cylinder Bore • Remove spark plug. Squirt about 1 tablespoon of If you do not plan to use the pressure washer for more clean engine oil into the cylinder. Cover spark plug than 30 days, you must prepare the engine and pump hole with rag.
- Page 17 Problem Cause Correction Nozzle in low pressure mode. Pull nozzle backward for high pressure mode. Water inlet is blocked. Clear inlet. Inadequate water supply. Provide adequate water flow. Inlet hose is kinked or leaking. Straighten inlet hose, patch leak. Pump has following Check and clean inlet hose Clogged inlet hose strainer.
- Page 18 CRAFTSMAN 2400 PSI Pressure Washer 580.767302 Main Unit m Exploded View \--29...
- Page 19 CRAFTSMAN 2400 PSI Pressure Washer 580.767302 Main Unit m Parts List Item Part # Qty. Description E190506GS 1 BASE CB1982GS 1 BUMPER 188194GS 2 BLIND RIVET 191413GS 2 VIBE MOUNT, with Washer 190537GS 1 CAP, Vinyl, Black B2150GS 1 HOOK, Gun...
- Page 20 CRAFTSMAN 2400 PSI Pressure Washer 580.767302 Pump m Exploded View...
- Page 21 CRAFTSMAN 2400 PSI Pressure Washer 580.767302 Pump m Parts List Item Part # Qty. Description Item Part # Qty. Description 190568GS 1 SEAL 190592GS 0 KIT, INLET CHECK 190569GS 1 RETAINER RING ..1 VALVE, Non-Return 190671GS 1 ENGINE ADAPTER &...
- Page 22 ENGINE, 6.5 HP, Briggs and Stratton, 120412 - Exploded View 22o_ 718 _ 32_ 3_ * REQUIRES SPECIAL TOOLS TO INSTALL. SEE REPAIR 746_42 32A_ INSTRUCTION MANUAL.
- Page 23 ENGINE, 6.5 HP, Briggs and Stratton, 120412 - Exploded View 1341- - _ 633 Q 633AG 615_ 186_ 137_ 108 ,_L__t_ 276_ 276© 51//_ 1221 _ 977 CARBURETOR GASKET SET 276_ 358 ENGINE GASKET SET 993 _ 1022_ 883_...
- Page 24 ENGINE, 6.5 HP, Briggs and Stratton, 120412 - Exploded View 562_ 1005 663_ 2221 427_ 597_ 456_ 689_ 1210 1211 2o9_ 958(_ 836A_ 836 _ 1095 VALVE GASKET 305_ 65A_...
- Page 25 ENGINE, 6.5 HP, Briggs and Stratton, 120412 - Parts List Item Part # Description Item Part # Description Muffler-Exhaust 693811 Cylinder Assembly 693593 299819 §Oil Seal (Magneto Side) 693621 Housing-Blower 693643 Cylinder Head 690960 Screw (Blower Housing) 695166 §+Cylinder Head Gasket 693610 Shield-Cylinder 692600...
- Page 26 If you have any questions regarding your warranty rights Your Warranty Rights and Obligations and responsibilities, your should contact your nearest The California Air Resources Board ("CARB") and Sears authorized service center or call Sears at Roebuck and Co., USA, are pleased to explain the Emission 1-800-473-7247.
- Page 27 Durante un a_o a partir de la fecha de compra, Sears reparar& sin cargo alspray guno, cualquier defecto en material y mano de obra, siempre y cuando esta maquina lavadora de presi6n Craftsman haya sido mantenida y puesta en funcionamien-to de acuerdo alas instrucciones suministradas en el manual del propietario.
- Page 28 Nunca mueva la maquina halando la manguera de alta • Algunos quimicos o detergentes pueden ser nocivos si • se inhalan o ingieren, causando nausea severa, presi6n. Utilice la manija que viene con la unidad. desmayos o envenenamiento. Los elementos nocivos •...
- Page 29 Sostenga el gancho en lugar con los alicates y asocie la tuerca de fijaci6n con una Ilave del 7/16". Si Su lavadora de presi6n Craftsman fue ensamblada, en gran no instal6, agrega la tapa del vinilo al "L" cerrojo.
- Page 30 * El uso de aceites multigrado (5W-30, 10W-30, etc.) en Ensamblar el Carrete de la Manguera temperaturas mayores a los 40-°F (4-°C) ocasionara un IMPORTANTE: Debera sacar la manguera del carrete consumo de aceite mayor al normal. Cuando utilice un cuando est6 operando su lavadora a presi6n.
- Page 31 Conecte la manguera de jardin a la entrada del agua. Conecte la Manguera y el Suministro Apriete con la mano. Agua a la Bomba ,-<,lnspeccione la IMPORTANTE: Usted debera armar la extensi6n para rejilla de entrada. boquillas y conectar todas las mangueras antes de darle ilo la use si esta arranque al motor.
- Page 32 CONOZCA SU MAQUINA LAVADORA DE PRESION Lea el manual del propietario y las reglas de seguridad antes de poner en marcha su maquina lavadora a presion. Compare las ilustraciones con su maquina lavadora a presi0n para familiarizarse con las ubicaciones de los diferentes controles y ajustes.
- Page 33 COMO USAR SU MAQUlNA • Gire la valvula de control de combustible a la posici6n de "Encendido" ("On") (completamente en direcci6n LAVADORA A PRESION contraria alas manecillas del reloj). Si tiene problemas operando su maquina lavadora a presi6n, por favor Ilame a la linea de ayuda para maquinas Combustible Valvula lavadoras a presi6n al 1-800-222-3136.
- Page 34 • Para una limpieza mas efectiva, mantenga la boquilla de Como Usar la Boquilla Ajustable rociado de 8 a 24 pulgadas de la superficie de limpieza. Usted ya debe saber como darle ARRANQUE a su maquina • Si coloca la boquilla de rociado demasiado cerca podria lavadora a presi6n y como DETENERLA.
- Page 35 Como Usar el Carrete para Manguera Enjuage de la M_quina Lavadora Presion Su maquina lavadora a presi6n viene equipada con un carrete para manguera disefiado para almacenar la iADVERTENCIA! Sea extremadamente cuidadoso manguera cuando la unidad no esta siendo usada. Estas si debe usar el sistema de limpieza desde una instrucciones son Qnicamente para almacenar la manguera escalera, andamio o cualquier superficie...
- Page 36 RESPONSABILIDADES DEL PROPIETARIO Siga el programa de mantenimiento seg6n el n6mero de horas o seg6n el calendario, Io que suceda primero. Se requiere de servicio con mayor frecuencia cuando opere la unidad en las condiciones adversas descritas a continuaci6n. CALENDARIO DE MANTENIMIENTO INTERVALO DE ANOTE LAS FECHAS CONFORME...
- Page 37 ANTES DE CADA USO Coloque el colador del filtro en linea en el extremo con rosca de la extensi6n para boquillas. Su direcci6n no • Revise el nivel de aceite del motor. importa. Coloque el colador ejerciendo presi6n con el •...
- Page 38 4. Useelalambre i ncluido e neljuego (ounpequeSo sujeta papeles) para liberar cualquier material extraSo que est6 tapando laboquilla. Introduzca elalambre d entro d elaboquilla ygirelo hacia los NOTA: Los dos anillos 'o' anteriores tienen un tamaSo lados, hacia adelante yatras hasta despejar laobstrucci6n. similar.
- Page 39 • Limpie cualquier residuo de aceite que haya quedado. Remplace la Bujia • Vuelva a conectar el cable de la bujia a la bujia. Remplace la bujia anualmente o cada 100 horas de operaci6n. Servicio del Depurador de Aire Su motor no funcionara adecuadamente y puede daSarse si usted Io hace funcionar con un depurador de aire sucio.
- Page 40 DESPUES DE CADA USO ALMACENAMIENTO PARA INVIERNO No debera haber agua en la unidad por largos periodos de tiempo. Los sedimentos de minerales se pueden depositar en pares de la bombay "congelar" su funcionamiento. Lleve iPRECAUCION! Usted debera proteger su unidad de las a cabo estos procedimientos despu6s de cada uso: temperaturas...
- Page 41 ALMACENAMIENTO PROLONGADO Aceite el Di_metro Interior del Cilindro • Retire la bujia. Rocie aproximadamente 1 onza de aceite Si usted no planea usar la maquina lavadora a presi6n por limpio para motor dentro del cilindro. Cubra el orificio de mas de 30 dias, debera preparar el motor para un la bujia con un trapo.
- Page 42 Problema Causa Solucion La boquilla esta en el modo de baja Mueva la boquilla hacia atras para el presi6n. modo de alta presi6n. La entrada de agua esta bloqueada. Limpie la entrada. Suministro de agua inadecuado. Proporcione flujo de agua adecuado.
- Page 43 Si tiene preguntas acerca de sus responsabilidades y derechos Sus Obligaciones y Derechos de Garantia de garantia, deber& ponerse en contacto con su centro de La Junta Directiva de Recursos Ambientales de California ("CARB') servicio autorizado mas cercano o Ilamar a Sears al y Sears Roebuck and Co.
- Page 44 For in-home major brand repair service: Call 24 hours a day, 7 days a week 1-800-4-MY-HOM E SM (1-800-469-4663) Para pedir servicio de reparacibn a domicilio - 1-800-676-5811 In Canada for all your service and parts needs call - 1-800-665-4455 Au Canada por tout le service ou les pi6ces For the repair or replacement parts you need:...