Table of Contents
Advertisement
Quick Links
Owner's Manual
®
OTARY LAWN
190cc Honda Engine
Power-Propelled
22" Multi-Cut
MOWER
Model No.
917.370950
• EspaSol, p. 20
CAUTION'.
Read and follow all
Safety Rules and Instructions
before operating this equipment
Sears Brands Management Corp., Hoffman Estates, IL 60179
Visit our Craftsman website: www.sears.com/craftsman
U.S.A.
Advertisement
Table of Contents

Related Manuals for Craftsman 917.370950


Summary of Contents for Craftsman 917.370950
- Page 1 190cc Honda Engine Power-Propelled 22" Multi-Cut Model No. 917.370950 • EspaSol, p. 20 CAUTION'. Read and follow all Safety Rules and Instructions before operating this equipment U.S.A. Sears Brands Management Corp., Hoffman Estates, IL 60179 Visit our Craftsman website: www.sears.com/craftsman...
- Page 2 7-11 Repair Parts ........38-47 Maintenance Schedule ......Sears Service ......Back Cover CRAFTSMAN 2=YEAR FULL WARRANTY For TWO YEARS from the date of purchase, this product is warranted against any defects in material or workmanship. Defective product will receive free repair or replacement if repair is unavailable.
- Page 3 I. GENERAL OPERATION • Always wear safety goggles or safety glasses with side shields when operating • Read, understand, and follow all mower. instructions on the machine and in the manual(s) before starting. Be thoroughly II. SLOPE OPERATION familiar with the controls and the proper Slopes are a major factor related to slip &...
- Page 4 • Never fill containers inside a vehicle, on • Keep nuts and bolts, especially blade a truck or trailer bed with a plastic liner. attachment bolts, tight and keep equip- Always place containers on the ground ment in good condition. away from your vehicle before filling.
- Page 5 Repair Protection Agreements Congratulations on making a smart pur- • Fast help by phone- phone sup- chase. Your new Craftsman® product is port from a Sears representative designed and manufactured for years of products requiring in-home repair, plus dependable operation.
- Page 6 Read these instructions and this manual in its entirety before you attempt to assemble or operate your new lawn mower. IMPORTANT: This lawn mower is shipped WITHOUT OIL OR GASOLINE in the engine. Your new lawn mower has been assembled at the factory with the exception of those parts left unassembled for shipping purposes.
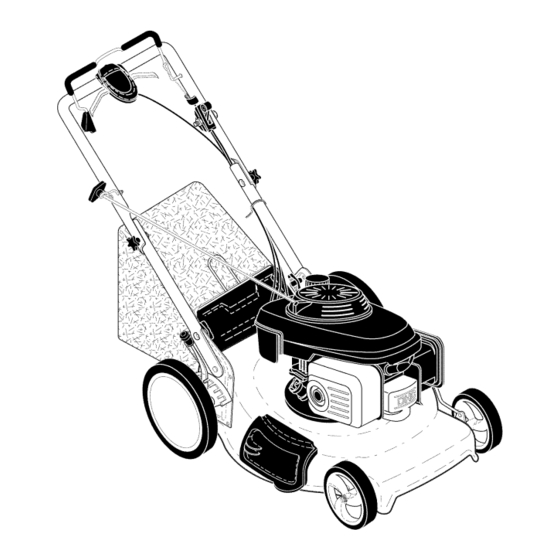
- Page 7 KNOW YOUR LAWN MOWER READ THIS OWNER'S MANUAL AND ALL SAFETY RULES BEFORE OPERATING YOUR MOWER. Compare the illustrations with your mower to familiarize yourself with the location of various controls and adjustments. Save this manual for future reference. These symbols may appear on your lawn mower or in literature supplied with the product.
- Page 8 The operation of any lawn Blade/brake '\\\ SAFETY GLASSES mower can result control lever in foreign objects thrown into the eyes, \\\\\ which can result in severe eye damage. Always wear safety Operator presence glasses or eye shields while operating your control bar lawn mower or performing any adjustments or repairs.
- Page 9 2. Rotate turnbuckle on drive control to REAR BAGGING increase drive speed. • Lift rear door of the lawn mower and 3. Operate mower to test drive speed. place the grass catcher frame hooks Readjustas required. onto the grass bag brackets. 4.
- Page 10 1. Be sure lawnmower is level. Remove oil fill cap/dipstick from spout. 3. You recieve a container of oil with the unit. Slowly pour the entire container down the oil fill spout into the engine. Insert and tighten oil fill cap/dipstick. IMPORTANT: •...
- Page 11 TO START ENGINE • Pores in cloth grass catchers can become filled with dirt and dust with use NOTE: Due to protective coatings on the and catchers will collect less grass. To engine, a small amount of smoke may be prevent this, regularly hose catcher off present during the initial use of the product with water and let dry before using.
- Page 12 MAINTENANCE BEFORE A FTER EVERY EVERY EVERY BEFORE EACH EACH 25 HOURS SCHEDULE USE USE HOURS OR SEASON HOURS STORAGE Check for Loose Fasteners _ Clean / Inspect Grass Catcher * Check Tires _ Check Drive Wheels Clean Lawn Mower ..M Clean under Drive Cover *** O Check Drive Belt / Pulleys *** Check / Sharpen / Replace Blade...
- Page 13 LAWN MOWER 5. Use block of wood between blade and lawn mower housing and tighten the Always observe safety rules when per- blade bolts, turning clockwise. forming any maintenance. • The recommended tightening torque is 36-44 ft. Ibs. TIRES IMPORTANT: Blade bolts are heat treat- •...
- Page 14 GEAR CASE * To keep your drive system working properly, the gear case and area around the drive should be kept clean and free of trash build-up. Clean under the drive cover twice a season. * The gear case is filled with lubricant to the proper level at the factory.
- Page 15 ,_CAUTION: Petroleum solvents, such as ,_ WARNING: Do not engage the drive kerosene, are not to be used to clean car- system during the washout process. tridge. They may cause deterioration of the 6. Shut off the engine. cartridge. Do not oil cartridge. Do not use 7.
- Page 16 _k WARNING" To avoid serious injury, ENGINE before performing any service and Maintenance, repair, or replacement adjustments: the emission control devices and systems, 1. Release control bar and stop engine. which are being done at the customers 2. Make sure the blade and all moving pense, may be performed by any non-road parts have completely stopped.
- Page 17 ENGINE Immediately prepare your lawn mower for storage at the end of the season or if the Maintenance, repair, or replacement unit will not be used for 30 days or more. the emission control devices and systems, which are being done at the customers LAWN MOWER pense, may be performed by any non-road...
- Page 18 OTHER IMPORTANT: Never cover mower while engine and exhaust areas are still warm. • Do not store gasoline from one season to another. • kCAUTION: Never store the lawn • Replace your gasoline can if your can mower with gasoline in the tank inside a starts to rust.
- Page 19 PROBLEM CAUSE CORRECTION Poor cut - 1. Worn, bent or loose blade. 1. Replace blade. Tighten blade bolt. uneven 2. Set all wheels at same 2. Wheel heights uneven. height. 3. Clean underside of 3. Buildup of grass, leaves and trash under mower. mower housing.
- Page 20 Esta garantia SOLO cubre defectos de material y mano de obra. La cobertura de la garantia NO incluye: •...
- Page 21 I. OPERACION • Siempre use gafas de seguridad o anteojos con protecci6n lateral cuando opere la sega- • Antes de empezar, debe familiarizarse dora. completamente con los controles y el uso correcto de la maquina. Para esto, debe leer II. OPERACION SOBRE LAS CUESTAS y comprender todas las instrucciones que...
- Page 22 • Nuncarepostar l a m_.quina a l interior de un • Mantenga lastuercasy lospernos, e spe- local. cialmente lospernosdelaccesorio de la • Nunca guardarla m_.quina o el contenedor cuchilla, a pretados y mantenga el equipoen buenascondiciones. de gasolina dondehayunallamaabierta, chispao luzpilotocomounacalderau otros •...
- Page 23 Reparaci6n Congratulaciones por su buena compra. • Ayuda rapida pot telefono - soporte tele- nuevo producto Craftsman® estb. disehado f6nico pot parte de un representante Sears y fabricado para funcionar de modo fiable pot sobre productos que requieren un arreglo en muchos ahos.
- Page 24 Lea estas instrucciones y este manual completamente antes de tratar de montar u operar su sega- dora nueva. IMPORTANTE" Este cortac6sped viene SIN ACEITE O GASOLINA en el motor. Su segadora nueva ha sido montada en la f_.brica con la excepci6n de aquellas partes que se deja- ron sin montar pot razones de envio.
- Page 25 FAIVlILIARICESE CON SU SEGADORA LEA ESTE MANUAL DEL DUENO Y LAS REGLAS DE SEGURIDAD ANTES DE OPARAR SU SEGADORA. Compare las ilustraciones con su segadora para familiarizarse con la ubicaci6n de los diversos controles y ajustes. Guarde este manual para referencia en el futuro. Estos simbolos pueden apareser sobre su segadora...
- Page 26 Laoperaci6n de cualquier Palanca de segadora puedehacerque mando cuchilta/ saltenobjetos extrahos dentrode freno susojos,Ioquepuedeproducir Barra de control dahosgravesen_stos.Siempre que exige la useanteojos de seguridad o protecci6n para presencia det losojosmientras operesu segadora o cuando operador hagaajustes o reparaciones. Recomendamos gafaso unamascara de seguridad devisi6n ampliadeseguridad usadasobrelasgafas.
- Page 27 Si las condiciones no mejoran despu_s de los • Para pasar a la operaci6n de acolchamiento, pasos descritos (la velocidad hacia adelante remover la recolectora de hierba y cerrar la queda la misma), la correa de transmisi6n puerta trasera. est,. desgastada y tiene que ser sustituida.
- Page 28 AsegOrese que la segadora est_ nivelada. Remueva la varila medidora de aceite del tubo de desarga de aceite. Usted recibe un envase de aceite con la unidad. Vierta lentamente el envase entero de aceite en el tubo de relleno del motor. Inserte y apriete la varilla medidora de aceite.
- Page 29 PARA PARAR EL MOTOR • Para un mejor ensacado del c6sped y para la • Para parar el motor mueva la palanca mayor[a de las condiciones de corte, la velo- de mando de control de aceleraci6n a la cidad del motor debe ajustarse a la posici6n de RAPIDO.
- Page 30 PROGRAMA ANTES DESPUES CADA CADA CADA ANTES DEL DE CADA DE CADA 25 HORAS O ALMACE- MANTEN|M|ENTO HORAS TEMPORADA HORAS NAMIENTO Revisar si hay Sujetadores Sueltos Limpiar/Inspeccionar el Recogedor de Cesped Controlar los Neumaticos Controlar las Ruedas Motrices Limpiar la Segadora ..
- Page 31 SEGADORA • La torsi6n para apretar recomendada es de 36 - 44 pies libras. Siempre observe las reglas de seguridad cu- IMPORTANTE: Los pernos de la cuchilla es ando haga el mantenimiento. tratado a calo. Si es necesario sustituir los pernos, sustituirlos s61o con pernos aprobados LLANTAS mostrados en la secci6n Partes de Reparaci6n...
- Page 32 CAJADEENGRANAJES • Paramantener e l sistema de impulsi6n funcionando enformaadecuada, l acaja de engranajes y el Areaalrededor d e la impulsi6n tienenquemantenerse l impiasy sin acumulaci6n d e basura.Limpie debajo de lacubierta de la impulsi6n dosvecespor temporada. • Lacajade engranajes s e Ilenaconlubricante hastael niveladecuado en lafb.brica.
- Page 33 orode _ste.Noaceiteel cartucho. N ouseaire ,_ADVERTENClA: No contrate el sistema de a presi6n paralimpiarlo o secarlo. impulsi6n durante el proceso del derrubio. 4. Instaleelcartucho, l uegovuelvaa ponerla Apague el motor. cubierta. Apague el abastecimiento de agua y quite la manguera de la guarnici6n. PREOAUOION: No quite la manguera de la guarnici6n...
- Page 34 _,DVERTENClA: Para evitar lesi6nes serias, MOTOR antes de dar calquier servico o de hacer El mantenimiento, la reparaci6n, o el reemplazo ajustes: de cualquier dispositivos o sistemas del control Suelte la barra de control y pare el motor. de la emisi6n, los cuales sean hechos al costo AsegOrese que la cuchilla y que todas las del cliente, pueden ser realizados por cualquier partes movibles se hayan detenido comple-...
- Page 35 Inmediatamente prepare su segadora para el almacenamiento al final de cada temporada o si la unidad no se va a usar pot 30 d[as o m_.s. SEGADORA Perno Cuando se va a guardar la segadora pot cierto perfodo de tiempo, Ifmpiela cuidadosamente, remueva toda la mugre, la grasa, las hojas, etc.
- Page 36 ACEITE DEL MOTOR • Si es posible, guarde su unidad en un recinto cerrado y cLibrala para protegerla contra el Drene el aceite (con el motor caliente) y cb.m- polvo y la mugre. bielo con aceite de motor limpio. (Vea "MO- TOR"...
- Page 37 PROBLEMA CAUSA CORRECClON Mal corte= Cuchilla desgastada, doblada Cambie la cuchilla. Apriete el perno o suelta. de la cuchilla. disparejo AItura de las ruedas dispareja. Ajuste todas las ruedas a la misma altura. Acumulaci6n de c_sped, hojas o Limpie la parte inferior de la basura debajo de la segadora.
- Page 38 CRAFTSMAN ROTARY LAWN MOWER - - MODEL NUMBER 917,370950 /' 58 ..... 6 .... ,, 52\...
- Page 39 CRAFTSMAN ROTARY LAWN MOWER - - MODEL NUMBER 917,3"/0950 PART PART PART DESCRiPTiON DESCRiPTiON DESCRiPTiON Nut, Hex 183471X479 Upper Handle 419944X007 Latch, Mulcher Door 155377 445853 Cable, Blade Brake/Clutch 420019 Mulcher Door 437517X479 Bar, Lower Handle Handle Bolt Control/Rear Door Prop...
- Page 40 CRAFTSMAN ROTARY LAWN MOWER - - MODEL NUMBER 917,370950 ( (, 55.... -..> 13 ......35 41 31 3415 ® ..... 32...
- Page 41 CRAFTSMAN ROTARY LAWN MOWER - - MODEL NUMBER 917,3"/0950 PART PART DESCRiPTiON DESCRiPTiON 446503 Drive Control Assembly 409148 Nut, Flangelock 3/8-16 (Includes Cable) 197480 O-Ring 429544X479 Mounting Bracket, Drive Control 430598 Axle, Rear 431650 Cable, Drive 441833X004 Axle, Front 17411312...
- Page 42 HONDA 4=CYCLE ENGINE MODEL NUMBER GCV190=LABHH-ED PISTON / CONNECTING _;L2,5 21-0 ./,_¢"...
- Page 43 HONDA 4=CYCLE ENGINE MODEL NUMBER GCV190=LABHH-ED CAMSHAFT PULLEY OiL PAN PART PART DESCRIPTION DESCRIPTION 1 12209-ZM0-003 1 11300-ZOY-406 Seal, Valve Stem Pan Assembly, 2 14320-ZOY-000 2 15625-ZE6-000 Pulley, Camshaft Gasket, Oil Filler Cap 3 14324-ZL8-000 3 15631-ZM0-000 Extension, Oil Filler Shaft, Cam Pulley 4 14400-Z0J-014 4 15639-ZM0-000...
- Page 44 HONDA 4=CYCLE ENGINE MODEL NUMBER GCV190=LABHH-ED BLADE HOLDER CARBURETOR ----1 17---0 {_9 AiR CLEANER LABELS RECOIL STARTER MUFFLER...
- Page 45 HONDA 4=CYCLE ENGINE MODEL NUMBER GCV190=LABHH-ED CARBURETOR MUFFLER PART PART DESCRIPTION DESCRIPTION 1 16010-883-015 Gasket Set 1 06180-Z0J-000 Kit, Spark Arrester 2 16013-ZL1-003 Float Set 2 18310-ZOY-000 Muffler 3 16015-887-782 Chamber Set, Float 3 18321-ZOL-J00 Protector, Muffler 4 16016-ZG0-W00 Screw Set 4 18350-ZL8-000 Arrester, Spark 5 16024-ZE1-811...
- Page 46 HONDA 4-CYCLE ENGINE MODEL NUMBER GCV190=LABHH-ED CHOKE LEVER ; ..', !@ 10,-,9 ._... L__eJ - ---J d_ "--% i--2 FLYWHEEL...
- Page 47 Engine Stop (NC) 16 17636-Z0L-000 7 51125-Z0L-003 Gauge, Fuel Level Holder, Wire (Fastex) 90681-959-003 21 19610-ZOL-861ZC CoverAssembiy, Clip A, Cable (3.8mm) "T89" (Craftsman Red) (Black) (NIFCO) 8 75110-Z0L-800 19610-Z0L-861ZA Cover Assembly, Brake Sub-Assembly "T89" CNHI") (Black) (S/N 1877909 and below)
- Page 48 HONDA EMiSSiON CONTROL SYSTEM WARRANTY Your new Honda Power Equipment engine complies with the U.S. EPA, Environment Canada, and State of California emission regulations (models certified for sale in California only). American Hon- da Motor Co., Inc. provides the emission warranty coverage for engines in the United States and its territories.
- Page 49 Only Honda approved replacement parts may be used in the performance of any warranty repairs and must be provided without charge to the owner. The use of replacement parts not equivalent to the original parts may impair the effectiveness of your engine emission control system. If such a replacement part is used in the repair or maintenance of your engine, and an authorized...
- Page 50 S_RV|C_ NOTES...
- Page 51 NOTAS S_RV|C|O...
- Page 52 NEED HOR£ HELP? Youq_[find the a_swer at@ more on managemyhO_eoCO_ - for fr'ee! o Find this and aLLyour other product manuals online. o Get answers from our team of home experts. o Get a personalized maintenance plan for your home. o Find information and tools to heLp with home projects.
- Page 53 190cc Honda Engine Power-Propelled 22" Multi-Cut Model No. 917.370950 • EspaSol, p. 20 CAUTION'. Read and follow all Safety Rules and Instructions before operating this equipment U.S.A. Sears Brands Management Corp., Hoffman Estates, IL 60179 Visit our Craftsman website: www.sears.com/craftsman...
- Page 54 7-11 Repair Parts ........38-47 Maintenance Schedule ......Sears Service ......Back Cover CRAFTSMAN 2=YEAR FULL WARRANTY For TWO YEARS from the date of purchase, this product is warranted against any defects in material or workmanship. Defective product will receive free repair or replacement if repair is unavailable.
- Page 55 I. GENERAL OPERATION • Always wear safety goggles or safety glasses with side shields when operating • Read, understand, and follow all mower. instructions on the machine and in the manual(s) before starting. Be thoroughly II. SLOPE OPERATION familiar with the controls and the proper Slopes are a major factor related to slip &...
- Page 56 • Never fill containers inside a vehicle, on • Keep nuts and bolts, especially blade a truck or trailer bed with a plastic liner. attachment bolts, tight and keep equip- Always place containers on the ground ment in good condition. away from your vehicle before filling.
- Page 57 Repair Protection Agreements Congratulations on making a smart pur- • Fast help by phone- phone sup- chase. Your new Craftsman® product is port from a Sears representative designed and manufactured for years of products requiring in-home repair, plus dependable operation.
- Page 58 Read these instructions and this manual in its entirety before you attempt to assemble or operate your new lawn mower. IMPORTANT: This lawn mower is shipped WITHOUT OIL OR GASOLINE in the engine. Your new lawn mower has been assembled at the factory with the exception of those parts left unassembled for shipping purposes.
- Page 59 KNOW YOUR LAWN MOWER READ THIS OWNER'S MANUAL AND ALL SAFETY RULES BEFORE OPERATING YOUR MOWER. Compare the illustrations with your mower to familiarize yourself with the location of various controls and adjustments. Save this manual for future reference. These symbols may appear on your lawn mower or in literature supplied with the product.
- Page 60 The operation of any lawn Blade/brake '\\\ SAFETY GLASSES mower can result control lever in foreign objects thrown into the eyes, \\\\\ which can result in severe eye damage. Always wear safety Operator presence glasses or eye shields while operating your control bar lawn mower or performing any adjustments or repairs.
- Page 61 2. Rotate turnbuckle on drive control to REAR BAGGING increase drive speed. • Lift rear door of the lawn mower and 3. Operate mower to test drive speed. place the grass catcher frame hooks Readjustas required. onto the grass bag brackets. 4.
- Page 62 1. Be sure lawnmower is level. Remove oil fill cap/dipstick from spout. 3. You recieve a container of oil with the unit. Slowly pour the entire container down the oil fill spout into the engine. Insert and tighten oil fill cap/dipstick. IMPORTANT: •...
- Page 63 TO START ENGINE • Pores in cloth grass catchers can become filled with dirt and dust with use NOTE: Due to protective coatings on the and catchers will collect less grass. To engine, a small amount of smoke may be prevent this, regularly hose catcher off present during the initial use of the product with water and let dry before using.
- Page 64 MAINTENANCE BEFORE A FTER EVERY EVERY EVERY BEFORE EACH EACH 25 HOURS SCHEDULE USE USE HOURS OR SEASON HOURS STORAGE Check for Loose Fasteners _ Clean / Inspect Grass Catcher * Check Tires _ Check Drive Wheels Clean Lawn Mower ..M Clean under Drive Cover *** O Check Drive Belt / Pulleys *** Check / Sharpen / Replace Blade...
- Page 65 LAWN MOWER 5. Use block of wood between blade and lawn mower housing and tighten the Always observe safety rules when per- blade bolts, turning clockwise. forming any maintenance. • The recommended tightening torque is 36-44 ft. Ibs. TIRES IMPORTANT: Blade bolts are heat treat- •...
- Page 66 GEAR CASE * To keep your drive system working properly, the gear case and area around the drive should be kept clean and free of trash build-up. Clean under the drive cover twice a season. * The gear case is filled with lubricant to the proper level at the factory.
- Page 67 ,_CAUTION: Petroleum solvents, such as ,_ WARNING: Do not engage the drive kerosene, are not to be used to clean car- system during the washout process. tridge. They may cause deterioration of the 6. Shut off the engine. cartridge. Do not oil cartridge. Do not use 7.
- Page 68 _k WARNING" To avoid serious injury, ENGINE before performing any service and Maintenance, repair, or replacement adjustments: the emission control devices and systems, 1. Release control bar and stop engine. which are being done at the customers 2. Make sure the blade and all moving pense, may be performed by any non-road parts have completely stopped.
- Page 69 ENGINE Immediately prepare your lawn mower for storage at the end of the season or if the Maintenance, repair, or replacement unit will not be used for 30 days or more. the emission control devices and systems, which are being done at the customers LAWN MOWER pense, may be performed by any non-road...
- Page 70 OTHER IMPORTANT: Never cover mower while engine and exhaust areas are still warm. • Do not store gasoline from one season to another. • kCAUTION: Never store the lawn • Replace your gasoline can if your can mower with gasoline in the tank inside a starts to rust.
- Page 71 PROBLEM CAUSE CORRECTION Poor cut - 1. Worn, bent or loose blade. 1. Replace blade. Tighten blade bolt. uneven 2. Set all wheels at same 2. Wheel heights uneven. height. 3. Clean underside of 3. Buildup of grass, leaves and trash under mower. mower housing.
- Page 72 Esta garantia SOLO cubre defectos de material y mano de obra. La cobertura de la garantia NO incluye: •...
- Page 73 I. OPERACION • Siempre use gafas de seguridad o anteojos con protecci6n lateral cuando opere la sega- • Antes de empezar, debe familiarizarse dora. completamente con los controles y el uso correcto de la maquina. Para esto, debe leer II. OPERACION SOBRE LAS CUESTAS y comprender todas las instrucciones que...
- Page 74 • Nuncarepostar l a m_.quina a l interior de un • Mantenga lastuercasy lospernos, e spe- local. cialmente lospernosdelaccesorio de la • Nunca guardarla m_.quina o el contenedor cuchilla, a pretados y mantenga el equipoen buenascondiciones. de gasolina dondehayunallamaabierta, chispao luzpilotocomounacalderau otros •...
- Page 75 Reparaci6n Congratulaciones por su buena compra. • Ayuda rapida pot telefono - soporte tele- nuevo producto Craftsman® estb. disehado f6nico pot parte de un representante Sears y fabricado para funcionar de modo fiable pot sobre productos que requieren un arreglo en muchos ahos.
- Page 76 Lea estas instrucciones y este manual completamente antes de tratar de montar u operar su sega- dora nueva. IMPORTANTE" Este cortac6sped viene SIN ACEITE O GASOLINA en el motor. Su segadora nueva ha sido montada en la f_.brica con la excepci6n de aquellas partes que se deja- ron sin montar pot razones de envio.
- Page 77 FAIVlILIARICESE CON SU SEGADORA LEA ESTE MANUAL DEL DUENO Y LAS REGLAS DE SEGURIDAD ANTES DE OPARAR SU SEGADORA. Compare las ilustraciones con su segadora para familiarizarse con la ubicaci6n de los diversos controles y ajustes. Guarde este manual para referencia en el futuro. Estos simbolos pueden apareser sobre su segadora...
- Page 78 Laoperaci6n de cualquier Palanca de segadora puedehacerque mando cuchilta/ saltenobjetos extrahos dentrode freno susojos,Ioquepuedeproducir Barra de control dahosgravesen_stos.Siempre que exige la useanteojos de seguridad o protecci6n para presencia det losojosmientras operesu segadora o cuando operador hagaajustes o reparaciones. Recomendamos gafaso unamascara de seguridad devisi6n ampliadeseguridad usadasobrelasgafas.
- Page 79 Si las condiciones no mejoran despu_s de los • Para pasar a la operaci6n de acolchamiento, pasos descritos (la velocidad hacia adelante remover la recolectora de hierba y cerrar la queda la misma), la correa de transmisi6n puerta trasera. est,. desgastada y tiene que ser sustituida.
- Page 80 AsegOrese que la segadora est_ nivelada. Remueva la varila medidora de aceite del tubo de desarga de aceite. Usted recibe un envase de aceite con la unidad. Vierta lentamente el envase entero de aceite en el tubo de relleno del motor. Inserte y apriete la varilla medidora de aceite.
- Page 81 PARA PARAR EL MOTOR • Para un mejor ensacado del c6sped y para la • Para parar el motor mueva la palanca mayor[a de las condiciones de corte, la velo- de mando de control de aceleraci6n a la cidad del motor debe ajustarse a la posici6n de RAPIDO.
- Page 82 PROGRAMA ANTES DESPUES CADA CADA CADA ANTES DEL DE CADA DE CADA 25 HORAS O ALMACE- MANTEN|M|ENTO HORAS TEMPORADA HORAS NAMIENTO Revisar si hay Sujetadores Sueltos Limpiar/Inspeccionar el Recogedor de Cesped Controlar los Neumaticos Controlar las Ruedas Motrices Limpiar la Segadora ..
- Page 83 SEGADORA • La torsi6n para apretar recomendada es de 36 - 44 pies libras. Siempre observe las reglas de seguridad cu- IMPORTANTE: Los pernos de la cuchilla es ando haga el mantenimiento. tratado a calo. Si es necesario sustituir los pernos, sustituirlos s61o con pernos aprobados LLANTAS mostrados en la secci6n Partes de Reparaci6n...
- Page 84 CAJADEENGRANAJES • Paramantener e l sistema de impulsi6n funcionando enformaadecuada, l acaja de engranajes y el Areaalrededor d e la impulsi6n tienenquemantenerse l impiasy sin acumulaci6n d e basura.Limpie debajo de lacubierta de la impulsi6n dosvecespor temporada. • Lacajade engranajes s e Ilenaconlubricante hastael niveladecuado en lafb.brica.
- Page 85 orode _ste.Noaceiteel cartucho. N ouseaire ,_ADVERTENClA: No contrate el sistema de a presi6n paralimpiarlo o secarlo. impulsi6n durante el proceso del derrubio. 4. Instaleelcartucho, l uegovuelvaa ponerla Apague el motor. cubierta. Apague el abastecimiento de agua y quite la manguera de la guarnici6n. PREOAUOION: No quite la manguera de la guarnici6n...
- Page 86 _,DVERTENClA: Para evitar lesi6nes serias, MOTOR antes de dar calquier servico o de hacer El mantenimiento, la reparaci6n, o el reemplazo ajustes: de cualquier dispositivos o sistemas del control Suelte la barra de control y pare el motor. de la emisi6n, los cuales sean hechos al costo AsegOrese que la cuchilla y que todas las del cliente, pueden ser realizados por cualquier partes movibles se hayan detenido comple-...
- Page 87 Inmediatamente prepare su segadora para el almacenamiento al final de cada temporada o si la unidad no se va a usar pot 30 d[as o m_.s. SEGADORA Perno Cuando se va a guardar la segadora pot cierto perfodo de tiempo, Ifmpiela cuidadosamente, remueva toda la mugre, la grasa, las hojas, etc.
- Page 88 ACEITE DEL MOTOR • Si es posible, guarde su unidad en un recinto cerrado y cLibrala para protegerla contra el Drene el aceite (con el motor caliente) y cb.m- polvo y la mugre. bielo con aceite de motor limpio. (Vea "MO- TOR"...
- Page 89 PROBLEMA CAUSA CORRECClON Mal corte= Cuchilla desgastada, doblada Cambie la cuchilla. Apriete el perno o suelta. de la cuchilla. disparejo AItura de las ruedas dispareja. Ajuste todas las ruedas a la misma altura. Acumulaci6n de c_sped, hojas o Limpie la parte inferior de la basura debajo de la segadora.
- Page 90 CRAFTSMAN ROTARY LAWN MOWER - - MODEL NUMBER 917,370950 /' 58 ..... 6 .... ,, 52\...
- Page 91 CRAFTSMAN ROTARY LAWN MOWER - - MODEL NUMBER 917,3"/0950 PART PART PART DESCRiPTiON DESCRiPTiON DESCRiPTiON Nut, Hex 183471X479 Upper Handle 419944X007 Latch, Mulcher Door 155377 445853 Cable, Blade Brake/Clutch 420019 Mulcher Door 437517X479 Bar, Lower Handle Handle Bolt Control/Rear Door Prop...
- Page 92 CRAFTSMAN ROTARY LAWN MOWER - - MODEL NUMBER 917,370950 ( (, 55.... -..> 13 ......35 41 31 3415 ® ..... 32...
- Page 93 CRAFTSMAN ROTARY LAWN MOWER - - MODEL NUMBER 917,3"/0950 PART PART DESCRiPTiON DESCRiPTiON 446503 Drive Control Assembly 409148 Nut, Flangelock 3/8-16 (Includes Cable) 197480 O-Ring 429544X479 Mounting Bracket, Drive Control 430598 Axle, Rear 431650 Cable, Drive 441833X004 Axle, Front 17411312...
- Page 94 HONDA 4=CYCLE ENGINE MODEL NUMBER GCV190=LABHH-ED PISTON / CONNECTING _;L2,5 21-0 ./,_¢"...
- Page 95 HONDA 4=CYCLE ENGINE MODEL NUMBER GCV190=LABHH-ED CAMSHAFT PULLEY OiL PAN PART PART DESCRIPTION DESCRIPTION 1 12209-ZM0-003 1 11300-ZOY-406 Seal, Valve Stem Pan Assembly, 2 14320-ZOY-000 2 15625-ZE6-000 Pulley, Camshaft Gasket, Oil Filler Cap 3 14324-ZL8-000 3 15631-ZM0-000 Extension, Oil Filler Shaft, Cam Pulley 4 14400-Z0J-014 4 15639-ZM0-000...
- Page 96 HONDA 4=CYCLE ENGINE MODEL NUMBER GCV190=LABHH-ED BLADE HOLDER CARBURETOR ----1 17---0 {_9 AiR CLEANER LABELS RECOIL STARTER MUFFLER...
- Page 97 HONDA 4=CYCLE ENGINE MODEL NUMBER GCV190=LABHH-ED CARBURETOR MUFFLER PART PART DESCRIPTION DESCRIPTION 1 16010-883-015 Gasket Set 1 06180-Z0J-000 Kit, Spark Arrester 2 16013-ZL1-003 Float Set 2 18310-ZOY-000 Muffler 3 16015-887-782 Chamber Set, Float 3 18321-ZOL-J00 Protector, Muffler 4 16016-ZG0-W00 Screw Set 4 18350-ZL8-000 Arrester, Spark 5 16024-ZE1-811...
- Page 98 HONDA 4-CYCLE ENGINE MODEL NUMBER GCV190=LABHH-ED CHOKE LEVER ; ..', !@ 10,-,9 ._... L__eJ - ---J d_ "--% i--2 FLYWHEEL...
- Page 99 Engine Stop (NC) 16 17636-Z0L-000 7 51125-Z0L-003 Gauge, Fuel Level Holder, Wire (Fastex) 90681-959-003 21 19610-ZOL-861ZC CoverAssembiy, Clip A, Cable (3.8mm) "T89" (Craftsman Red) (Black) (NIFCO) 8 75110-Z0L-800 19610-Z0L-861ZA Cover Assembly, Brake Sub-Assembly "T89" CNHI") (Black) (S/N 1877909 and below)
- Page 100 HONDA EMiSSiON CONTROL SYSTEM WARRANTY Your new Honda Power Equipment engine complies with the U.S. EPA, Environment Canada, and State of California emission regulations (models certified for sale in California only). American Hon- da Motor Co., Inc. provides the emission warranty coverage for engines in the United States and its territories.
- Page 101 Only Honda approved replacement parts may be used in the performance of any warranty repairs and must be provided without charge to the owner. The use of replacement parts not equivalent to the original parts may impair the effectiveness of your engine emission control system. If such a replacement part is used in the repair or maintenance of your engine, and an authorized...
- Page 102 S_RV|C_ NOTES...
- Page 103 NOTAS S_RV|C|O...
- Page 104 NEED HOR£ HELP? Youq_[find the a_swer at@ more on managemyhO_eoCO_ - for fr'ee! o Find this and aLLyour other product manuals online. o Get answers from our team of home experts. o Get a personalized maintenance plan for your home. o Find information and tools to heLp with home projects.