Table of Contents
Advertisement
Quick Links
Download this manual
See also:
User Manual
o EN 55011
Limits and methods of measurement
of radio disturbance characteristics of
industrial,scientific and medical (ISM
high frequency equipment
Limits and methods of measurement
o EN 55013
of radio disturbance characteristics of
broadcast receivers and associated
equipment
o EN 55014
Limits and methods of measurement
of radio disturbance characteristics of
household electrical appliances,
portable tools and similar electrical
apparatus
o EN 55015
Limits and methods of measurement
of radio disturbance characteristics of
fluorescent lamps and luminaries
o EN 55020
Immuni t y from radio interference of
broadcast receivers and associated
equipment
T EN 55022
Limits and methods of measurement
of radio disturbance characteristics of
information technology equipment
o DIN VDE 0855
Cabled distribution systems; Equipment
o part 10
for receiving and/or distribution from
o part 12
sound and television signals
T CE marking
o EN 60065
Safety requirements for mains operated
electronic and rel a ted apparatus for
household and similar general use
o EN 60335
Safety of household and similar
electrical appliances
(S ta mp )
Declaration of Conformity
We, Manufacturer/Importer
G.B.T. Technology Träding GMbH
Ausschlager Weg 41, 1F, 20537 Hamburg, Germany
declare that the product
( description of the apparatus, system, installation to which i t refers)
GV-R9700 PRO
is in conformity with
(reference to the specification under which conformity is declared)
in accordance with 89/336 EEC-EMC Directive
The manufacturer also declares the conformity of above mentioned product
with the actual required safety standards in accordance w ith LVD 73/23 EEC
(full address)
VGA Card
o EN 61000-3-2*
T EN 60555-2
o EN 61000-3-3*
T EN 60555-3
T EN 50081-1
T EN 50082-1
o EN 55081-2
o EN 55082-2
o ENV 55104
o EN50091-2
(EC conformity marking)
o EN 60950
Safety for information technology equipment
including electrical bussiness equipment
o EN 50091-1
General and Safety requirements for
uninterruptible power systems (UPS)
Manufacturer/Importer
Date : Aug. 28, 2002
Disturbances in supply systems cause
by household appliances and similar
electrical equipment "Harmonics"
Disturbances in supply systems cause
by household appliances and similar
electri c al equipment "Voltage fluctuations"
Generic emission standard Part 1:
Residual commercial and light industry
Generic immunity standard Part 1:
Residual commercial and light industry
Generic emission standard Part 2:
Industrial environment
Generic emission standard Part 2:
Industrial environment
lmmunity requirements for household
appliances tools and similar apparatus
EMC requirements for uninterruptible
power systems (UPS)
Timmy Huang
Signature:
Name:
Timmy Huang
Advertisement
Table of Contents

Related Manuals for Gigabyte GV-R9700 PRO


Summary of Contents for Gigabyte GV-R9700 PRO
-
Page 1: Declaration Of Conformity
Ausschlager Weg 41, 1F, 20537 Hamburg, Germany declare that the product ( description of the apparatus, system, installation to which i t refers) VGA Card GV-R9700 PRO is in conformity with (reference to the specification under which conformity is declared) in accordance with 89/336 EEC-EMC Directive... - Page 2 DECLARATION OF CONF ORMITY Per FCC Part 2 Sect ion 2.1077(a) Responsibl e Party Name: G.B.T. INC. (U.S .A.) Address: 17358 Railroad S treet City of Industry, CA 91 748 Phone/Fax No: (818) 854-9338/ (818) 854-9339 hereby declares that the product Product Name: VGA Card GV-R97 00 PRO...
- Page 3 R9700 PRO Radeon 9700 PRO Graphics Accelerator USER'S MANUAL Rev. 112 12MD-R9700P-112...
- Page 4 Chapter 1 User's Manual Copyright Copyright by GIGA-BYTE TECHNOLOGY CO., LTD. ("GBT") No part of this manual may be reproduced or transmitted in any from without the expressed, written permission of GBT. Trademarks Third-party brands and names are the property of their respective owners. Notice Due to rapid change in technology, some of the specifications might be out of date before publication of this booklet.
-
Page 5: Table Of Contents
Table of Contents 1. INTRODUCTION ................. 4 1.1. PREFACE ....................4 1.2. KEY FEATURES ..................4 2.HARDWARE INSTALLATION ............... 5 2.1. UNPACKING ....................5 2.2. BOARD LAYOUT ..................6 2.3. HARDWARE INSTALLATION ..............7 3.SOFTWARE INSTALLATION ............... 9 ® ® ®... -
Page 6: Introduction
1. INTRODUCTION 1.1. PREFACE R9700 PRO features world's first 8-pipeline architecture for twice the rendering power, ™ 128MB of memory to accelerate latest 3D games and new SMARTSHADER ® ® technology supporting DirectX 9.0 and the latest OpenGL functionality to give developers the freedom to create more complicated and realistic visual effects than ever before. -
Page 7: Hardware Installation
DO NOT APPLY POWER TO YOUR SYSTEM IF IT HAS BEEN DAMAGED ON THE CARD. In order to ensure your graphics card working correctly, please use official Gigabyte BIOS only. Use none official gigabyte BIOS might cause problem on the graphics card. - 5 -... -
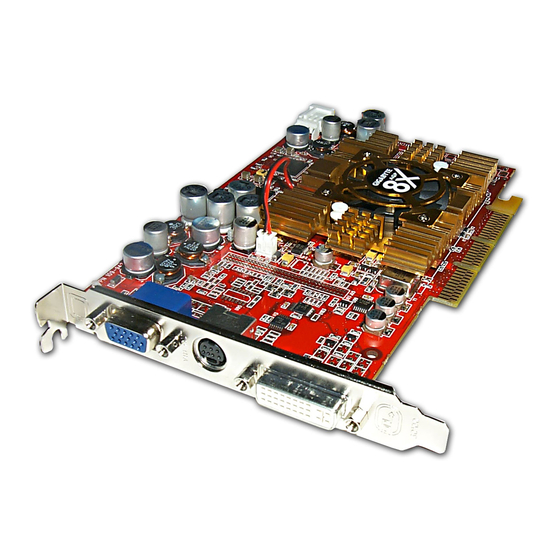
Page 8: Board Layout
2.2. BOARD LAYOUT R9700 PRO (128MB DDR) VGA Monitor Connector (15pin) TV-Out DVI Connector VGA Output Analog Monitor Analog LCD Monitor VGA Monitor Connector (15pin) AV Output NTSC / PAL TV TV-out S-VideoOutput Projector DVI Output DVI Connector Digital LCD Monitor DVI-I to D-sub VGA Output Connector... -
Page 9: Hardware Installation
2.3. HARDWARE INSTALLATION Installing Your Graphics card. Now that you have prepared your computer, you are ready to install your graphics accelerator card. To install your graphics accelerator card: 1. Power off the computer and monitor, then disconnect the display cable from the back of your computer. - Page 10 4. Locate the AGP slot. If necessary, remove the metal cover from this slot; then align your Graphics card with the AGP slot, and press it in firmly until the card is fully eated. R9700 PRO Graphics card AGP Slot 5.
-
Page 11: Software Installation
3.SOFTWARE INSTALLATION In this manual, we assume that your CD-ROM Drive letter to be Drive D: ® ® ® 3.1. WINDOWS 98 /98SE / WINDOWS ME / WINDOWS XP DRIVER AND UTILITIES INSTALLATION The installation of Win ® 98/98SE / WINDOWS ®... -
Page 12: Directx Installation
3.1.2. DirectX Installation ® Install Microsoft DirectX 8.1 to enable 3D hardware acceleration support for Windows ® ® 98/98SE/ Windows 2000 / or Windows ME to achieve better 3D performence. ® ® Note: For software MPEG support in Windows 98/ 98SE/ Windows 2000 or ®... - Page 13 4.Click "OK" item. Then the DirectX 8.1 installation is completed. - 11 - Software Installation...
-
Page 14: Driver Installation
3.1.3. Driver Installation The following is the step-by-step installation guide. Step 1: New Hardware Found After R9700 PRO is inserted into your computer at the first time, the windows will automatically detect a new hardware in the system and pop out a "New Hardware Found" message. - Page 15 3..Click "No" icon. After the system has finished loading, insert the R9700 PRO driver CD disk into your CD- ROM, and then you can see the AUTORUN window. If it does not show up, please run "D:\setup.exe". Step 5: Driver Setup (Pictures below are shown in Windows XP) 1.
- Page 16 3.Click "Yes". 4. Click "Express" or "Custom" icon. 5. Click "Finish" to restart computer. R9700 PRO Graphics Accelerator - 14 -...
- Page 17 After installation of the display drivers, you will find an ATI icon on the taskbar's status area. Clicking this icon open the ATi control panel. 1.Rotate Screen 2.Using Single Display ™ HYDRAVISION ™ ® HYDRAVISION and the Desktop Manager are activated whenever Windows starts.
-
Page 18: Display Properties
3.1.4. Display Properties pages The screen shows the information of display adapter, color, the range of display area and the refresh rate. Settings (Resolutions and Color depth for windows) The Setting properties page allows you to adjust the Direct 3D settings. You can move the slider to the change resolution. - Page 19 OpenGL Properties: The OpenGL properties page gives you complete control of the OpenGL settings. Main Settings slider Moving the slider to the left will maximize application performance, while moving the slider to the right will pro- vide excellent 3D image quality. Moving this slider from one position to the next changes the individual Custom Set- tings sliders found below.
- Page 20 textures of the same image. Moving the slider to the right selects a higher quality base mipmap, delivering the highest quality application experience. Moving the slider to the left selects a lower quality mipmap, delivering the highest application performance. Wait for Vertical Sync This will lower the frame rate of full screen games but reduce the image tearing that can occur with the higher frame rate.
- Page 21 Direct 3D Properties: The Direct 3D properties page allows you to adjust the Direct 3D settings. Main Settings slider Moving the slider to the left will maximize application performance, while moving the slider to the right will provide excellent 3D image quality. Moving this slider from one posi- tion to the next changes the individual Custom Settings slid- ers found below.
- Page 22 The base mipmap is the highest quality texture, and all subsequent mipmaps are smaller sized textures of the same image. Moving the slider to the right selects a higher quality base mipmap, delivering the highest quality application experience. Moving the slider to the left selects a lower quality mipmap, delivering the highest application performance.
- Page 23 Color Properties: The Color Properties is used to adjust the color settings. It also allows gamma control for video playing of the Video Overlay. The color settings affect all display devices mapped to the view.You can change red, green, and blue display colors. Set Desktop and Video Overlay brightness (gamma) levels can also be changed.
- Page 24 Display Properties: If your VGA card is equipped with a S-Video connector, you can use a second output device (e.q. a TV or a computer monitor) as part of your operating desktop extending your desktop to second device or copying your desktop on the second device. Select Display Type Enable / Disable "Extend my windows desktop onto this monitor"...
- Page 25 Overlay Properties: The Overlay Properties is used to adjust the Brightness / Contrast / Saturation / Hue / Gamma settings. Overlay properties allows for the viewing of full-motion video on your PC. However, there is only one video overlay, which is only available on the Primary display. The video overlay controls are automatically activated during playback of any video file type that supports overlay adjustments.
-
Page 26: Windows Nt 4.0 Driver Installation
3.2. WINDOWS NT 4.0 DRIVER INSTALLATION Please make sure the Windows NT 4.0 have installed Windows NT 4.0 Service Pack version 6.0 (or later) before installing the R9700 PRO graphics accelerator driver. To install the R9700 PRO driver for Windows NT: ®... -
Page 27: Windows 2000 Driver Installation
3.4. BIOS FLASH UTILITY R9700 PRO BIOS update procedure: Note: Please download the newest BIOS from our website (www.gigabyte.com.tw) or contact your local dealer for the file. If you want to realize the BIOS flash information, please refer to detail on P.27... -
Page 28: Troubleshooting Tips
4.Troubleshooting Tips The following troubleshooting tips may help if you experience problems. Contact your dealer or GBT for more advanced troubleshooting information. Check that the card is seated properly in the AGP slot. Ensure that the display cable is securely fastened to the card's display connector. Make sure that the monitor and computer are plugged in and receiving power. -
Page 29: Appendix
5. Appendix 5.1. How to reflash the BIOS We use GV-AR64SH VGA card and Atiflash BIOS flash utility as example. How to reflash the BIOS for your graphics card? 1. Extract the Zip file to the drive C: or A: 2. - Page 30 3. Change the command path to the file location C:\> or A:\> 4. Reflash BIOS command as below : C:\> atiflash -p 0 <filename> 5. Reboot your PC when it's done. R9700 PRO Graphics Accelerator - 28 -...
-
Page 31: Resolutions And Color Depth Table
® 5.2. Resolutions and Color Depth Table (In Windows Radeon 9700 PRO 2D Single Display Modes Display Refresh Color Depth (bpp) Screen Rate 8bpp(256 color) 16bpp(65K color) 32bpp(16.7M) Resolution (Hz) Standard mode High mode True mode 640 x 480 800 x 600 (interlaced) (interlaced) (interlaced) - Page 32 Display Refresh Color Depth (bpp) Screen Rate 8bpp(256 color) 16bpp(65K color) 32bpp(16.7M) Resolution (Hz) Standard mode High mode True mode 1152 x 864 (interlaced) (interlaced) (interlaced) (interlaced) (interlaced) (interlaced) 1280 x 768 1280 x 960 1280 x 1024 (interlaced) (interlaced) (interlaced) (interlaced) (interlaced)
- Page 33 Display Refresh Color Depth (bpp) Screen Rate 8bpp(256 color) 16bpp(65K color) 32bpp(16.7M) Resolution (Hz) Standard mode High mode True mode 1792 x 1344 1800 x 1440 1856 x 1392 1920 x 1080 1920 x 1200 1920 x 1440 2048 x 1536 * Lower maximum refresh rates at some resolutions when using lower bandwidth memory configuration.
- Page 34 R9700 PRO Graphics Accelerator - 32 -...