Table of Contents
Advertisement
Quick Links
Copyright Notice:
No part of this installation guide may be reproduced, transcribed, transmitted, or trans-
lated in any language, in any form or by any means, except duplication of documentation
by the purchaser for backup purpose, without written consent of ASRock Inc.
Products and corporate names appearing in this guide may or may not be registered
trademarks or copyrights of their respective companies, and are used only for identifi ca-
tion or explanation and to the owners' benefi t, without intent to infringe.
Disclaimer:
Specifi cations and information contained in this guide are furnished for informational use
only and subject to change without notice, and should not be constructed as a commit-
ment by ASRock. ASRock assumes no responsibility for any errors or omissions that may
appear in this guide.
With respect to the contents of this guide, ASRock does not provide warranty of any kind,
either expressed or implied, including but not limited to the implied warranties or condi-
tions of merchantability or fi tness for a particular purpose. In no event shall ASRock, its
directors, offi cers, employees, or agents be liable for any indirect, special, incidental, or
consequential damages (including damages for loss of profi ts, loss of business, loss of
data, interruption of business and the like), even if ASRock has been advised of the pos-
sibility of such damages arising from any defect or error in the guide or product.
This device complies with Part 15 of the FCC Rules. Operation is subject to the following
two conditions:
(1) this device may not cause harmful interference, and
(2) this device must accept any interference received, including interference that
may cause undesired operation.
CALIFORNIA, USA ONLY
The Lithium battery adopted on this motherboard contains Perchlorate, a toxic substance
controlled in Perchlorate Best Management Practices (BMP) regulations passed by the
California Legislature. When you discard the Lithium battery in California, USA, please
follow the related regulations in advance.
"Perchlorate Material-special handling may apply, see
www.dtsc.ca.gov/hazardouswaste/perchlorate"
ASRock Website: http://www.asrock.com
Published April 2011
Copyright©2011 ASRock INC. All rights reserved.
1
ASRock H61DEL Motherboard
Advertisement
Table of Contents

Related Manuals for ASROCK H61DEL


Summary of Contents for ASROCK H61DEL
-
Page 1: Copyright Notice
ASRock. ASRock assumes no responsibility for any errors or omissions that may appear in this guide. With respect to the contents of this guide, ASRock does not provide warranty of any kind, either expressed or implied, including but not limited to the implied warranties or condi- tions of merchantability or fi... -
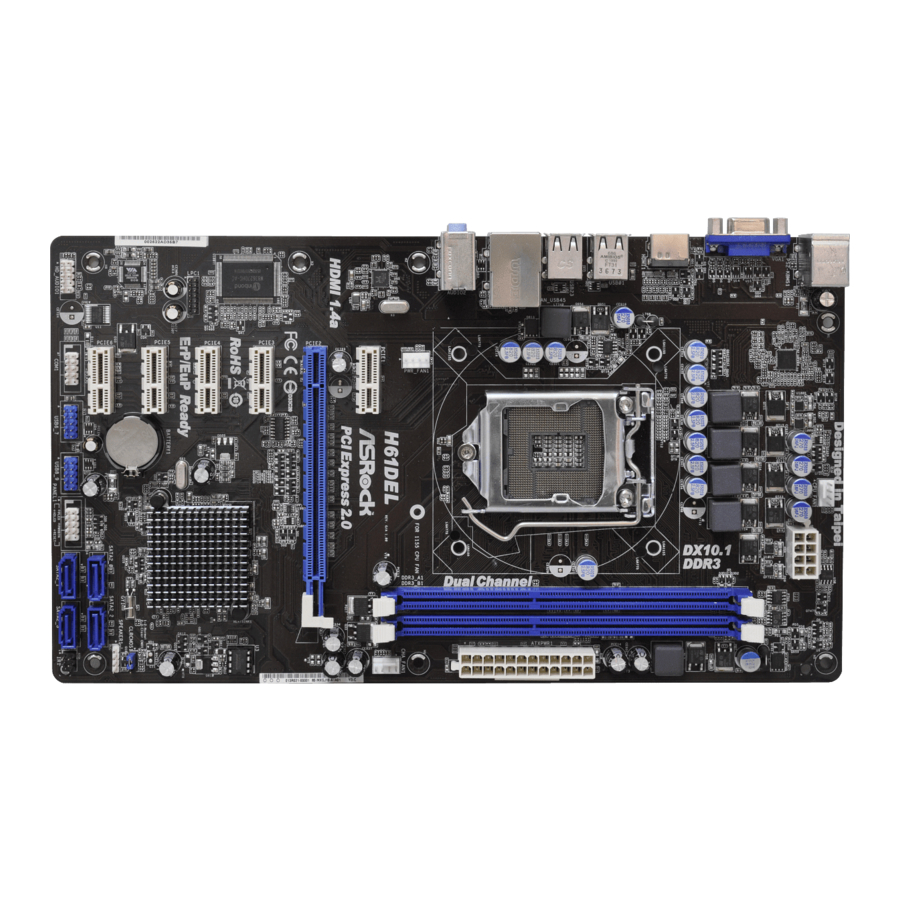
Page 2: Motherboard Layout
PCI Express 2.0 x1 Slot (PCIE3, White) SATA2 Connector (SATA2_2, Blue) PCI Express 2.0 x16 Slot (PCIE2, Blue) SATA2 Connector (SATA2_0, Blue) PCI Express 2.0 x1 Slot (PCIE1, White) Infrared Module Header (IR1) Power Fan Connector (PWR_FAN1) SATA2 Connector (SATA2_3, Blue) ASRock H61DEL Motherboard... - Page 3 / Vista 64-bit OS: Please click “VIA HD Audio Deck” icon , and click “Advanced Options” on the left side on the bottom. In “Advanced Options” screen, select “Independent Headphone”, and click “OK” to save your change. ASRock H61DEL Motherboard...
-
Page 4: Package Contents
In case any modifi cations of this manual occur, the updated version will be available on ASRock website without further notice. You may fi nd the latest VGA cards and CPU support lists on ASRock website as well. -
Page 5: Specifications
HDMI port ® Audio - 5.1 CH HD Audio (VIA VT1705 Audio Codec) - PCIE x1 Gigabit LAN 10/100/1000 Mb/s - Realtek RTL8111E - Supports Wake-On-LAN - Supports LAN Cable Detection - Supports Energy Effi cient Ethernet 802.3az ASRock H61DEL Motherboard... - Page 6 Software Suite (CyberLink DVD Suite - OEM and Trial; Creative Sound Blaster X-Fi MB - Trial) Unique Feature - ASRock Extreme Tuning Utility (AXTU) (see CAUTION 6) - Instant Boot - ASRock Instant Flash (see CAUTION 7) - ASRock APP Charger (see CAUTION 8)
- Page 7 7 64-bit / 7 / Vista 64-bit / Vista ASRock Extreme Tuning Utility (AXTU) is an all-in-one tool to fi ne-tune different system functions in a user-friendly interface, which is including Hardware Monitor, Fan Control, Overclocking, OC DNA and IES. In Hardware Monitor, it shows the major readings of your system.
- Page 8 Please visit our website for the operation procedures of ASRock Extreme Tuning Utility (AXTU). ASRock website: http://www.asrock.com ASRock Instant Flash is a BIOS fl ash utility embedded in Flash ROM. This convenient BIOS update tool allows you to update system BIOS ®...
- Page 9 Intel’s suggestion, the EuP ready power supply must meet the standard of 5v standby power effi ciency is higher than 50% under 100 mA current consumption. For EuP ready power supply selection, we recommend you checking with the power supply manufacturer for more details. ASRock H61DEL Motherboard...
-
Page 10: Pre-Installation Precautions
CPU surface is unclean or if there is any bent pin on the socket. Do not force to insert the CPU into the socket if above situation is found. Other- wise, the CPU will be seriously damaged. ASRock H61DEL Motherboard... - Page 11 Pin1 Pin1 alignment key 1155-Pin Socket orientation key notch 1155-Pin CPU For proper inserting, please ensure to match the two orientation key notches of the CPU with the two alignment keys of the socket. ASRock H61DEL Motherboard...
-
Page 12: Installation Of Cpu Fan And Heatsink
Please be noticed that this motherboard supports Combo Cooler Option (C.C.O.), which provides the fl exible option to adopt three dif- ferent CPU cooler types, Socket LGA 775, LGA 1155 and LGA 1156. The white throughholes are for Socket LGA 1155/1156 CPU fan. ASRock H61DEL Motherboard... -
Page 13: Installation Of Memory Modules (Dimm)
DIMM if you force the DIMM into the slot at incorrect orientation. Step 3. Firmly insert the DIMM into the slot until the retaining clips at both ends fully snap back in place and the DIMM is properly seated. ASRock H61DEL Motherboard... -
Page 14: Expansion Slots (Pci Express Slots)
Step 4. Align the card connector with the slot and press fi rmly until the card is completely seated on the slot. Step 5. Fasten the card to the chassis with screws. Step 6. Replace the system cover. ASRock H61DEL Motherboard... -
Page 15: Dual Monitor And Surround Display Features
If you haven’t installed onboard VGA driver yet, please install onboard VGA driver from our support CD to your system and restart your computer. ASRock H61DEL Motherboard... -
Page 16: Surround Display Feature
F. Set the “Screen Resolution” and “Color Quality” as appropriate for the second monitor. Click “Apply” or “OK” to apply these new values. G. Repeat steps C through E for the diaplay icon identifi ed by the number one, two, three and four. ASRock H61DEL Motherboard... - Page 17 HDTV set-top-boxes, as well as few entertainment PCs requires a secure connection to a compliant display. Due to the increase in manufacturers employing HDCP in their equipment, it is highly recommended that the HDTV or LCD monitor you purchase is compatible. ASRock H61DEL Motherboard...
-
Page 18: Jumpers Setup
fi rst, and then shut it down before you do the clear-CMOS ac- tion. Please be noted that the password, date, time, user default profi le, 1394 GUID and MAC address will be cleared only if the CMOS battery is removed. ASRock H61DEL Motherboard... -
Page 19: Onboard Headers And Connectors
USB 2.0 ports. USB_PWR (9-pin USB8_9) (see p.2 No. 17) DUMMY USB_PWR Infrared Module Header This header supports an IRTX +5VSB optional wireless transmitting (5-pin IR1) DUMMY and receiving infrared module. (see p.2 No. 13) IRRX ASRock H61DEL Motherboard... - Page 20 S1 sleep state. The LED is off when the system is in S3/S4 sleep state or powered off (S5). HDLED (Hard Drive Activity LED): Connect to the hard drive activity LED on the chassis front panel. The LED is on when the hard drive is reading or writing data. ASRock H61DEL Motherboard...
- Page 21 20-pin ATX power supply. To use the 20-pin ATX power supply, please plug your power supply along with Pin 1 and Pin 13. 20-Pin ATX Power Supply Installation ASRock H61DEL Motherboard...
- Page 22 4-pin ATX 12V power supply. To use the 4-pin ATX power supply, please plug your power supply along with Pin 1 and Pin 5. 4-Pin ATX 12V Power Supply Installation Serial port Header This COM1 header supports a serial port module. (9-pin COM1) (see p.2 No. 19) ASRock H61DEL Motherboard...
-
Page 23: Installing Windows
Using SATA / SATAII HDDs without NCQ function STEP 1: Set up UEFI. A. Enter UEFI SETUP UTILITY Advanced screen SATA Confi guration. B. Set the option “SATA Mode” to [IDE]. ® STEP 2: Install Windows XP / XP 64-bit OS on your system. ASRock H61DEL Motherboard... - Page 24 STEP 1: Set up UEFI. A. Enter UEFI SETUP UTILITY Advanced screen SATA Confi guration. B. Set the option “SATA Mode” to [IDE]. ® STEP 2: Install Windows 7 / 7 64-bit / Vista / Vista 64-bit OS on your system. ASRock H61DEL Motherboard...
-
Page 25: Bios Information
It will display the Main Menu automatically if “AUTORUN” is enabled in your computer. If the Main Menu does not appear automatically, locate and double-click on the fi le “ASSETUP.EXE” from the BIN folder in the Support CD to display the menus. ASRock H61DEL Motherboard... - Page 26 1. Einführung Wir danken Ihnen für den Kauf des ASRock H61DEL Motherboard, ein zuverlässig- es Produkt, welches unter den ständigen, strengen Qualitätskontrollen von ASRock gefertigt wurde. Es bietet Ihnen exzellente Leistung und robustes Design, gemäß der Verpflichtung von ASRock zu Qualität und Halbarkeit. Diese Schnellinstalla- tionsanleitung führt in das Motherboard und die schrittweise Installation ein.
-
Page 27: Spezifikationen
- Unterstützt HDCP-Funktion mit HDMI-Port - Unterstutzt 1080p Blu-ray (BD) / HD-DVD-Wiedergabe mit HDMI-Port ® Audio - 5.1 CH HD Audio (VIA VT1705 Audio Codec) - PCIE x1 Gigabit LAN 10/100/1000 Mb/s - Realtek RTL8111E - Unterstützt Wake-On-LAN ASRock H61DEL Motherboard... - Page 28 (Testversion), ASRock Software Suite (CyberLink DVD Suite und Creative Sound Blaster X-Fi MB) (OEM- und Testversion) Einzigartige - ASRock Extreme Tuning Utility (AXTU) (siehe VORSICHT 6) Eigenschaft - Sofortstart - ASRock Instant Flash (siehe VORSICHT 7) - ASRock APP Charger (siehe VORSICHT 8)
- Page 29 - Hybrid Booster: - ASRock U-COP (siehe VORSICHT 11) - Boot Failure Guard (B.F.G. – Systemstartfehlerschutz) - Combo-Kühleroption (siehe VORSICHT 12) - Gute Nacht-LED Hardware Monitor - Überwachung der CPU-Temperatur - Motherboardtemperaturerkennung - Drehzahlmessung für CPU/Gehäuse/Stromlüfter - Geräuscharmer CPU-/Gehäuselüfter (ermöglicht die au tomatische Anpassung der Gehäuselüftergeschwindigkeit...
- Page 30 Per IES (Intelligent Energy Saver) kann der Spannungsregulator bei Inaktivität der CPU-Kerne die Anzahl an Ausgangsphasen zur Steigerung der Effi zienz reduzieren – ohne die Rechenleistung zu beeinträchtigen. Hinweise zur Bedienung der ASRock Extreme Tuning Utility (AXTU) fi nden Sie auf unserer Webseite. ASRock-Webseite: http://www.asrock.com ASRock Instant Flash ist ein im Flash-ROM eingebettetes BIOS-Flash- Programm.
- Page 31 APP Charger. Installieren Sie einfach den ASRock APP Charger-Treiber; dadurch lädt sich Ihr iPhone wesentlich schneller über einen Computer- auf – genaugenommen bis zu 40 % schneller als zuvor. Der ASRock APP Charger ermöglicht Ihnen die schnelle Aufl adung mehrerer Apple-Geräte gleichzeitig;...
- Page 32 Stromversorgung dem Standard entsprechen, was bedeutet, dass bei einem Stromverbrauch von 100 mA die 5-Volt-Standby-Energieeffi zienz höher als 50% sein sollte. Für die Wahl einer EuP-fähigen Stromversorgung empfehlen wir Ihnen, weitere Details beim Hersteller der Stromversorgung abzufragen. ASRock H61DEL Motherboard...
-
Page 33: Einstellung Der Jumper
Sie zuerst das System hoch. Fahren Sie es dann vor der CMOS-Löschung herunter. Bitte beachten Sie, dass Kennwort, Datum, Uhrzeit, benutzerdefi niertes Profi l, 1394 GUID und MAC-Adresse nur gelöscht werden, wenn die CMOS-Batterie entfernt wird. ASRock H61DEL Motherboard... - Page 34 USB_PWR Anschlussleiste werden zwei (9-pol. USB8_9) USB 2.0-Ports unterstützt. (siehe S.2 - No. 17) DUMMY USB_PWR Infrarot-Modul-Header Dieser Header unterstützt ein IRTX +5VSB optionales, drahtloses Sende- DUMMY (5-pin IR1) und Empfangs-Infrarotmodul. (siehe S.2 - No. 13) IRRX ASRock H61DEL Motherboard...
- Page 35 Gehäuses. Die LED leuchtet, wenn das System in Betrieb ist. Die LED blinkt, wenn sich das System im Ruhezustand S1 befi ndet. Die LED schaltet sich aus, wenn sich das System in den Modi S3/S4 befi ndet oder ausgeschaltet ist (S5). ASRock H61DEL Motherboard...
- Page 36 Motherboards anschließen möchten, verbinden Sie ihn bitte mit den Pins 1 – 3. Pins 1–3 anschließen Lüfter mit dreipoligem Anschluss installieren ATX-Netz-Header Verbinden Sie die ATX- Stromversorgung mit diesem (24-pin ATXPWR1) Header. (siehe S.2 - No. 5) ASRock H61DEL Motherboard...
- Page 37 4-Pin ATX Energieversorgung zu verwenden, stecken Sie bitte Ihre Energieversorgung zusammen mit dem Pin 1 und Pin 5 ein. Installation der 4-Pin ATX 12V Energieversorgung COM-Anschluss-Header Dieser COM-Anschluss- Header wird verwendet, um (9-pin COM1) ein COM-Anschlussmodul zu (siehe S.2 - No. 19) unterstützen. ASRock H61DEL Motherboard...
- Page 38 ASSETUP.EXE im BIN-Verzeichnis der Support-CD, um die Menüs aufzurufen. Das Setup-Programm soll es Ihnen so leicht wie möglich machen. Es ist menüges- teuert, d.h. Sie können in den verschiedenen Untermenüs Ihre Auswahl treffen und die Programme werden dann automatisch installiert. ASRock H61DEL Motherboard...
-
Page 39: Contenu Du Paquet
1. Introduction Merci pour votre achat d’une carte mère ASRock H61DEL, une carte mère très fi - able produite selon les critères de qualité rigoureux de ASRock. Elle offre des per- formances excellentes et une conception robuste conformément à l’engagement d’ASRock sur la qualité... -
Page 40: Spécifications
HDMI 1.4a - Prise en charge de la fonction HDCP avec port HDMI - Supporter 1080p Blu-ray(BD)/ lecteur de HD-DVD avec port HDMI ® Audio - 5.1 Son haute défi nition de CH (codec audio VIA VT1705) ASRock H61DEL Motherboard... - Page 41 - IGPU, DRAM, PCH, CPU PLL, VTT, VCCSA Tension Multi-ajustement CD d’assistance - Pilotes, utilitaires, logiciel anti-virus (version d’évaluation), suite logicielle ASRock (CyberLink DVD Suite et Creative Sound Blaster X-Fi MB) (Version OEM et d’essai) Caractéristique - Utilitaire ASRock Extreme Tuning (AXTU)
- Page 42 - ASRock Instant Flash (voir ATTENTION 7) - Chargeur ASRock APP (voir ATTENTION 8) - SmartView (voir ATTENTION 9) - ASRock XFast USB (voir ATTENTION 10) - L’accélérateur hybride: - ASRock U-COP (voir ATTENTION 11) - Garde d’échec au démarrage (B.F.G.) - Combo Cooler Option (C.C.O.) (voir ATTENTION 12)
- Page 43 7 64-bit / 7 / Vista 64-bit / Vista ASRock Extreme Tuning Utility (AXTU) est un utilitaire tout-en-un qui permet de régler précisément différentes fonctions du système, via une interface facile à utiliser, incluant Moniteur de périphériques, Contrôle du ventilateur, Overclocking, OC DNA et IES. Dans Moniteur de périphériques, il affi...
- Page 44 O ASRock Instant Flash é um utilitário de fl ash do BIOS incorporado na memória Flash ROM. Esta prática ferramenta de actualização do BIOS permite-lhe actualizar o BIOS do sistema sem necessitar de entrar nos ® sistemas operativos, como o MS-DOS ou o Windows .
- Page 45 électrique de 5v en mode de veille doit être supérieure à 50% pour 100 mA de consommation de courant. Pour choisir une alimentation électrique conforme à la norme EuP, nous vous recommandons de con- sulter votre fournisseur de courant pour plus de détails. ASRock H61DEL Motherboard...
- Page 46 CMOS. Veuillez noter que le mot de passe, la date, l’heure, le profi l par défaut de l’utilisateur, 1394 GUID et l’adresse MAC seront effacés seulement si la batterie du CMOS est enlevée. ASRock H61DEL Motherboard...
- Page 47 (voir p.2 No. 17) DUMMY P+10 P-10 USB_PWR En-tête du module infrarouge Cet en-tête supporte un module IRTX +5VSB infrarouge optionnel de (IR1 br.5) DUMMY transfert et de réception sans (voir p.2 No. 13) fi l. IRRX ASRock H61DEL Motherboard...
- Page 48 Ce voyant DEL est allumé lorsque le système est en marche. Le voyant DEL clignote lorsque le système est en mode veille S1. Le voyant DEL est éteint lorsque le système est en mode veille S3/ S4 ou lorsqu’il est éteint (S5). ASRock H61DEL Motherboard...
- Page 49 Si vous prévoyez de connecter le ventilateur de CPU à 3 broches au connecteur du ventilateur de CPU sur cette carte mère, veuillez le connecter aux broches 1-3. Installation de ventilateur à 3 broches Broches 1-3 connectées ASRock H61DEL Motherboard...
- Page 50 1 et la broche 5. 4-Installation d’alimentation à 4 broches ATX 12V En-tête de port COM Cette en-tête de port COM est utilisée pour prendre en charge (COM1 br.9) un module de port COM. (voir p.2 No. 19) ASRock H61DEL Motherboard...
-
Page 51: Informations Sur Le Cd De Support
CD-ROM. Le Menu principal s’affi che automatiquement si “AUTORUN” est activé dans votre ordinateur. Si le Menu principal n’apparaît pas automatiquement, locali- sez dans le CD technique le fi chier “ASSETUP.EXE” dans le dossier BIN et double- cliquez dessus pour affi cher les menus. ASRock H61DEL Motherboard... -
Page 52: Contenuto Della Confezione
1. Introduzione Grazie per aver scelto una scheda madre ASRock H61DEL, una scheda madre af- fi dabile prodotta secondo i severi criteri di qualità ASRock. Le prestazioni eccellenti e il design robusto si conformano all’impegno di ASRock nella ricerca della qualità e della resistenza. - Page 53 Audio - 5.1 Audio HD CH (VIA VT1705 Audio Codec) - PCIE x1 Gigabit LAN 10/100/1000 Mb/s - Realtek RTL8111E - Supporta Wake-On-LAN - Supporta il rilevamento cavo LAN - Supporto di Energy Effi cient Ethernet 802.3az ASRock H61DEL Motherboard...
- Page 54 Software ASRock (Suite CyberLink DVD e Creative Sound Blaster X-Fi MB) (OEM e Versione demo) Caratteristica - ASRock Extreme Tuning Utility (AXTU) (vedi ATTENZIONE 6) speciale - Instant Boot - ASRock Instant Flash (vedi ATTENZIONE 7) - Caricatore ASRock APP Charger (vedi ATTENZIONE 8)
- Page 55 - Predisposto ErP/EuP (è necessaria l’alimentazione predisposta per il sistema ErP/EuP) (vedi ATTENZIONE 13) * Per ulteriori informazioni, prego visitare il nostro sito internet: http://www.asrock.com AVVISO Si prega di prendere atto che la procedura di overclocking implica dei rischi, come anche la regolazione delle impostazioni del BIOS, l’applicazione della tecnologia...
- Page 56 Windows . Con questa utilità, si può premere il tasto <F6> durante il POST, oppure il tasto <F2> nel menu BIOS per accedere ad ASRock In- stant Flash. Avviare questo strumento e salvare il nuovo fi le BIOS nell’unità...
- Page 57 Se vuoi un modo rapido e indipendente per caricare i dispositivi Apple, come iPhone/iPod/iPad Touch, ASRock ha preparato una soluzione meravigliosa: ASRock APP Charger. Basta installare il driver APP Char- ger per caricare l’iPhone più rapidamente rispetto al computer, con una velocità...
- Page 58 5 v è più alta del 50% con un consumo di corren- te di 100 mA. Per la scelta di un’alimentatore predisposto EuP consiglia- mo di verifi care ulteriori dettagli con il produttore. ASRock H61DEL Motherboard...
- Page 59 CMOS. No- tare che password, data, ore, profi lo utente predefi nito, 1394 GUID e indirizzo MAC saranno cancellati solo se è rimossa la batteria della CMOS. ASRock H61DEL Motherboard...
- Page 60 (9-pin USB8_9) USB_PWR (vedi p.2 Nr. 17) DUMMY USB_PWR Collettore modulo infrarossi Questo collettore supporta IRTX +5VSB moduli ad infrarossi optional (5-pin IR1) DUMMY per la trasmissione e la (vedi p.2 Nr. 13) ricezione senza fi li. IRRX ASRock H61DEL Motherboard...
- Page 61 Il LED è acceso quando il sistema è operativo. Il LED continua a lampeggiare quando il sistema è in stato di standby S1. Il LED è spento quando il sistema è in stato di sospensione /ibernazione S3/S4 oppure spento (S5). ASRock H61DEL Motherboard...
- Page 62 CPU su questa scheda madre, collegarla ai piedini 1-3. Piedini 1-3 collegati Installazione della ventola a 3 piedini Connettore alimentazione ATX Collegare la sorgente d’alimentazione ATX a questo (24-pin ATXPWR1) connettore. (vedi p.2 Nr. 5) ASRock H61DEL Motherboard...
- Page 63 4-pin ATX 12V, prego collegare la presa elettrica al Pin 1 e Pin 5. Installazione elettrica 4-Pin ATX 12V Collettore porta COM Questo collettore porta COM è utilizzato per supportare il (9-pin COM1) modulo porta COM. (vedi p.2 Nr. 19) ASRock H61DEL Motherboard...
- Page 64 Inserire il CD di supporto nel lettore CD-ROM. Se la funzione “AUTORUN” è attivata nel computer, apparirà automaticamente il Menù principale. Se il Menù principale non appare automaticamente, posizionarsi sul fi le “ASSETUP.EXE” nel CESTINO del CD di supporto e cliccare due volte per visualizzare i menù. ASRock H61DEL Motherboard...
-
Page 65: Contenido De La Caja
1. Introducción Gracias por su compra de ASRock H61DEL placa madre, una placa de confi anza producida bajo el control de calidad estricto y persistente. La placa madre provee realización excelente con un diseño robusto conforme al compromiso de calidad y resistencia de ASRock. - Page 66 - Sonido HD de 5.1 Canales (Códec de sonido VIA VT1705) - PCIE x1 Gigabit LAN 10/100/1000 Mb/s - Realtek RTL8111E - Soporta Wake-On-LAN - Admite detección de conexión de cable LAN - Compatible con Ethernet 802.3az de bajo consumo energético ASRock H61DEL Motherboard...
- Page 67 - Controladores, utilidades, software de antivirus (versión de prueba), ASRock Software Suite (CyberLink DVD Suite y Creative Sound Blaster X-Fi MB) (OEM y versión de prueba) Característica - ASRock Extreme Tuning Utility (AXTU) (vea ATENCIÓN 6) Única - Instant Boot - ASRock Instant Flash (vea ATENCIÓN 7) - ASRock APP Charger (vea ATENCIÓN 8)
- Page 68 Esta operación se debe realizar bajo su propia responsabilidad y Ud. debe asumir los costos. No asumimos ninguna responsabilidad por los posibles daños causados por el aumento de la velocidad del reloj. ASRock H61DEL Motherboard...
- Page 69 . Gracias a esta utilidad, sólo necesitará pulsar <F6> durante la fase POST o pulsar <F2> para acceder al menú de confi gu- ración del BIOS y a la utilidad ASRock Instant Flash. Ejecute esta herra- mienta y guarde el archivo correspondiente al sistema BIOS nuevo en su unidad fl...
- Page 70 Windows 7 / 7 64 bits / Vista / Vista bits y que la versión de su explorador es IE8. Sitio Web de ASRock: http://www.asrock.com/Feature/SmartView/index.asp 10. ASRock XFast USB puede aumentar el rendimiento de los dispositivos de almacenamiento USB.
- Page 71 5v en modo de espera debería ser mayor del 50% con un consumo de corriente de 100mA. Para seleccionar una fuente de alimentación que cumpla la directiva EuP, le recomendamos que consulte con el fabricante de la fuente de alimentación para obtener más detalles. ASRock H61DEL Motherboard...
- Page 72 Tenga en cuenta que la contraseña, la fecha, la hora, el perfi l predeterminado del usuario, el GUID 1394 y la dirección MAC solamente se borrará si la batería CMOS se quita. ASRock H61DEL Motherboard...
- Page 73 Este es una interface para PRESENCE# panel frontal MIC_RET cable de audio de panel frontal OUT_RET que permite conexión y control (9-pin HD_AUDIO1) conveniente de apparatos de (vea p.2, N. 20) OUT2_L Audio. J_SENSE OUT2_R MIC2_R MIC2_L ASRock H61DEL Motherboard...
- Page 74 El LED se enciende cuando el disco duro esté leyendo o escribiendo datos. Es posible que el diseño del panel frontal varíe en función del chasis. Un módulo del panel frontal consiste principalmente de interruptor de alimentación, interruptor de restablecimiento, LED de alimentación, LED ASRock H61DEL Motherboard...
- Page 75 ATX de 20 pins tradicional. Para usar una fuente de alimentación ATX de 20 pins, por favor, conecte su fuente de alimentación usando los Pins 1 y 13. Instalación de una Fuente de Alimentación ATX de 20 Pins ASRock H61DEL Motherboard...
-
Page 76: Bios Información
Para iniciar la instalación, ponga el CD en el lector de CD y se des- plegará el Menú Principal automáticamente si «AUTORUN» está habilitado en su computadora. Si el Menú Principal no aparece automáticamente, localice y doble-pulse en el ar- chivo “ASSETUP.EXE” para iniciar la instalación. ASRock H61DEL Motherboard... - Page 77 1. Введение Благодарим вас за покупку материнской платы ASRock H61DEL надежной материнской платы, изготовленной в соответствии с постоянно предъявляемыми ASRock жесткими требованиями к качеству. Она обеспечивает превосходную производительность и отличается отличной конструкцией, которые отражают приверженность ASRock качеству и долговечности. Данное руководство по быстрой установке включает вводную информацию о материнской...
- Page 78 - поддержка Wake-On-LAN - Поддержка определения кабеля ЛВС - Поддержка энергосберегающего интерфейса Ethernet 802.3az Разъемы ввода- I/O Panel вывода на задней - 1 x порт мыши PS/2 панели - 1 x порт клавиатуры PS/2 - 1 x VGA/D-Sub порт ASRock H61DEL Motherboard...
- Page 79 - Средство ASRock Extreme Tuning Utility (AXTU) Особенность (см. ОСТОРОЖНО, пункт 6) - Instant Boot - ASRock Instant Flash (см. ОСТОРОЖНО, пункт 7) - ASRock APP Charger (см. ОСТОРОЖНО, пункт 8) - SmartView (см. ОСТОРОЖНО, пункт 9) - ASRock XFast USB (см. ОСТОРОЖНО, пункт 10) - Hybrid Booster: - ASRock U-COP (см.
- Page 80 системы и даже вызвать повреждение входящих в нее компонентов и устройств. Приступая к оверклокингу, вы полностью берете на себя все связанные с ним риски и расходы. Мы не будем нести ответственность за любые возможные повреждения в результате оверклокинга. ASRock H61DEL Motherboard...
- Page 81 Функция HBR поддерживается только в Windows 7 64-бит / 7 / Vista бит / Vista Служебная программа ASRock Extreme Tuning Utility (AXTU) – это универсальное средство тонкой настройки различных функций системы с удобным и понятным интерфейсом, включающая разделы Hardware Monitor (Наблюдение за оборудованием), Fan Control (Управление...
- Page 82 ASRock Instant Flash – программа для прошивки BIOS, встроенная в Flash ROM. Данное средство для обновления BIOS умеет работать ® без входа в операционные системы, вроде MS-DOS или Windows Чтобы запустить программу достаточно нажать <F6> во время самотестирования системы (POST) или войти в BIOS при помощи...
- Page 83 EuP нужны соответствующие материнская плата и блок питания. Компания Intel предложила, что совместимый с EuP блок питания должен обеспечивать 50% эффективность линии питания 5V при потреблении 100 мА (в режиме ожидания). Сверьтесь с информацией производителей блоков питания, чтобы выбрать модель с поддержкой EuP. ASRock H61DEL Motherboard...
- Page 84 перед очисткой CMOS, необходимо сначала выполнить загрузку системы, а затем завершить ее работу. Примите во внимание, что пароль, дата, время, профиль пользователя по умолчанию, идентификатор 1394 GUID и MAC-адрес будут очищены только тогда, когда будет извлечена из своего гнезда батарейка CMOS. ASRock H61DEL Motherboard...
-
Page 85: Колодки И Разъемы На Плате
USB 2.0 поддерживает два порта USB 2.0. USB_PWR (9-контактный USB8_9) (см. стр. 2, п. 17) DUMMY USB_PWR Колодка инфракрасного модуля Данная колодка позволяет IRTX +5VSB подключить дополнительный (5-контактный IR1) DUMMY модуль беспроводного (см. стр. 2, п. 13) инфракрасного приемопередатчика. IRRX ASRock H61DEL Motherboard... - Page 86 корпуса. Способ выключения системы с помощью кнопки питания можно настроить. RESET (кнопка сброса): Подключите к этим контактам кнопку сброса на передней панели корпуса. Нажмите кнопку сброса для перезагрузки компьютера, если компьютер «завис» и нормальную перезагрузку выполнить не удается. ASRock H61DEL Motherboard...
- Page 87 работать, хотя функция управления скоростью вращения вентилятора окажется недоступной. Если вы хотите подключить вентилятор процессора с 3-контактным разъемом к разъему вентилятора процессора на данной материнской плате, для этого следует использовать контакты 1-3. Контакты 1-3 подключены Установка вентилятора с 3-контактным разъемом ASRock H61DEL Motherboard...
- Page 88 электропитание ATX с 4-Pin, пожалуйста включите ваше электропитание наряду с Булавкой 1 и Прикрепите 5. ATX С 4-Pin 12V Установка Электропитания Колодка COM-порта Данная колодка COM-порта позволяет подключить модуль (9-контактный COM1) порта COM. (см. стр. 2, п. 19) ASRock H61DEL Motherboard...
- Page 89 Если в вашем компьютере включена функция автозапуска (AUTORUN), то на экране автоматически появится главное меню компакт-диска (Main Menu). Если этого не произошло, найдите в папке BIN на компакт-диске поддержки файл ASSETUP.EXE и дважды щелкните на нем, чтобы открыть меню. ASRock H61DEL Motherboard...
-
Page 90: Paket İçindekiler
önceden haber verilmeksizin değişebilir. Bu belgede değişiklik yapılması durumun -da, güncelleştirilmiş sürüm ayrıca haber verilmeksizin ASRock web sitesinde sunulur. En son VGA kartlarını ve CPU destek listelerini de ASRock web sitesinde bulabilirsiniz. ASRock web sitesi http://www.asrock.com Bu anakartla ilgili teknik desteğe ihtiyacınız olursa, kullandığınız modele özel bilgiler için lütfen web sitemizi ziyaret edin. -
Page 91: Arka Panel
- PCIE x1 Gigabit LAN 10/100/1000 Mb/sn - Realtek RTL8111E - LAN’da Uyan özelliğini destekler - LAN Kablo Algılama’yı destekler - Enerji Verimli Ethernet 802.3az desteği Arka Panel G/З Paneli G/З - 1 x PS/2 Fare Portu - 1 x PS/2 Klavye Portu ASRock H61DEL Motherboard... - Page 92 Sürümü), ASRock Yazılım Paketi (CyberLink DVD Paketi - OEM ve Deneme; Creative Sound Blaster X-Fi MB - Deneme) Benzersiz - ASRock Extreme Tuning Utility (AXTU) (bkz. DİKKAT 6) Özellik - Anında Önyükleme - ASRock Anında Flash (bkz. DİKKAT 7) - ASRock APP Charger (bkz. DİKKAT 8) - SmartView (bkz.
- Page 93 - FCC, CE, WHQL - ErP/EuP Hazır (ErP/EuP hazır güç kaynağı gerekli) (bkz. DİKKAT 13) * Ayrıntılı ürün bilgileri için lütfen web sitemizi ziyaret edin: http://www.asrock.com UYARI Lütfen, ayarı BIOS'da ayarlama, Untied Overclocking Teknolojisi'ni uygulama veya üçüncü taraf aşırı hızlandırma araçlarını kullanma gibi durumlarda aşırı hızlandırmayla ilgili risk olduğunu unutmayın.
- Page 94 Touch gibi Apple cihazlarınızı şarj etmek için daha hızlı ve daha özgür bir biçimde şarj etmek istiyorsanız, ASRock sizin için mükemmel bir çözüm hazırladı - ASRock APP Charger. Sadece APP Charger sürücünü kurarak, iPhone’unuzu bilgisayarınızdan daha çabuk ve eskisinden 40% daha hızlı...
- Page 95 EuP hazır güç kaynağı gerekir. Intel’in önerisine göre, EuP hazır güç kaynağının 100 mA akım tüketiminde 5v beklemede güç etkinliği %50’den yüksektir standardını karşılaması gerekir. EuP hazır güç kaynağı seçimi için, daha fazla ayrıntı için güç kaynağı üreticisine başvurmanızı öneririz. ASRock H61DEL Motherboard...
- Page 96 BIOS’u güncellemeyi tamamladığınızda CMOS’u temizlemeniz gerekirse, ilk olarak sistemi başlatmanız ve ardından CMOS temizleme işlemini gerçekleştirmeden önce kapatmanız gereklidir. Parola, tarih, saat, kullanıcı varsayılan profi li, 1394 GUID ve MAC adresinin yalnızca CMOS pili çıkarıldığında temizleneceğini lütfen aklınızda bulundurunuz. ASRock H61DEL Motherboard...
- Page 97 USB 2.0 portunu destekler. (9-pinli USB8_9) USB_PWR (bkz. s.2 No. 17) DUMMY USB_PWR Kızılötesi Modülü Fişi Bu fi ş, isteğe bağlı bir kablosuz IRTX +5VSB aktarma ve alma kızılötesi (5-pinli IR1) DUMMY modülünü destekler. (bkz. s.2 No. 13) IRRX ASRock H61DEL Motherboard...
- Page 98 çalışırken LED yanar. Sistem S1 uyku modunda iken LED yanıp sön meye devam eder. Sistem S3/S4 uyku modunda veya kapalı (S5) iken LED söner. HDLED (Sabit Disk Çalışma LED’i): Kasa üzerindeki sabit disk çalışma LED’ini ön panele bağlayın. Sabit disk veri okurken veya yazarken LED yanar. ASRock H61DEL Motherboard...
- Page 99 Bu anakart 24-pinli ATX güç konektörü sağlasa da geleneksel bir 20-pinli ATX güç kaynağı bağlarsanız da çalışabilir. 20-pinli ATX güç kaynağını kullanmak için, lütfen güç kaynağınızı Pin 1 ve Pin 13'le birlikte takın. 20-Pinli ATX Güç Kaynağını Takma ASRock H61DEL Motherboard...
- Page 100 Destek CD'sini kullanmaya başlamak için, CD'yi CDROM sürücünüze takın. Bilgisayarınızda "OTOMATİK KULLAN" özelliği etkinleştirilmişse, Ana Menüyü otomatik olarak görüntüler. Ana Menü otomatik olarak görüntülenmezse, menüleri görüntülemek için Destek CD'sinin “BIN” klasöründeki "ASSETUP.EXE" dosyasını bulun ve çift tıklatın. ASRock H61DEL Motherboard...
- Page 101 1. 제품소개 ASRock 의 H61DEL 메인 보드를 구매하여 주신것에 대하여 감사 드립니다 . 이 메 인보드는 엄격한 품질관리 하에 생산되어진 신뢰성 있는 메인보드 입니다 . 이 제품 은 고 품격 디자인과 함께 ASRock 의 우수한 품질과 최고의 안정성을 자랑하고 있습...
- Page 102 - 웨이크 - 온 - 랜 지원 - LAN 케이블 감지 지원 - 절전형 이더넷 802.3az 지원 후면판 I/O I/O Panel - 1 개 PS/2 마우스 포트 - 1 개 PS/2 키보드 포트 - 1 개의 VGA/D-Sub 포트 - 1 개의 HDMI 포트 ASRock H61DEL Motherboard...
- Page 103 - IGPU, DRAM, PCH, CPU PLL, VTT, VCCSA 전압 멀티 조절 지원 CD - 드라이버 , 유틸리티 , 백신 소프트웨어 ( 시험판 ), ASRock 소 프트웨어 스위트 (CyberLink DVD 세트 및 크리에이티브 사운 드 블라스터 X-Fi MB) (OEM 및 시험판 ) 특점및...
- Page 104 - FCC, CE, WHQL - ErP/EuP 지원 (ErP/EuP 지원 전원 공급기가 요구됨 ) ( 주의 13 참조 ) * 상세한 제품정보는 당사의 웹사이트를 방문할수있습니다 . http://www.asrock.com 경고 오버클로킹에는 BIOS 설정을 조정하거나 Untied Overclocking Technology 를 적 용하거나타업체의 오버클로킹 도구를 사용하는 것을 포함하여 어느 정도의 위험이...
- Page 105 64 비트이고 브라우저 버전이 IE8 인지 확인하십시오 . ASRock 웹사이트 : http://www.asrock.com/ Feature/SmartView/index.asp 10. ASRock XFast USB 는 USB 스토리지 장치 성능을 높여줍니다 . 성능은 장치의 속성에 따라 다를 수 있습니다 . 11. 시스템을 다시 시작하기 전에 메인보드 위의 CPU 팬이 정상적으로...
- Page 106 직후에는 CMOS 를 삭제하지 마십시오 . BIOS 를 업데이트하자마자 CMOS 를 삭제해야 하는 경우 먼저 시스템을 부팅하고 CMOS 를 종료하고 삭제 작업을 해 야 합니다 . CMOS 배터리를 제거할 경우에만 암호 , 날짜 , 시간 , 사용자 기본 프 로파일 , 1394 GUID, MAC 주소가 삭제됩니다 . ASRock H61DEL Motherboard...
- Page 107 (2 페이지 , 17 번 항목 참조 ) DUMMY USB_PWR 적외선 모듈 헤더 이 헤더는 선택품목인 무선 IRTX +5VSB 적외선 송수신 모듈을 (5 핀 IR1) DUMMY 지원합니다 . (2 페이지 , 13 번 항목 참조 ) IRRX ASRock H61DEL Motherboard...
- Page 108 가 계속 깜박입니다 . 시스템이 S3/S4 대기 상태 또는 전원 꺼짐 (S5) 상태 에 있을 때는 LED 가 꺼져 있습니다 . HDLED( 하드 드라이브 동작 LED): 섀시 전면 패널의 하드 드라이브 동작 LED 에 연결합니다 . 하드 드라이 브가 데이터를 읽거나 쓰고 있을 때 LED 가 켜져 있습니다 . ASRock H61DEL Motherboard...
- Page 109 이 마더보드는 24 핀 ATX 전원 커넥터를 제공하지만 , 종래의 20 핀 ATX 전원 공급장치를 사용해도 작동이 가능합니다 . 20 핀 ATX 전원 공급장치를 사용하려면 , Pin 1 과 Pin 13 으로 전원공급장치를 연결하십시오 . 20 핀 ATX 전원 공급장치 설치 ASRock H61DEL Motherboard...
- Page 110 뉴를 모니터에 디스플레이 시켜 줄 것입니다 . 만일 자동으로 메인 메뉴가 나타나지 않는다면 , 보조 CD 의 디스플레이 메뉴 안에 있는 BIN 폴더 ASSETUP.EXE 파일을 더블 클릭하여 주시기 바랍니다 . (D: \ BIN \ ASSETUP.EXE, D: 는 CD-ROM 드라이브 ) ASRock H61DEL Motherboard...
- Page 111 い。 www.asrock.com/support/index.asp 1.1 パッケージ内容 ASRock H61DEL マザーボード: (ATX フォームファクター : 12.0-in x 6.8-in, 30.5 cm x 17.3 cm) ASRock H61DEL クイックインストレーションガイド ASRock H61DEL サポート CD 2 x シリアル ATA (SATA) データケーブル(オプション) 1 x I/O パネルシールド ASRockからのお知らせ ASRockからのお知らせ ... ® Windows...
- Page 112 - 5.1 CH HD オーディオ ® (VIA VT1705 オーディオ Codec) - PCIE x1 Gigabit LAN 10/100/1000 Mb/s - Realtek RTL8111E - Wake-On-LAN をサポート - LAN ケーブル検出をサポート - Energy Efficient Ethernet 802.3az をサポート リアパネル I/O Panel - PS/2 マウスポート x 1 ASRock H61DEL Motherboard...
- Page 113 - ASRock Extreme チューニングユーティリティ (AXTU) ( 注意 6 参照 ) - インスタントブート - ASRock Instant Flash ( 注意 7 参照 ) - ASRock APP ヱャージャー ( 注意 8 を参照 ) - SmartView ( 注意 9 を参照 ) - ASRock XFast USB ( 注意 10 を参照 ) - ハイブリッドブースタ...
- Page 114 とディープカラーは Windows 7 64-bit / 7 上でのみ使用できま す。ディープカラーを使用できるのは、ディスプレイが EDID で 12bpc をサ ® ポートしている場合だけです。HBR は Windows 7 64-bit / 7 / Vista 64-bit / Vista で使用できます。 ASRock Extreme Tuning Utility (AXTU) は、分かりやすいインター フェイスでさまざまなシステム機能を微調整するオールインワンツールで、 ハードウェアモニタ、ファンコントロール、オーバークロッキング、OC DNA、ES な どを含んでいます。ハードウェアモニタでは、システムの主要な読み込みを 示します。ファンコントロールでは、調整するファン速度と温度を示します。オー ASRock H61DEL Motherboard...
- Page 115 のシステムに読み込んで、同じ OC 設定にすることが可能です。IES ( インテ リジェントエネルギーサーバー ) では、電圧レギュレータにより、CPU コアがアイ ドルになっているときコンピュータの性能を犠牲にすることなく、多くの出力位 相を削減して効率性の向上を図ります。ASRock Extreme Tuning Utility (AXTU) の操作手順については、当社 Web サイトをご覧ください。 ASRock Web サイト :http://www.asrock.com ASRock Instant Flash は、Flash ROM(フラッシュ ROM)に組み込ま れている BIOS フラッシュユーティリティです。この便利な BIOS 更新ツールに ® より、MS-DOS あるいは Windows のように最初にオペレーティングシステム に入る必要なしに、システム BIOS を更新することができます。このユーティリ...
- Page 116 ションを用意しています。すべての 775 と 1156 CPU ファンを使用できるわけ ではないことにご注意ください。 Energy Using Product(エコデザイン)の略語 EuP は完成システムの消 費電力を定義するために欧州連合により規制された条項です。 EuP に従っ て、管制システムの総 AC 電力はオフモード条件下で 1.00W 未満に抑える必 要があります。EuP 規格を満たすには、EuP 対応マザーボードと EuP 対応 電源が必要です。 Intel の提案に従い、EuP 対応電源装置は規格を満たす 必要があります、つまり 5v のスタンバイ電力効率は 100 mA の消費電流下 で 50% 以上でなければなりません。 EuP 対応電源装置を選択する場合、電 源装置製造元に詳細を確認するようにお勧めします。 ASRock H61DEL Motherboard...
- Page 117 ( ページ2アイテム 9 参照) デフォルト設定 CMOS の消去 注 : CLRCMOS1 により、CMOS のデータをクリアできます。システムパラメータをクリアしデフォルト設定にリ セットするには、コンピュータの電源をオフにし、電源装置から電源コードを抜いてください。15 秒待って から、ジャンパキャップを使用して CLRCMOS1 のピン 2 とピン 3 を 5 秒間ショートしてください。ただし、 BIOS 更新の後すぐには CMOS をクリアしないでください。BIOS の更新の終了後直ちに CMOS をクリア する必要がある場合、まずシステムを起動してからシャットダウンし、その後クリア CMOS アクションを実 行する必要があります。パスワード、日付、時刻、ユーザーデフォルトのプロファイルを忘れずにメモして ください。1394 GUID と MAC アドレスは、CMOS バッテリを取り外した場合のみ消去されます。 ASRock H61DEL Motherboard...
- Page 118 ページ2, アイテム 18 を参照 ヘッダが搭載されています。それ ぞれの USB 2.0 ヘッダは 2 つの USB 2.0 ポートをサポートできま (9 ピン USB8_9) す。 ページ2, アイテム 17 を参照 USB_PWR DUMMY USB_PWR 赤外線モジュールコネクタ このコネクタは赤外線の無線送受信 IRTX +5VSB (5 ピン IR1) モジュールに対応します。 DUMMY ページ2, アイテム 13 を参照 IRRX ASRock H61DEL Motherboard...
- Page 119 ページ2, アイテム 16 を参照 シャーシに付いている電源スイッチ、リセットスイッチ、システムステータ スインジケータを下記のピン割り当て指示に従ってこのヘッダに接続します。 ケーブルを接続する前にピンの正負極性にご注意ください。 PWRBTN ( 電源スイッチ ): 前面パネルに付いている電源スイッチに接続します。電源スイッチによるシス テム電源オフ方法を設定して変更することも可能です。 RESET ( リセットスイッヱ ): シャーシの前面パネルに付いているリセットスイッチに接続します。コン ピュータがフリーズし、正常な再起動をしない場合は、リセットスイッチを 押してコンピュータを再起動します。 PLED ( システム電源 LED): シャーシの前面パネルに付いている電源ステータスインジケータに接続しま す。LED は、システムが動作しているときに点灯します。LED はシステム が S1 スリープ状態のときに点滅します。システムが S3 または S4 スリープ状 態になるか、電源オフ (S5) になると、LED は消灯します。 ASRock H61DEL Motherboard...
- Page 120 1 2 3 4 このマザーボードでは 4 ピン CPU ファン ( クワイエットファン ) がサポートされていますが、 ファン速度コントロール機能がない場合でも、3 ピン CPU ファンは正常に作動します。3 ピン CPU ファンをこのマザーボードの CPU ファンコネクタに接続しようとしている場合、 ピン 1-3 に接続してください。 接続されたピン 1-3 3 ピンファンのインストール ATX パワーコネクタ ATX 電源コネクタを接続します。 (24 ピン ATXPWR1) ページ2, アイテム 5 を参照 ASRock H61DEL Motherboard...
- Page 121 接続する必要があることに注意し てください。接続に問題があると、電源 は正しく供給されません。 このマザーボードで 8-pin ATX 12V 電源コネクタが提供されたが、従来の 4-pin ATX 12V 電源でも動作できます。 4-pin ATX 電源を使用する場合、電源を Pin 1 と Pin 5 とともに差し込んでください。 4-Pin ATX 12V 電源の取り付け シリアルポートヘッダ この COM1 ヘッダは、シリアルポートモ ジュールをサポートします。 (9 ピン COM1) ページ2, アイテム 19 を参照 ASRock H61DEL Motherboard...
- Page 122 7 / 7 64-bit / Vista / Vista bit / XP / XP 64-bit といった様々なマイクロソフト ウインドウズ オペレーティングシ ステムをサポートします。マザーボードに付属しているサポート CD はマザーボードの特徴 を有効にするために必要なドライバやユーティリティを含んでいます。サポート CD を使用 するには、CDROM ドライブに CD を挿入してください。AUTORUN 機能が有効な場合、自 動的にメインメニュウが立ち上がります。AUTORUN 機能が無効な場合、サポート CD 内の BIN フォルダにある ASSETUP.EXE をダブルクリックすることにより、メインメニュウが立ち 上がります。 ASRock H61DEL Motherboard...
- Page 123 華擎网址:http://www.asrock.com 如果您需要與此主板有關的技術支持 , 請參觀我們的網站以了解您使用機 種的規格信息。 www.asrock.com/support/index.asp 1.1 包裝盒內物品 華擎 H61DEL 主板 (ATX 規格 : 12.0 英吋 X 6.8 英吋 , 30.5 厘米 X 17.3 厘米 ) 華擎 H61DEL 快速安裝指南 華擎 H61DEL 支持光盤 兩條 Serial ATA(SATA) 數據線 ( 選配 ) 一塊 I/O 擋板...
- Page 124 - 支持 Energy Efficient Ethernet 802.3az Rear Panel I/O 界面 - 1 個 PS/2 鼠標接口 ( 后面板輸入 / - 1 個 PS/2 鍵盤接口 輸出接口 ) - 1 個 VGA/D-Sub 接口 - 1 個 HDMI 接口 - 6 個可直接使用的 USB 2.0 接口 ASRock H61DEL Motherboard...
- Page 125 - 驅動程序 , 工具軟件 , 殺毒軟件(測試版本 ), 華擎軟件套 裝 (CyberLink DVD 套件與 Creative Sound Blaster X-Fi MB)(OEM 與試用版 ) 獨家功能 - ASRock Extreme Tuning Utility (AXTU)(詳見警告 6) - 即時開機功能 - 華擎 Instant Flash(見警告 7) - 華擎 APP Charger(見警告 8) - SmartView(見警告 9)...
- Page 126 ® 在 EDID 中支持 12bpc 時 ,Deep Color 模式才會被開啟。只有 Windows 64 位元 /7/Vista 64 位元 /Vista 支持 HBR。 6、 ASRock Extreme Tuning Utility (AXTU) 是一個多合一的工具,可在用戶 友好的界面中微調不同的系統功能,包括硬件監控、風扇控制、超頻、O C DNA 和 IES。在 Hardware Monitor(硬件監控)中,顯示系統的主要參數。 在 Fan Control(風扇控制)中,顯示風扇速度和溫度,以便您進行調整。 在 Overclocking(超頻)中,您可以對 CPU 進行超頻,以优化系統性能。 在 OC DNA 中,您可以將自己的 OC 設置保存為配置文件,并与您的朋友共...
- Page 127 耗電量的規定。根據 E u P 的規定 , 一個完整系統在關機模式下的交流電總 消耗必須在 1.00W 以下。為滿足 E uP 標準 , 您需要同時具備支持 EuP 的主 ® 板和支持 EuP 的電源供應器。根據 Intel 的建議 , 支持 EuP 的電源供應器 必須滿足在 100m A 電流消耗時 ,5V s b 電源效率高于 50%。有關支持 E u P 的 電源供應器選擇方面的更多細節 , 我們建議您諮詢電源供應器的製作商。 ASRock H61DEL Motherboard...
- Page 128 線帽將 C L R C M O S1 上的插針 2 和插針 3 短接 5 秒。但是,請勿在更新 B I O S 后 立即清除 C M O S。如果需要在更新 B I O S 后立即清除 C M O S,必須在執行 C M O S 清除操作之前,先啟動然后關閉系統。請注意,只有取出 C M O S 電池,密碼、 日期、時間、用戶默認配置文件、1394 GUID 和 MAC 地址才會被清除。 ASRock H61DEL Motherboard...
- Page 129 IRTX 這個接頭支持一個選配的無 +5VSB DUMMY 線發送和接受紅外線的 (5 針 IR1) 模塊。 ( 見第 2 頁第 13 項 ) IRRX 前置音頻面板接頭 可以方便連接音頻設備。 PRESENCE# MIC_RET (9 針 HD_AUDIO1) OUT_RET ( 見第 2 頁第 20 項 ) OUT2_L J_SENSE OUT2_R MIC2_R MIC2_L ASRock H61DEL Motherboard...
- Page 130 當系統處于 S1 待機模式時 , 此指示燈保持閃爍。當系統處于 S3/S4 待 機模式或關機 (S5) 模式時 , 此指示燈熄滅。 HD LED( 硬盤活動指示燈 ): 連接機箱前面板的硬盤動作指示燈。當硬盤正在讀取或寫入數據時 , 此指示燈亮起。 前面板設計因機箱不同而有差異。前面板模塊一般由電源開關、 重啟開關、電源指示燈、硬盤動作指示燈、喇叭等構成。將您的機 箱前面板連接到此排針時 , 請確認連接線與針腳上的說明相對應。 機箱喇叭接頭 請將機箱喇叭連接到這個接 頭。 (4 針 SPEAKER1) ( 見第 2 頁第 10 項 ) ASRock H61DEL Motherboard...
- Page 131 (8 針 ATX12V1) ( 見第 2 頁第 3 項 ) 雖然此主板提供 8-pin ATX 12V 電源接口 , 但是您仍然可以使用傳統的 4-pin ATX 12V 電源。為了使用 4-pin ATX 12V 電源 , 請順著 Pin 1 和 Pin 5 插上電 源接頭。 4-Pin ATX 12V 電源安裝說明 ASRock H61DEL Motherboard...
- Page 132 進行常規檢驗。如果你需要在開機自檢 ( P O S T ) 之后進入 B I O S 設置程序,請按下 <Ctrl>+<Alt>+<Delete> 鍵重新啟動電腦,或者按下系統面板上的重啟按鈕。有關 BIOS 設置的詳細信息,請查閱隨機支持光盤裡的用戶手冊 (PDF 文件 )。 3. 支持光盤信息 ® ® 本主板支持各種微軟視窗操作系統:Microsoft Windows 7/7 64 位元 /Vista Vista 64 位元 /XP/XP 64 位元。主板隨機支持光盤包含各種有助于提高主板效能的 必要驅動和實用程序。請將隨機支持光盤放入光驅裡,如果電腦的“自動運行”功能 已啟用,屏幕將會自動顯示主菜單。如果主菜單不能自動顯示,請查找支持光盤內 BIN 文件夾下的“ASSETUP.EXE”,并雙擊它,即可調出主菜單。 ASRock H61DEL Motherboard...
- Page 133 若您慾了解此產品的有毒有害物質或元素的名稱及含量說明,請參照以下表格及說 明。 有害物質或元素 部件名稱 鉛 (Pb) 鎘 (Cd) 汞 (Hg) 六价鉻 (Cr(VI)) 多溴聯苯 (PBB) 多溴二苯醚 (PBDE) 印刷電路板 及電子組件 外部信號連 接頭及線材 O: 表示該有毒有害物質在該部件所有均質材料中的含量均在 SJ/T 11363-2006 標準規定 的限量要求以下。 X: 表示該有毒有害物質至少在該部件的某一均質材料中的含量超出 SJ/T 11363-2006 標準 規定的限量要求,然該部件仍符合歐盟指令 2002/95/EC 的規範。 備註 : 此產品所標示之環保使用年限,系指在一般正常使用狀況下。 ASRock H61DEL Motherboard...
- Page 134 1. 主機板簡介 謝謝你採用了華擎 H61DEL 主機板 , 本主機板由華擎嚴格製造 , 品質可靠 , 穩定性好 , 能夠獲得卓越的性能。此快速安裝指南包括了主機板介紹和分步驟安裝指導。您可以 查看支持光碟裡的使用手冊了解更詳細的資料。 由於主機板規格和 BIOS 軟體將不斷更新 , 本手冊之相關內容變更恕不另 行通知。請留意華擎網站上公布的更新版本。你也可以在華擎網站找到最 新的顯示卡和 CPU 支援列表。 華擎網址:http://www.asrock.com 如果您需要與此主機板有關的技術支援 , 請參觀我們的網站以了解您使用 機種的規格訊息。 www.asrock.com/support/index.asp 1.1 包裝盒內物品 華擎 H61DEL 主機板 (ATX 規格 : 12.0 英吋 x 6.8 英吋 , 30.5 公分 x 17.3 公分 ) 華擎...
- Page 135 - 支援 Energy Efficient Ethernet 802.3az Rear Panel I/O 界面 - 1 個 PS/2 滑鼠接口 ( 後背板輸入 / - 1 個 PS/2 鍵盤接口 輸出接口 ) - 1 個 VGA/D-Sub 接口 - 1 個 HDMI 接口 - 6 個可直接使用的 USB 2.0 接口 ASRock H61DEL Motherboard...
- Page 136 - 驅動程式 , 工具軟體 , 防毒軟體(試用版本 ), 華擎軟體 套餐 (CyberLink DVD 套餐與 Creative Sound Blaster X-Fi MB)(OEM 與試用版本 ) 獨家功能 - ASRock Extreme Tuning Utility (AXTU)(詳見警告 6) - 即時開機功能 - 華擎 Instant Flash(見警告 7) - 華擎 APP Charger(見警告 8) - SmartView(見警告 9)...
- Page 137 EDID 中支援 12bpc 時 ,Deep Color 模式才會被開啟。只有 Windows 7 64 位元 /7/Vista 64 位元 /Vista 支援 HBR。 6、 ASRock Extreme Tuning Utility (AXTU) 是一款多合一的工具,易於操 作的使用者介面便於微調不同的系統功能(例如:Hardware Monitor、 Fan Control、Overclocking、OC DNA 及 IES)。Hardware Monitor 可顯 示系統的主要讀數;Fan Control 可顯示並可供您調整風扇速度及溫度; Overclocking 可供您進行 CPU 超頻以獲得最佳系統效能。透過 OC DNA,...
- Page 138 充電體驗。 9、 S m a r t V i e w 是網際網路瀏覽器的新功能,也是 I E 的起始頁面,其中結合 了您最常瀏覽的網站、您的記錄、F a c e b o o k 朋友和即時新聞摘要,並全 數整合在一個更好的檢視中,以提供更貼近您個人使用習慣的網際網路功 能。ASRock 主機板獨家配備 SmartView 公用程式,協助您隨時隨地與朋友 保持聯繫。若要使用 SmartView 功能,請確定您所使用的作業系統版本為 ® Windows 7 / 7 64 位元 / Vista / Vista 64 位元,而且您的瀏覽器...
- Page 139 註: C L R C M O S1 可供您清除 C M O S 中的資料。若要清除及重設系統參數並恢復為預設設 定,請先關閉電腦電源,並從電源插座中拔下電源線,等待 15 秒鐘之後,使用跳 線帽使 CLRCMOS1 的 pin2 及 pin3 短路 5 秒的時間。但請勿於更新 BIOS 後立即清除 CMOS。如需於更新 BIOS 後立即清除 CMOS,您必須先開機再關機,然後再執行 CMOS 清除操作。請注意,只有在移除 C M O S 電池的情況下,密碼、日期、時間、使用者 預設設定檔、1394 GUID 及 MAC 位址才會清除。 ASRock H61DEL Motherboard...
- Page 140 支援兩個 USB 2.0 接口。 USB_PWR (9 針 USB8_9) ( 見第 2 頁第 17 項 ) DUMMY USB_PWR 紅外線模組接頭 這個接頭支援一個選配的模 IRTX +5VSB 組 , 可用來無線傳輸和接收紅 DUMMY (5 針 IR1) 外線。 ( 見第 2 頁第 13 項 ) IRRX ASRock H61DEL Motherboard...
- Page 141 RESET( 重開開關 ): 連接機箱前面板的重開開關。當電腦當機且無法正常重新啟動時 , 可 按下重開開關重新啟動電腦。 PLED( 系統電源指示燈 ): 連接機箱前面板的電源狀態指示燈。當系統運行時 , 此指示燈亮起。 當系統處於 S1 待命模式時 , 此指示燈保持閃爍。當系統處於 S3/S4 待 命模式或關機 (S5) 模式時 , 此指示燈熄滅。 HD LED( 硬碟活動指示燈 ): 連接機箱前面板的硬碟動作指示燈。當硬碟正在讀取或寫入數據時 , 此指示燈亮起。 前面板設計因機箱不同而有差異。前面板模組一般由電源開關、 重開開關、電源指示燈、硬碟活動指示燈、喇叭等構成。將您的機 箱前面板連接到此接頭時 , 請確認連接線與針腳上的說明相對應。 ASRock H61DEL Motherboard...
- Page 142 用傳統的 20-pin ATX 電源。為了使用 20-pin ATX 電源 , 請順 著 Pin 1 和 Pin 13 插上電源接頭。 20-Pin ATX 電源安裝說明 ATX 12V 電源接口 請注意,必需將帶有 ATX 12V 插頭的電源供應器連接到這個 (8 針 ATX12V1) 插座,這樣就可以提供充足的 ( 見第 2 頁第 3 項 ) 電力。如果不這樣做,就會導 致供電故障。 ASRock H61DEL Motherboard...
- Page 143 運行需要時,測試和初始化元件。有關 B I O S 設置的詳細訊息,請查閱隨機支援光碟 裡的使用手冊 (PDF 文件 )。 3. 支援光碟訊息 ® ® ® 本主板支援各種微軟 Windows 操作系統:Microsoft Windows 7/7 64 位元 / Vista /Vista 64 位元 /XP/XP 64 位元。主板附帶的支援光碟包含各種有助於提高主 板效能的必要驅動和實用程式。請將隨機支援光碟放入光碟機裡,如果系統的“自動 運行"功能已啟用,銀幕將會自動顯示主菜單。如果主菜單不能自動顯示,請查閱支 援光碟內 BIN 文件夾下的 ASSETUP.EXE 文件並雙點它,即可調出主菜單。 ASRock H61DEL Motherboard...
-
Page 144: Installing Os On A Hdd Larger Than 2Tb
“UEFI:xxx“ to boot. ® 4. Start Windows installation. ® 5. If you install Windows 7 64-bit OS, OS will be formatted by GPT (GUID Partition ® Table). Please install the hotfi x fi le from Microsoft http://support.microsoft.com/kb/979903 ASRock H61DEL Motherboard...