Table of Contents
Advertisement
Quick Links
Advertisement
Table of Contents

Related Manuals for TRENDnet TEW-726EC


Summary of Contents for TRENDnet TEW-726EC
- Page 1 Cover Page TRENDnet User’s Guide...
-
Page 2: Table Of Contents
Connect to your wireless network ................11 Connect to your wireless network using WPS ............. 12 Create or modify wireless network profiles ..............15 Technical Specifications..............17 Troubleshooting ................18 Appendix ..................19 © Copyright 2013 TRENDnet. All Rights Reserved. -
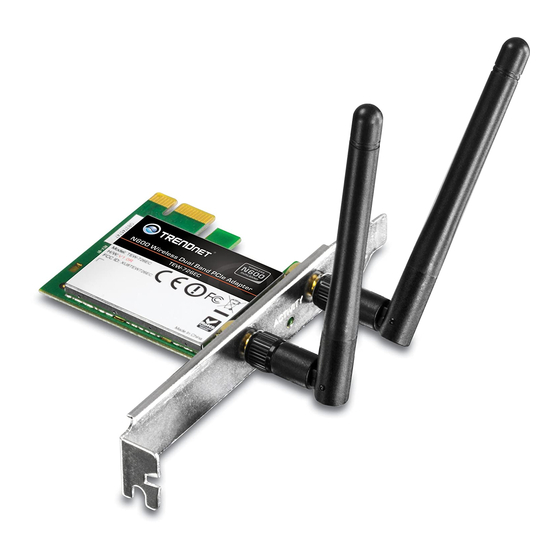
Page 3: Product Overview
Product Overview Features TRENDnet’s N600 Wireless Dual Band PCIe Adapter, model TEW-726EC, upgrades a desktop computer to proven 300 Mbps dual band wireless speed and coverage. Quickly connect to a common 2.4 GHz or a less congested 5 GHz wireless network to seamlessly stream HD video and surf the internet. -
Page 4: Product Hardware Features
• Available PCIe (PCI Express x1) slot and another computer wirelessly connected to the dual band router using the less- • CD-ROM Drive (Driver & Utility Installation with included CD) congested 5GHz band. © Copyright 2013 TRENDnet. All Rights Reserved. -
Page 5: Installing Your Wireless Adapter
Next. Note: If the Autorun prompt does not appear automatically, open the CD contents and double-click Autorun.exe. 3. At the CD-ROM main menu, click Install Drivers & Utility. © Copyright 2013 TRENDnet. All Rights Reserved. - Page 6 Install this driver software anyway. Note: If you do not receive a security prompt, continue to the next step. 9. After the process is completed, click Finish. 7. Wait for the utility and drivers installation to complete. © Copyright 2013 TRENDnet. All Rights Reserved.
-
Page 7: Hardware Installation
Note: Shutdown menu option may vary in appearance depending on your operating system. 4. Locate and double click the TRENDnet Wireless Utility icon. 2. Open your computer case and insert the wireless dual band PCIe card into an available PCI Express slot. Once installed, attached the antennas to PCIe card. -
Page 8: Using The Wireless Utility
Exit – This option will close the utility and terminate the application. The application will no longer be running and accessible from your system tray. You will have to restart the application manually by double-clicking the Desktop icon. © Copyright 2013 TRENDnet. All Rights Reserved. -
Page 9: Wireless Utility Overview
MAC address automatically assigned to your wireless connected. (BSSID), and Signal Strength of the adapter by the wireless network upon wireless network you are currently successful connection. connected. © Copyright 2013 TRENDnet. All Rights Reserved. - Page 10 You the list. in the list to remove. set. You must first select must first select an an existing profile in the existing profile in the list to connect. list to modify. © Copyright 2013 TRENDnet. All Rights Reserved.
- Page 11 WPS supported device such as a wireless router/access point using the WPS PIN method. Next After selecting the WPS method to use, click Next to continue to remaining steps of the WPS connection process. © Copyright 2013 TRENDnet. All Rights Reserved.
- Page 12 About Window This window displays the wireless adapter MAC address, driver, and utility version reference information. MAC Address, Utility & Driver Version Displays the wireless adapter MAC address, utility, and driver version reference information. © Copyright 2013 TRENDnet. All Rights Reserved.
-
Page 13: Connect To Your Wireless Network
If you are still experiencing issues connecting to your wireless network, you may need to verify the security settings of your wireless network to make sure they correct key is entered. Connection Unsuccessful © Copyright 2013 TRENDnet. All Rights Reserved. -
Page 14: Connect To Your Wireless Network Using Wps
3. In the WPS window, the Push Button Configuration (PBC) option will be selected by default. If not, check the PBC option. • (Recommended) Push Button Configuration (PBC) method • PIN (Personal Identification Number) Method 4. Click Next. © Copyright 2013 TRENDnet. All Rights Reserved. - Page 15 8. If successful, you will see the following message at the top and the connection information at the bottom of the utility will appear. Note: Typically, the WPS button hold time is 3-5 sec., then release. For TRENDnet routers/access points, the WPS hardware push button hold time is 3 seconds. If you are using another brand device, you may need to refer to your device documentation.
- Page 16 WPS section. The example below (from our PIN (Personal Identification Number) Method TRENDnet TEW-692GR router) shows where the WPS client PIN information is entered. 1. Open up the wireless utility. 6. On the wireless utility, click Start.
-
Page 17: Create Or Modify Wireless Network Profiles
For additional information on security parameters, you can refer to the Appendix. 1. Open up the wireless utility. Click Properties. 2. Click on the Profile Management tab. © Copyright 2013 TRENDnet. All Rights Reserved. - Page 18 TKIP or AES. Select the EAP (Extensible Authentication Protocol) Type. EAP-TLS – Requires additional certificate to be installed on computer for authentication purposes. EAP-PEAP – Requires additional certificate to be installed along with a password. © Copyright 2013 TRENDnet. All Rights Reserved.
-
Page 19: Technical Specifications
802.11a/n: 5.150 ~ 5.350 GHz / 5.725 ~ 5.825 GHz (FCC), 5.150 ~ 5.350 GHz / 5.470 ~ 5.725 GHz (ETSI) Data Rate 802.11a: up to 54 Mbps (auto 802.11b: up to 11 Mbps fallback) © Copyright 2013 TRENDnet. All Rights Reserved. -
Page 20: Troubleshooting
2. Remove the adapter from the computer point's SSID 3. Click the Windows / Start icon, click All Programs, click TRENDnet Wireless and 2. Please check with your network administrator for security key in order to access a then click Uninstall. -
Page 21: Appendix
Setting up wireless security is very important. Leaving your wireless network open and this encryption type however are limited to 54Mbps. unsecure could expose your entire network and personal files to outsiders. TRENDnet • WPA-Auto: This setting provides the router with the ability to detect wireless recommends reading through this entire section and setting up wireless security on your devices using either WPA or WPA2 encryption. - Page 22 Go into the Control Panel, click Network and Internet. b. Click Manage Network Connections, right-click the Local Area Connection icon and click Properties. c. Click Internet Protocol Version (TCP/IPv4) and then click Properties. © Copyright 2013 TRENDnet. All Rights Reserved.
- Page 23 Windows 8/7 1. Open Connect to a Network by clicking the network icon ( ) in the notification area. © Copyright 2013 TRENDnet. All Rights Reserved.
- Page 24 RF output power may be limited to 10 mW EIRP in the frequency range of 2454 – 2483.5 MHz. For detailed information the end-user should contact the RoHS national spectrum authority in France. This product is RoHS compliant. © Copyright 2013 TRENDnet. All Rights Reserved.
- Page 25 Limited Warranty TRENDnet User’s Guide TRENDnet tímto prohlašuje, že tento TEW-726EC je ve shodě se Hierbij verklaart TRENDnet dat het toestel TEW-726EC in Česky [Czech] Nederlands základními požadavky a dalšími příslušnými ustanoveními směrnice overeenstemming is met de essentiële eisen en de andere relevante [Dutch] 1999/5/ES a 2006/95/ES.
- Page 26 Download section limited to, duty, tax, and other fees. and look for the desired TRENDnet product to access to the GPL Code or LGPL Code. These codes are distributed WITHOUT WARRANTY and are subject to the copyrights of WARRANTIES EXCLUSIVE: IF THE TRENDNET PRODUCT DOES NOT OPERATE AS the developers.