Table of Contents
Advertisement
Advertisement
Table of Contents

Related Manuals for Clarion M455A


Summary of Contents for Clarion M455A
- Page 1 Owner’s manual Mode d’emploi Manual de instrucciones Istruzioni per l’uso M455A MARINE AM/FM/CD MULTIMEDIA CONTROLLER COMBINÉ NAUTIQUE RADIO AM/FM-LECTEUR CD MULTIMEDIA CONTROLADOR MULTIMEDIA MARINO DE AM/FM/DISCOS CD UNITÀ DI CONTROLLO MULTIMEDIALE PER USO MARITTIMO AM/FM/CD...
-
Page 2: Table Of Contents
Thank you for purchasing this Clarion product. ∗ Please read this owner’s manual in its entirety before operating this equipment. ∗ After reading this manual, be sure to keep it in a handy place (e.g., glove compartment). ∗ Check the contents of the enclosed warranty card and keep it with this manual. -
Page 3: Precautions
2. PRECAUTIONS 1. When it is very cold in the boat and the unit is 2. When the boat is underway in rough water the used soon after switching on the heater, the CD may skip as a result of intense vibrations disc and the optical components may become and shock. -
Page 4: Handling Compact Discs
Handling Compact Discs the CD player. Use only compact discs bearing the • Do not use compact discs that have large mark. scratches, are misshapen, cracked, etc. Use of Do not play heart-shaped, octagonal, or other such discs may cause misoperation or damage. specially shaped compact discs. -
Page 5: Controls
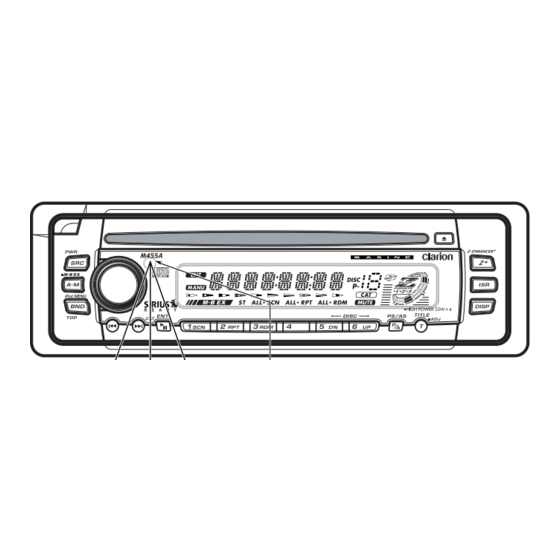
3.CONTROLS / LES COMMANDES CONTROLES / CONTROLLI Source unit / Appareil pilote / Unidad fuente / Unità di fonte [ CD SLOT ] [ ROTARY ] [ RELEASE ] [ Q ] [ Z+ ] [SRC] [ ISR ] [A-M] [BND] [ DISP ] [å], [∂]... -
Page 6: Nomenclature
4. NOMENCLATURE Note: • Be sure to read this chapter referring to the front diagrams of chapter “3. CONTROLS” on page 5 (unfold). Names of the Buttons and their Functions [RELEASE] button [DIRECT] (1–6) buttons • Deeply push in [RELEASE] button to release •... -
Page 7: Major Button Operations When External Equipment Is Connected To This Unit
Major button operations when external equipment is connected to this unit ● When the Sirius Satellite ] (Play/Pause) button Radio is connected • Play or pause a CD. ∗ For details, see the section “Sirius [å], [∂] buttons Satellite Radio operations”. •... - Page 8 Major button operations when external equipment is connected to this unit [RPT] (Repeat)/[DIRECT] (2) button • Perform repeat play. Also perform all-repeat play when the button is held depressed for 1 second or longer. • Use to select the ARTISTS menu in the iPod MENU mode.
-
Page 9: Display Items
Display Items : Preset channel indication (1 to 6) : Enter indication Disc number indication (1 to 6) : Manual indication : Satellite indication Operation status indication Titles, frequency, clock, etc. are displays. Z-Enhancer Plus indication : MAGNA BASS EXTEND indication : Stereo indication : Disc indication : Scan indication... -
Page 10: Detachable Control Panel
5. DETACHABLE CONTROL PANEL Removing the DCP Storing the DCP in the DCP Case 1. Press the [SRC] button for 1 second or Hold the DCP, in the orientation as shown in the longer to switch off the power. figure below, and put it into the supplied DCP case. -
Page 11: Remote Control
6. REMOTE CONTROL Optional Wired Remote Control Unit Operations ■ Following operations are enabled by remote control with the Wired Remote Control Unit CMRC1 or CMRC2 (sold separately). Display Items [ POWER/SOURCE ] Operation status indication ∗ Frequency, clock, etc. are displayed. : Stereo indication : Satellite indication : Mute indication... - Page 12 Optional Wired Remote Control Unit Operations [a], [d] Buttons CAUTION Selecting tracks (in CD changer mode or CD Lower the volume level before powering the mode) source unit off. The source unit stores the Press the [d] button to start playback from the last volume setting.
-
Page 13: Optional Wireless Remote Control Unit Operations
Optional Wireless Remote Control Unit Operations ■Following operations are enabled by remote control with the Wireless Remote Control Unit RCB-176- 600 (sold separately). Receiver for remote control unit Operating range : 30° in all directions Remote control unit Signal transmitter (Sold separately) [ SRC ] [ BND ]... - Page 14 Optional Wireless Remote Control Unit Operations Mode CD changer Radio/Satellite iPod Button [SRC] Switches among radio, Satellite Radio Receiver, CD, iPod, CD changer, TV and AUX. The power of this unit turns off by pressing and holding or 1 second or longer when the power is on.
-
Page 15: Operations
7. OPERATIONS Note:Be sure to read this chapter referring to the front diagrams of Basic Operations chapter “3. CONTROLS” on page 5 (unfold). Adjusting the volume CAUTION Turning the [ROTARY] knob clockwise Lower the volume level before powering the increases the volume; turning it source unit off. - Page 16 Basic Operations Note: • B-BOOST : bass emphasized • If the rear line level output is set to the full range • IMPACT : bass and treble “REAR” setting, “S-VOL” will not be shown as a emphasized selection. • EXCITE : bass and treble emphasized mid de- Adjusting the bass...
-
Page 17: Radio Operations
Radio Operations Basic Operations Adjusting the balance Changing the reception area 1. Press the [A-M] button and select “BAL 0”. This unit is initially set to USA frequency intervals of 10kHz for AM and 200kHz for FM. When using 2. Turning the [ROTARY] knob clockwise it outside the USA, the frequency reception range emphasizes the sound from the right can be switched to the intervals below. - Page 18 Radio Operations Seek tuning 2. Press and hold one of the [DIRECT] buttons for 2 seconds or longer to store the current 1. Press the [BND] button and select the station into preset memory. desired band (FM or AM). ∗ If “MANU” is lit in the display, press and hold Auto store the [BND] button for 1 second or longer.
-
Page 19: Cd Operations
CD Operations Loading a CD 2. To resume CD play, press the [ ] button again. Insert a CD into the center of the [CD SLOT] with the label side facing up. “CD” or “LOADING” appears on the display, the CD Selecting a track enters into the slot, and play starts. -
Page 20: Operations Common To Each Mode
7. Press the [T] button to return to the previous ∗ The factory default setting is “WELCOME TO mode. CLARION”. Note: 1. Press and hold the [T] button for 1 second or • You cannot set the clock when it is displayed with longer to switch to the adjustment selection only the ignition on. - Page 21 Operations Common to Each Mode Setting LOW PASS FILTER Selecting AUX IN sensitivity This function allows you to set the low-pass filter Make the following settings to select the for sub-woofer output. sensitivity when sounds from external devices ∗ The factory default setting is “REAR”. connected to this unit are difficult to hear even after adjusting the volume.
-
Page 22: Accessories
8. ACCESSORIES Sirius Satellite Radio Operations ■Requires additional SIR-CL1 or SIR-CL3M CeNET module What is Sirius Satellite Radio? 2. Press the [å] or [∂] button to select “SID DISP”. Sirius is radio the way it was meant to be: Up to 3. - Page 23 Sirius Satellite Radio Operations Switching the display Manual tuning 1. Press the [DISP] button to select the sub Any channel including channels without display. broadcasts and channels not covered by the contract can be selected during manual tuning. 2. In the sub display, press and hold the [DISP] button for 1 second or longer to cycle 1.
- Page 24 Sirius Satellite Radio Operations Notes: Category selection function • When the name of a channel stored in memory is SIRIUS Radio allows you to select broadcast changed by a broadcasting channel, the display channel category (contents). may show a channel name that differs from the stored name.
-
Page 25: Ipod Operations
iPod Operations Connecting the iPod CeNET Controller allows Play time display you to operate your iPod from the operation The current track number and play time are panel of this unit. This unit has the iPod MENU displayed. mode which allows you to operate by the same feeling as operating on the iPod. - Page 26 iPod Operations Selecting a track Random play ●Track-up This specifies random playback of the tracks included in the album. It corresponds to 1. Press the [∂] button during playback to the iPod operation of selecting “Settings” ➜ move ahead to the beginning of the next track.
-
Page 27: Cd Changer Operations
CD Changer Operations iPod Operations 3. Turn the [ROTARY] knob to select the menu, CD changer functions then press the [∂] button. Select tracks by When an optional CD changer is connected repeating this operation. through the CeNET cable, this unit controls all Notes: CD changer functions. - Page 28 CD Changer Operations Fast-forward/fast-rewind Random play ●Fast-forward Random play selects and plays individual tracks on the disc in no particular order. This function Press and hold the [∂] button for 1 second or continues automatically until it is cancelled. longer. 1.
-
Page 29: Tv Operations
TV Operations TV tuner functions 1. Press the [BND] button and select the desired band (TV1 or TV2). When an optional TV tuner is connected through ∗ If “MANU” is not lit in the display, press and the CeNET cable, this unit controls all TV tuner hold the [BND] button for 1 second or longer. - Page 30 TV Operations Preset scan Preset scan allows the user to view each preset position before it automatically advances to the next preset. This function is useful for searching for a desired TV station in memory. 1. Press the [P/A] button. 2.
-
Page 31: Troubleshooting
9. TROUBLESHOOTING Problem Cause Measure Power does not Fuse is blown. Replace with a fuse of the same amperage. If the turn on. fuse blows again, consult your store of purchase. (No sound is produced.) Incorrect wiring. Consult your store of purchase. No sound output Amplifier turn-on lead is Turn the unit off and check each wire for a possible... -
Page 32: Error Displays
10. ERROR DISPLAYS If an error occurs, one of the following displays is displayed. Take the measures described below to eliminate the problem. Error Display Cause Measure ERROR 2 A CD is caught inside the CD deck and is This is a failure of CD deck’s mechanism. not ejected. -
Page 33: Specifications
11. SPECIFICATIONS Source unit harness wire connections AM Tuner Frequency Range: Wire Color Function U.S.A : 530 kHz to 1710 kHz Yellow +12V DC Constant Power Europe : 531 kHz to 1602 kHz Source/Memory Australia : 531 kHz to 1629 kHz +12V DC Switch Lead/ Usable Sensitivity: 25 µV Accessory... - Page 34 M455A...
- Page 35 M455A...
- Page 36 Clarion Co., Ltd. All Rights Reserved. Copyright © 2006: Clarion Co., Ltd. PE-2687B Printed in China / Imprimé en Chine / Impreso en China / Stampato in Cina 2006/4 280-8402-00...