Singer Sewing Machine Instruction Manual
Hide thumbs
Also See for Sewing Machine:
- Instruction manual (96 pages) ,
- Manual (6 pages) ,
- User manual (1 page)
Table of Contents
Advertisement
Quick Links
MESURES DE SÉCURITÉ IMPORTANTES
Lorsqu'un appareil électrique est en usage, il faut toujours observer certaines mesures élémentaires de sécurité y compris les
suivantes.
Lire les instructions en entier avant d'utiliser cette machine à coudre.
DANGER-
Pour réduire le risque de décharge électrique:
-
1. Un appareil ne devrait jamais être laissé sans surveillance lorsqu'il est branché.
Débranchez toujours l'appareil de la prise externe de courant immédiatement après usage et avant le nettoyage.
MISE EN GARDE-
1. Cet appareil ne doit pas être utilisé comme un jouet. Une stricte surveillance doit être exercée lorsque l'appareil est en usage
par ou près des entants.
2. N'utilisez cet appareil qu'aux fins mentionnées dans ce manuel. N'utilisez que les accessoires recommandés par le
manufacturier tel qu'indiqué dans ce manuel.
3. N'utilisez jamais cet appareil si le cordon ou la fiche sont endommagés, si l'appareil fait défaut, s'il a été échappé ou
endommagé ou immergé. Retournez cet appareil au concessionnaire autorisé ou centre de réparations pour examen.
Réparation, réglage électrique ou mécanique.
4. N'utilisez jamais l'appareil lorsque les ventilateurs sont obstrués. Gardez les ventilateurs de la machine à coudre et du
rhéostat libres de mousse, poussière ou de tissu.
5. Gardez les doigts loin des pièces en mouvement spécialement autour de l'aiguille de la machine à coudre.
6. Utilisez toujours la plaque à aiguille recommandée. Une plaque inappropriée peut causer le bris de l'aiguille.
7. N'utilisez jamais d'aiguilles gauchies.
8. Ne tirez ni ne poussez le tissu pendant que vous cousez. Ceci peut faire dévier l'aiguille et la briser.
9. Arrêtez («0») la machine à coudre lorsque vous faites des réglages à l'aiguille, enfilage, changement.
enfilage de canette ou changement de pied presseur, etc.
10. Débranchez toujours la machine de la prise externe de courant lorsque vous retirez les couvercles,
effectuez la lubrification ou tout autre entretien mentionné dans le manuel d'instructions.
11. N'insérez ni ne laissez tomber aucun objet dans aucune ouverture.
12. N'utilisez pas en plein air.
13. N'utilisez pas ou des produits en aérosol sont en usage ni ou est administré de l'oxygene.
14. Pour débrancher, tournez tous les réglages en position d'arrêt («0»), puis débranchez la prise externe de courant.
15. Ne débranchez pas en tirant le cordon. Pour débrancher, saisissez la fiche, non pas le cordon.
CONSERVEZ CES INSTRUCTIONS
Cette machine à coudre est couçue pour usage domestique seulement.
RHÉOSTAT
Avec cette machine à coudre, utilisez le modèle YC-485EC de Yamamoto Electric.
Cet appareil est conforme à la directive CEE 89/336 EEC concernant les normes
électromagnétiques.
Pour réduire le risque de brûlures, de feu, de décharge électrique ou de blessures
personnelles:
est une marque déposée de The Singer Company Ltd ou de ses filiales.
2005
Tous droits réservés.
1
Advertisement
Table of Contents

Related Manuals for Singer Sewing Machine


Summary of Contents for Singer Sewing Machine
- Page 1 Avec cette machine à coudre, utilisez le modèle YC-485EC de Yamamoto Electric. Cet appareil est conforme à la directive CEE 89/336 EEC concernant les normes électromagnétiques. est une marque déposée de The Singer Company Ltd ou de ses filiales. 2005 Tous droits réservés.
- Page 2 Use el modelo YC-485EC de Yamamoto Electric con esta máquina de coser. Este instrumento se conforma con directivo de CEE 89/336/EEC cubriendo supresión contra interferencia de radio. SINGER es una marca registrada de The Singer Company Ltd o sus afiliados. Todos los derechos reservados.
-
Page 3: Table Of Contents
TABLE OF CONTENTS 1. KNOWING YOUR SEWING MACHINE Blindhem stitch ---------------------------------------------------- 48 - 49 Multi-stitch zigzag, Shell stitch --------------------------------- 50 - 51 Machine identification ------------------------------------------------ 6 - 7 Stretch stitches ----------------------------------------------------- 52 - 61 Accessories ------------------------------------------------------------ 8 - 9 Straight stretch stitch, Overedge stitch, Feather stitch, Setting up your machine ---------------------------------------- 10 - 11 Ric-rac stitch, Pin stitch, Blanket stitch, Honeycomb stitch, Spool pins, Presser foot lifter ---------------------------------- 12 - 13... - Page 4 TABLE DES MATIERES Point invisible ------------------------------------------------------ 48 - 49 1. VOTRE MACHINE À COUDRE Zigzag multi-point, Point de lingerie ------------------------- 50 - 51 Description de la machine ----------------------------------------- 6 - 7 Points extensibles ------------------------------------------------ 52 - 61 Accessoires ------------------------------------------------------------ 8 - 9 Point droit extensible, Point surjet extensible, Point plume, Préparation de la machine ------------------------------------- 10 - 11 Point ric rac, Point épingle, Point languette, Point nid d’abeille,...
- Page 5 INDICE DE CONTENIDOS 1. PRINCIPALES PARTES DE LA MAQUINA Puntada recta triple, Puntada sobre-borde, Puntada pluma, Puntada ric rac, Puntada de broche, Identificación de la máquina --------------------------------------- 6 - 7 Puntada de ribete, Puntada panal, Accesorios -------------------------------------------------------------- 8 - 9 Puntada “Entredos”, Puntada en escalera, Preparación de la máquina ------------------------------------ 10 - 11 Puntada obrlock doble, Puntada entrecruz,...
-
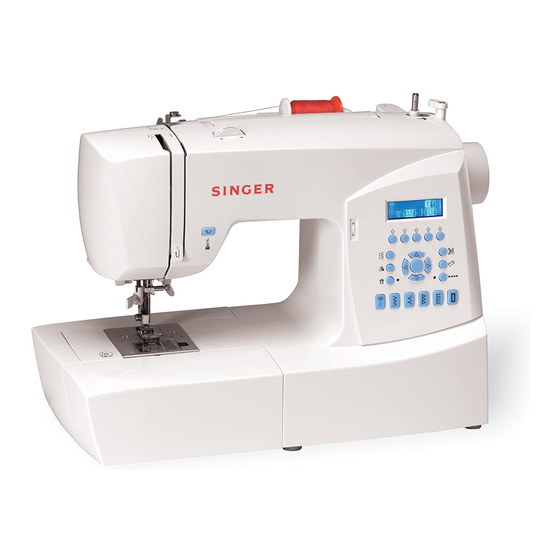
Page 6: Knowing Your Sewing Machine
1. KNOWING YOUR SEWING MACHINE MACHINE IDENTIFICATION 1. Thread guide 2. Thread take-up 3. Thread tension control 4. Face cover 5. Thread cutter 6. Extension table (Accessory box) 7. Bobbin winder shaft 8. Bobbin winder stop 9. Reverse stitch switch 10. -
Page 7: Votre Machine À Coudre
1. VOTRE MACHINE À COUDRE 1. PRINCIPALES PARTES DE LA MAQUINA DESCRIPTION DE LA MACHINE IDENTIFICATION DE LA MAQUINA 1. Guía hilo 1. Guide-fil 2. Releveur de fil 2. Tria- hilos 3. Control tensión hilo 3. Réglage tension du fil supérieur 4. -
Page 8: Accessories
ACCESSORIES FOR SEWING MACHINE 1. Needles 2. Bobbins (4 total - 1 in machine) 3. Auxiliary spool pin 4. Spool pin felt discs (2) 5. Spool pin cap (mini) 6. Spool pin cap (small) 7. Spool pin cap (large) 8. Buttonhole opener/Brush/Seam Ripper 9. -
Page 9: Accessoires
ACCESSOIRES ACCESORIOS POUR LA MACHINE À COURE PARA MAQUINA DE COSER 1. Aiguilles 1. Agujas 2. Canettes (total 4 - 1 dans la machine) 2. Canillas (4 total – 1 en máquina) 3. Porte-bobine auxiliaire vertical 3. Pasador de carrete auxiliar 4. -
Page 10: Setting Up Your Machine
SETTING UP YOUR MACHINE Be sure to wipe off any surplus oil from needle Set power/light switch at plate area before using your machine the first “OFF” time. Mettez l’interrupteur moteur/ lumière sur “OFF”. POWER LINE CORD/FOOT CONTROL Poner el Interruptor de corriente/ Connect the plug of the power line cord into luz de velocidad en “OFF”... -
Page 11: Préparation De La Machine
PRÉPARATION DE LA MACHINE PRÉPARACION DE LA MAQUINA Installez votre machine sur une surface bien plane. Asegurarse de limpiar cualquier aceite sobrante del área de la Votre machine à coudre a été huilée à fond par l’usine. plancha de aguja, antes de usar, por primera vez, la máquina. ll est donc indispensable, avant de commencer à... -
Page 12: Spool Pins, Presser Foot Lifter
SPOOL PINS Spool HORIZONTAL SPOOL PIN for normal Bobine thread spool Carrete Spool pin felt discs Place thread spool on the pin and secure with a spool cap to Rondelle feutre ensure smooth flow of thread. If the thread spool has a thread Disco del pasador carrete retaining slit, it should be placed to the right. -
Page 13: Porte-Bobine, Levier Du Pied Presseur
PORTE-BOBINE PORTA CARRETES PORTE-BOBINE HORIZONTAL pour la PASADOR DE CARRETE HORIZONTAL bobine normale para carrete de hilo normal Placez la bobine sur la broche et fixez-y un couvre-fil pour Coloque el carrete de hilo en el pasador y asegúrelo con la assurer un débit de fil bien régulier. -
Page 14: Converting To Free-Arm Sewing
CONVERTING TO FREE-ARM SEWING Your machine can be used either as a flat- bed or as a free-arm model. With the extension table in position, it provides a large working surface as a standard flat-bed model. To remove the extension table, hold it firmly with both hands and pull it off to the left as shown. -
Page 15: Utilisation Du Bras Libre
CONVERSION PARA LA COSTURA UTILISATION DU BRAS LIBRE CON BRAZO Cette machine peut s’utiliser aussi bien sous la forme d’une La máquina tanto se puede utilizar como base plana o una base plane que celle d’un bras libre. En conservant la table de máquina de brazo libre. -
Page 16: Winding The Bobbin
WINDING THE BOBBIN 1. Place a spool of thread on the spool pin, and secure it with the spool pin cap. Pull the thread out from the spool and place it through thread guides as shown in illustration. 2. Put end of thread through the hole in bobbin as shown. 3. -
Page 17: Préparation De La Canette
PRÉPARATION DE LA CANETTE DEVANADO DE LA CANILLA 1. Mettez une bobine de fil en place sur un porte-bobine et 1. Coloque el carrete de hilo en el pasador de carrete y fixez-la bien à l’aide du couvre-fil. Tirez le fil hors de la bobine asegúrelo con la tapa de pasador de carrete. -
Page 18: Threading The Bobbin Thread
THREADING THE BOBBIN THREAD 1. Raise the needle to its highest position by rotating the hand wheel toward you. 2. Remove the bobbin cover plate by pushing the release button to the right. Bobbin cover will pop up sufficiently to allow you to remove the cover. -
Page 19: Enfilage Du Fil De Canette
ENFILAGE DU FIL DE CANETTE ENHEBRADO DEL HILO DE LA CANILLA 1. Relevez l’aiguille en position haute en tournant 1. Eleve la aguja hasta su posición más alta girando el volantd. manuellement le volant vers vous. 2. Retirez la plaque de canette en poussant le bouton de 2. -
Page 20: Threading The Top Thread
THREADING THE TOP THREAD A. Raise the presser foot lifter. Always be sure to raise the presser foot lifter before threading the top thread. (If the presser foot lifter is not raised, correct thread tension cannot be obtained.) B. Turn the hand wheel toward you until the needle is in its highest position and the thread take-up is visible. -
Page 21: Enfilage Du Fil Supérieur
ENFILAGE DU FIL SUPÉRIEUR ENHEBRADO DEL HILO SUPERIOR A. Elevez le pied presseur. Veillez à toujours élever le releveur A. Levante el prensatelas. Siempre asegúrese de levantar el de pied presseur avant d’enfiler le fil supérieur. (Si le releveur prensatelas antes de bobinar el hilo superior. (Si no se de pied presseur n’est pas élevé, vous ne pourrez pas obtenir levanta el prensatelas, no se podrá... -
Page 22: Using Automatic Needle Threader
USING AUTOMATIC NEEDLE THREADER Raise the needle to its highest position by rotating the hand wheel towards you. 1. Hook thread to thread guide as illustrated. 2. Pull down lever holding the end of thread. 3. Turn the lever as far as it will go. 4. -
Page 23: Utilisation De L'enfileur De Chas D'aiguille
UTILISATION DE L’ENFILEUR DE CHAS EMPLEO DEL ENHEBRADOR AGUJA D’AIGUILLE Levantar la aguja a la posición más elevada girando el volante de la máquina hacia uated. Amener l’aiguille en position haute en toumant le volant vers vous. 1. Enhebrar el hilo en el guía+ hilo como indica la ilustración. 1. -
Page 24: Picking Up Bobbin Thread
PICKING UP BOBBIN THREAD 1. Raise the presser foot lifter. 2. Holding needle thread loosely with your left hand, turn hand wheel toward you with your right hand first lowering the needle and continuing until the needle comes to its highest position. NOTE: A quick way to pick up the bobbin thread is, with straight stitch selected, touch and release the reverse switch. -
Page 25: Rappel Du Fil Inférieur
RAPPEL DU FIL INFÉRIEUR RECOGIDA DEL HILO DE LA CANILLA 1. Relever le pied presseur. 1. Alzar la palanca del pie prensatelas. 2. Tenir le fil de l’aiguille et tourner le volant vers vous en faisant 2. Manteniendo flojo el hilo de la aguja con la mano izquierda, remonter l’aiguille à... -
Page 26: Needle, Thread And Fabric Chart
16/100 purple band * Do not use on stretch fabrics. * For best sewing results, always use a Singer Branded Needle. Always disconnect the machine from power supply by removing the plug from the wall-outlet. Changing the needle 1. Raise the needle bar to its highest position by turning the hand wheel toward you. -
Page 27: Tableau Des Aiguilles, Fiils Et Tissus
* Pour obtenir les meilleurs résultats de couture, utilisez * Para los mejores resultados de costura, use siempre agujas toujours une aiguille de marque Singer. marca Singer. D é b r a n c h e z t o u j o u r s . L a m a c h i n e d e Siempre desconecte la máquina de la fuente de... -
Page 28: Adjusting Top Thread Tension
ADJUSTING TOP THREAD TENSION Under side 90% of your sewing will be accomplished with the word “AUTO” Côté de dessous exposed on the tension control dial on top of the machine. Reverso Well balanced Helpful Hint: A slight adjustment to the + or - side of Correct AUTO will improve sewing appearance. -
Page 29: Réglage De La Tension Du Fil Supérieur
RÉGLAGE DE LA TENSION DU FIL AJUSTE DE LA TENSION DEL HILO SUPÉRIEUR SUPERIOR 90% de votre couture sera accomplie avec le mot “AUTO” El 90% de su costura será realizada con la palabra “AUTO” apparaissant sur le cadran de réglage de tension en haut de expuesta en el dial de control de tensión encima de la máquina. -
Page 30: Functions Of Control Panel
FUNCTIONS OF CONTROL PANEL 7. DECORATIVE & LETTER STITCH MODE BUTTON When the machine is turned on, straight stitch is selected and Decorative & letter stitch patterns can be selected by pop-up screen for individual preference settings appears on pressing the button. the LCD display. -
Page 31: Fonctions Du Panneau De Commande
FONCTIONS DU PANNEAU DE COMMANDE FUNCIONES EN EL PANEL DE CONTROL Lorsque vous allumez la machine, le point droit est sélectionné Cuando se conecta la máquina, se selecciona la puntada recta et un écran surgissant pour les réglages des préférences y aparece la pantalla desplegable para ajustes de preferencias personnelles apparaît sur l’affichage LCD. -
Page 32: Error Messages
ERROR MESSAGES If an incorrect operation is made, the sewing machine will not operate with beep sound and an error message will be displayed. When an error message is displayed, fix the problem following the instructions below. 1. If foot control is depressed, while no pattern is selected. Select a pattern. -
Page 33: Mensaje De Error
MESSAGE D’ERREUR MENSAJE DE ERROR Si vous effectuez une opération incorrecte, la machine à coudre Si se realiza una operación incorrecta, la máquina de coser cessera de fonctionner; un message d’erreur accompagné no funcionará y se escuchará un sonido bip y se exhibirá un d’un bip sonore sera alors émis. -
Page 34: Reverse Operation Switches
REVERSE OPERATION SWITCHES Dual purpose reverse/tacking stitch switch Reverse stitch switch Interrupteur couture arrière Interruptor de puntadas hacia atrás * Reverse stitch function for straight and zigzag stitches ( Reverse sewing is carried out while the reverse stitch switch is pushed. The machine will continue to sew in reverse as long as the reverse switch button is pressed. -
Page 35: Touche De Fonctionnement
TOUCHE DE FONCTIONNEMENT INTERRUPTOR DE FUNCIONAMIENTO Interrupteur de couture arrière/faufilage Interruptor de costura hacia atrás/remate * Fonction couture arrière pour les points droits et * Función de costura hacia atrás para costuras rectas y zigzags ( zigzag ( La couture arrière avance lorsque l’interrupteur couture La costura hacia atrás se realiza mientras se presiona el arrière reste appuyé. -
Page 36: Starting To Sew
2. STARTING TO SEW UTILITY AND BUTTONHOLE STITCH SEWING When the machine is turned on, straight stitch is selected automatically and pop-up screen for individual preference settings appears on the LCD display. SELECTING THE PATTERN (1) Press the utility stitch button and first 5 patterns (group 1) will appear on the display. -
Page 37: Comenzando A Coser
2. DÉMARRAGE DE LA COUTURE 2. COMENZANDO A COSER COUTURE DE POINTS DE COSTURA DE PUNTADA DE OJAL Y BOUTONNIÈRE ET UTILITAIRES UTILITARIA Lorsque vous allumez la machine, le point droit est sélectionné Cuando se conecta la máquina, se selecciona la puntada recta automatiquement et un écran surgissant pour les réglages automáticamente y aparece la pantalla desplegable para ajuste des préférences personnelles apparaît sur l’affichage LCD. - Page 38 MIRROR IMAGE SETTING Mirror image of a selected pattern can be selected by pressing the mirror image button, if the mirror image icon appears on the display. TWIN NEEDLE SETTING Twin needle mode can be selected by pressing the twin needle button, if the twin needle icon appears on the display.
- Page 39 RÉGLAGE DE L’IMAGE MIROIR AJUSTE DE IMAGEN EN ESPEJO Vous pouvez sélectionner l’image miroir d’un motif sélectionné La imagen en espejo de un patrón seleccionado se puede en appuyant sur la touche d’image miroir, si l’icône de l’image seleccionar presionando el botón de imagen en espejo, si la miroir apparaît sur l’affichage.
- Page 40 UTILITY AND BUTTONHOLE STITCH PATTERN CHART TABLEAU DES MOTIFS DE POINTS DE BOUTONNIÈRE ET UTILITAIRES CUADRO DE PATRON DE COSTURA DE PUNTADA DE OJAL Y UTILITARIA Utility stitch mode button Vertical scroll button Multi-function buttons Touche de mode de point utilitaire Touche de défilement vertical Touches multifonctions Botón de modo de costura utilitaria...
- Page 41 Group 7 / Groupe 7 / Grupo 7 Group 10 / Groupe 10 / Grupo 10 Group 8 / Groupe 8 / Grupo 8 Group 11 / Groupe 11 / Grupo 11 Group 9 / Groupe 9 / Grupo 9...
-
Page 42: Straight Stitching
STRAIGHT STITCHING Straight stitch is most frequently used for every aspect of sewing. Let’s learn how to sew following the steps below. 1. SETTINGS Presser foot - General Purpose Foot Thread tension control - AUTO NOTE: Based upon the weight of the fabric, slight “fine tuning”... -
Page 43: Point Droit
2. COMMENCEZ À COUDRE 2. EMPEZER A COSER POINT DROIT PUNTADA RECTA Ceci est le point le plus utilisé pour toute genre de couture. Punto recto se usa más frecuentemente para coser cualquier Apprenez à vous servir correctement de votre machine, en cosa. -
Page 44: Hand-Look Quilt Stitch
INSERTING ZIPPERS AND PIPING Use zipper foot to sew to the right or left of the zipper or close to the cord. Needle to left of foot Needle to right of foot Aiguille à gauche du pied presseur Aiguille à droite du pied presseur Aguja a la izquierda del Aguja a la derecha del prensatelas... -
Page 45: Exécution Du Point De Matelassage
PLACER UNE FERMETURE À INSERCION DE CREMALLERAS Y VIVO GLISSIÈRE OU UN BIAIS (GALONNER) Utilizar el prensatelas de cremalleras que permite coser a la derecha o la izquierda de la cremallera o cerca del cordón vivo. Utilisez le pied fermeture glissière, au moyen duquel vous pouvez piquer aussi bien à... -
Page 46: Zigzag Stitching
ZIGZAG STITCHING Under side Côté de dessous SETTINGS :Presser foot - General Purpose Foot Reverso :Thread tension control - AUTO The top thread may appear on the bottom depending on the thread, fabric, type of stitch and sewing speed, but the bobbin thread must never appear on the top of the fabric. -
Page 47: Point Zigzag
POINT ZIGZAG PUNTADA ZIG-ZAG RÉGLAGES :Pied presseur - Pied universel AJUSTES :Pie prensatelas - Pie universal :Réglage tension du fil supérieur - AUTO :Control tensión hilo - AUTO Le fil supérieur peut paraître sur l’envers, en fonction du fil, du El hilo superior puede aparecer en la parte inferior, según el tissu et de la vitesse de couture, mais le fil de la canette ne doit hilo, tejido, tipo de puntada y velocidad de costura, pero el hilo... -
Page 48: Blindhem Stitch
BLINDHEM STITCH The blindhem stitch is primarily used for hemming curtains, trousers, skirts, etc. Medium to heavyweight fabric Settings : Presser foot - Blind stitch foot Material de peso medio a pesado : Thread Tension Control: AUTO Tissus moyens et lourds - Regular blind stitch for normal firm fabrics - Elastic blind stitch for soft, stretchable fabrics Under side... -
Page 49: Point Invisible
POINT INVISIBLE PUNTADA INVISIBLE RÉGLAGES :Pied presseur - Pied point invisible AJUSTES :Pie prensatelas - Prensatelas de puntada invisible :Réglage tension du fil supérieur - AUTO :Control tensión hilo - AUTO - Point invisible pour les tissus tissés Puntada invisible regular para las telas normales Puntada invisible super elástico para las telas - Point invisible pour les tissus extensibles suves, elástico... -
Page 50: Multi-Stitch Zigzag, Shell Stitch
MULTI-STITCH ZIGZAG SETTINGS :Presser foot - General Purpose Foot :Thread tension control - AUTO This is a strong stitch because as its name implies, it makes three short stitches where the normal zig-zag makes only one. For this reason it is highly recommended for overcasting all types of fabrics. -
Page 51: Zigzag Multi-Point, Point De Lingerie
ZIGZAG MULTI-POINT ZIG-ZAG DE TRES PUNTADAS RÉGLAGES :Pied presseur - Pied universel AJUSTES :Pie prensatelas - Pie universal :Réglage tension du fil supérieur - AUTO :Control tensión hilo - AUTO Pour réparer des déchirures droites ou en angle placez le tissu Esta es una puntada fuerte, ya que como su nombre implica, avec le début de l’accroc sous la partie centrale du pied. -
Page 52: Stretch Stitches
STRETCH STITCHES SETTINGS :Presser foot - General Purpose Foot or Satin Stitch Foot :Thread tension control - AUTO Stretch stitches are mainly for use on knit, or stretchable fabrics, but can also be used on ordinary woven materials. STRAIGHT STRETCH STITCH Straight stretch stitch is far stronger than an ordinary straight stitch because it locks three times - forwards, backwards and forwards. -
Page 53: Points Extensible
POINTS EXTENSIBLE PUNTADAS ELASTICAS RÉGLAGES :Pied presseur - Pied universel ou pour point AJUSTES :Pie prensatelas - Pie universal o para coser bourdon en satén :Réglage tension du fil supérieur - AUTO :Control tensión hilo - AUTO Les points extensible sont généralement utilisés pour les tissus Las puntadas elásticas se utilizan principalmente en géneros de élastiques, mais peuvent ètres utilisès sur tissus tissés. -
Page 54: Blanket Stitch
Useful for decorative stitching on borders and for use in heirloom sewing. The Entredeux stitch is most often sewn with a Wing Needle (Singer Style 2040) to create holes in the stitch pattern. Helpful Hint: A slight + adjustment of the tension will... - Page 55 Le point entredeux et le plus souvent costuras antiguas. La puntada “Entre dos” es más cousu à l’aide d’une aiguille aile (Style Singer 2040) pour créer comúnmente usada con una aguja “de ala” (Singer estilo 2040) des trous dans le motif du point.
-
Page 56: Ladder Stitch
LADDER STITCH The Ladder stitch is primarily used for drawn thread hemstitching. It can also be used for sewing over thin tape in an opposite or same color. Place the stitch in the center and a special effect will be obtained for decoration. Another use for the ladder stitch is couching over narrow ribbon, yarn or elastic. -
Page 57: Point Surjet Double
POINT D’ÉCHELLE PUNTADA EN ESCALERA Le point d’échelle est principalement utilisé pour la couture La puntada en escalera se usa principalmente para hacer d’ourlets à fil tiré. Il peut également être utilisé pour effectuer la dobladillos. También se puede usar para coser sobre cinta couture par dessus une mince bande d’une couleur opposée fina de un color opuesto o del mismo color. -
Page 58: Slant Overedge Stitch
SLANT OVEREDGE STITCH Seams and overcasts in one operation to produce a narrow, supple seam, particularly suited to swimwear, sportswear, T- shirts, babywear in stretch nylon, stretch towelling, jersey and cotton jersey. SLANT PIN STITCH Excellent for hemstitching table and bed covers with an elegant touch. - Page 59 SURJET OBLIQUE PUNTADA OVERLOCK INCLINADO Le surjet sert à la réalisation de couture et surjet en une seule La puntada overlock inclinado produces una costura estrecha opération. Avec ce point, vous pouvez faire des coutures étroites y elástica particularmente adecuada para prendas de baño, et souples, parfaitement adaptées aux maillots de bain, prendas de sport, camisetas T, prendas de niños de niló...
- Page 60 THORN STITCH It is a versatile stitch used for joining fabric pieces and as a decorative touch. REINFORCED OVEREDGE STITCH Both of these stitches are perfect for attaching flat elastic when making or repairing lingerie. They can also be used for smocking and as a seam finish.
- Page 61 POINT D’ÉPINE PUNTADA “HERRINGBONE” C’est un point polyvalent utilisé pour joindre des morceaux de Puntada versátil que se utiliza para unir piezas de género y tissu et de la broderie. bordado. POINT SURJET RENFORCÉ PUNTADA SOBRE-BORDE REFORZADO Convient particulièrement bien pour assembler et surfiler en une seule opération.
-
Page 62: Continuous Patterns
CONTINUOUS PATTERNS SETTINGS :Presser foot - General purpose foot or Satin Stitch Foot :Thread tension control - AUTO These are the optimum patterns for sewing continuous patterns. Use whichever patterns suit your preference. -
Page 63: Motifs Continuel
MOTIFS CONTINUEL PATRONES CONTINUOS RÉGLAGES :Pied presseur - Pied universel ou pour point AJUSTES :Pie prensatelas - Pie universal o para coser bourdon en satén :Réglage tension du fil supérieur - AUTO :Control tensión hilo - AUTO Ces motifs conviennent parfaitement à la couture des motifs Estos son los patrones ideales para costura de patrones continuels. -
Page 64: Novelty Patterns
NOVELTY PATTERNS SETTINGS :Presser foot - Satin stitch foot :Thread tension control - AUTO These can be used for sewing single pattern and continuous patterns. SEWING ON A BUTTON SETTINGS :Presser foot - General purpose foot :Feed dog control - Position your fabric and button under the presser foot. -
Page 65: Motifs Spécials
MOTIFS SPÉCIALS PATRONES ACTUALES RÉGLAGES :Pied presseur - Pied zigzag AJUSTES :Pie prensatelas - Pata para zigzag :Réglage tension du fil supérieur - AUTO :Control tensión hilo - AUTO Ceci peut être utilisé pour coudre des motifs uniques et des Estos pueden ser usados para coser patrones de una puntada motifs continuels. -
Page 66: Sewing A Buttonhole
SEWING A BUTTONHOLE Tab B Languette B USING BUTTONHOLE FOOT Tab A Lengüeta B Languette A Your machine offers you two different widths of bartack and Lengüeta A keyhole buttonholes sewn by a system that measures the size of the button and calculates the size buttonhole required. All of this is done in one easy step. -
Page 67: Confection Des Boutonnières
CONFECTION DES BOUTONNIÈRES CONFECCION DE OJALES UTILISATION DU PIED BOUTONNIÈRE USO DEL PIE DE OJALADORA Votre machine vous offre deux différentes largeurs de brides Su máquina de coser le ofrece dos anchos de ojales con de boutonnières avec arrêt et à oeillet cousues au moyen d’un presilla y tipo sastre cosidos por un sistema que mide el tamaño système qui mesure la taille du bouton et qui calcule la taille del botón y calcula el tamaño del ojal necesario. - Page 68 5. Carefully mark the position of buttonhole on your garment. 6. Place the fabric under the foot. Pull out the bobbin thread underneath the fabric to a length of about 4 inches to the rear. 7. Align the buttonhole mark on the fabric with the mark on the buttonhole foot, and then lower the buttonhole foot.
- Page 69 5. Marquez soigneusement la position de la boutonnière sur le 5. Marque cuidadosamente la posición del ojal en la vestimenta. vêtement. 6. Coloque el material debajo del pie. Tire del hilo de la bobina 6. Placez le tissu sous le pied. Tirez le fil de la bobine sous le debajo del material a un largo de aproximadamente 10 cm tissu sur une longueur d’environ 10 centimètres vers l’arrière.
- Page 70 CORDED BUTTONHOLES Spur Hook filler cord (crochet thread or buttonhole twist) over the spur Saliente and pull both ends of the cord forward under the foot and tie off Tige the cord as shown in the illustration. Sew buttonhole so that zigzag stitches cover the cord. When completed, release the cord from foot and snip off extra length.
-
Page 71: Boutonnières Gansees (Renforcees)
BOUTONNIÈRES GANSEES OJALES CON CORDON (RENFORCEES) Enganchar el cordón de relleno al saliente de la guía y estirar ambos extremos del cordón hacia adelante, por debajo de la Accrocher le cordonnet (fil de passe ou fil de soie) sur la tige du guía. -
Page 72: Decorative & Letter Stitch Sewing
DECORATIVE & LETTER STITCH SEWING Decorative & letter stitch patterns can be selected by pressing the button for this mode and combined into a string by selecting each pattern. SELECTING DECORATIVE & LETTER STITCH PATTERNS (1) Press the decorative & letter stitch mode button and first 5 patterns will appear on the lower column of the display. -
Page 73: Couture Des Points Décoratifs Et Alphabétiques
COUTURE DE POINTS DÉCORATIFS COSTURA DE PUNTADAS ET ALPHABÉTIQUES DECORATIVAS Y LETRAS Vous pouvez sélectionner des motifs de points décoratifs et Los patrones de puntada decorativa y letras se pueden alphabétiques en appuyant sur la touche de ce mode, et les seleccionar presionando el botón para este modo y combiner en chaîne en sélectionnant chacun des motifs. - Page 74 SHIFTING THE CURSOR When patterns are selected, the cursor shifts to the right side of selected patterns. Press the cursor left button and cursor will shift to the left and cursor position will be highlighted. The cursor is used to check selected patterns, clear patterns, insert patterns or change settings of each pattern as described below.
- Page 75 DÉPLACEMENT DU CURSEUR MOVIENDO EL CURSOR Lorsque des motifs sont sélectionnés, le curseur se déplace Cuando se seleccionan patrones, el cursor se mueve al lado sur le côté droit des motifs sélectionnés. Si vous appuyez sur derecho de los patrones seleccionados. Presione el botón la touche de curseur gauche, le curseur se déplacera vers la izquierdo del cursor y el cursor se moverá...
- Page 76 INDIVIDUAL PREFERENCE SETTINGS OF DECORATIVE STITCH PATTERNS Settings of stitch length, width, mirror image and twin needle can be changed for decorative stitch patterns except letter stitch patterns: A. STITCH WIDTH AND LENGTH SETTINGS When a pattern is selected, it will automatically sew at default settings of stitch length and width.
- Page 77 RÉGLAGE DES PRÉFÉRENCES PERSONNELLES AJUSTES DE PREFERENCIA INDIVIDUALES DE DES MOTIFS DE POINTS DÉCORATIFS PATRONES DE PUNTADAS DECORATIVAS Les réglages de longueur, largeur de point, image miroir et Los ajustes de largo, ancho, imagen en espejo y doble aguja aiguille double peuvent être changés pour les motifs de points de puntada se pueden cambiar para puntadas decorativas décoratifs, à...
- Page 78 DECORATIVE & LETTER STITCH PATTERN CHART TABLEAU DES MOTIFS DE POINTS DÉCORATIFS ET ALPHABÉTIQUES CUADRO DE PATRONES DE PUNTADAS DECORATIVAS Y LETRAS Decorative & letter stitch mode button Vertical scroll buttons Multi-function buttons Touche de couture des points décoratifs et alphabétiques Touches de défilement vertical Touches multifonctions Botón de modo de costura de puntadas decorativas y letras...
- Page 79 Group 7 / Groupe 7 / Grupo 7 Group 11 / Groupe 11 / Grupo 11 Group 8 / Groupe 8 / Grupo 8 Group 12 / Groupe 12 / Grupo 12 Group 9 / Groupe 9 / Grupo 9 Group 13 / Groupe 13 / Grupo 13 Group10 / Groupe 10 / Grupo 10...
-
Page 80: Decorative Designs
DECORATIVE DESIGNS SETTINGS :Presser foot - Satin stitch foot :Thread tension control - AUTO 5 different types of decorative stitches are available. Following are examples of how to use and sew these stitches. You can use other stitches in the same way. * You should carry out a test sewing on a cut-off strip of the fabric being sewn to check the pattern to be used. - Page 81 MOTIFS DÉCORATIFS DISEÑOS DE BORDADOS DECORATIVOS RÉGLAGES :Pied presseur - Pied pour point bourdon AJUSTES :Pie prensatelas - Pie para coser en satén :Réglage tension du fil supérieur - AUTO :Control tensión hilo - AUTO 5 types différents de points décoratifs sont disponibles. Se dispone de 5 tipos diferentes de puntadas decorativas.
-
Page 82: Caring For Your Machine
Put one drop of sewing machine oil on the hook race as indicated by the arrows. (A, B) NOTE: Singer Brand Sewing Machine Oil is suggested. DO NOT use “all purpose” oil as it is not suited for sewing machine lubrication. -
Page 83: Entretien De Votre Machine
NOTA: Se sugiere usar aceite de máquina de coser d’huile “universelle”, elle ne convient pas à la marca Singer. NO use aceite “para todo uso” debido a lubrification des machines à coudre. que no es el más adecuado para la lubricación de su máquina de coser. -
Page 84: Other Information
TWIN NEEDLE (Option) A twin-needle produces two rows of parallel stitches for pin tucks, double top stitching and decorative sewing. Use of a Singer Brand 3mm (Style 2025) Twin Needle is strongly recommended. THREADING THE TWIN NEEDLE 1. Place a spool on each spool pin. Thread the two threads as one. -
Page 85: Renseignements Autres
L’utilisation d’une aiguille double de 3 mm de la marque Singer Se recomienda usar una aguja doble (estilo 2025) de 3 mm (Style 2025) est fortement recommandée. marca Singer. -
Page 86: Straight Stitch Needle Position
STRAIGHT STITCH NEEDLE POSITION The position of the needle when sewing straight stitch may be adjusted to anyone of 13 different positions with the Stitch Width Control as illustrated: Toward left Toward right Vers la gauche Vers la droite Hacia izquierda Hacia derecha Multi-function button Touche multifonctions... -
Page 87: Réglage De La Position D'aiguille Pour Le Point Droit
RÉGLAGE DE LA POSITION AJUSTE DE POSICION DE AGUJA D’ALGUILLE POUR LE POINT DROIT PARA PUNTADA RECTA 13 positions d’aiguille sont utilisables pour le matelassage, 13 posiciones de aguja disponibles para acolchados, surpiqure etc. puntadas de revestimiento, etc. -
Page 88: Performance Checklist
5. PERFORMANCE CHECKLIST GENERAL PROBLEMS Machine does not sew. * Power switch is turned off.- Turn on the switch. * Buttonhole lever is not raised when sewing stitch patterns. – Raise buttonhole lever. * Buttonhole lever is not lowered when sewing buttonhole. – Lower buttonhole lever. -
Page 89: Vérification Des Petits
5. VÉRIFICATION DES PETITS 5. CUADRO DE VERIFICACION DE PROBLÈMES DE COUTURE RENDIMIENTO PROBLEMAS GENERALES PROBLÈMES GENERAUX Máquina no cose. La machine ne coud pas: * El interruptor de energía no está conectado. - Ponerio en la * L’interrupteur est hors fonction. L’activé posición LOW o HIGH. -
Page 90: Quick Reference Table Of Stitch Length And Width
6. QUICK REFERENCE 6. TABLEAU DE 6. CUADRO DE TABLE OF STITCH RÉFÉRENCE RAPIDE REFERENCIA RAPIDA LENGTH AND WIDTH DES LONGUEURS ET DE LARGO Y ANCHO LARGEURS DE POINTS DE PUNTADA UTILITY AND MOTIFS DE POINTS DE PATRONES DE BUTTONHOLE STITCH BOUTONNIÈRE ET PUNTADA DE OJAL Y PATTERNS... - Page 91 WIDTH WIDTH LENGTH LENGTH WIDTH WIDTH LENGTH LENGTH LARGEUR (mm) LARGEUR (mm) LONGUEUR (mm) LONGUEUR (mm) LARGEUR (mm) LARGEUR (mm) LONGUEUR (mm) LONGUEUR (mm) STITCH STITCH STITCH STITCH ANCHO ANCHO LARGO LARGO ANCHO ANCHO LARGO LARGO POINT POINT POINT POINT AUTO AUTO MANUAL...
- Page 92 WIDTH LENGTH WIDTH LENGTH LARGEUR (mm) LONGUEUR (mm) LARGEUR (mm) LONGUEUR (mm) STITCH STITCH ANCHO LARGO ANCHO LARGO POINT POINT AUTO MANUAL AUTO MANUAL AUTO MANUAL AUTO MANUAL PUNTADA PUNTADA AUTO MANUEL AUTO MANUEL AUTO MANUEL AUTO MANUEL AUTO MANUAL AUTO MANUAL AUTO...
- Page 93 DECORATIVE AND MOTIFS DE POINTS PATRONES DE LETTER STITCH DÉCORATIFS ET PUNTADAS PATTERNS ALPHABÉTIQUES DECORATIVAS Y LETRAS WIDTH LENGTH WIDTH LENGTH LARGEUR (mm) LONGUEUR (mm) LARGEUR (mm) LONGUEUR (mm) STITCH STITCH ANCHO LARGO ANCHO LARGO POINT POINT AUTO MANUAL AUTO MANUAL AUTO MANUAL...
- Page 94 ENGLISH / FRANÇAIS / ESPAÑOL © Part No. 82034 7/06...
- Page 95 7430 INSTRUCTION MANUAL MANUEL D’INSTRUCTION MANUAL DE INSTRUCCIONES...
-
Page 96: Important Safety Instructions
If the plug does not fit fully in the outlet, reverse the plug. If it still does not fit, contact a qualified electrician to install the proper outlet. Do not modify the plug in any way. This appliance complies with EEC Directive 89/336/EEC covering the electromagnetic compatibility. is a registered trademark of The Singer Company Ltd or its affiliates. Copyright 2005...