Table of Contents
Advertisement
Advertisement
Table of Contents

Related Manuals for White Superlock 834DW


Summary of Contents for White Superlock 834DW
- Page 3 if it if it if it...
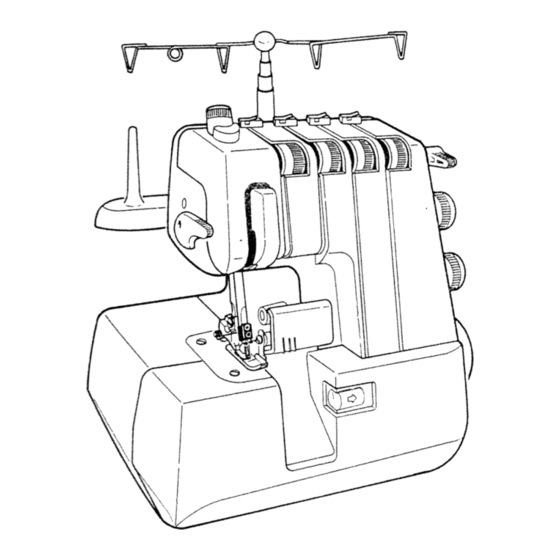
- Page 7 2. OPERATION AND FUNCTION OF PARTS Handwheel Always turn handwheel toward you. Changing Presser Foot ± Switch off the machine. Attaching 1. Raise presser foot. 2. Raise needles to their highest position by turning handwheel toward you. Re movi n ç 3.
- Page 10 3-2. Setting Telescopic Thread Stand Extend the telescopic thread stand to its full height, then turn it until the shaft clicks into its locked position. 3-3. Changing Threads Cut thread Tie threads The machine is supplied with thread but the follow ing is an easy way to change them: (1) Cut the thread in use near the cone spool (behind the telescopic thread stand).
- Page 13 —...
- Page 14 (3) Needle Threading (C) (D). For ease in threading, turn the moveable cutter to the non-operating position. (See Page 3). 1. Raise the needles to their highest position. 2. Draw thread from spool and pass it through guide®. © 3. Lay thread between thread tension discs while pressing down the tension release lever.
- Page 17 Left Needle Right Needle Upper Lower THREAD Looper Loope TENSiON STITCH CUTTING STITCH ‘j3l ‘f3l PTT;:NN LENGTH WIDTH FINGER STITCHES NORMAL OVERLOOK 2.5-5 mm 5-6 mm POSITION PULL LEVER ROLLED EDGE 1-1.5 mm 5-6 mm — TOWARD PULL LEVER NARROW EDGE 1-1.5 mm 5-6 mm —...
- Page 20 ADJUSTING BALANCE OF STITCH WIDTH AND CUTTING WIDTH Adjust the cutting width from 5.2(0.2”) to 7.0mm (0.28”) according to the kind of material. The standard cutting width is 5.5mm (0.21”). Open the front cover to adjust the cutting width. (1) If the cutting width is narrower than the stitch width, leaving loops off the fabric edge, turn the cutting width adjusting dial to the direction of arrow.
- Page 21 —...
- Page 23 SEWING FOR CURVED SEAMS For a neat and clean finish of curved seams: For inside curves, guide the fabric gently with the trimming line of the fabric under the right front of the presser foot, applying pressure to the fabric with your left hand, at the same time, apply a little pressure in the opposite direction with your right hand to hold it against the cutter as shown.
- Page 24 10. THREE THREAD OVERLOCK STITCH USING I NEEDLE Though this machine is made mainly for 4 thread stitch overlock using 2 needles. ,jjj1, To sew three-thread stitch overlock using 1 needle simply remove 1 needle. (1) By removing the right needle. l lJi, Three-thread overlock stitch using 1 needle for as wde as a 4-thread overlock stitch using 2 needles...
- Page 25 EJ of...
- Page 26 — — — — — — • — — — — — — — — — — — — — — —...
- Page 29 isDARD CHART FOR ROLLED EDGE (3-Thread Rolled Edge) ROLLED NARROW EDGE EDGE CUflING WIDTH 5-6 mm 5-6 mm STITCH LENGTH 1-1.5 mm 1-1 5 mm DIFFERENTIAL FEED RATIO © RIGHT NEEDLE THREAD THREAD UPPER OOER TENSION THREAD LOWER LOOPER THREAD + Adjust as needed according to the kind of the fabric and the threads.
- Page 30 Pin tucks are overlocked on the edge. Use the cutter as a guide but do not cut your fabric. Pin tucking is suited to the design of a child’s clothing and a lady’s blouse. (1) Remove the left or right needle for your desired pintuck width.
- Page 31 14. REPLACING LOWER CUTTER Replacing Lower Cutter Align Unplug the machine .ower cutter holder (1) Open front cover and disengage upper cutter. (See page 3) (2) Loosen lower cutter clamp screwJand remove lower cutter. (3) Set the new lower cutter. cutter Align the top of lower cutter with the top of needle plate, and tighten lower cutter clamp...
- Page 33 ..
- Page 34 18. TABLE OF SEWING MATERIALS, NEEDLES AND THREADS Thin material Medium to thick Thick material (crepe, georgette) material (thick denim) (Broadcloth, gabardine, etc.) Needle SCHMETZ 80—90 130/705H (For home-use sewing machine) Poluester(spun, filament) #60/2 Twisted thread #60/2 Twisted thread #50/2 Twisted thread #80/2 twisted thread 60/2 twisted thread —...
- Page 36 —...