Table of Contents
Advertisement
Advertisement
Table of Contents

Related Manuals for Honda EW140


Summary of Contents for Honda EW140
- Page 2 The generator/welder is a potential source of electrical shock if misused. Do not expose the generator/welder to moisture, rain or snow. Do not let the gelierator/welder get wet, and do not operate it with hands.
- Page 3 The illustrations in this manual are based on the EW 171 generator/welder. Honda Motor Co., Ltd. reserves the right to make changes at any time without notice and without incurring any obligation.
-
Page 4: Table Of Contents
CONTENTS CONTENTS 1. GENERATOR/WELDER SAFETY .................... 2. COMPONENT IDENTIFICATION 3. PRE-OPERATION CHECK ....................4. STARTING THE ENGINE ....5. GENERATOR/WELDER OPERATION ........6. STOPPING THE ENGINE ..............‘.......... High altitude operation ..............7. MAINTENANCE ........... - Page 5 1. GENERATOR/WELDER SAFETY TO ENSURE SAFE OPERATION Place the generator/welder on a firm, level surface; avoid loose sand or snow. If the generator/welder is tilted or overturned, fuel spillage and a fire may result. To prevent fire hazards and to provide adequate ventilation, keep the...
- Page 6 Gasoline extremely flammable is explosive under certain conditioris. Refuel in a well-ventilated area with the engine stopped. Do not smoke or allow flames or sparks in the refueling area or where gasoline stored. Do not overfill the fuel tank. After refueling, make sure the ta,nk cap is closed...
- Page 7 Read these labels before you operate the generator/welder.
- Page 8 NO LO USE EN LUGARES CERRAOOS POROUE ELMONOXIOE...
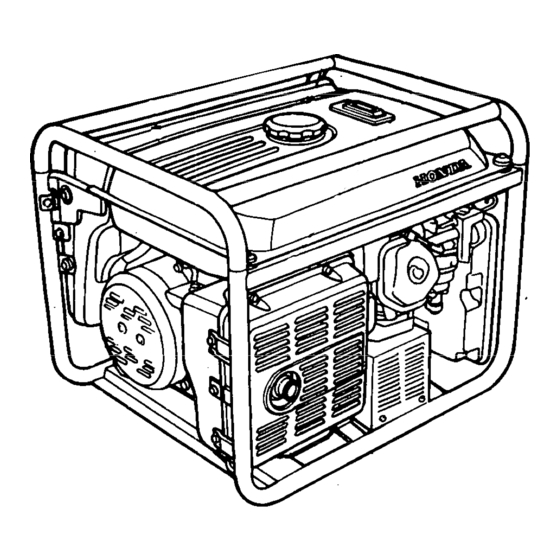
- Page 9 2. COMPONENT IDENTIFICATION WELDING CURRENT FUEL GAUGE FUEL jANK ADJ;;ETMENT KNOB ENGINE 9WlTCH CIRCUIT BREAKER WELDING/AC SELECTOR AC RECEPTACLES AIR ’ CLEANER ENGINE OIL FILLER CAP RECOIL STARTER GRIP AUTO THdOTTLE ENGINE OIL DRAIN PLUG SWITCH...
- Page 10 SPARK PLUG ‘_...
- Page 11 Nondetergent oils, castor-based oils, and 2-stroke oils are nor recommended because they have inadequate lubricating characteristics. Honda 4-stroke oil, equivalent high detergent, premium quality motor oil certified to meet or exceed U.S. automobile manufac- requirements Service turers’...
- Page 12 Iqad, change brands of gasoline. If spark knock pinging persists, consult your authorized Honda dealer. Failure to do so is considered misuse, and damage caused by misuse is not covered’ Honda’s LiMited -Warranty. Occasionally yoti’may experience light spark knock while operating under.
- Page 13 ALCOHOL If you decide to use a gasoline containing alcohol (gasohol), be sure it’s octane rating is at least as high as that recommended by Honda. There are two types of “gasohol”: one containing ethanol, and the other containing methanol.
- Page 14 Air Cleaner Check the air cleaner element to be sure it is clean and in good condition. Clean or replace the element if necessary (page 31). CAUTION: Never run the engine without the air cleaner. Rapid engine wear will result from contaminants, such as dust and dirt, being drawn through the carburetor,...
-
Page 15: Starting The Engine
3. STARTING THE ENGINE 1. Make sure that the AC circuit breaker is in the OFF position, and that there are no welding cables attached to the DC terminals. The generator may be hard to start if a load is connected. AC CIRCUIT BREAKER 2. - Page 16 3. Pull the choke rod to the CLOSE position. NOTE: Do not use the choke if the engine is warm or the air temperature high. CHOKE ROD 4. Make sure the autp-throttle switch is OFF, or more time will be required for warm-up.
- Page 17 5. Move the engine switch to the ON position. ENGINE 6. Pull the starter grip until compression is felt, then pull briskly. CAUTION: Do not allow the starter grip to snap back against the engine. Return it gently to prevent damage to the starter or housing.
- Page 18 7. Push the choke rod to the OPEN position as the Engine warms up. CHOKE 8. If you wish to use the au&-throttle system, turn the auto-throttle switch to the AUTO position after the engine has warmed up for 2 or 3 minutes. AUTO-THROTTLE SWITCH...
- Page 19 5. GENERATOR/WELDER OPERATION Connections for standby power to a building’s electrical system must be made by a qualified electrician and must comply with all applicable laws and electrical codes. Improper connections can allow electrical cur- rent from the generator to backfeed into the utility lines.
- Page 20 Oil Alert System The Oil Alert system is designed to prevent engine.damage caused by an in- sufficient amount of oil in the crankcase. Before the oil level in the crankcase can fall below a safe limit, the Oil Alert system will automatically shut down the engine (the engine switch Grill remain in the ON position).
- Page 21 AC operation 1. Start the engine. 2. Turn the AC/DC (Weld) selector switch to AC position. CAUTION: Under no circumstances should any type of electrical appliance be plugged into any of the AC receptacles when the selector is in the DC (WELD) position.
- Page 22 WELDING Welding is potentially a very hazardous activity. It should only be attempted by a trained welder with a thorough knowledge of proper welding techniques and safety procedures. Be sure to read and follow safety rules on pages 3.4 and 5 of this manual. ,l : Put the Engine Switch in the OFF position.
- Page 23 2. Connect the welding cables-to the welder’s DC terminals (See page 24 and 25). CAUTION: Failure to use the proper gauge cable may lead to painful burns and/or damage to equipment. See table on page 24. 3. Start the engine and when it has warmed up fully, turn the Auto-Throttle Switch to the AUTO position.
- Page 24 4. Turn the AC/DC (WELD) Selector to the DC (WELD) position. CAUTION: To avoid accidental arcing, one cable end should be firmly attached the object fo be welded, ahd the electrode holder at the end of the other cable should be held in the operator’s hand when the DC (WELD) selec- tor is turned...
- Page 25 5. Set the current adjustment knob to the proper current level for the job being done (See page 24).
- Page 26 SELECTING THE CORRECT WELDING CURRENT Measure the thickness of the metal you are welding and then refer to the table below to select the proper electrode size and current setting. CURRENT ELECTRODE DIAMETER PLATE THICKNESS IN INCHES SETTING IN INCHES 50- 100 UPTO 3/16...
- Page 27 POLARITY SELECTION welding terminals are labeled, “+” (positive) and “-” (negative). Changing the polarity of the cables will affect the weld. The correct polarity selection is dependent on the type of electrode you are using and the type of material you are welding;...
- Page 28 &6. STO~SPING THE #GINE NOTE: To stop the engine in, an emergency, turn the engine switch to the off position. In normal use: 1. Moie the AC circuit breaker to the OFF position. AC CIRCUIT BREAKER 2. Move the engine switch to the OFF position. ENGIN;...
- Page 29 If you always operate the generator/welder at altitudes higher than 6,000 feet. above sea level, ask your authorized Honda Generator/Welder dealer perform these carburetor modifications. Even with suitable carburetor jetting, engine horsepower...
-
Page 30: Maintenance
Exhaust contains poisonous carbon monoxide gas; exposure may cause loss of consciousness and may lead to death. CAUTION: only genuine HONDA parts or their equivalent maintenance ‘or repair. Replacement parts which are not of equivalent quality may damage the generator/welder. - Page 31 (Replace if necessary) NOTE: (1): Service more frequently when used in dusty areas. (2): These items should be serviced by an authorized Honda dealer, unless the owner has the proper tools and is mechanically proficient. See the Honda Shop Manual.
- Page 32 Changing Drain the oil while the engine is still warm to assure rapid and complete draining. 1. Remove the oil filler cap and drain plug to drain the oil. 2. Install the drain plug, and tighten it securely. 3. Refill with the recommended oil (see page 81, and check the oil level.
- Page 33 Air Cleaner Service A dirty air cleaner will’restrict air flow to the carburetor. To prevent car- buretor malfunction, service the air cleaner regularly (page 29). Service more frequently when operating the generator/welder in extremely dusty areas. Never use gasoline or low flash point solvents for cleaning air cleaner element.
- Page 34 2. Wash the element in a solution of household detergent and warm water, then rinse thoroughly, or wash in nonflammable or high flash point sol- vent. Allow’the element to dry thoroughly. 3. Soak the element in clean engine oil and squeeze out the excess oil. The engine will smoke during initial start-up if too much oil is left in the element.
- Page 35 Sediment Cup Cleaning The sediment cup prevents dirt or water which may be in the fuel tank from entering the carburetor. If the engine has not been run for a long time, the sediment cup should be cleaned. 1. Turn the fuel valve to the OFF position. Remove the sediment cup. 2.
- Page 36 Spark Plug Service Recommended spark plug: BPR-5ES (NGK) W 1 GEPR-U (ND) To ensure proper engine operation, the spark plkrg must be properly gap- ped and free of deposits. -If the engine has been running, the muffler will be very hot. Be caieful not to touch the muffler.
- Page 37 6. Check that the spark plug washer is in good condition, and thread the spark plug in by hand to prevent cross-threading. 7. After the spark plug is seated, tighten with a spark plug wrench to com- press the washer. NOTE: If installing a new spark plug, tighten l/2 turn after the spark plug seats to compress the washer.
- Page 38 Spark Arrester Maintenance This generator/welder is equ!ipped with a U.S.D.A. qualified spark arrester which requires periodic maintenance to ensure its effectiveness. It is illegal in some areas to operate an engine w’ithout a spark arrester; check local laws and regulations. The muffler becomes very hot during operation...
-
Page 39: Transporting/Storage
8. TRANSPORTING/STORAGE To prevent severe burns or fire hazards, let the engine cool before transporting the generator/welder or storing it indoors. When transporting the generator/welder, turn the engine switch and the fuel valve to the OFF position, and keep the generator/welder level prevent fuel spillage. - Page 40 d. Drain the carburetor by loosening the drain screw. Drain the gasoline into a suitable container. Gasoline is extremely flammable an.d is explosive under certain conditions. Perform this task in a well-ventilated area with the engine stop- ped. Do not smoke or allow flames or sparks...
- Page 41 Perform this test in a well-ventilated area. e. If there are no sparks, replace the plug. f. If the new spark plug does not spark, take the generator to an authorized Honda dealer. OIL ALERT LAMP ENGiNE SWITCH...
- Page 42 Perform this test in a well-ventilated area. 7. If the engine still does not start, take the generator to an authorized Honda dealer. B. When the’engine starts but stopsimmediately; 1. Check the oil-alert lamp. If the oil alert lamp flashes when the starter is pulled, check the engine oil level and fill with the recommended oil.
-
Page 43: Specifications
IO. SPECIFICATIONS Dimensions EW140 EW171 Model Power product description code ,Length Width Height 630 x 675 x 510 x490 (24.8 x 19.5 x 19.1 (26.6 x 20.1 x 19.3 74 kg (163.1 Dry weight 92 kg (202.8 Engine GX240 GX340 Engine Type (20.6... - Page 44 11. WIRING DlAGWEiM EW1401171...
-
Page 45: Wheel Kit Installation (Optional Parts)
12. 4-WHEEL KIT INSTALLATION (optional parts) 1. Install the wheels on the axle shafts. 2. Install the axle assemblies on the generator using eight bolts and nuts, as shown. NOTE: The shaft with the wheel stopper goes on the engine side. 2-WHEEL AND HANGER KIT (optional parts1... - Page 46 Your purchase of a Honda product is greatly appreciated by both your dealer and American Honda Motor Co., Inc. We want to assist you in every way possible to assure your complete satisfaction with your purchase.
- Page 47 When you write or call, please provide the following information: • Model and serial numbers • Name of the dealer who sold the Honda power equipment to you • Name and address of the dealer who services your equipment •...