HP iPAQ rx4200 - Mobile Media Companion Product Information Manual
Hp ipaq product information guide
Hide thumbs
Also See for iPAQ rx4200 - Mobile Media Companion:
- Overview (10 pages) ,
- User manual (101 pages)
Table of Contents
Advertisement
Quick Links
Download this manual
See also:
User Manual
Advertisement
Table of Contents

Related Manuals for HP iPAQ rx4200 - Mobile Media Companion


Summary of Contents for HP iPAQ rx4200 - Mobile Media Companion
- Page 1 HP iPAQ Product Information Guide...
- Page 2 All other product names mentioned herein may be trademarks of their respective companies. Hewlett-Packard Company shall not be liable for technical or editorial errors or omissions contained herein. The information is provided “as is” without warranty of any kind and is subject to change without notice.
-
Page 3: Table Of Contents
Table of contents HP iPAQ Product Information Guide Frequently Asked Questions ..................1 Box Contents ......................2 Getting Started CD Contents ..................3 Finding More Information ................... 4 Components ......................5 Top Components ....................5 Back Panel Components ................... 6 Left and Right Side Components ............... - Page 4 Windows Media Player 10 Mobile ..............26 Listening to Music and Watching Videos ..........27 Clearing the Now Playing List ..............28 Updating a Library ................... 28 HP Photosmart Mobile ..................28 Attaching a Voice Note to a Picture ............29 E-mailing Pictures ..................
- Page 5 Obtaining Services for a Cracked or Damaged Screen ........... 47 Additional Guidelines for Using Your HP iPAQ ............47 Index ..........................48 ENWW...
-
Page 7: Hp Ipaq Product Information Guide Frequently Asked Questions
HP iPAQ Product Information Guide Frequently Asked Questions How Do I… Find information here… Install Microsoft ActiveSync and create an Synchronization on page 11 ActiveSync partnership? Troubleshoot ActiveSync? Troubleshooting Help for Synchronization Issues on page 13 Locate the serial and model number for my HP Finding the Serial Number and Model iPAQ? Number on page 16... -
Page 8: Box Contents
Box Contents This illustration depicts the items that come in the box with your HP iPAQ. Use this illustration to become more familiar with your new device. NOTE Box contents vary by model. Box Contents Removable clip cover HP iPAQ Stylus Getting Started CD with special software HP iPAQ Product Information Guide... -
Page 9: Getting Started Cd Contents
Box Contents 1,200 mAh Li-Ion removable/rechargeable battery HP iPAQ documentation Wired stereo headset 1, 2 Mini-USB synchronization cable AC adapter with interchangeable plug Wired stereo headset is not included with all models. Listening to personal stereo equipment at full volume for long periods can damage hearing. In order to reduce the risk of hearing loss, decrease the amount of time listening to personal stereo equipment at full volume. -
Page 10: Finding More Information
NOTE All current Microsoft operating systems are supported by ActiveSync 4.1, except Windows 98SE and Windows ME. Finding More Information For information on… See this source… Using your HP iPAQ Additional Product Information on the Getting Started CD. Connecting to and synchronizing with a ActiveSync Help on your computer. -
Page 11: Components
Components NOTE Not all models or features are available in all regions. Top Components Component Function ● Wireless LED Indicator Flashing blue LED—WLAN or Bluetooth is on. ● LED off—WLAN and Bluetooth are off. Reset Button Press with the stylus to perform a soft reset of your HP iPAQ. -
Page 12: Back Panel Components
Back Panel Components Component Function Speaker Use the speaker to listen to audio. Battery Cover Remove to install or remove the battery. Stylus Use to input information: ● Slide out to remove the stylus. ● Slide in to replace the stylus. HP iPAQ Product Information Guide ENWW... -
Page 13: Left And Right Side Components
Left and Right Side Components Component Function Internal WLAN Antenna Transmits and receives WLAN signals. Charging/Communications Connects to mini-USB synchronization cable. Port Headset Connector Plug the headset into this connector to listen to music. Stylus Use to input information: ● Slide out to remove the stylus. -
Page 14: Setting Up Your Hp Ipaq
Component Function Scroll Wheel Roll the scroll wheel to move through documents and Web pages. Press the scroll wheel to make a selection. Microphone Speak into the microphone to record voice notes. OK Button Press to close the current window or application. Press and hold to launch Calendar. -
Page 15: Step 2: Charge The Battery
Step 2: Charge the battery CAUTION To avoid damaging your HP iPAQ or the AC adapter, be sure all connectors are properly aligned before connecting. The battery provides power for your HP iPAQ to operate. Your HP iPAQ comes with a mini-USB synchronization cable, which must be used to charge the device. -
Page 16: Step 4: Follow The On-Screen Instructions On Your Personal Computer
Step 4: Follow the on-screen instructions on your personal computer The HP Install Wizard installs: ● Microsoft ActiveSync ● Other optional software applications Microsoft ActiveSync Connect your HP iPAQ when instructed. Connect the USB end of the synchronization cable to a USB port on your personal computer. -
Page 17: Step 5: Complete The Setup Wizard On Your Hp Ipaq
Step 5: Complete the Setup Wizard on your HP iPAQ When turning on your HP iPAQ for the first time, follow the instructions on the screen. Use the stylus to enter information. (See the product component illustrations for the location of the stylus.) Step 6: Synchronize your HP iPAQ with your personal computer Synchronization... - Page 18 To synchronize your HP iPAQ and a personal computer using the mini-USB synchronization cable: Be sure ActiveSync 4.1 or later is installed on your personal computer. Plug the USB end of the synchronization cable into your personal computer. Connect the mini-USB end on the synchronization cable to the charging/ communications port on your HP iPAQ.
-
Page 19: Changing The Activesync Connection Mode
Changing the ActiveSync Connection Mode You can change the type of ActiveSync connection being used between your HP iPAQ and your PC (personal computer) to meet your specific needs. You should use USB Serial Sync Mode if you: ● Are having general problems with the ActiveSync connection between your HP iPAQ and your personal computer. - Page 20 ● Synchronization has been established between your HP iPAQ and personal computer but connection is dropped. (The green icon on your personal computer stops spinning and grays out.) ● Firewall or other network protection software message box is displayed for ActiveSync to access the network or Internet. If you experience difficulty while synchronizing your HP iPAQ and personal computer, try the following solutions to troubleshoot any synchronization issues:...
- Page 21 ● Click Tools > Options > Sync Options tab. ● Uncheck the boxes for the sync items listed under the Server group. ● Place a checkmark in the boxes under the Desktop group for those items to synchronize. ● Disconnect your HP iPAQ from your personal computer and wait for the ActiveSync message confirming that your device is no longer connected.
-
Page 22: Protecting Your Hp Ipaq With A Password
synchronized properly, go to ActiveSync on your personal computer and select Tools > Add/Remove Programs and select any programs to reinstall. Protecting Your HP iPAQ with a Password Keep your data more secure by requiring a password every time you turn on your HP iPAQ. -
Page 23: Resetting Your Hp Ipaq
Resetting Your HP iPAQ Perform a reset if your HP iPAQ stops responding. The two types of resets are soft and factory. Performing a Soft Reset A soft reset stops all running applications, but does not erase any programs or saved data. NOTE Be sure to close all running applications before performing a soft reset. -
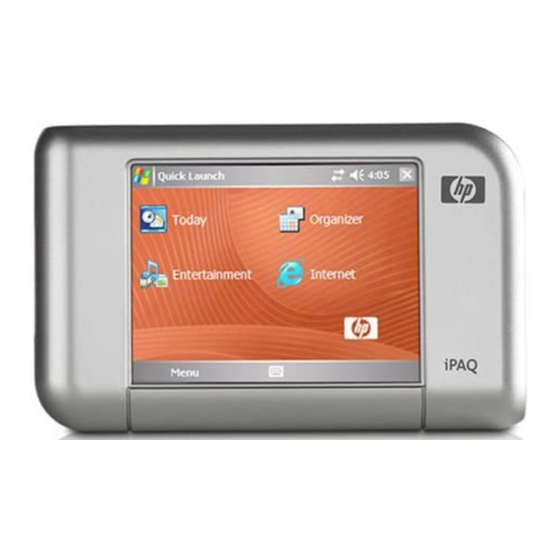
Page 24: Hp Quick Launch
HP Quick Launch HP Quick Launch is a simple way to open the most frequently used programs on your HP iPAQ. ● Tap the Today icon to access the Today screen. ● Tap the Entertainment icon to access entertainment applications like Windows Media Player 10 Mobile for music and videos, Photosmart Mobile, and games. -
Page 25: Status Icons
To customize the Today screen: Tap Start > Settings > Today. On the Appearance tab, select the desired theme for the background of the Today screen. On the Items tab, select the items to appear on the Today screen. TIP To change the order of items displayed on the Today screen, tap the item, and tap Move Up or Move Down. -
Page 26: Ipaq Wireless
Icon Status Microsoft ActiveSync is synchronizing. Speaker is on. Speaker is off (or in mute position). Battery power is low. Battery power is very low. E-mail has been received. Instant messages received. iPAQ Wireless Tap Start > Today > iPAQ Wireless or tap the iPAQ Wireless icon on the Today screen to launch iPAQ Wireless, which provides a control center to turn all wireless activities (WLAN and Bluetooth) on and off, and to configure their settings. -
Page 27: Checking The Battery Charge Level
Icon Status Bluetooth is on. Bluetooth is off. The iPAQ Wireless screen has two power buttons to turn wireless features on and off. The WLAN and Bluetooth tabs allow you to access each wireless activity individually. Configure wireless connections by tapping View WLAN Networks on the WLAN tab or Bluetooth Settings on the Bluetooth tab. -
Page 28: Entering Text
● Keep Wireless Features Off – Always turn off the WLAN and Bluetooth power when they are not in use. Tap Start > Today > iPAQ Wireless, and then tap the WLAN or Bluetooth button to turn the features off. ●... -
Page 29: Entering Text Using Block Recognizer
Text Input Method Definition Block Recognizer Use a single stroke to write letters, numbers, symbols, and punctuation that are then converted into typed text. Perform gestures to enter Return and Backspace. Keyboard Tap keys displayed on the on-screen keyboard to enter text. Letter Recognizer Write individual letters, numbers, and punctuation that are converted into typed text. -
Page 30: Entering Text Using The On-Screen Keyboard
TIP For help with writing characters with Block Recognizer, tap the question mark near the writing area. Entering Text Using the On-screen Keyboard NOTE Some text entry methods are not supported in all languages. In addition, some languages may support alternate text entry methods. -
Page 31: Entering Text Using Letter Recognizer
Entering Text Using Letter Recognizer NOTE Some text entry methods are not supported in all languages. In addition, some languages may support alternate text entry methods. From any program, tap the Input Selector arrow, and then Letter Recognizer. Write characters, numbers, and symbols in the designated writing area. ●... -
Page 32: Entertainment
To write with Transcriber: From any program, position the cursor where you want the text to appear. Use the stylus to write anywhere on the screen. The handwriting is converted to text shortly after you lift the stylus from the screen. -
Page 33: Listening To Music And Watching Videos
With this new version: ● Synchronize music, playlists, videos, and recorded TV to your HP iPAQ for enjoyment on the go. ● Automatically convert video and recorded TV during synchronization to an optimized- and size-reduced format for better viewing on your HP iPAQ. -
Page 34: Clearing The Now Playing List
NOTE To play a file stored on your HP iPAQ but that is not in a library, on the Library screen, tap Menu > Open File. Tap and hold the item that you want to play (such as a file or a folder) and then tap Play or Queue Up. -
Page 35: Attaching A Voice Note To A Picture
● View a slideshow. ● Send pictures by e-mail attachments. ● Associate a picture with a Contact. ● Assign a picture to the Today screen background. Attaching a Voice Note to a Picture To attach a sound file to a picture: Tap Start >... -
Page 36: Viewing A Slideshow
Tap the Reduce sent photo size to check box and select the reduction percentage desired. Tap Next. Enter the appropriate e-mail address or use Contacts by tapping Menu > Add Recipient. Enter other appropriate information, such as an e-mail title and message. Tap Send. -
Page 37: Calendar
With these applications: ● Manage contacts and calendar. ● Send and receive e-mail. ● Browse the Internet. ● Open and view slide show presentations. ● Create and edit documents and templates. ● Create and edit Excel workbooks and more. To access these productivity tools and learn more about the features, tap Start >... -
Page 38: Viewing Appointments
TIP To quickly view today’s agenda, on the Today screen, tap one of your upcoming appointments. Viewing Appointments To view an appointment on your calendar: Tap Start > Calendar. Tap the appointment to view. To view appointments for the week: Tap Start >... -
Page 39: Sending A Meeting Request
Sending a Meeting Request Use Calendar to schedule meetings via e-mail with contacts who use Outlook or Outlook Mobile. To send a meeting request: Tap Start > Calendar. Schedule a new appointment, or open an existing one and tap Edit. Tap Attendees. -
Page 40: Creating A Contact
If you use Outlook on your computer, synchronize contacts between your HP iPAQ and your personal computer. Creating a Contact Tap Start > Contacts. Tap New and enter the contact information. When finished, tap OK. NOTE If your contact list has been filtered by a category when you create a contact, that category is automatically assigned to the new contact. -
Page 41: Finding A Contact
Finding a Contact To find a contact on a long list: Tap Start > Contacts. If you are not in Name view, tap Menu > View By > Name. Do one of the following: ● Begin entering a name or phone number in the provided text box until the contact is displayed. -
Page 42: Locating A Task
Locating a Task When the task list is long, display a subset of the tasks or sort the list to quickly find a specific task. Tap Start > Programs > Tasks. In the task list, do one of the following: ●... -
Page 43: Setting Up An E-Mail Account On An Exchange Server
NOTE Some of the messaging applications may vary and are available only on select HP iPAQ models. Setting up an E-mail Account on an Exchange Server Synchronize directly with an Exchange Server using a connection to a wireless network or a personal computer. To set up e-mail on an Exchange server: Tap Start >... -
Page 44: Setting Up A Pop3, Http, Or Imap4 E-Mail Account
Select the check boxes for the types of information items that you want to synchronize with Exchange Server. 10. To change available synchronization settings, select the type of information and tap Settings. 11. Tap Finish. You can set up your HP iPAQ to synchronize with Exchange Server over a wireless network or through a cable or Bluetooth connection to a personal computer. -
Page 45: Composing And Sending Outlook E-Mail Messages
Once Auto configuration has finished, tap Next. Enter your name (the name you want displayed when you send e-mail) and your password. If Auto configuration is successful, your user name is already entered. Tap Next, then Finish to complete setting up your account, or tap Options to access additional settings. -
Page 46: Replying To Or Forwarding An Outlook E-Mail Message
To check spelling, tap Menu > Spell Check. Tap Send. If you are working offline, your message is moved to the Outbox folder and is sent the next time you connect. NOTE Tap the Inbox drop-down arrow to access other Outlook folders such as Drafts, Outbox, and Sent Items. -
Page 47: Word Mobile
Before connecting to the Internet, setting up a wireless connection or network card, obtain the following: ● Internet Service Provider (ISP) or wireless service provider ● ISP server phone number or access point ● User name and password To access Internet Explorer Mobile, tap Start > Internet Explorer. Word Mobile You can create and edit documents and templates in Word Mobile. -
Page 48: Powerpoint Mobile
To access Excel Mobile, tap Start > Programs > Excel Mobile. PowerPoint Mobile Use PowerPoint Mobile to open and view slide show presentations created on your computer. With PowerPoint Mobile: ● Open a presentation from an e-mail message. ● Download a presentation from a file share or the Internet. ●... -
Page 49: Turning Wlan On Or Off
● Use virtual private networks (VPNs) for secure remote access ● Use hotspots for wireless connectivity Turning WLAN On or Off To turn WLAN on or off: Tap Start > Today > iPAQ Wireless. Tap the WLAN icon on the iPAQ Wireless screen. When WLAN is on: ●... -
Page 50: Configuring Network Security Settings
Configuring Network Security Settings A wireless network can be added when the network is automatically detected. Or, manually enter the settings information to add the network. To determine if authentication information is needed, check with your Network Administrator or Hotspot Service Provider. Tap Start >... -
Page 51: Turning Bluetooth On Or Off
TIP Your HP iPAQ may include additional Bluetooth features. For more information, refer to Additional Product Information located on the Getting Started CD. Turning Bluetooth On or Off To turn on Bluetooth: Tap Start > Today > iPAQ Wireless. On the iPAQ Wireless screen, tap the Bluetooth icon. When Bluetooth is turned on, the wireless LED on your HP iPAQ flashes blue. -
Page 52: Protecting The Hp Ipaq Screen From Cracking Or Damage
Protecting the HP iPAQ Screen from Cracking or Damage CAUTION The screen of your HP iPAQ is made of glass and can be damaged or broken by drops, impacts, or pressure. To reduce the risk of damage to the internal components, do not spray liquid directly on the screen, or allow excess liquid to drip inside your HP iPAQ. -
Page 53: Additional Guidelines For Using Your Hp Ipaq
Obtaining Services for a Cracked or Damaged Screen NOTE HP is not responsible for damage that occurs as a result of failure to follow the instructions that came with the HP branded product. Refer to the warranty document included with your HP iPAQ for more information. - Page 54 Index AC adapter 3 Calendar ActiveSync 3, 10, 11, 13 appointments 32 Antennae Today screen 31 Bluetooth 8 today's agenda 31 WLAN 7 view 32 Appointments 32 CD, Getting Started 2 Charging/communications port 7 Command bar, icons 19 Component illustrations 5, 6, 7 Back components 6 Components Battery...
- Page 55 playing games 26 printing pictures 28 playing music and videos 26 sending pictures 29 viewing pictures 28 viewing a slideshow 30 watching videos 27 viewing pictures 28 Windows Media Player 10 Mobile 26 Internet Explorer Mobile 40 Excel Mobile 41 iPAQ Wireless Exchange Server 36, 37 Bluetooth 45...
- Page 56 Scroll wheel 5, 8 OK button 8 SD slot 5 Outlook e-mail 36 Serial number, location 16 Services for cracked or damaged screen 47 HP Customer Support, contacting 47 Password Setup instructions 8 change or reset 16 Side components 7 hint 16 Soft reset 17 Photos...
- Page 57 messaging 18 volume 18 Top components 5 Transcriber 25 Windows Media Player 10 Mobile listening to music 27 Now Playing list 28 updating library 28 watching videos 27 Windows Media Player button 8 Wired stereo headset 3 WLAN antenna 7 authentication 44 iPAQ Wireless 43, 44 LED 5, 43...