Brother PT 7600 - P-touch EDGE 7600 B/W Thermal Transfer Printer User Manual
Electronic labeling system
Hide thumbs
Also See for PT 7600 - P-touch EDGE 7600 B/W Thermal Transfer Printer:
- User manual (103 pages)
Table of Contents
Advertisement
Available languages
Available languages
Quick Links
USER´S GUIDE
USER´S GUIDE
GUÍA DE USUARIO
GUÍA DE USUARIO
• Read this User's Guide before you start using your P-touch labeler.
• Keep this User's Guide in a handy place for future reference.
• Lea este manual de instrucciones antes de emplear la etiquetadora P-touch.
• Guarde esta guía de usuario para futuras referencias.
7500/7600
www.brother.com
Advertisement
Chapters
Table of Contents

Related Manuals for Brother PT 7600 - P-touch EDGE 7600 B/W Thermal Transfer Printer


Summary of Contents for Brother PT 7600 - P-touch EDGE 7600 B/W Thermal Transfer Printer
- Page 1 7500/7600 USER´S GUIDE USER´S GUIDE GUÍA DE USUARIO GUÍA DE USUARIO • Read this User’s Guide before you start using your P-touch labeler. • Keep this User’s Guide in a handy place for future reference. • Lea este manual de instrucciones antes de emplear la etiquetadora P-touch. •...
- Page 2 USER’S GUIDE...
- Page 3 PT-7600 Federal Communications Commission (FCC) Declaration of Conformity (For USA Only) Responsible Party : Brother International Corporation 100 Somerset Corporate Boulevard Bridgewater, NJ 08807-0911 USA TEL : (908) 704-1700 declares that the product Product Name : Brother P-touch Electronic Labeling System...
-
Page 4: Compilation And Publication Notice
PT-7500 FCC NOTICE This device complies with Part 15 of the FCC Rules. Operation is subject to the following two conditions: (1) this device may not cause harmful interference, and (2) this device must accept any interference received, including interference that may cause undesired operation. This equipment has been tested and found to comply with the limits for a Class B digital device, pursuant to Part 15 of the FCC Rules. - Page 5 ® Brother Two-Year Limited Warranty and Replacement Service (USA Only) Who is covered: • This limited warranty (“warranty”) is given only to the original end-use/retail purchaser (referred to in this warranty as “Original Purchaser”) of the accompanying product, consumables and accessories (collectively referred to in this warranty as “this Product”).
- Page 6 What Brother will do: If the problem reported concerning your Machine and/or accompanying Consumable and Accessory Items is covered by this warranty and if you first reported the problem to Brother or an Authorized Service Center within the applicable warranty period, Brother or its Authorized Service Center will repair or replace the Machine and/or accompanying Consumable and Accessory Items at no charge to you for parts or labor.
- Page 7 Limitations: Brother is not responsible for damage to or loss of any equipment, media, programs or data related to the use of this Product. Except for that repair or replacement as described above, Brother shall not be liable for any direct, indirect, incidental or consequential damages or specific relief. Because some states do not allow the exclusion or limitation of consequential or incidental damages, the above limitation may not apply to you.
-
Page 8: Important Information
Supplies/Accessories www.brothermall.com or 1-877-552-MALL (6255) BROTHER INTERNATIONAL CORPORATION 100 SOMERSET CORPORATE BLVD. BRIDGEWATER, NEW JERSEY 08807-0911 Please record your model and serial number and your date and location of Purchase below for your records. Keep this information with your proof of purchase (bill of sale) in case your Product requires service. -
Page 9: Safety Precautions
Before Using Your P-touch Labeler Thank you for purchasing the PT-7500/7600. Your new P-touch labeler is an easy to operate, feature packed labeling system that makes creating professional, high quality labels a breeze. In addition to easy label creation via pre-formatted label layouts, the P-touch labeler editing software features advanced label formatting, block formats, bar codes and auto-numbering functions. - Page 10 WARNING Rechargeable battery pack (for PT-7600 only) Follow these guidelines to avoid fire, heat, damage, and electric shock. Do not use this P-touch labeler with any Do not allow the rechargeable battery pack rechargeable battery pack other than that to get wet. specified.
- Page 11 WARNING Batteries (Alkaline/Rechargeable) Follow these guidelines to avoid leakage, or damage to the batteries. Do not use metallic articles, such as If the batteries leak, make sure the fluid does tweezers or a metallic pen, when not come into contact with your eyes, as this exchanging the batteries.
- Page 12 CAUTION Tape Cutter Follow these guidelines to avoid personal injury and damage of the P-touch labeler. Do not open the tape compartment cover Do not apply excessive pressure to the cutter when operating the cutter unit. unit. AC adapter If you do not intend using the P-touch Always hold the plug when disconnecting labeler for an extended period of time, the power cord from the power outlet.
-
Page 13: General Precautions
General Precautions ● Do not use the P-touch labeler in any way or for any purpose not described in this guide. Doing so may result in accidents or damage to the machine. ● Do not put any foreign objects into the tape exit slot, AC adapter connector, or USB port (for PT-7600 only), etc. -
Page 14: Table Of Contents
Contents Before Using Your P-touch Labeler ..........i Safety precautions ..................i General Precautions ..............v Contents ..................vi 1. Getting Started ..............1 Unpacking Your P-touch Labeler ........... 1 General Description ..............3 Top view & bottom view ................3 Keyboard & LCD screen ................4 Back light ...................... - Page 15 Inputting Label Data ..............20 Entering and editing text ................20 Entering an accented character ..............22 Entering a bar code ..................23 Entering a symbol ..................25 Formatting the Label ..............28 Specifying a label length ................28 Specifying a margin size ................28 Framing the text ..................29 Specifying the character size ..............30 Specifying the character width ..............
- Page 16 Uninstalling / Replacing the printer driver ..........53 Using P-touch Editor 5.0 .............. 54 Starting P-touch Editor ................55 Layout window ....................57 Starting P-touch Editor Help ..............59 Transferring Data To/From a Computer ........61 Entering Transfer mode ................61 How to use P-touch Transfer Manager & P-touch Library ... 62 Starting up P-touch Transfer Manager ............
-
Page 17: Getting Started
Getting Started Unpacking Your P-touch Labeler Check that the package contains the following before using your P-touch labeler. PT-7600 P-touch labeler Rechargeable battery pack (BA-7000) TZ tape cassette Strap belt CD-ROM User's Guide USB cable AC adapter (AD-18) (The design of the adapter may differ by country.) - Page 18 PT-7500 P-touch labeler Strap belt TZ tape cassette User's Guide AC adapter (AD-18) (The design of the adapter may differ by country.)
-
Page 19: General Description
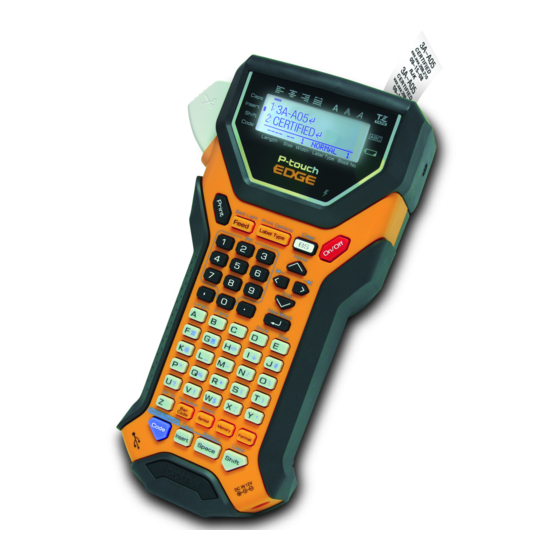
General Description Top view & bottom view Top view Display Tape cutter button Keyboard AC adapter connector USB port (for PT-7600 only) Back cover Release lever Battery compartment Print head Tape cassette compartment Tape exit slot Bottom view... -
Page 20: Keyboard & Lcd Screen
Keyboard & LCD screen PT-7600 is shown here. 2 34 5 1 Left text alignment (page 33) F Insert mode (page 21) 2 Center text alignment (page 33) G Shift mode (page 20) 3 Right text alignment (page 33) H Code mode (page 20) 4 Justified text alignment I Charging indicator light (page 8) (page 33) -
Page 21: Back Light
Back light Press g and f to turn on or turn off the back light. The back light can be used when you wish to see the display more clearly. The default setting is ON. ☞ Power can be saved when the back light is turned off. ☞... -
Page 22: Batteries
Notes on the AC adapter ☞ Only use the AC adapter designed exclusively for this machine. ☞ Disconnect the AC adapter if you do not intend to use this P-touch labeler for an extended period of time. When the power is disconnected and without battery power, all text shown in the display and stored in the memory will be lost. -
Page 23: Rechargeable Battery Pack (For Pt-7600 Only)
☞ Make sure that the batteries are inserted so that their poles point in the correct direction. With batteries installed, the P-touch labeler determines the remaining battery charge during printing and feeding. If a low battery charge is detected, the low battery indicator ()) comes on. - Page 24 Charging the rechargeable battery pack Insert the plug on the AC adapter cord into the connector on the machine and insert the AC adapter plug into a standard electrical outlet. While the rechargeable battery pack is charging, the charging indicator light lights up. Charging time is approx. 3 hours.
-
Page 25: Tape Cassettes
Notes on the rechargeable battery pack ☞ Be sure to use the suggested AC adapter (AD-18) ☞ Connect the AC adapter directly to the P-touch labeler to use it immediately after purchase or when the rechargeable battery pack’s charge becomes low. ☞... - Page 26 Notes on tape cassettes ☞ Before installing the tape cassette, make sure that the end of the tape feeds under the tape guides. ☞ If the tape cassette to be installed has an ink ribbon and the ink ribbon is loose, use your finger to wind the toothed wheel in the direction of the arrow on the cassette until there is no slack in the ribbon.
- Page 27 Flexible ID Tape ☞ For applications that require more flexible labels, such as around sharp bends and cylindrical objects, we recommend using Flexible ID Tape. ☞ Labels made with Flexible ID Tape are not designed for use as electrical insulation. ☞...
-
Page 28: Turning The P-Touch Labeler On/Off
Turning the P-touch Labeler On/Off Press o to turn on or turn off the P-touch labeler. If the P-touch labeler is powered by the AC adapter or batteries, the previous session’s text is displayed when the P-touch labeler is turned on again. This feature allows you to stop work on a label, turn off the machine, and return to it later without having to re- enter the text. -
Page 29: Label Type Modes
Label Type Modes Selecting a Label Type Mode Pressing a allows you to select one of the two regular modes for designing and printing your own custom labels, or any of the six special modes available for printing labels pre-formatted for identifying patch panels, cables, connectors and other components. Press a. -
Page 30: Rotate And Rotate & Repeat Modes
After selecting the Label Type mode NORMAL or VERTICAL, the label text can be entered, formatted, printed and cut as usual. With the Normal Label Type mode, the entered text is printed horizontally along the label. With the Vertical Label Type mode, the entered text is printed vertically along the label. -
Page 31: Flag Mode
Flag Mode Labels printed using this Label Type mode can be wrapped around cable or wire with the ends stuck together to form a flag. With the FLAG Label Type mode, each block of text is printed at both ends of separate labels. The length of the unprinted part of this label is equal to the circumference of the cable or wire. -
Page 32: Port And Panel1 Modes
Port and Panel1 Modes Labels printed using these Label Type modes can be used to identify various components or panels. With the Port Label Type mode, each block of the text is printed on a separate label, making these labels useful for identifying different components or ports that are not equally spaced. -
Page 33: Panel2 Mode
● BLK LEN. (block length): * For the PORT Label Type mode: 0.80" to 8.00" (20.0 to 200.0 mm) Default: 1.20" (30.0 mm) * For the PANEL1 Label Type mode: 0.25" to 8.00" (6.0 to 200.0 mm) Default: 1.20" (30.0 mm) ●... - Page 34 ● BLOCK: 1 to 50 blocks Default: 1 LENGTH: 0.25" to 8.00" (6.0 to 200.0 mm) Default: 0.70" (17.5mm) MULTIPLE: x1 to x9 Default: 1 ● FRAME: OFF, 1 Default: OFF ● PRINT: FRONT, REVERSE Default: FRONT ● ROTATE: OFF, ON Default: OFF ☞...
-
Page 35: Basic Functions
Basic Functions Performing Basic Operations Choosing functions, parameters, settings and groups ” appears, press l to select the previous item or r to select the next ● If “ item. ” appears, press u to select the previous item or d to select the next ●... -
Page 36: Inputting Label Data
Inputting Label Data Entering and editing text Entering characters ● To type a lowercase letter, a number, a comma or a period, simply press the key for that character. To type an uppercase letter, press h to enter Shift mode, and then press the ●... -
Page 37: Inserting Text
Adding a new line of text To end the current line of text and start a new one, press n. “ ● ” appears at the end of the line. ☞ The number of text lines that can be printed depends on the width of the tape. Maximum Number of Tape Width Lines That Can Be Printed... -
Page 38: Entering An Accented Character
Deleting text To remove characters to the left of the cursor’s current position, press b until ● all of the characters that you wish to delete are removed. ● To delete all of the text: Press g, then b. Press u or d to select either TEXT ONLY (to erase just the text) or TEXT&FORMAT (to erase all of the text and return all formatting functions to their default settings). -
Page 39: Entering A Bar Code
For each additional accented character, repeat steps Press n. ☞ To type in an uppercase accented character, press (or press , then to enter Caps mode) before pressing the letter key. Entering a bar code The Bar Code function allows bar codes to be printed as part of labels. ☞... -
Page 40: Setting Bar Code Parameters
Setting bar code parameters Press g, then c. Press l or r until the parameter that you wish to change is displayed. Press u or d until the desired setting is displayed. Repeat steps until all parameters are set as you wish. Press n. -
Page 41: Entering A Symbol
The following special characters can only be added to bar codes created using protocols EAN128 and CODE128. Symbol Character Symbol Character Symbol Character (SPACE) Symbol Control Character Symbol Control Character Symbol Control Character FNC3 FNC2 FNC4 FNC1 Entering a symbol There are 164 symbols and pictures available with the Symbol function. - Page 42 • To add a single symbol or the last one in a series, skip to step • To add a series of symbols to the text, press g, then n. For each additional symbol, repeat steps through Press n. ☞ A symbol can also be selected by typing in the corresponding code from the table below.
- Page 43 Category Symbols 1 2 1 3 1 4 NUMBER PICTOGRAPH ELECTRICAL / ELECTRONIC PROHIBITION WARNING COMMUNICATIONS AUDIO/VISUAL...
-
Page 44: Formatting The Label
Category Symbols OTHERS *A maximum of 16 most recently selected symbols are PERSONAL automatically saved in the PERSONAL symbol category for CATEGORY quick and easy symbol use. ☞ Once the PERSONAL symbol category becomes full , newly selected symbols will overwrite older ones unless the Symbol Save function is set to OFF (Refer to Specifying if the PERSONAL symbol category is continually updated... -
Page 45: Framing The Text
Framing the text Press g, then B. Press u or d until the desired frame setting is displayed. Press n. The selected setting is applied to the entire text. The following frame styles are available. Frame Frame Sample Sample Setting Setting... -
Page 46: Specifying The Character Size
Specifying the character size The character size can be specified for all text in the label or only for the text in the line that the cursor is in. ☞ With the default character size setting AUTO, the largest possible text size is automatically selected depending on the width of the installed tape and the number of lines in the text. -
Page 47: Specifying The Character Width
Specifying the character width Formatting the Global width of all text Press t. Press l or r until GLB WIDTH is displayed. Press u or d until the desired character width setting is displayed. Press n. The selected setting is applied to the entire text. Formatting the width of a line Move the cursor to the line of text whose character width you wish to change. -
Page 48: Specifying The Character Style
Width NORMAL NARROW MINIMUM WIDE Size 6 points Specifying the character style Formatting the Global character style of all text Press t. Press l or r until GLB STYL is displayed. Press u or d until the desired character style setting is displayed. Press n. -
Page 49: Using The Pre-Formatted Auto Format Templates
Specifying the alignment for all lines in the text Press t. Press l or r until ALIGN is displayed. Press u or d until the desired setting is displayed. Press n. The selected setting is applied to the entire text. The following alignment settings are available. -
Page 50: Printing Labels
Template Tape Width Template Fields Sample Name Label Length 1" × 4.05" 1 SYMBOL? 2 TEXT1? SIGN (24 mm × 102 mm) 3 TEXT2? 3/4" × 4.05" 1 NAME? BADGE (18 mm × 102 mm) 2 COMPANY? 1/2" × 3.55" 1 TITLE? FILING (12 mm ×... -
Page 51: Feeding Tape
Feeding tape To feed out 1" (23 mm) of tape, press f. The message “FEED” is displayed. ● ☞ Press to feed out any leftover printed tape after pressing to quit printing. Printing a label To print out a label, press p. The message “WORKING”, then “COPIES” ●... - Page 52 ☞ If the Cut function is set to 1 or 3, the message “CUT TAPE TO CONTINUE” appears after each label is printed. Press the tape cutter button to cut off the label and continue printing. ☞ Be sure to cut the tape within 5 minutes from the time that the message appears. ☞...
- Page 53 ☞ If the Cut function is set to 1 or 3, the message “CUT TAPE TO CONTINUE” appears after each label is printed. Press the tape cutter button to cut off the label and continue printing. ☞ Be sure to cut the tape within 5 minutes from the time that the message appears. ☞...
- Page 54 Press r so that the second number in the range displayed below BLOCK NO. is flashing. Press u or d until the desired block number is displayed (or use the number keys to type in the desired setting). Press n (or p). START appears in the Print Option menu. Press n (or p) to begin printing the specified number of labels.
-
Page 55: Storing And Recalling Files
Combining special printing functions Many of the special printing functions can be combined, depending on various conditions, such as which Label Type mode is selected or whether a template is being used. For example, by combining the operations for the Repeat Printing function and the Numbering function to print two copies of a label with “1”... -
Page 56: Recalling Text That Has Been Stored
☞ If the maximum number of characters has already been stored, the error message “MEMORY FULL!” appears in the display. If this occurs, an existing text file must be deleted before the new one can be stored. ☞ If a file is already stored under the selected file number, the message “OVERWRITE?”... - Page 57 Press n. The message “OK TO CLEAR?” (or “CLEAR ALL?” if all files were selected) appears. Press n. The text stored in the selected files is deleted. ☞ If you do not wish to delete the selected text file(s), press instead of step ☞...
-
Page 58: Machine Adjustments
Machine Adjustments Various functions are available for changing and adjusting the operation of the P-touch labeler. Selecting how tape is fed and cut The Cut function enables you to specify how the tape is fed out after it is printed. The settings of the Cut function consist of combinations of two different cut methods: cut-pause (where the machine stops printing so the label can be cut) and chain printing (where the last copy is not fed out to be cut, reducing the amount of tape that is wasted). -
Page 59: Adjusting The Display Contrast
Adjusting the display contrast The display can be made lighter or darker by selecting a setting between -2 and +2. (The default setting is 0.) Select a higher value to increase the contrast (make the display darker). Select a lower value to decrease the contrast (make the display lighter). Press g, then Z. -
Page 60: Specifying If The Personal Symbol Category Is Continually Updated
Press g, then Z. Press l or r until LENGTH ADJUST is displayed. Press u or d until the desired setting is displayed, and then press n. Specifying if the PERSONAL symbol category is continually updated You can specify whether symbols continue to be added to the PERSONAL symbol category (with the older symbols deleted) when the category becomes full (ON) or symbols are no longer added after the PERSONAL symbol category becomes full (OFF). -
Page 61: Cleaning
Cleaning Occasionally, certain parts of the P-touch labeler may need to be cleaned. Dust or dirt may become attached to the P-touch labeler’s print head and rollers, particularly when the unit is used outdoors or in a very dusty environment. With use, the tape cutter may become covered with adhesive, making it difficult to cut the tape. - Page 62 Notes on cleaning the print head & rollers ☞ If a blank horizontal streak appears through the label text, clean the machine’s print head. ☞ The print head can be cleaned more easily if the optional print head cleaning cassette (TZ-CL4) is used.
-
Page 63: Using P-Touch Labeler With A Computer (For Pt-7600 Only)
Using P-touch Labeler With a Computer (for PT-7600 only) This P-touch labeler is equipped with a USB port, allowing you to connect it to a ® ® computer running Microsoft Windows . The enclosed CD-ROM contains P-touch Editor 5.0, which is installed together with the printer driver and P-touch Transfer Manager. -
Page 64: System Requirements
CD-ROM Precautions ● Do not scratch the CD-ROM. ● Do not subject the CD-ROM to extremely high or extremely low temperatures. ● Do not put heavy objects on the CD-ROM or apply force to the CD-ROM. ● The software contained on the CD-ROM is meant for use with your purchased machine only. - Page 65 Installing the P-touch Editor 5.0 ☞ The installation procedure may change depending on the Operating System on your PC. Windows Vista® is shown here as an example. Start your PC making sure to log on as a user with Administrator privileges. Insert the CD-ROM into the CD-ROM drive.
-
Page 66: Installing The Printer Driver
Installing the Printer driver ☞ Read the contents of the “Before installing the printer driver” dialog box, and then check [Yes, confirmed] and click [OK]. The installation procedure for the printer driver differs depending on the operating system being used. ®... - Page 67 The printer is detected, and then a message appears again, warning that no digital signature was found. Click [Yes] to install the printer driver. You will be prompted to register your P-touch labeler online, click [Yes] and then click [Next]. If you have selected to register the product your default internet browser will be launched in a new window.
- Page 68 The printer is detected, and then the “Found New Hardware Wizard” starts up. Select [No, not this time], and then click [Next]. In the dialog box for selecting the installation method, select “Install the software automatically (Recommended)”, and then click [Next]. Again, a message appears warning that no digital signature was found.
-
Page 69: Uninstalling The P-Touch Editor 5.0
The printer is detected, and then the driver is installed. You will be prompted to register your P-touch labeler online, click [Yes] and then click [Next]. If you have selected to register the product your default internet browser will be launched in a new window. Click [Finish] to complete the installation. -
Page 70: Using P-Touch Editor 5.0
Using P-touch Editor 5.0 P-touch Editor 5.0 makes it easy for anyone to design and print more complex labels, for almost any needed imaginable. See the P-touch Editor Help for samples of various kinds of labels and details on creating, printing, and saving the labels. The following is the example for Windows ®... -
Page 71: Starting P-Touch Editor
☞ The printed label may differ from the image that appears in the Preview area of Transfer Manager. ☞ If the number or order of fields in a database are changed and only the database (*.csv file) is transferred to update it, the database may not link correctly with the template. In addition, the first line of data in the transferred file must be recognized by the P-touch labeler machine as “field names”, otherwise the database cannot be used to print. - Page 72 Choose an option in the [New/Open] dialog box and click [OK]. • You can choose the label printer and tape size. • When you choose [Open File], the [Open] dialog box appears. You can choose and open the file you have created and stored previously.
-
Page 73: Layout Window
Layout window Express Mode This mode provides easy label creation with text and images. The layout window consists of the following sections: 1Menu bar Commands are categorized under each menu (File, Edit, View, and Insert, etc.) by function. 2Command bar The command bar contains the New/Open, Paper, Text, Frame, Image, etc. - Page 74 Professional Mode This mode provides full-scale label creation for creating the templates. The layout window consists of the following sections: 1Menu bar Commands are categorized under each menu (File, Edit, View, and Insert, etc.) by function. 2Standard toolbar A group of frequently used commands (New Layout, Open, Save, Print, etc.) are provided in this toolbar.
-
Page 75: Starting P-Touch Editor Help
☞ The [View] menu allows you to show/hide the toolbars, palettes, and windows. ☞ See the P-touch Editor Help for details. Snap Mode With this mode, you can capture the screen, print it as image, and save it for future use. To start Snap Mode, follow the steps below. - Page 76 In the [New/Open] dialog, click [Help-How To]. Starting from P-touch Editor Click Help menu and choose P-touch Editor Help. Express Mode Professional Mode Starting from Snap Mode Right click the mouse and choose P-touch Editor Help.
-
Page 77: Transferring Data To/From A Computer
Printing the Help description The information given in P-touch Editor Help can be printed. Use your normal printer to print the P-touch Editor Help information. In the [Contents] tab, choose any topic you want to print. Click on the Toolbar. Choose the range of topics to be printed, and click [OK]. -
Page 78: How To Use P-Touch Transfer Manager & P-Touch Library
How to use P-touch Transfer Manager & P-touch Library ☞ Although the PT-7600 can be connected to the computer through a USB connection, label layouts created in P-touch Editor cannot be printed directly from the application. P-touch Transfer Manager: The PT-7600 can transfer templates created in P-touch Editor. - Page 79 Layout window 1Menu Commands are categorized into each menu (File, Edit, View, Tool, and Help) by function. 2Toolbar There are icons for frequently used commands. Click on one to access that command. 3Selecting the printer model (Only for P-touch Transfer Manager) Select the printer model to send data to.
-
Page 80: Transferring Label Templates From The Pc
Explanations of the Icons Icon Button name Function Transfer Transfers the label templates and other data on your (Only for P-touch PC to the P-touch labeler (when connecting USB Transfer Manager) interface cable). Backup Backs up the data you have transferred to the P-touch (Only for P-touch labeler using the P-touch Transfer Manager. - Page 81 Drag the transfer data to the folder you created. Drag the transfer data from All contents, Layouts or another folder under Filter. When transferring multiple sets of data, you can move all the transfer data to the folder you created. Key Assign numbers are automatically assigned to transferred data inside the folder you made in the previous step.
-
Page 82: Adding A User-Defined Character Image To The Text
Click [OK]. The data in the folder selected in the folder view is transferred to the P-touch labeler. ☞ If you have selected specific data in the list view, only that selected data is transferred to the P-touch labeler. Adding a user-defined character image to the text If a user-defined character image (a bitmap character not usually available on the P- touch labeler) is assigned to a PF key, that character can be added to any label that you create on the P-touch labeler. - Page 83 Using a template not linked to a database Using a template not linked to a database is the same as using any of the preset Auto Format templates. For details on using Auto Format templates, refer to Using the pre- formatted Auto Format templates on page 33.
-
Page 84: Using Downloaded Database Data
☞ If the Cut function is set to 1 or 3, the message “CUT TAPE TO CONTINUE” appears after each label is printed. Press the tape cutter button to cut off the label and continue printing. ☞ Be sure to cut the tape within 5 minutes from the time that the message appears. ☞... - Page 85 ☞ To search for a specific record, refer to Searching the database on page 70. Using database data in a Label Type mode This function enables you to select the range of database fields to print. Press a, and then select the Label Type mode as described in chapter 2. Press g, then a.
-
Page 86: Backing Up Label Templates
Searching the database While selecting a database record to be used in a template or while selecting a database record whose data is to be added to a label, the database can be searched for records containing specific characters or records with a specific number. To search the database for a record containing specific characters: Press g and e until the search screen is displayed. - Page 87 Select the P-touch labeler to back up from, then click The backup confirmation message is displayed. Click [OK]. A new folder with a name containing the current date is created inside the P-touch labeler folder, and all the P-touch labeler’s data is transferred to that new folder.
-
Page 88: Starting Up The P-Touch Library
Starting up the P-touch Library You can use the P-touch Library to access labels you wish to edit. Click the [Start] button, then choose [All programs (Programs)] - [Brother P- touch] - [P-touch Tools] - [P-touch Library 2.1]. The P-touch Library starts up. Opening and editing data Choose the data you want to edit, then click The application associated with the data is... - Page 89 Check the items to be used as search conditions and set the search items. The search items that can be set are as follows. Settings Details This sets the method for combining multiple search items. If you choose Multiple Parameters AND, files are searched for those that satisfy all the conditions.
-
Page 90: Appendix
Appendix Resetting the P-touch Labeler You can reset the internal memory of your P-touch labeler when you want to clear all saved label files, or in the event the P-touch labeler is not working properly. Turn off the machine and then while holding down g and R, press o to turn the machine back on. - Page 91 Problem Cause Solution A label will not print if there is no Has text been entered? text entered. Is the tape cassette installed Check that the tape cassette is correctly, and is there enough tape installed correctly, and that there is remaining? enough tape remaining.
-
Page 92: Error Message List
Problem Cause Solution All files stored in the internal Have the batteries and AC adapter memory are lost if the batteries and been disconnected? AC adapter are disconnected for longer than two minutes. All data stored in the internal Label files saved Is there enough power remaining in memory is lost if the batteries previously are now empty. - Page 93 Error Message Cause Solution • Press n to use the • The message appears when changing from a different PANEL2 Label Type mode. Label Type mode to the All text is cleared. BLOCK NO. CHANGE PANEL2 Label Type mode • Press b to select a CLEAR TEXT? and the current block number is different from the...
- Page 94 Error Message Cause Solution On 3/4" (18 mm) tape: • This message appears if you • Reduce the number of lines CHECK THE NUMBER try to print or use the or install a wider tape. OF LINES! 5 MAX Preview function when the number of lines in the text is greater than the maximum On 1/2"...
-
Page 95: Memory Full
Error Message Cause Solution • This message appears if a • Install a 3/4" (18-mm)-wide INSERT 3/4" TAPE 3/4" (18-mm)-wide tape tape cassette. cassette is not installed when printing an Auto Format INSERT 18mm TAPE template created for 3/4" (18-mm)-wide tape. •... - Page 96 Error Message Cause Solution • This message appears if no • Store a text file before trying files are stored in the to recall or delete one. NO FILES! memory when you try to recall or delete one. • Press n to reduce. •...
-
Page 97: Machine Specifications
Machine Specifications Main Unit Item Specification Input Device Keyboard (56 key) Display 16 characters x 2 lines (132 dot x 48 dot) * Line indicator and 15 characters = 16 characters LCD Contrast 5 levels (+2, +1, 0, -1, -2) Back light Printing Print method... - Page 98 Item Specification Characters Internal character set Total of 373 characters (62 alphanumeric, 164 sym- bols, 147 accented characters.) Text buffer Maximum 512 characters. Fonts Helsinki Character size Auto*, 48 pt, 36 pt, 24 pt, 18 pt, 12 pt, 9 pt, 6 pt * 62 pt Maximum (one line of only uppercase text and numbers on 1"...
-
Page 99: Operating Environment: Windows® (For Pt-7600 Only)
Item Specification Other Operating tempera- ° 50 ~ 95 F / 20 ~ 80% humidity (without ture / humidity condensation) ® Operating Environment: Windows (for PT-7600 only) Item Specification ® ® Microsoft Windows 2000 Professional/XP/ ® Windows Vista Memory ® Windows 2000 Pro, XP: 128MB or more required ®... -
Page 100: Index
Index Contrast function......43 copies ........... 35 AC adapter ........5 cursor..........20 Accent function......22 Cut function ........42 alignment ........33 cut-pause ........42 arrow keys......4, 19, 20 Auto Format function ....33 Auto Reduction function ....43 database record range .... - Page 101 left text alignment......33 indicator........4 indicators ........4 length adjustment......43 block number ......4 Length function ......28 bold text style ......4 length indicator ....... 4 Caps ..........4 local formatting center text alignment ....4 character size ......30 Code ...........
- Page 102 problems ........74 width adjustment....... 43 P-touch Editor Transfer mode ....... 61 installing........47 troubleshooting ......74 starting ........54 template ........66 uppercase letters ......20 user-defined character image ..66 recalling ........40 Repeat Printing function ....35 return key......
-
Page 103: Contact Information (For Usa Only)
For purchasing accessories on the Internet: http://www.brothermall.com To order by mail or pay by check, please complete the accessory order form and mail it along with payment to: Brother International Corporation Attn: Consumer Accessory Division P.O. Box 341332 Bartlett, TN 38133-1332... - Page 105 GUÍA DE USUARIO...
- Page 106 PT-7600 Declaración de conformidad de la Comisión Federal de Comunicaciones (FCC) (sólo para EE.UU.) Parte responsable: Brother International Corporation 100 Somerset Corporate Boulevard Bridgewater, NJ 08807-0911 USA TEL: (908) 704-1700 declara que el producto Nombre del producto: Sistema de etiquetado electrónico P-touch de Brother Número de modelo:...
- Page 107 PT-7500 AVISO DE LA FCC Este dispositivo cumple la parte 15 de las normas de la FCC. Su funcionamiento esta sujeto a las siguientes condiciones: (1) este dispositivo no puede causar interferencias nocivas y (2) este dispositivo debe aceptar todas las interferencias recibidas, incluidas aquellas que puedan causar un funcionamiento no deseado.
- Page 108 Aviso de recopilación y publicación Este manual se ha redactado y publicado bajo la supervisión de Brother Industries Ltd. y en el mismo se proporcionan las descripciones y especificaciones más actualizadas de los productos. El contenido de este manual y las especificaciones de este producto están sujetos a cambios sin previo aviso.
-
Page 109: Precauciones De Seguridad
Antes de utilizar su Etiquetadora P-touch ¡Muchas gracias por adquirir la PT-7500/7600! Su nueva etiquetadora P-touch es un sistema de etiquetado fácil de utilizar y con numerosas funciones que simplifica al máximo la creación de etiquetas profesionales de gran calidad. Además de la sencilla creación de etiquetas mediante diseños previamente establecidos, etiquetadora P-touch incluye funciones de software de edición como formato avanzado de etiquetas, formatos de bloque, códigos de barras y funciones de numeración automática. - Page 110 ADVERTENCIA Batería recargable (sólo para PT-7600) Siga estas indicaciones para evitar incendios, calor, daños y descargas eléctricas. No utilice esta etiquetadora P-touch con una No permita que se moje la batería batería recargable distinta de la especificada. recargable. Para recargar la batería recargable, introdúzcala No cortocircuite los terminales de la batería en la etiquetadora P-touch y, a continuación, recargable o la etiquetadora P-touch con...
- Page 111 ADVERTENCIA Pilas (alcalinas/recargables) Siga estas indicaciones para evitar que se produzcan fugas o daños en las pilas. No utilice artículos metálicos, como pinzas Si las pilas presentan fugas, asegúrese de o bolígrafos metálicos, al cambiar las que el líquido no entre en contacto con los batteries.
- Page 112 PRECAUCIÓN Cortadora de cinta Respete estas pautas para evitar lesiones corporales y daños a la etiquetadora P-touch. No abrir la tapa del compartimiento de la No aplique una presión excesiva sobre la cinta al trabajar con la unidad cortadora. cortadora. Adaptador de CA Si no va a utilizar la etiquetadora P-touch Para desconectar el cable de alimentación de...
-
Page 113: Precauciones Generales
Precauciones generales ● No utilice la etiquetadora P-touch de manera o para fines distintos de los descritos en esta guía. Si lo hace podrían producirse accidentes o dañar el equipo. ● No inserte objetos extraños en la ranura de salida de la cinta, el conector del adaptador de CA o el puerto USB (sólo para PT-7600), etc. - Page 114 ÍNDICE Antes de utilizar su Etiquetadora P-touch ........i Precauciones de seguridad ................i Precauciones generales ..............v 1. Para empezar ..............1 Desembalaje de la Etiquetadora P-touch ........1 Descripción general ............... 3 Vista superior y vista inferior ............... 3 Teclado y pantalla LCD ................4 Iluminación de fondo ..................
- Page 115 Introducción de un símbolo ................25 Cómo formatear la etiqueta ............28 Definición de la longitud de la etiqueta ............28 Definición de un tamaño de margen ............28 Cómo enmarcar el texto ................29 Definición del tamaño de los caracteres ............30 Definición de la anchura de los caracteres ..........31 Definición del estilo de los caracteres ............
- Page 116 Ventana de diseño ..................57 Inicio de la ayuda de P-touch Editor ............59 Transferencia de datos a/desde un PC ......... 61 Para entrar en el modo Transfer ..............61 Uso de P-touch Transfer Manager y P-touch Library ....62 Inicio de P-touch Transfer Manager ............62 Transferencia de las plantillas de etiquetas desde el PC ......
-
Page 117: Para Empezar
Para empezar Desembalaje de la Etiquetadora P-touch Compruebe que el paquete contiene lo siguiente antes de utilizar la etiquetadora P-touch. PT-7600 Etiquetadora P-touch Batería recargable (BA-7000) Casete de cinta TZ Cinta CR-ROM Guía del usuario Cable USB Adaptador de CA (AD-18) (El diseño del adaptador puede ser distinto en función del país.) - Page 118 PT-7500 Etiquetadora P-touch Cinta Casete de cinta TZ Guía del usuario Adaptador de CA (AD-18) (El diseño del adaptador puede ser distinto en función del país.)
-
Page 119: Descripción General
Descripción general Vista superior y vista inferior Vista superior Visualizador Botón del cortador de la cinta Teclado Conector del adaptador de CA Puerto USB (sólo para PT-7600) Cubierta posterior Palanca de liberación Compartimento de las pilas Cabezal de impresión Compartimento del casete de cinta Ranura de salida de la cinta Vista inferior... -
Page 120: Teclado Y Pantalla Lcd
Teclado y pantalla LCD 23 4 5 Aquí se muestra la PT-7600. 1 Alineación del texto a la izquierda E Modo de mayúsculas continuas (página 20) (página 33) F Modo de inserción (página 21) 2 Alineación del texto centrada G Modo de mayúscula individual (página 33) (página 20) 3 Alineación del texto a la derecha... -
Page 121: Iluminación De Fondo
Iluminación de fondo Pulse g y f para encender o apagar la luz posterior. El ajuste por defecto es “ENCENDIDA”. ☞ Se puede ahorrar electricidad apagando la iluminación de fondo. ☞ Si se apaga la luz posterior, esta parpadeará durante un segundo cuando se encienda por primera vez la máquina para recordarle que puede utilizarla si tiene dificultades para ver la pantalla. -
Page 122: Pilas
Observaciones acerca del adaptador de CA ☞ Emplee sólo el adaptador de CA diseñado exclusivamente para esta máquina. ☞ Si prevé que no va a utilizar la etiquetadora P-touch durante un período prolongado, desconecte el adaptador de CA. Cuando se desconecta la máquina y no se utiliza la batería, se pierden el texto que se muestra en la pantalla y el que está... -
Page 123: Batería Recargable (Sólo Para Pt-7600)
☞ Asegúrese de insertar las pilas de forma que sus polos queden orientados en la dirección correcta.Con las pilas instaladas, la etiquetadora P-touch determina cuánta carga queda durante la impresión y el avance de la cinta. Si detecta que queda poca, se encenderá el indicador de pilas gastadas ( ). - Page 124 Carga de la batería recargable Inserte la clavija del cable del adaptador de CA en el conector de la máquina y el enchufe del adaptador en una toma eléctrica normal. Durante la carga de la batería, la luz del indicador de carga se ilumina. El tiempo de carga es de unas 3 horas. La luz del indicador de carga se apaga una vez finalizada la carga.
-
Page 125: Casetes De Cinta
Observaciones acerca de la batería recargable ☞ Asegúrese de usar el adaptador de CA recomendado (AD-18). ☞ Conecte el adaptador de CA directamente a la etiquetadora P-touch para utilizarla inmediatamente después de haberla adquirido o cuando la carga de la batería recargable sea baja. - Page 126 Observaciones acerca de los casetes de cinta ☞ Antes de instalar el casete de cinta, cerciórese de que el extremo de la cinta avanza por debajo de las guías. ☞ Si el casete de cinta que va a instalar tiene una cinta entintadora y que está floja, haga girar la rueda dentada con el dedo, en el sentido de la flecha del casete, hasta tensarla.
- Page 127 Cinta de identificación flexible ☞ Para aquellas aplicaciones que requieran etiquetas más flexibles (por ejemplo, para pegarlas sobre curvas pronunciadas o en torno a objetos cilíndricos), se recomienda usar cinta de identificación flexible. ☞ Las etiquetas creadas con cinta de identificación flexible no están diseñadas para servir como aislante eléctrico.
-
Page 128: Conexión/Desconexión De La Etiquetadora P-Touch
Conexión/desconexión de la Etiquetadora P-touch Pulse o para encender o apagar la etiquetadora P-touch. Si la etiquetadora P-touch se utiliza con el adaptador de CA o pilas, se mostrará el texto de la session anterior cuando se vuelva a encender la etiquetadora P-touch. Esta característica le permite interrumpir la creación de una etiqueta, apagar la máquina y posteriormente reanudar el trabajo en la misma etiqueta sin tener que volver a introducir el texto. -
Page 129: Modos De Tipo De Etiqueta
Modos de tipo de etiqueta Selección de un modo de tipo de etiqueta Pulsando a, podrá seleccionar uno de los dos modos normales de diseño e impresión de etiquetas personalizadas, o cualquiera de los seis modos especiales disponibles para imprimir etiquetas preformateadas para la identificación de paneles de conexiones, cables, conectores y otros componentes. -
Page 130: Modos Girar (Rotate) Y Girar Y Repetir (Rotate & Repeat)
Después de seleccionar el modo de tipo de etiqueta NORMAL o VERTICAL, el texto de la etiqueta puede escribirse, formatearse, imprimirse y cortarse de la manera habitual. Con el modo de tipo de etiqueta NORMAL, el texto introducido se imprime horizontalmente a lo largo de la etiqueta. -
Page 131: Modo Bandera (Flag)
Modo Bandera (FLAG) Las etiquetas impresas usando este modo de tipo de etiqueta se pueden enrollar en torno a hilos o cables pegando los extremos entre sí para formar una bandera. Con el modo BANDERA, cada bloque de texto se imprime en ambos extremos de etiquetas diferentes. -
Page 132: Modos Puerto (Port) Y Panel 1 (Panel1)
Modos Puerto (PORT) y Panel 1 (PANEL1) Las etiquetas impresas usando estos modos de tipo de etiqueta se pueden usar para identificar diversos componentes o paneles. Con el modo de tipo de etiqueta PORT, cada bloque de texto se imprime en una etiqueta diferente, por lo que dichas etiquetas son útiles para identificar distintos componentes o puertos que no estén espaciados de forma regular. -
Page 133: Modo Panel 2 (Panel2)
● LON_BLOQ (longitud del bloque): * Para el modo de tipo de etiqueta PORT: 0,80" a 8,00"(20,0 a 200,0 mm) Valor predeterminado: 1,20"(30,0 mm) * Para el modo de tipo de etiqueta PANEL1: 0,25" a 8,00"(6,0 a 200,0 mm) Valor predeterminado: 1,20"(30,0 mm) ●... - Page 134 ● BLOQUE? : 1 a 50 bloques Valor predeterminado: 1 LONGITUD : 0,25" a 8,00"(6,0 a 200,0 mm) Valor predeterminado: 0,70"(17,5 mm) MÚLTIPLE : x1 a x9 Valor predeterminado: 1 ● MARCO : APGDO, 1 Valor predeterminado: APGDO ● IMPRIMIR: EN ORDEN, INVERSO Valor predeterminado: EN ORDEN ●...
-
Page 135: Funciones Básicas
Funciones básicas Cómo realizar las operaciones básicas Elección de funciones, parámetros, ajustes y grupos ”, pulse l para seleccionar el elemento anterior o r para ● Si aparece “ seleccionar el elemento siguiente. ”, pulse u para seleccionar el elemento anterior o d para ●... -
Page 136: Introducción De Los Datos De La Etiqueta
Introducción de los datos de la etiqueta Introducción y modificación de texto Introducción de caracteres ● Para escribir una letra minúscula, un número, una coma o un punto, sólo tiene que pulsar la tecla correspondiente. Para escribir una letra mayúscula, pulse h para entrar en el modo de mayúscula ●... - Page 137 Cómo añadir una nueva línea de texto Para poner fin a la línea de texto actual y empezar otra nueva, pulse n. ● Aparecerá “ ” al final de la línea. ☞ El número de líneas de texto que se pueden imprimir depende de la anchura de la cinta. Número máximo de líneas Anchura de la cinta que pueden imprimirse...
-
Page 138: Introducción De Un Carácter Acentuado
Borrado de texto ● Para eliminar caracteres situados a la izquierda de la posición actual del cursor, pulse b hasta que haya borrado todos los caracteres deseados. ● Para borrar todo el texto: Pulse g y luego b. Pulse u o d para seleccionar SÓLO TEXTO (para borrar sólo el texto) o TEXT&FORMATO (para borrar todo el texto y devolver todas las funciones de formato a sus valores predeterminados). -
Page 139: Introducción De Un Código De Barras
Para cada carácter acentuado adicional, repita los pasos Presione n. ☞ Para escribir un carácter acentuado en mayúsculas, pulse para entrar en el modo de mayúsculas continuas) antes de pulsar la tecla de la letra. Introducción de un código de barras La función códigos de barras permite imprimir códigos de barras como parte de las etiquetas. - Page 140 Configuración de los parámetros de código de barras Pulse g y luego c. Pulse l o r hasta que se visualice el parámetro que desee cambiar. Pulse u o d hasta que se visualice el ajuste deseado. Repita los pasos hasta ajustar todos los parámetros de la forma deseada.
-
Page 141: Introducción De Un Símbolo
Los siguientes caracteres especiales solamente podrán añadirse a códigos de barras creados con los protocolos EAN128 y CODE128. Símbolo Carácter Símbolo Carácter Símbolo Carácter (SPACE) Símbolo Carácter de control Símbolo Carácter de control Símbolo Carácter de control FNC3 FNC2 FNC4 FNC1 Introducción de un símbolo La función de símbolo permite utilizar 164 símbolos e imágenes. - Page 142 • Para añadir un solo símbolo o el último de una serie, vaya al paso • Para añadir al texto una serie de símbolos, pulse g y luego n. Para cada símbolo adicional, repita los pasos Pulse n. ☞ También se puede seleccionar un símbolo escribiendo el código correspondiente, que puede ver en la tabla siguiente.
- Page 143 1 2 1 3 1 4 COMUNICACIONES AUDIO/VISUAL...
-
Page 144: Cómo Formatear La Etiqueta
*En la categoría de símbolos PERSONAL se guardan automáticamente los símbolos seleccionados más recientemente, hasta un máximo de 16, para poder usarlos fácil y rápidamente. ☞ Una vez que se llene la categoría de símbolos PERSONAL , los nuevos símbolos que se seleccionen se sobrescribirán sobre los antiguos a menos que la función de guardar (desactivada). -
Page 145: Cómo Enmarcar El Texto
Cómo enmarcar el texto Pulse g y luego B. Pulse u o d hasta que se visualice el ajuste de marco deseado. Pulse n. El ajuste seleccionado se aplicará a todo el texto. Están disponibles los siguientes estilos de marco: Ajuste de Ajuste de Muestra... -
Page 146: Definición Del Tamaño De Los Caracteres
Definición del tamaño de los caracteres El tamaño de los caracteres se puede definir para todo el texto de la etiqueta o sólo para el texto de la línea en la que está el cursor. Cómo formatear el tamaño de los caracteres de todo el texto Pulse t. -
Page 147: Definición De La Anchura De Los Caracteres
Definición de la anchura de los caracteres Cómo formatear la anchura de todo el texto Pulse t. Pulse l o r hasta que se visualice ANCHO G.. Pulse u o d hasta que se visualice el ajuste de anchura de caracteres deseado. Pulse n. -
Page 148: Definición Del Estilo De Los Caracteres
Anchura ESTRECHO MÍNIMO GRANDE NORMAL Tamaño (condensado) (fino) (ancho) 6 puntos Definición del estilo de los caracteres Cómo formatear el estilo de los caracteres de todo el texto Pulse t. Pulse l o r hasta que se visualice ESTILO G. Pulse u o d hasta que se visualice el ajuste de estilo de caracteres deseado. -
Page 149: Uso De Las Plantillas De Formato Automático
Definición de la alineación de todas las líneas de texto Pulse t. Pulse l o r hasta que se visualice ALINEAR. Pulse u o d hasta que se visualice el ajuste deseado. Pulse n. El ajuste seleccionado se aplicará a todo el texto. Están disponibles los siguientes ajustes de alineación: IZQDA. -
Page 150: Impresión De Etiquetas
Anchura cinta × Nombre de Tecla Campos de la plantilla Muestra la plantilla Longitud etiqueta 1" × 4,05" 1 SÍMBOLO? 2 TEXTO1? SEÑALIZ. (24 mm × 102 mm) 3 TEXTO2? 3/4" × 4,05" 1 NOMBRE? VISITAS (18 mm × 102 mm) 2 EMPRESA? 1/2"... -
Page 151: Avance De La Cinta
Avance de la cinta Para hacer avanzar 1"(23 mm) de cinta, pulse f. Aparecerá el mensaje ● “ALIMENTANDO”. ☞ Pulse para hacer avanzar el excedente de cinta impresa después de pulsar para abandonar la impresión. Impresión de una etiqueta Para imprimir una etiqueta, pulse p. Aparecerá el mensaje “PROCESANDO” y ●... - Page 152 ☞ Si la función de corte está ajustada a 1 o 3, aparecerá el mensaje “CORTAR CINTA Y ALIMENTAR” (corte la cinta para continuar) después de que se imprima cada etiqueta. Pulse el botón del cortador de la cinta para cortar la etiqueta y proseguir con la impresión. ☞...
- Page 153 ☞ Si la función de corte está ajustada a 1 ó 3, aparecerá el mensaje “CORTAR CINTA Y ALIMENTAR” (corte la cinta para continuar) después de que se imprima cada etiqueta. Pulse el botón del cortador de la cinta para cortar la etiqueta y proseguir con la impresión. ☞...
- Page 154 Pulse r para que parpadee el segundo número de la serie visualizada debajo de Nº BLOQUE. Pulse u o d hasta que se visualice el número de bloque deseado (o utilice las teclas numéricas para escribirlo). Pulse n (o p). Aparecerá IMPRIMIR en el menú de opciones de impresión. Presione n (o p) para empezar a imprimir el número de etiquetas definido.
-
Page 155: Almacenamiento E Invocación De Archivos
Combinación de funciones de impresión especiales Muchas de las funciones de impresión especiales se pueden combinar, en función de diversas condiciones, por ejemplo, en función del modo de tipo de etiqueta seleccionado o de si se está usando una plantilla. Por ejemplo, si se combinan las operaciones de la función de copias múltiples y la función de numeración para imprimir dos copias de una etiqueta después de seleccionar “1”... -
Page 156: Invocación De Texto Previamente Almacenado
☞ Si ya se ha almacenado el número máximo de caracteres, aparecerá el mensaje “MEMORIA LLENA!” en el visualizador. Cuando ocurra esto, deberá borrar un archivo de texto existente para poder almacenar el nuevo. ☞ Si ya se ha almacenado un archivo bajo el número seleccionado, aparecerá el mensaje “¿SOBRESCRIBIR?”... - Page 157 Pulse n. Aparecerá el mensaje “¿BORRAR?” (o “ELIMINAR TODO?” si ha seleccionado todos los archivos). Pulse n. Se borrará el texto almacenado en los archivos seleccionados. ☞ Para ver otras partes del archivo de texto seleccionado, pulse ☞ Para quitar un archivo de texto de la lista de archivos a borrar, visualícelo y pulse para que el número del archivo deje de estar resaltado.
-
Page 158: Ajustes De La Máquina
Ajustes de la máquina Existen diversas funciones que permiten cambiar y ajustar el funcionamiento de la etiquetadora P-touch. Selección de la forma de avance y corte de la cinta La función Cut permite definir la forma de avance de la cinta una vez impresa. Los ajustes de la función de corte son combinaciones de dos métodos diferentes: pausa-corte (la máquina detiene la impresión para que se pueda cortar la cinta) e impresión en cadena (la última copia no avanza para ser cortada, con lo que se reduce la cantidad de... -
Page 159: Ajuste De La Función De Reducción Automática
Pulse g y luego Z. Pulse l o r hasta que se visualice CONT. PANTALLA. Pulse u o d hasta que se visualice el ajuste deseado y seguidamente pulse n. Ajuste de la función de reducción automática Con la función de reducción automática, puede seleccionar si la anchura del texto (ANCHO. TEXT.) o el tamaño del texto (TAM. -
Page 160: Definición De La Actualización Continua De La Categoría De Símbolos Personal
Definición de la actualización continua de la categoría de símbolos PERSONAL Puede definir si, cuando se llene la categoría de símbolos PERSONAL, deben seguir añadiéndose símbolos PERSONAL, eliminando los más antiguos (ACTIVADO), o no (APGDO). (El ajuste predeterminado es ACTIVADO). Pulse g y luego Z. -
Page 161: Limpieza
Limpieza Es posible que, de vez en cuando, haya que limpiar ciertas partes de la etiquetadora P- touch. Puede que se adhiera polvo o suciedad al cabezal de impresión y a los rodillos de la etiquetadora P-touch, especialmente si se emplea la unidad en exteriores o en lugares con mucho polvo. - Page 162 Observaciones acerca de la limpieza del cabezal de impresión y de los rodillos ☞ Si aparece una franja horizontal en blanco en el texto de la etiqueta, limpie el cabezal de impresión de la máquina. ☞ Será más fácil limpiar el cabezal de impresión si se emplea el casete de limpieza opcional (TZ-CL4).
-
Page 163: Uso De La Etiquetadora P-Touch Con Un Pc (Sólo Para Pt-7600)
Uso de la Etiquetadora P-touch con un PC (sólo para PT-7600) Esta etiquetadora P-touch está provista de un puerto USB que permite conectarla a un ® ® PC que opere en Microsoft Windows . El CD-ROM adjunto incluye P-touch Editor 5.0, que se instala junto con el controlador de impresión, y P-touch Transfer Manager. -
Page 164: Requisitos Del Sistema
Precauciones relativas al CD-ROM ● No raye el CD-ROM. ● No exponga el CD-ROM a temperaturas extremadamente altas ni extremadamente bajas. ● No coloque objetos pesados sobre el CD-ROM ni ejerza presión sobre este disco. ● El software contenido en el CD-ROM está indicado para su uso exclusivo con la máquina comprada. - Page 165 Instalación del programa P-touch Editor 5.0 ☞ El procedimiento de instalación puede variar en función del sistema operativo de su ® PC. Aquí se muestra Windows Vista como ejemplo. Inicie el PC asegurándose de iniciar sesión como usuario con derechos de Administrador.
- Page 166 Instalación del controlador de impresión ☞ Lea el contenido del cuadro de diálogo “Before installing the printer driver” y, a continuación, seleccione [Si, confirmado] y haga clic en [Aceptar]. El procedimiento de instalación del controlador de impresión varía según el sistema operativo que se utilice.
- Page 167 La impresora se detectará y, a continuación, aparecerá de nuevo un mensaje de advertencia que indica que no se ha encontrado ninguna firma digital. Haga clic en [Sí] para instalar el controlador de impresión. Se le preguntará si desea registrar la etiquetadora P-touch en línea, haga clic en [Sí] y luego en [Siguiente].
- Page 168 La impresora se detectará y, a continuación, se iniciará el “Asistente para hardware nuevo encontrado”. Seleccione [No, quizá en otro momento] y haga clic en [Siguiente]. En el cuadro de diálogo para seleccionar el método de instalación, seleccione “Instalar automáticamente el software (recomendado)”...
-
Page 169: Desinstalación De P-Touch Editor / Quick Editor
La impresora se detectará y, a continuación, se instalará el controlador. Se le preguntará si desea registrar la etiquetadora P-touch en línea, haga clic en [Sí] y luego en [Siguiente]. Si ha seleccionado registrar el producto, se abrirá una nueva ventana del navegador de Internet predeterminado. Haga clic en [Finalizar] para completar la instalación. -
Page 170: Uso De P-Touch Editor 5.0
Uso de P-touch Editor 5.0 P-touch Editor 5.0 facilita a todos los usuarios el diseño e impresión de etiquetas más complejas, cualesquiera que sean sus necesidades. Consulte la ayuda de P-touch Editor para obtener ejemplos de diferentes tipos de etiquetas y detalles acerca de la creación, impresión y almacenamiento de etiquetas. A ®... -
Page 171: Inicio De P-Touch Editor
☞ No se puede transferir una maquetación de P-touch Editor que utilice la función de impresión dividida (que amplía la etiqueta y la imprime en 2 o más etiquetas). ☞ Los ajustes de longitud de etiqueta en P-touch Editor y la etiquetadora P-touch pueden ser ligeramente distintos debido a pequeñas variaciones en el funcionamiento mecánico. - Page 172 Seleccione una opción del cuadro de diálogo [Nuevo/Abrir] y haga clic en (Aceptar). • Puede seleccionar la impresora de etiquetas y el tamaño de la cinta. • Si selecciona [Abrir archivo], aparecerá el cuadro de diálogo [Abrir]. Puede seleccionar y abrir el archivo que ha creado y guardado anteriormente.
-
Page 173: Ventana De Diseño
Ventana de diseño Express Mode Este modo permite crear etiquetas con texto e imágenes de manera simple. La ventana de diseño tiene las secciones siguientes: 1Barra de menú Los comandos están clasificados en cada menú (Archivo, Edición, Ver, Insertar, etc.) según su función. 2Barra de comandos La barra de comandos contiene Nuevo/Abrir, Papel, Texto, Marco, Imagen, etc. - Page 174 Professional Mode Este modo ofrece todas las posibilidades de creación de etiquetas mediante el uso de plantillas. La ventana de diseño tiene las secciones siguientes: 1Barra de menú Los comandos están clasificados en cada menú (Archivo, Edición, Ver, Insertar, etc.) según su función. 2Barra estándar Esta barra de herramientas contiene un conjunto de los comandos más utilizados (Nuevo diseño, Abrir, Guardar, Imprimir, etc.).
-
Page 175: Inicio De La Ayuda De P-Touch Editor
☞ El menú [Ver] permite mostrar/ocultar las barras de herramientas, la paleta de propiedades y ventanas. ☞ Consulte la ayuda de P-touch Editor para obtener más información. Snap Mode En este modo puede capturar la pantalla, imprimirla como una imagen y guardarla para un uso futuro. - Page 176 En el cuadro de diálogo [Nuevo/Abrir], haga clic en [Ayuda-procedimientos para]. Iniciar desde P-touch Editor Haga clic en el menú Ayuda y seleccione Ayuda de P-touch Editor. Express Mode Professional Mode Iniciar desde Snap Mode Haga clic con el botón secundario del ratón y seleccione Ayuda de P-touch Editor.
-
Page 177: Transferencia De Datos A/Desde Un Pc
Impresión de la descripción de la ayuda Es posible imprimir la información que proporciona la ayuda de P-touch Editor. Utilice su impresora habitual para imprimir la información de la ayuda de P-touch Editor. En la ficha [Contenido], seleccione el tema que desea imprimir. Haga clic en en la barra de herramientas. -
Page 178: Uso De P-Touch Transfer Manager Y P-Touch Library
Uso de P-touch Transfer Manager y P-touch Library ☞ Aunque la PT-7600 se puede conectar al PC mediante una conexión USB, los diseños de etiquetas creados en P-touch Editor no se pueden imprimir directamente desde la aplicación. P-touch Transfer Manager: la PT-7600 puede transferir plantillas creadas en P-touch Editor. - Page 179 Ventana de diseño 1Menú Los comandos están clasificados en cada menú (Archivo, Edición, Ver, Herramientas y Ayuda) según su función. 2Barra de herramientas Se incluyen iconos para los comandos que se utilizan con mayor frecuencia. Haga clic en un icono para acceder a ese comando. 3Selección del modelo de impresora (Sólo en P-touch Transfer Manager) Seleccione el modelo de impresora para enviar los datos.
-
Page 180: Transferencia De Las Plantillas De Etiquetas Desde El Pc
Explicaciones de los iconos Icono Nombre del botón Función Transferir (Sólo Transfiere las plantillas de etiquetas y otros datos para P-touch desde el PC a la etiquetadora P-touch (si conecta el Transfer Manager) cable de interfaz USB). Copia de seguridad Realiza una copia de seguridad de los datos que ha (Sólo para P-touch transferido a la etiquetadora P-touch utilizando P-... - Page 181 Arrastre los datos de transferencia a la carpeta que ha creado. Arrastre los datos de transferencia de Todos los contenidos, Diseños u otra carpeta bajo Filtro. Cuando transfiera varios conjuntos de datos, puede desplazar todos los datos de transferencia a la carpeta que haya creado. Los números de Asignación de clave se asignan automáticamente a los datos de transferencia de la carpeta que ha creado en...
-
Page 182: Para Agregar Al Texto Una Imagen De Carácter Definida Por El Usuario
Haga clic en [OK]. Los datos en la carpeta seleccionada en la vista de carpetas se transferirán a la etiquetadora P-touch. ☞ Si ha seleccionado datos específicos en la vista de lista, sólo se transferirán los datos seleccionados a la etiquetadora P-touch. Para agregar al texto una imagen de carácter definida por el usuario Si se asigna a una tecla PF una imagen de carácter definida por el usuario (un carácter de mapa de bits que normalmente no está... - Page 183 Uso de una plantilla no vinculada a una base de datos Una plantilla no vinculada se usa de la misma forma que cualquiera de las plantillas de formato automático predefinidas. Para obtener más información acerca del uso de las plantillas de formato automático, consulte Uso de las plantillas de formato automático en la página 33.
-
Page 184: Uso De Los Datos De La Base De Datos Descargada
☞ Si la función de corte está ajustada a 1 o 3, aparecerá el mensaje “CORTAR CINTA Y ALIMENTAR” (corte la cinta para continuar) después de que se imprima cada etiqueta. Pulse el botón del cortador de la cinta para cortar la etiqueta y proseguir con la impresión. ☞... - Page 185 ☞ Para buscar un registro concreto, consulte Búsqueda en la base de datos en la página 70. Uso de los datos de la base de datos en un modo de tipo de etiqueta Esta función permite seleccionar la serie de campos de base de datos a imprimir. Pulse a y luego seleccione el modo de tipo de etiqueta tal como se describe en el capítulo 2.
-
Page 186: Copia De Seguridad De Plantillas De Etiquetas
Búsqueda en la base de datos Al seleccionar un registro de base de datos para usarlo en una plantilla o para añadir sus datos a una etiqueta, es posible buscar en la base de datos un registro que contenga caracteres concretos o que tenga un número determinado. Para buscar en la base de datos un registro que contenga caracteres concretos: Pulse g y e hasta que aparezca la... - Page 187 Seleccione la etiquetadora P-touch de la que va a realizar la copia de seguridad y haga clic en Aparecerá el mensaje de confirmación de la copia de seguridad. Haga clic en [Sí]. Se creará una nueva carpeta con un nombre que contiene la fecha actual dentro de la carpeta de la etiquetadora P-touch, y se transferirán todos los datos de la...
-
Page 188: Inicio De P-Touch Library
Inicio de P-touch Library Puede utilizar P-touch Library para acceder a etiquetas que desee editar. Haga clic en el botón [Inicio], seleccione [Todos los programas (Programas)] - [Brother P-touch] - [P-touch Tools] - [P-touch Transfer Manager 2.1]. Se abrirá P-touch Library. Apertura y edición de datos Seleccione los datos que desea editar y haga clic en... - Page 189 Compruebe los elementos que se utilizarán como condiciones de búsqueda y defina los elementos de la búsqueda. Los elementos de la búsqueda que se pueden definir son los siguientes. Ajustes Detalles Define el método para combinar varios elementos de búsqueda. Si selecciona Parámetros Y, se buscan los archivos que cumplan todas las condiciones.
-
Page 190: Apéndice
Apéndice Restablecimiento de la Etiquetadora P-touch Es posible restablecer la memoria interna de la etiquetadora P-touch cuando se desee borrar todos los archivos de etiqueta guardados o en el caso de que la etiquetadora P- touch no funcione correctamente. Apague la máquina y, después, mientras mantiene pulsadas g y , pulse para volver a encenderla Deje de pulsar g y... - Page 191 Problema Causa Solución Si no se ha introducido ningún texto, ¿Ha introducido texto? no se imprimirá ninguna etiqueta. ¿Se ha colocado la cinta Compruebe que el cartucho de cinta correctamente y queda cinta se ha instalado correctamente y que suficiente? queda suficiente cinta.
-
Page 192: Lista De Mensajes De Error
Problema Causa Solución Cuando la cinta muestra franjas, esto indica que se ha llegado al final ¿Queda suficiente cinta en la cinta? La etiquetadora P-touch de la misma. Sustituya la cinta se detiene durante la cuando aparecen estas franjas. impression de una ¿Le queda poca carga a las baterías y Reemplace todas las baterías o etiqueta. - Page 193 Mensaje de error Causa Solución • Este mensaje aparecerá si la • Reduzca la anchura del código de barras. CÓD BRRS longitud del código de barras DEMASIADO LARGO es superior a 8,8"(22 cm) al pulsar p. • Pulse n para utilizar el •...
- Page 194 Mensaje de error Causa Solución En cinta de 3/4"(18 mm): • Este mensaje aparecerá si • Reduzca el número de líneas o LÍMITE DE LÍNEA intenta imprimir o usar la instale una cinta más ancha. 5 LÍNEAS MÁX. función de vista preliminar cuando el número de líneas del texto es mayor que el En cinta de 1/2"(12 mm):...
- Page 195 Mensaje de error Causa Solución • Este mensaje aparecerá si no • Instale un casete de cinta de INSTAL. CINTA se encuentra instalado casete 3/4"(18 mm) de anchura. 3/4 PULGADA. de cinta de 3/4"(18 mm) de anchura al imprimir una plantilla de formato INSTAL.
- Page 196 Mensaje de error Causa Solución • Este mensaje aparecerá si • Antes de intentar invocar o intenta invocar o borrar un borrar un archivo de texto, NO HAY ARCHIVOS archivo de texto de la almacénelo. memoria sin que haya ninguno almacenado. •...
-
Page 197: Características Técnicas De La Máquina
Características técnicas de la máquina Unidad principal Elemento Especificación Dispositivo de entrada Teclado (56 teclas) Pantalla 16 caracteres x 2 líneas (132 puntos x 48 puntos) * Indicador de línea y 15 caracteres = 16 caracteres Contraste de la panta- 5 niveles (+2, +1, 0, -1, -2) lla LCD Luz posterior... - Page 198 Elemento Especificación Caracteres Conjunto de caracteres Hay un total de 373 caracteres (62 alfanuméricos, internos: 164 símbolos y 147 caracteres acentuados) Memoria intermedia de Máximo de 512 caracteres texto Fuentes Helsinki Tamaño de caracteres Auto*, 48 pt, 36 pt, 24 pt, 18 pt, 12 pt, 9 pt, 6 pt * 62 puntos como máximo (una línea del texto con sólo letras mayúsculas y números en la cinta de 1"...
-
Page 199: Entorno Operativo: Windows® (Sólo Pt-7600)
® Entorno operativo: Windows (sólo PT-7600) Elemento Especificación ® ® Microsoft Windows 2000 Professional / XP/ ® Windows Vista Memoria ® Windows 2000 Pro, XP Pro, XP Home: Se requieren 128MB o más ® Windows Vista : 512 MB o más Disco duro Se requieren 70MB o más Monitor... -
Page 200: Índice Alfabético
Índice alfabético Cinta de identificación flexible ..11 código de barras AC adapter ........5 caracteres especiales....24 ajuste de longitud ......43 confirmación........19 ajuste predeterminado..... 19 copias..........35 alineación ........33 cursor ..........20 alineación del texto a la derecha ..33 indicador........ - Page 201 función de nuevo bloque ....21 instalación función de numeración ....36 P-touch Editor......47 función de reducción automática..43 invocación ........40 imagen de carácter definida por el letras mayúsculas......20 usuario........... 66 letras minúsculas ......20 impresión en cadena....... 42 limpieza impresión especular......
- Page 202 P-touch Editor inicio ......... 54 versión........... 44 instalación........47 vista preliminar....... 34 plantilla........66 visualizador........4 contraste ........42 visualizador de LCD ......4 rodillos .......... 45 selección........19, 20 ajuste predeterminado....19 serie de bloques......37 serie de registros de la base de datos..........
-
Page 203: Información De Contacto (Sólo Para Ee.uu.)
Información de contacto (sólo para EE.UU.) - Page 208 Printed in China Impreso en China LW2575001B...