GE J1470S Quick Start Manual
J series
Hide thumbs
Also See for J1470S:
- User manual (88 pages) ,
- Kullanıcı el kitabı (85 pages) ,
- Bruksanvisning (85 pages)
Advertisement
Quick Links
Download this manual
See also:
User Manual
GE Digital Camera
J Series : J1470S
© 2011 General Imaging Company
http://www.ge.com/digitalcameras
© 2011 General Imaging Company
1
2
2
1
5
4
3
4
5
6
7
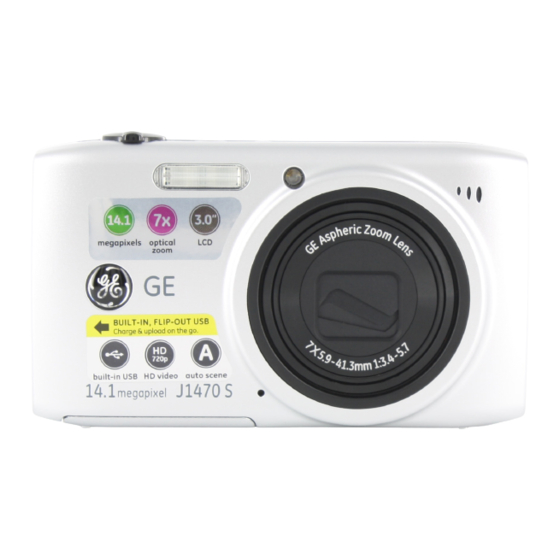
Camera Views
Delete button/Self-timer button/Down
1
Flash Lamp
14
button
2
AF Assist/Timer Indicator
15
Face Detection/Left button
3
Lens
16
Function/OK Button
4
Speaker
17
Wrist Strap
5
Microphone
18
USB interface switch
6
LCD Screen
19
USB interface
7
i key Status Indicator
20
Power Button
8
Mode button
21
Movie button
9
Status Indicator
22
Shutter Button
10
Playback Button
23
Zoom wheel
11
Menu Button
24
Tripod Socket
12
Disp/Up Button
25
Card Slot/Battery Compartment
3
13
Flash Mode/Right Button
26
Memory card/Battery slot switch
Inserting the battery
1. Slide open the battery cover in the direction shown
direction shown in figure
.
2. Insert the battery as shown in figure
.
3. Close the battery cover and slide it to the right to lock it as shown in figures
Setting the Date/Time/Language
1. Press the power button to turn on the camera and the language menu will
appear.Use the Up/Down/Left/Right button to select a language, then press
to confirm the language.
2. Use the Up/Down/Left/Right button again to set the date and time, and press
to confirm.
Taking a picture
1. Hold the camera securely.
2. Press the Zoom wheel on either the Tele or Wide position of the camera to zoom
in or out of your subject while taking pictures.
3. Press the shutter button halfway to focus on the subject then press the button
fully to take a picture.
Using the Mode Button
The camera provides a convenient Mode Button that allows you to switch easily
between different modes.
Press the Left/Right button to choose the mode, then press
Auto mode
Manual mode
Panorama mode
Portrait Mode
Using the menu button
The convenient menu button allows you to access the shooting menus, and camera
settings menus more quickly.
Press the Left/Right button to switch between menu types, then press the Down
button to select the page with the function you want to adjust. Press
Photo setting menu
Recording setting menu
Playback setting mebu
Display setting menu
Viewing your picture
1. Press the Playback button to switch to Playback mode.
2. Use the Left/Right button to browse through your photos.
Quick Start Guide English
Vues de l'appareil photo
1
Flash
2
Assistant AF / Indicateur de compteur
3
Objectif
4
Haut-parleur
5
Micro
6
Ecran LCD
7
Touche i
8
Sélecteur de mode
9
Indicateur d'état
10 Bouton Lecture
11 Bouton Menu
12 Bouton Haut/Bas
13 Bouton Mode Flash / Droite
Insérer la batterie
1. Ouvrez le compartiment de la batterie .
then lift the cover the
2. Insérez le clos batterie dans le créneau de la batterie Dans la correcte
direction.
3. Fermez le compartiment de la batterie.
.
Régler la date, l'heure et la langue
1. Appuyer sur Marche/arrêt pour mettre l'appareil sous tension. Le menu Langue
apparaît,Utiliser les flèches vers le haut, vers le bas, à gauche ou à droite pour
sélectionner la langue,Puis appuyer sur
2. Utiliser à nouveau les flèches vers le haut,vers le bas, vers la gauche ou vers la
droite pour régler la date et l'heure,Appuyer ensuite sur
Prendre une photo
1. Maintenir fermement l'appareil photo.
2. Composer votre image depuis l'écran LCD.
3. Appuyer légèrement sur le bouton de l'obturateur pour faire la mise au point
sur le sujet au centre de l'image, puis appuyer complètement sur le bouton de
l'obturateur pour prendre la photo.
Utilisation du bouton Mode
La caméra possède un bouton Mode pratique qui permet de changer facilement
entre les différents modes.
Appuyez sur le bouton Gauche/Droite pour choisir le mode,appuyez sur
to confirm.
confirmer.
ASCN mode
Mode auto
Scene mode
Mode manuel
Movie mode
Panorama
Mode Portrait
Utilisation des touches du menu
L'appareil photo dispose de touches de menu appropriées vous permettant de
procéder plus rapidement aux réglages de prise de vue et de l'appareil photo.
Appuyez sur la touche gauche/droite pour trouver le type de menu désiré puis sur les
touches bas et
respectivement pour le sélectionner et le valider.
to confirm.
Réglage photo
Basic setting menu
Réglage film
Link setting menu
Réglage Lecture
File and software setting menu
Configuration d'affichage
Afficher votre image
1. Placer la molette des modes en mode Lecture.
2. Utiliser les flèches vers la gauche ou vers la droite pour passer d'une photo à
une autre.
Guide de Mise en route Français
14
Touche Supprimer / Retardateur / Bas
15
Touche de prise de vue rapprochée/
Gauche
16
Fonction/Bouton OK
17
Bracelet
18
Commutateur d'interface USB
19
Interface USB
20
Bouton d'alimentation
21
Touche Vidéo
22
Déclencheur
23
Roulette du zoom
24
Douille pour trépied
25
Fente pour carte mémoire /
Compartiment de batterie
26
Loquet du logement Carte /mémoire et
batterie
pour confirmer votre choix.
pour confirmer.
pour
Mode ASCN
Mode paysage
Mode film
Installation générale
Transmission
Fichier/logiciel
Advertisement

Related Manuals for GE J1470S


Summary of Contents for GE J1470S
- Page 1 GE Digital Camera Quick Start Guide English Guide de Mise en route Français J Series : J1470S Camera Views Vues de l’appareil photo Flash Touche Supprimer / Retardateur / Bas Delete button/Self-timer button/Down Flash Lamp button Assistant AF / Indicateur de compteur Touche de prise de vue rapprochée/...
- Page 2 Guía de inicio rápido Español Guia de consulta rápida Português Schnellstartanleitung Deutsch Guida rapida Italiano Vistas de la Cámara Vistas da câmera Kamera-Ansichten Vedute della fotocamera Botão excluir/botão temporizador Botón Eliminar/Botón Temp. Auto/Botón Abajo Blitz Löschen-/Selbstauslöser-/Unten-Taste Lampada Flash Pulsante Cancella/Autoscatto/Giù Lámpara de flash 1 Lâmpada do flash automático/botão para baixo...