RCA EZ409HD - Small Wonder Camcorder User Manual
User manual
Hide thumbs
Also See for EZ409HD - Small Wonder Camcorder:
- Quick start manual (1 page) ,
- Quick start manual (2 pages)

Related Manuals for RCA EZ409HD - Small Wonder Camcorder

Summary of Contents for RCA EZ409HD - Small Wonder Camcorder
-
Page 1: User Manual
user manual EZ409HD It is important to read this user manual prior to using your new product for the first time. -
Page 2: Fcc Statement
FCC information FCC statement Manufacturer/Responsible Party This device complies with part 15 of the FCC rules. Audiovox Electronics Corp., Operation is subject to the following two 150 Marcus Blvd., Hauppauge, NY 11788 conditions: (1) This device may not cause harmful 1-317-810-4880 interference, and (2) This device must accept any (Please note this phone number is for regulatory... -
Page 3: Safety Information
Safety information CAUTION RISK OF ELECTRIC SHOCK DO NOT OPEN THE LIGHTNING FLASH THE EXCLAMATION CAUTION: TO REDUCE THE AND ARROWHEAD POINT WITHIN THE RISK OF ELECTRIC SHOCK, WITHIN THE TRIANGLE TRIANGLE IS A DO NOT REMOVE COVER (OR IS A WARNING SIGN WARNING SIGN BACK). -
Page 4: Table Of Contents
Computer system requirements ..........15 Getting started Connecting to a PC ................15 1. Content of the box ..............7 About RCA Memory Manager .............15 2. Charging the battery ..............7 Viewing videos on PC ..............15 3. Inserting microSD memory card ..........7 4. Turning on the camcorder ............7 Additional information Tips and troubleshooting ..............16... -
Page 5: End User License Agreement
(b) You may transfer the Program and license to another permanently erasing the Program and all copies party only as a part of the RCA branded Portable thereof. Digital Audio/Video Device (“A/V Device”), and only if... - Page 6 End user license agreement 4. WARRANTY DISCLAIMER 7. THIRD PARTY SOFTWARE THE PROGRAM IS PROVIDED “AS IS” WITHOUT WARRANTY ANY THIRD PARTY SOFTWARE THAT MAY BE PROVIDED OF ANY KIND, EITHER EXPRESSED OR IMPLIED, WITH THE PROGRAM IS INCLUDED FOR USE AT YOUR INCLUDING, BUT NOT LIMITED TO THE IMPLIED OPTION.
-
Page 7: Getting Started
Getting started Lift up the cover Dear RCA customer, Thank you for purchasing the RCA Small Wonder Camcorder. This product will let you record videos with high definition quality. You can also manage your recordings on your computer with the RCA Memory Manager included with this product. -
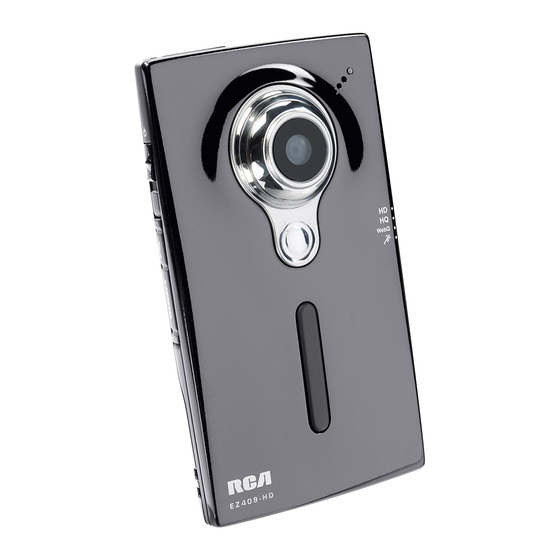
Page 8: General Controls
General controls Panel controls microSD card slot (Lift up the cover to show the card slot) Recording indicator Microphone On/off switch* Lens USB and HDMI video output (Lift up the cover to access the connectors) Camcorder strap hole LCD screen AV output Delete Playback/pause... -
Page 9: Operation Modes
General controls Operation modes There are three basic modes for operating the camcorder: Video, Photo and Playback. The camcorder will always enter into Video mode after switched on. Refer to the diagram below for switching between modes and read relevant sections in the user manual for detailed operations. Switch on Press PHOTO... -
Page 10: Video Mode
Video mode Recording videos • A pause indicator replaces the red at the top 1. In Video mode ( ), press the red RECORD left corner of the screen. button to begin recording. • To resume recording, press PLAY/PAUSE. Video mode 3. -
Page 11: Photo Mode
Photo mode Taking photos You must return to Video mode ( ) 1. In Photo mode ( ), press PHOTO to take photos. before recording videos. Photo mode • If you are not in Photo mode, press PHOTO once to enter Photo mode ( ) and then press the button again to take photos. -
Page 12: Playback Mode
Playback mode Playing back recordings 4. Press PLAY/PAUSE to pause playback. • Press PLAY/PAUSE again to resume playback. 1. Press PLAY/PAUSE to enter Playback mode and start playback of the most recent recording Pause indicator (video/photo). Playback indicator Current file number/Total number of files Remaining playback time Elapsed... -
Page 13: Deleting
Deleting Deleting recordings To delete all videos, press & hold 1. Press DELETE and the last recording and DELETE for 3 seconds and then repeat “DELETE ?” appear on the screen. step 2. • To select another video, press to cue the previous or next video. -
Page 14: Connecting To External Devices
Connecting to external devices Viewing videos on TV Recording videos to VHS tape or DVD 1. Plug in the AV cable (provided) – Insert the single 1. Plug in the AV cable (provided) – Insert the connector end into the camcorder (AV jack) and single connector end into the camcorder and connect the double connector ends to the connect the double connector ends to... -
Page 15: Managing Videos On Your Computer
The installation sequence will only appear the first time you connect your camcorder to a PC. Each subsequent time you connect the camcorder to that PC, the RCA Memory Manager application should open automatically. * Available for free download at www.microsoft.com ** The application is also available for free download at www.rcaaudiovideo.com... -
Page 16: Additional Information
Technical specifications • Adjust the volume by pressing + or – during Product: Digital Camera Recorder playback. Brand: RCA Model: EZ409HD Pictures are distorted when videos are played Electrical Consumption: 3.7V Lithium battery back via connected TV set. Power adapter: (input) 100-120V~60Hz 0.3A, •... -
Page 17: Back Up Your Data
As with any portable player, you must back up the Please visit www.rcaaudiovideo.com for: drive regularly. The manufacturer is not responsible • Latest software and firmware for lost data. • RCA Memory Manager Software • User manual • Frequently asked questions (FAQ) • Customer service and technical support... -
Page 18: Warranty Information
PURCHASE. IN NO CASE SHALL THE COMPANY BE 12 Month Limited Warranty LIABLE FOR ANY CONSEQUENTIAL OR INCIDENTAL Applies to RCA Audio/Video Products DAMAGES FOR BREACH OF THIS OR ANY OTHER WARRANTY. No person or representative is authorized to assume for the Company any liability AUDIOVOX ELECTRONICS CORP. - Page 19 Warranty information 1-877-833-3491 • Insure your shipment for loss or damage. Audiovox accepts no liability in case of damage or loss en route to Audiovox. • Pay any charges billed to you by the Exchange Center for service not covered by the warranty. •...
- Page 20 Illustrations contained within this publication are for representation only and subject to change. The descriptions and characteristics given in this document are given as a general indication and not as a guarantee. In order to provide the highest quality product possible, we reserve the right to make any improvement or modification without prior notice.