Drolet ECO-65 Owner's Manual
Drolet eco-65 pellet stove owner's manual
Hide thumbs
Also See for ECO-65:
- Installation and operation manual (102 pages) ,
- Installation and operation manual (98 pages)
Table of Contents
Advertisement
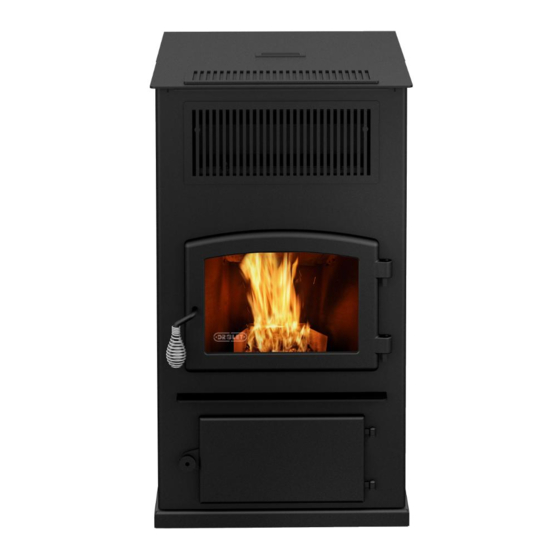
ECO - 65
Warning: If your appliance is not properly installed a house fire may result. For your safety, follow the
installation directions. Contact local building or fire officials about restrictions and installation inspection
requirements in your area. These authorities should be consulted to determine if there is a need to obtain a
permit.
PLEASE read this entire manual before installation and use of this pellet fuel-burning room heater. Failure to
follow these instructions could result in property damage, body injury, or even death.
Save these instructions.
Some surfaces become hot at higher feeding rates. To prevent potential burns, avoid contact with those areas.
This heating unit must serve as a supplementary heat source. An alternative heat source should be available in
the home if needed. The manufacturer cannot be responsible for additional heating costs associated with the
use of an alternative heat source.
It is highly recommended that the user buys this product from a retailer who can provide installation and
maintenance advices.
PROFESSIONAL INSTALLATION IS HIGHLY RECOMMENDED
This manual is available for free download on the manufacturer's web site. It is a copyrighted
document. Re-sale is strictly prohibited. The manufacturer may update this manual from time
to time and cannot be responsible for problems, injuries, or damages arising out of the use of
information contained in any manual obtained from unauthorized sources.
Printed in Canada
OWNER'S MANUAL
Manufactured by:
STOVE BUILDER INTERNATIONAL INC.
250, de Copenhague, Saint-Augustin-de-Desmaures
(Quebec), Canada G3A 2H3
Tel: (418) 878-3040
Fax: (418) 878-3001
45433A
12-03-2013
Advertisement
Table of Contents

Related Manuals for Drolet ECO-65


Summary of Contents for Drolet ECO-65
- Page 1 ECO - 65 OWNER’S MANUAL Warning: If your appliance is not properly installed a house fire may result. For your safety, follow the installation directions. Contact local building or fire officials about restrictions and installation inspection requirements in your area. These authorities should be consulted to determine if there is a need to obtain a permit.
- Page 2 INTRODUCTION Thank you for purchasing the ECO-65 pellet stove. You are now prepared to burn pellet in the most efficient, convenient way possible. To achieve the safest, most efficient and most enjoyable performance from your stove, you must do three things: 1) Install it properly; 2) Operate it correctly;...
-
Page 3: Safety Precautions
SAFETY PRECAUTIONS DO NOT OPERATE YOUR STOVE IF KEEP FOREIGN OBJECTS OUT OF YOU SMELL SMOKE COMING FROM IT. THE HOPPER. TURN IT OFF, MONITOR IT, AND CALL YOUR DEALER. NEVER GASOLINE, THROW THIS MANUAL GASOLINE-TYPE LANTERN FUEL, AWAY. THIS MANUAL HAS IMPORTANT KEROSENE, CHARCOAL LIGHTER... - Page 4 To receive full warranty coverage, you will need to show evidence of the date you purchased your stove. Keep your sales invoice. We also recommend that you register your warranty online at http://www.drolet.ca/en/service-support/warranty-registration Registering your warranty online will help us track rapidly the information we need on your stove.
-
Page 5: Table Of Contents
REMOVAL AND REPLACEMENT OF GASKETS ................. 31 3.11. RECOMMENDED MAINTENANCE SCHEDULE ..................38 TROUBLESHOOTING GUIDE ........................ 39 ELECTRICAL DIAGRAM ........................45 5.1. FUSE ACCESS ............................46 REPLACEMENT PARTS ......................... 47 APPENDIX A ................................ 50 APPENDIX B ................................ 51 DROLET LIMITED LIFETIME WARRANTY ......................52... -
Page 6: Installation
1.3. CLEARANCES The Drolet ECO-65 has been tested and listed for installation in residential and mobile home. (refer to figure 1 to 3) FLOOR PROTECTION: In the USA, the unit must be installed on a non-combustible floor pad extending at least 6 inches... - Page 7 DO NOT USE MAKESHIFT MATERIALS OR COMPROMISES IN THE INSTALLATION OF THIS UNIT. INSTALL VENT WITH CLEARANCES SPECIFIED BY THE VENT MANUFACTURER. This heating unit must serve as a supplementary heat source. An alternative heat source should be available in the home if needed.
-
Page 8: Combustion Air Supply
1.4. COMBUSTION AIR SUPPLY It is mandatory to connect this stove to an outside combustion air source to reduce the risk of hopper burn back caused by negative pressure. A insulated 4” inside diameter metallic pipe, either flexible or rigid, must be attached to the inlet at the stove’s rear (refer to figures 5, 6 &... - Page 9 FIGURE 8 FIGURE 7 Fresh air supply Fresh air supply...
-
Page 10: Anchor The Stove
1.5. ANCHOR THE STOVE The stove must be anchored to the floor with screws. Please use the two holes located on each side of the pedestal. (See Fig. 9) FIGURE 9 Anchor 1.6. VENTING In Canada, we recommend that you use a listed pellet vent that meets the ULC S-609-M89/ORD C441-M90 Standard. -
Page 11: Equivalent Vent Length (Evl)
DO NOT CONNECT THIS UNIT TO A CHIMNEY FLUE SERVING ANOTHER APPLIANCE. DO NOT INSTALL A FLUE DAMPER IN THE EXHAUST VENTING SYSTEM OF THIS UNIT. WARNING: INSTALL VENT AT CLEARANCES SPECIFIED BY THE VENT MANUFACTURER. WARNING: DO NOT INSTALL IN BEDROOM CAUTION: THE STRUCTURAL INTEGRITY OF THE MANUFACTURED HOME FLOOR, WALL, AND CEILING/ROOF MUST BE MAINTAINED... -
Page 12: Installation Configurations
1.6.2. Installation Configurations a) Horizontally through wall (Refer to figures 10, 11, or 12) NOTE: Follow vent chimney manufacturer’s instructions. 1. Position stove, adhering to clearances shown in Figures 1 & 2. 2. Locate position of hole in wall; directly behind stove exhaust vent (refer to figure 5). 3. - Page 13 In Canada: a) less than 7 feet vertically above any public sidewalk, lane, street, right-of-way, stairway or landing; b) within 6 feet of a mechanical air supply inlet to a building; c) within 3 feet of a building opening or air inlet of another appliance; d) above a gas meter/regulator assembly within 3 feet horizontally of the vertical centerline of the regulator e) within 6 feet of any gas service regulator vent outlet or within 3 feet of an oil tank vent or an oil tank...
-
Page 14: B) Vertically With New Chimney System
b) Vertically with new chimney system (Refer to Figure 13) OPTION: To achieve a centered vertical installation, a 45º elbow and a clean-out tee can be used to offset the pipe from the exhaust outlet to the rear center of the stove. OPTION: Install Vent elbow in place of clean-out tee. -
Page 15: C) Vertically Into Existing Chimney System
c) Vertically into existing chimney system (Refer to Figure 14) As an alternative, 4” Vent can be run inside existing chimney to termination (Figure 12). This is the preferred method. Follow guidelines for equivalent vent length. FIGURE 14 Venting through existing chimney d) Vertically into existing masonry fireplace (Refer to figure 15) -
Page 16: E) Installation Through Side Of Masonry Chimney
e) Installation through side of masonry chimney (Refer to figure 16) 1. Position the stove, adhering to the clearances in Figures 1 & 2. Mark the center of the hole where the pipe is to pierce the masonry chimney. 2. It will be necessary to break out the masonry around the location of the pipe center mark. Use a 5-inch diameter hole for 4-inch pipe. -
Page 17: Operation
Pellets made of wood and hay will produce more ash than straight wood pellets. The wood and hay pellets that have been tested in your Eco-65 consisted of 1/3 hay and 2/3 wood. Make sure that any wood and hay pellets you put in your Eco-65 respect that mix (+/- 10%). -
Page 18: Lighting Procedure
2.6. UNIT CONTROLS (See Figure 16) The blowers and automatic fuel supply are controlled from a panel on the right-hand side of the ECO-65. The control panel functions are as follows. MODE SWITCH When the mode switch is pressed, you will be able to choose the Manual or the Thermostat mode, or to turn off the appliance. -
Page 19: Opening Door
CONVECTION BLOWER SPEED CONTROL The convection blower speed varies directly with the fuel feed rate. Reducing the blower speed will also reduce the noise. When the “CONVECTION BLOWER SPEED CONTROL” button is pushed, the convection blower will switch to its lowest speed. The convection blower will remain at its lowest speed unless the stove reaches a certain temperature. -
Page 20: Refueling
2.11. SHUTDOWN PROCEDURE Turning your Drolet stove off is a matter of pressing the “MODE” control panel switch, until the “OFF” led goes on. The blowers will continue to operate until internal firebox temperatures has fallen to a preset level. -
Page 21: Thermostatic Mode
Location of the thermostat is very important to obtain the best comfort and efficiency from your ECO-65. The thermostat should be mounted 50 inches from the floor on a wall located 15 to 20 feet from the stove. You should avoid an installation directly in front of the stove to avoid cycling.(See figure 19) -
Page 22: Operating Safety Precautions
N.B.: It is possible to change the setting of your unit such that if the thermostat does not call for heat after 45 minutes, the unit will remain at the lowest heat setting (#1) but will not shut down (this is the PILOT ON mode). The stove will remain at the lowest heat level until the thermostat calls for heat again. - Page 23 d. KEEP ALL LOOSE OR MOVEABLE HOUSEHOLD COMBUSTIBLES, SUCH AS FURNITURE, DRAPES, TOYS, ETC. AT LEAST THREE FEET FROM THE OPERATING STOVE. e. Maintain proper ventilation. It is important that adequate oxygen be supplied to the fire for the combustion process.
-
Page 24: Maintenance
MAINTENANCE FAILURE TO CLEAN AND MAINTAIN THIS UNIT AS INDICATED CAN RESULT IN POOR PERFORMANCE AND SAFETY HAZARDS. NEVER CLEAN WHEN HOT. WARNING : THE USE OF A DOMESTIC, CENTRAL OR COMMERCIAL VACUUM CLEANER TO PERFORM THE MAINTENANCE OF YOUR PELLET STOVE IS NOT RECOMMENDED. ASH PARTICLES ARE SO FINE THAT IT CAN DAMAGE THE MOTOR OF SUCH VACUUM CLEANERS. -
Page 25: Maintenance Of The Combustion Chamber, Heat Exchangers And Blower Housing
3.2. MAINTENANCE OF THE COMBUSTION CHAMBER, HEAT EXCHANGERS AND BLOWER HOUSING Remove and clean the baffle inside the combustion chamber after burning +/- 10 bags of pellets. 3.3. MAINTENANCE OF THE HEAT EXCHANGERS AND BLOWER HOUSING The heat exchangers should be inspected regularly during the heating season. Easy access is provided: To access the heat exchangers, remove the decorative panel and the air jacket access panel located on the left hand side of the stove. -
Page 26: Venting System Maintenance
3.4. VENTING SYSTEM MAINTENANCE REGULARLY EXAMINE THE FLUE PIPES, THE JOINTS, AND THE SEALING TRIMS TO ENSURE THAT THE SMOKE AND THE COMBUSTION GASES ARE NOT TRANSPORTED INTO THE AIR DUCTING SYSTEM. The most efficient method to sweep the venting system is by using a 4-inch pellet brush. Brush downwards so ash, soot and creosote residues will come off the inner surface and fall at the bottom of the venting system where they can be removed easily. -
Page 27: Ash Removal
3.5. ASH REMOVAL In order to remove ashes form the ash drawer, simply unscrew the wing nut, open the access door, and empty the ash drawer. Attention, it is important that the ash drawer is in place and the access door is kept closed while the appliance is in use. -
Page 28: Door Gasket Maintenance
GLASS CARE Clean door glass as necessary. The use of a specialty designed cleaner is recommended. Your authorized Drolet dealer can also assist you to choose the right product. Regular household glass cleaners will not clean creosote. WARNING: NEVER USE ABRASIVE CLEANERS ON THE GLASS OR DOOR. -
Page 29: Removal And Replacement Of Broken Door Glass
A broken glass must be replaced with an identical ROBAX (ceramic glass) 5 mm thick with the dimensions : 10’’5/32 x 14’’21/32. Your authorized Drolet dealer can help you to obtain this genuine replacement part. To replace the glass, use the following procedure;... - Page 30 Once the retainers are secured the tabs should barely touch the glass … WARNING: REPLACEMENT GLASS SHOULD ONLY BE PURCHASED FROM A DROLET DEALER (SEE “REPLACEMENT PARTS’’ SECTION). TEMPERED GLASS OR ORDINARY GLASS WILL NOW...
-
Page 31: Removal And Replacement Of Gaskets
3.10. REMOVAL AND REPLACEMENT OF GASKETS Exhaust blower cleanout trap gasket Step 1: Slide the left side panel about 10" toward the front. In order to remove the side panel, align the rear bearing with the circular opening in the sliding rail then pull it out. Step 2: Remove all 6 bolts securing the exhaust blower cleanout trap. - Page 32 Step 3: Remove all 4 bolts securing the cleanout plate located inside the exhaust blower cage assembly. Remove all accumulation of soot within the housing using an ahs vacuum. Put back the cleanout plate and its respective bolts in place. Step 4: Apply gasket #21344 from AC09190 on the exhaust blower cleanout trap and secure it all with all 6 bolts kept on step 2.
- Page 33 Front left cleaning and replacing gasket Step 1: Remove the side air jacket access panel by untying the 9 spring clips. Step 2: Remove all 8 bolts securing the cleanout trap. Remove the worn gasket and clean-up the contact surfaces. Clean-up the dirty area inside the appliance with an ash vacuum.
- Page 34 Step 3: Remove all 5 bolts retaining the upper cleanout trap. Remove the worn gasket and clean-up the contact surfaces. Clean-up the dirty area inside the appliance with an ash vacuum. Apply gasket #21348 from AC09190 on the cleanout trap. Put back in place the cleanout trap with its respective bolts. Step 4: Put back in place the side air jacket access panel and re-attach all 9 spring clips.
- Page 35 Step 5: Put back in place the side panel by sitting down the bottom on the lower track first, and then push it to the vertical. Align the rear bearing through the circular opening in the top sliding track and push the side panel toward the back.
- Page 36 Step 2: Remove the upper air jacket access panel by untying the 8 spring clips. Step 3: Remove all 6 bolts retaining the right cleanout panel. Remove the worn gasket and clean-up the contact surfaces. Clean-up the dirty area inside the appliance with an ash vacuum. Apply gasket #21349 from AC09190 on the cleanout panel.
- Page 37 Step 4: Put back in place the upper air jacket access panel and re-attach all 8 spring clips. Step 5: Put back in place the side panel by sitting down the bottom on the lower track first then pushes it to the vertical. Align the rear bearing through the circular opening in the top sliding track and push the side shield toward the back.
-
Page 38: Recommended Maintenance Schedule
3.11. RECOMMENDED MAINTENANCE SCHEDULE Use this as a guide under average-use conditions. Weekly Twice a year Annually Components or after or after +/- 500 pounds 1.5 tons per 3 tons of pellets Baffle Vacuum Bottom air wash inlet Vacuum Burn Pot Brush / Vacuum Glass Clean... -
Page 39: Troubleshooting Guide
TROUBLESHOOTING GUIDE When your stove acts up, your first reaction may be to call for help.This guide may save time and money by enabling you to solve simple problems yourself. Problems can be caused by only five factors: 1) poor fuel; 2) poor operation or maintenance;... - Page 40 STOVE SHUTS OFF AND DISPLAYS WARNING CODE Possible Causes: Possible Remedies: (Unplug stove first when possible) The hopper is out of pellets. Refill the hopper. The burn pot holes are blocked. Remove the burn pot and clean it thoroughly. The air inlet, interior chambers, or exhaust system is partly Follow all cleaning procedures in the maintenance section of the blocked.
- Page 41 The control board is not sending power to the igniter. Check the voltage going to the igniter during ignition. It should be a full current. If the voltage is lower than full current, check the wiring. If the wiring is functional and properly connected, the board is defective.
- Page 42 STOVE STOPS FEEDING PELLETS AND APPEARS ON THE CONTROL BOARD Possible Cause: Possible Remedy: As a security measure, the auger stops turning and feeding pellets The hopper lid has stayed open for more than 3 minutes as soon as the hopper lid opens. It will resume normal operation as soon as the hopper lid is closed.
- Page 43 GLASS “SOOTS” UP AT A VERY FAST RATE FLAME IS LAZY, DARK, AND HAS BLACK TIPS AFTER STOVE HAS BEEN ON FOR A WHILE, THE BURNPOT OVERFILLS Possible Causes: Possible Remedies: Stove or vent pipe is dirty, which restricts airflow through the Follow all cleaning procedure in the maintenance section of the burn pot.
- Page 44 SMOKE SMELL OR SOOT BUILD-UP Because it is a wood-burning device, your Drolet ECO-65 may emit a faint wood-burning odor. If this increases beyond normal, or if you notice an unusual soot build-up on walls or furniture, check your exhaust system carefully for leaks.
-
Page 45: Electrical Diagram
ELECTRICAL DIAGRAM FIGURE 26... -
Page 46: Fuse Access
FIGURE 27 FIGURE 28 5.1. FUSE ACCESS All fuses are located inside the pc board box, you must remove the pc board cover to access the fuse. To do so, simply remove the 5 screws securing it in place. Make sure you put the pc board box back in place before you restart the unit. -
Page 47: Replacement Parts
REPLACEMENT PARTS Contact an Authorized DROLET Dealer to obtain any of these parts. Never use substitute materials. Use of non- approved parts can result in poor performance and safety hazards. ITEM # PIÈCES 1/2 " CHROME PLATED COIL HANDLE AC07867... - Page 48 ITEM # PIÈCES THERMOSTAT TERMINAL 60036 6 OUPUT MOTHER BOARD 44138 REAR VENTILATION LOUVER PL62350 UPPER REAR PANEL PL62349 POWER CORD 96" X 18-3 60013 AUGER 24030 GEAR MOTOR BRACKET 24233 AUGER SUPPORT INSULATION 21193 GEAR MOTOR FOR PELLET STOVE 3.5 RPM 44109 GEAR MOTOR FOR PELLET STOVE 1.7 RPM 44106...
-
Page 50: Appendix A
APPENDIX A HORIZONTAL AND VERTICAL VENT CHART Possible Horizontal vent length (feet) For example, let’s imagine an installation consisting of a horizontal vent coming out at the back of the stove on a total distance of 8 feet. This horizontal run is followed by a Tee and a 6-foot vertical rise. This type of installation is not acceptable. -
Page 51: Appendix B
APPENDIX B INSPECTION FORM... -
Page 52: Drolet Limited Lifetime Warranty
1 year blankets. *Pictures required Shall your unit or a components be defective, contact immediately your DROLET dealer. Prior to your call make sure you have the following information necessary to your warranty claim treatment: Your name, address and telephone Serial number and model name as indicated on number;...