Table of Contents
Advertisement
PRODUCT
SUPPORT
MANUAL
Y1-03-0014
(25-60-01)
Overhaul Manual
with Illustrated Parts List
Rev. R
EM-1A, EM-1D™
Product No. 2204, 2208
FAA PMA Approved under A3-06-1402-
Portable Safety Megaphone
ACR Electronics, Inc.
5757 Ravenswood Road
Fort Lauderdale, Fl 33312
+1(954) 981-3333 • Fax +1 (954) 983-5087
www.acrelectronics.com
Email: Info@acrelectronics.com
A Chelton Group company
Advertisement
Table of Contents

Related Manuals for ACR Electronics EM-1A MEGAPHONE

Summary of Contents for ACR Electronics EM-1A MEGAPHONE
- Page 1 Illustrated Parts List Rev. R EM-1A, EM-1D™ Product No. 2204, 2208 FAA PMA Approved under A3-06-1402- Portable Safety Megaphone ACR Electronics, Inc. 5757 Ravenswood Road Fort Lauderdale, Fl 33312 +1(954) 981-3333 • Fax +1 (954) 983-5087 www.acrelectronics.com Email: Info@acrelectronics.com...
-
Page 2: Table Of Contents
TABLE OF CONTENTS SECTION TITLE PAGE Description Technical Data Operation Cleaning Battery Replacement Testing Trouble Shooting Disassembly Inspection Check 10.0 Repair 11.0 Assembly 12.0 Parts List ILLUSTRATION Figure 1 Block Diagram ACR/EM-1A & EM-1D Portable Safety Megaphone Figure 2 Illustrated Parts List ACR/EM-1A &... -
Page 3: Description
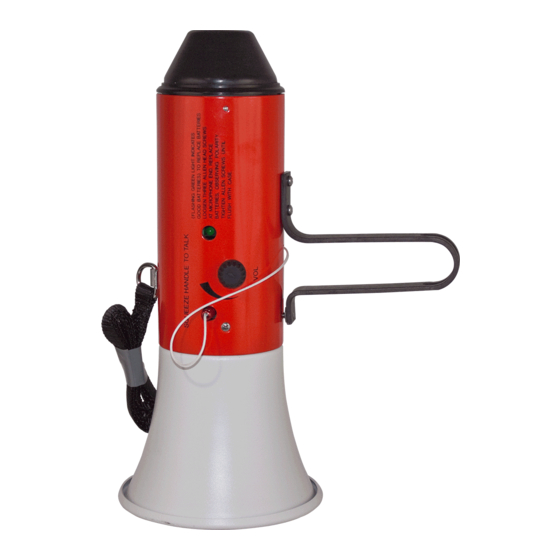
DESCRIPTION The ACR/EM-1A, 1D is a battery operated solid state megaphone specifically developed for use in enclosed areas such as in the interior of an aircraft or ship cabin. It has been designed to minimize regenerative acoustic feedback that results in whistling and other oscillations of this nature. -
Page 4: Operation
Gain Control* Thumb operated Amplifier Integrated circuit, 2 watts power output Speaker Re-entrant horn and driver type; input power five (5) watts; 90° dispersion angle Microphone High Sensitivity Batteries Six (6) standard 1½ volt “AA” cells Power Drain 25 milliamps static current 550 milliamps maximum current Frequency Response 500 to 3500 Hz... - Page 5 Adjust the volume control knob to a suitable sound level. The volume control may be adjusted with the thumb of the same hand holding the megaphone.* When not in use, carry the megaphone by the neck strap, attached to top of unit.
-
Page 6: Cleaning
Audible - when megaphone is activated by squeezing the handle, a chirp heard in the speaker means the remaining battery capacity is greater than 50% of initial capacity. If beep is not present, replace battery. CLEANING External surfaces of the megaphone may be cleaned with a soft cloth, dampened in a solution of mild household detergent. -
Page 7: Troubleshooting
then the amplifier. If the sound character is abnormal, check the batteries and then the siren circuitry.* If no sound is heard, remove the microphone and mouthpiece assembly and the batteries. Check that both the microphone and battery contacts are clean. -
Page 8: Disassembly
DISASSEMBLY (see Figure 2) Megaphone should be disassembled for repair or replacement of components only. 8.1.1 Remove microphone and mouthpiece assembly (2) by removing the three set screws (3). 8.1.2 Remove battery cells (4) from the three tubes by tilting megaphone to allow cells to drop out into the hand. -
Page 9: Assembly
11.1 Assembly of the megaphone is in reverse order of disassembly. Follow these instructions: 11.1.1 Attach Horn (18) and Speaker Assembly (7) to Megaphone Subassembly (10). Ensure alignment with location pins. Pass speaker wires through the provided slot. 11.1.2 Plug speaker connector into the "out" header on PCB. 11.1.3 Push entire assembly gently into the housing (15), until it stops. - Page 10 FIGURE 2 ACR / EM-1A, EM-1D PORTABLE SAFETY MEGAPHONE ILLUSTRATED PARTS LIST...
-
Page 11: Parts List
12.0 PARTS LIST 12.1 Replaceable parts are illustrated in Figure 2, and listed below in the table. Part numbers shown in the “Part Number” column may be ordered from ACR unless another manufacturer’s name is given in parenthesis in the “Description”...