Table of Contents
Advertisement
Advertisement
Table of Contents

Related Manuals for Jensen VM9212


Summary of Contents for Jensen VM9212
- Page 1 VM9212 Installation and Operation Manual Watts Peak 40W x 4...
-
Page 3: Table Of Contents
Thank you for choosing a Jensen product. We hope you will find the instructions in this owner’s manual clear and easy to follow. If you take a few minutes to look through it, you’ll learn how to use all the features of your new Jensen VM9212 Mobile Multimedia Receiver for maximum enjoyment. - Page 4 VM9212...
-
Page 5: Preparation
VM9212 PREPARATION Congratulations on your purchase of the Jensen VM9212 • Programmable Volume Control Mobile Multimedia Receiver. • Rear Camera Input (Normal and Mirror Image View) • Touch Screen Calibration Mode It’s a good idea to read all of the instructions before beginning •... -
Page 6: Installation
Install support strap to make the unit more stable. NOTE: If the VM9212 is to be installed in a car equipped NOTE: For proper operation of the CD/DVD player, the with an on-board drive or navigation computer, do not chassis must be mounted within 20°... - Page 7 VM9212 Final ISO-DIN Installation FINAL INSTALLATION Remove trim ring. Mount factory brackets on new radio using existing screws from old radio. Slide radio chassis into dash opening and secure. Reinstall dash panel. FINAL ISO-DIN INSTALLATION...
-
Page 8: Wiring Diagram
The Media Adapter Cable SUB.W External Power Amplifier allows you to connect a portable media player and SURROUND other devices to your REAR R VM9212 without removing the YELLOW radio. SURROUND REAR L Connect Media Adapter WHITE FRONT R Cable to Auxiliary Input... -
Page 9: Controls And Indicators
7. LCD Display 8. MUTE Press to silence the receiver. Press again to resume previous volume level. NOTE: The VM9212 features Softmute, which will allow the volume to increase or decrease gradually when the MUTE function is activated or deactivated. - Page 10 VM9212 CONTROLS AND INDICATORS 9. IR Remote Control Receiver 10. ( DVD Mode: Press once to play back the previous chapter/ track. TUNER Mode: Press once to auto-search for the previous available radio station. MENU Mode: Press once to move the cursor to the left.
-
Page 11: Remote Control
VM9212 REMOTE CONTROL Table 1: Remote Control Functions Button Function Name Ref# TUNER CD/MP3 MENU Enters the main menu of the Turns on/off PBC when play- disc ing VCD TITLE Enters the title menu of the Plays first ten seconds of... - Page 12 VM9212 Table 1: Remote Control Functions Button Function Name Ref# TUNER CD/MP3 Displays set-up parameters Displays set-up parameters OPEN/ Opens/closes the TFT moni- Opens/closes the TFT moni- Opens/closes the TFT moni- Opens/closes the TFT moni- CLOSE Decreases monitor tilt angle...
-
Page 13: Using The Tft Monitor
VM9212 USING THE TFT MONITOR Open/Close TFT Monitor Aspect Ratio Exit Picture Quality Setting Mode: Press the PIC button (24) on the remote control or the Open TFT Monitor Press the WIDE button (28) on the remote control or DISP/... - Page 14 VM9212 Table 3: Monitor Protective Measures Self OPEN Button Power Obstruction Protection Pressed Reconnected Monitor Unit stops at Monitor fully Monitor is loading in obstruction extended automati- horizontally point horizontally cally loaded into unit Monitor Unit stops at Monitor Monitor swiv-...
-
Page 15: Operating Instructions
VM9212 OPERATING INSTRUCTIONS Power On / Off Audio Control Menu Table 4: Audio Adjustments The Audio Control feature allows you to easily adjust your Press the /SRC button (6) on the unit (or the button (4) Audio Function Adjustable Range audio system to meet the acoustical characteristics of your on the remote control) to turn the unit on. -
Page 16: Setup Menu
VM9212 SETUP MENU To access system settings, press the SETUP button (31) on the unit. A submenu appears in a second row with the Setting Options Function selected option highlighted in blue. the remote control or touch the button on the screen to... -
Page 17: Exiting The System Setup Menu
VM9212 To reset the password, access the “RATING” menu and enter P.VOL Sub-menu Features Setting Options Function the current password. Once the correct password is entered, Setting Options Function you can access the “Password” field and enter a new one. -
Page 18: Tuner Operation
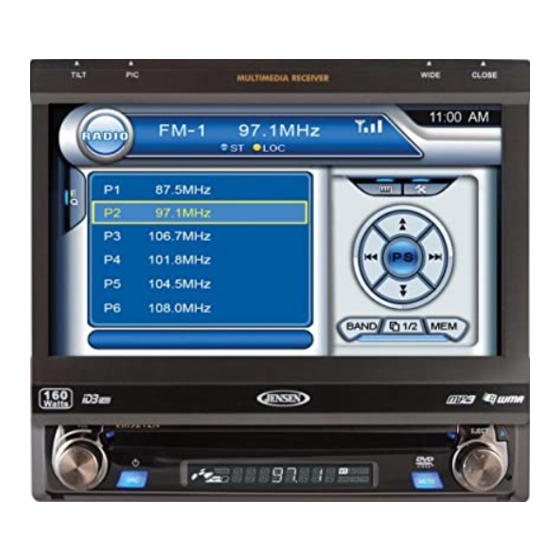
VM9212 TUNER OPERATION Tuner TFT Display Switch to Radio Tuner source Direct Tuning • Touch the top left corner of the screen (the RADIO To enter a radio station directly, touch the button or circle) to view the SOURCE MENU. Touch “Radio”. -
Page 19: Dvd/Vcd Video Operation
VM9212 DVD/VCD VIDEO OPERATION Using the Touch-Screen Controls Slow Motion Playback NOTE: When properly installed, DVD video cannot be Press the << button (22) on the remote control, the V button The touch key areas for DVD playback are outlined below. -
Page 20: Accessing The Dvd Menu
VM9212 • For VCD mode, you can choose Time or Track multiple angles, press the ANGLE button (13) on the remote NOTE: When a VCD is playing with PBC turned “On”, search. control to toggle available angles of the on-screen image. -
Page 21: Playback Information
VM9212 Playback Information Table 5: Disc Properties During DVD and VCD playback, press the INFO button (10) Max Play Symbol 12cm Disc Properties on the remote control to display playback information on the Time screen, including the media playing and current playback (MPEG 1 time. -
Page 22: Dvd/Cd Audio Operation
Operation section for information about these topics. : Touch to view the SETUP menu The VM9212 will play music or other audio files from the 16. Touch for quick access to Equalizer level settings Fast Forward following disc media: 17. -
Page 23: Mp3/Wma Operation
Current time correctly. Use the following settings when compressing audio Track titles The VM9212 player will only recognize three folder levels and data for your MP3 disc: ID3 information does not display folders containing only other folders. In the •... -
Page 24: Controlling Playback
VM9212 Controlling Playback Playing MP3/WMA Files After inserting a MP3/WMA disc, files will play in the sequence of the “Root’ directory. NOTE: When burning MP3 / WMA files onto a DVD disc, use the 2X or 4X burning option, if available. This slower burning speed will help eliminate buffer errors and increase disc reading reliability. -
Page 25: Troubleshooting
VM9212 TROUBLESHOOTING Table 7: Troubleshooting Problem Cause Corrective Action GENERAL Unit will not power on Radio Fuse blown Install new fuse with correct rating Car battery fuse blown Install new fuse with correct rating Illegal operation Press the RESET button located in the bottom right corner of the front panel... -
Page 26: Error Messages
VM9212 Table 7: Troubleshooting Problem Cause Corrective Action Disc does not play back Disc is warped or scratched Use disc in good condition Disc is dirty or wet Clean disc with soft cloth Laser pickup is dirty Clean laser pickup with cleaning disc... -
Page 27: Care And Maintenance
VM9212 Care and Maintenance Use only a clean silicone cloth and neutral detergent to clean the front panel or monitor. A rough cloth and non- neutral detergent (such as alcohol) may result in scratching or discoloration. Do not get water or cleaning fluids on the unit. -
Page 28: Specifications
VM9212 SPECIFICATIONS DVD/CD Player Amplifier Remote (Blue/White): 500mA max, current limited Compatible Disc Media: DVD + R / RW (Single and Dual protection Layer) and CD-R / RW Operating Temperature: -20C ~ 65C Compatible Media Formats: CD-DA, MP3, WMA, VCD, Fuse: 15-amp, mini ATM type SVCD, AVI, MPEG1 / 2 and Kodak picture CD (JPEG). -
Page 29: Limited Warranty
The Company extends this warranty to the original retail purchaser of products This Warranty is in lieu of all other express warranties or liabilities. ANY IMPLIED purchased through an authorized Audiovox retailer in the U.S.A., Puerto Rico or WARRANTIES, INCLUDING... - Page 30 Audiovox Electronics Corporation Hauppauge, NY 11788 Technical Assistance: 1-800-323-4815 www.jensen.com © 2007 Audiovox Ver. 111307 Printed in China...