Memorex Mi1111 - Micro System User Manual
Micro system for ipod with pll am/fm radio, mp3/cd player and remote control
Hide thumbs
Also See for Mi1111 - Micro System:
- Specification sheet (2 pages) ,
- Specifications (1 page)
Table of Contents
Advertisement
Available languages
Available languages
Mi1111
User's Guide
Guía del usuario
Micro System for iPod with PLL AM/FM Radio,
MP3/CD Player and Remote Control
Microsistema para iPod con Radio AM/FM,
Reproductor de MP3/CD y Control remoto
Before operating this product, please read these instructions
completely. / Antes de operar este producto, lea este
instructivo en su totalidad.
Advertisement
Table of Contents

Related Manuals for Memorex Mi1111 - Micro System

Summary of Contents for Memorex Mi1111 - Micro System
- Page 1 Mi1111 User’s Guide Guía del usuario Micro System for iPod with PLL AM/FM Radio, MP3/CD Player and Remote Control Microsistema para iPod con Radio AM/FM, Reproductor de MP3/CD y Control remoto Before operating this product, please read these instructions completely. / Antes de operar este producto, lea este instructivo en su totalidad.
-
Page 2: Safety Precautions
SAFETY PRECAUTIONS CAUTION RISK OF ELECTRIC SHOCK DO NOT OPEN CAUTION: TO REDUCE THE RISK OF ELECTRIC SHOCK, DO NOT REMOVE COVER (OR BACK). NO USER-SERVICEABLE PARTS INSIDE. REFER SERVICING QUALIFIED SERVICE PERSONNEL. (This Caution Marking with Rating Label is located at the bottom enclosure of the unit.) DANGEROUS VOLTAGE: The lightning flash with arrowhead symbol within an... -
Page 3: Surge Protectors
SAFETY PRECAUTIONS INFORMATION: This equipment complies with Class B digital device regulations. This equipment generates, uses and can radiate radio frequency energy and, if not installed and used in accordance with the instructions, may cause harmful interference to radio communications. However, there is no guarantee that interference will not occur in a particular installation. -
Page 4: Important Safety Instruction
IMPORTANT SAFETY INSTRUCTION Before using the unit, be sure to read all back or bottom are provided for ventilation, to operating instructions carefully. Please note ensure reliable operation of the product and that these are general precautions and may to protect it from overheating. These not pertain to your unit. - Page 5 where it can fall into such power lines or that have the same characteristics as the circuits. When installing an outside antenna original part. Unauthorized substitutions may system, extreme care should be taken to result in fire, electric shock or other hazards. keep from touching such power lines or 20.
- Page 6 Dear Customer: Selecting fine audio equipment such as the unit you’ve just purchased is only the start of your musical enjoyment. Now it’s time to consider how you can maximize the fun and excitement your equipment offers. This manufacturer and the Electronic Industries Association’s Consumer Electronics Group want you to get the most out of your equipment by playing it at a safe level.
-
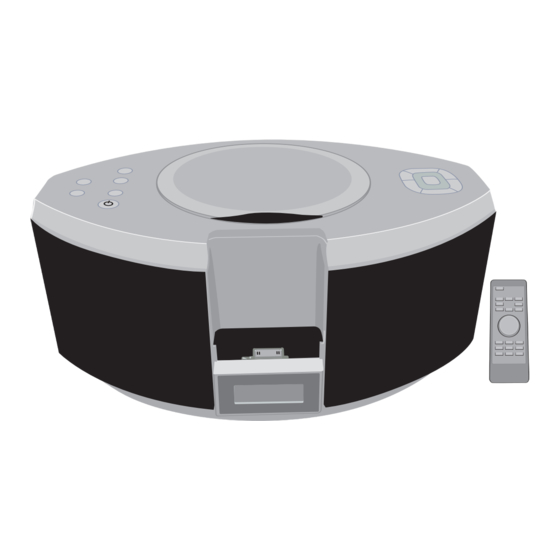
Page 7: Location Of Controls
LOCATION OF CONTROLS FRONT/TOP 1. CD Compartment 15. Tune/Skip/Time 2. FUNCTION Button Down (-) Button 3. TIMER Button 16. CD Compartment Press to 4. PRESET/FOLDER Open Area + / - Button 17. iPod Dock with Connector, 5. PROG./MEMO./ Dock Adapter & Inter- Clock Set Button changeable Universal 6. - Page 8 LOCATION OF CONTROLS (CONTINUED) REMOTE 1. POWER Button 11. MUTE Button 2. RANDOM Button 12. REPEAT Button 13. SLEEP Button 3. TIMER Button 14. STOP/BAND (I) Button 4. FUNCTION Button 15. VOLUME + Button 5. PLAY/PAUSE (®p) Button 6. INTRO Button 16.
-
Page 9: Power Source
POWER SOURCE AC CONNECTION Unwind the AC cord and extend it to its full length. Insert the AC plug into any convenient 120V 60Hz household outlet. Please note that this unit is equipped with a polarized AC plug which has one blade wider than the AC Outlet other. -
Page 10: Optional Connections
OPTIONAL CONNECTIONS A/V (Audio/Video) OUT JACK (REAR OF UNIT) If you are using an iPod with video (5th generation) or iPod photo, you can connect this unit to an external TV with the included audio/video cable. You will then be able to view the photos (in Slideshow mode)/videos, and hear the audio, from the iPod on your external TV. -
Page 11: Operation
OPERATION TO SET OR RESET THE ACTUAL TIME With the power off, press and hold Press the Tune/Skip/Time Down the PROG./MEMO./Clock Set (-) 1 or Up (+) 2 button to set the button until “12” or “24” Hour unit to the 24 hour mode (also blinks in the display. - Page 12 INSERTING AN iPod Tabs facing front Locate the correct iPod Universal Insert the dock and dock adapter (A) Dock to use as shown on pages 28- onto the connector (B) (as shown). 29. Insert the dock (A) into the dock NOTE: For iPod nano, 1st or 2nd adapter (B) (as shown), making sure generation, make sure to slide the...
- Page 13 OPERATION USING AN iPod WITH THIS UNIT With an iPod connected (see If you are not already in iPod mode, press the FUNCTION previous page), turn this unit on by button to select iPod mode. You pressing the Power button; the can operate the iPod using its own display will show briefly “Hello”...
- Page 14 OPERATION (CONTINUED) ADJUSTING THE VOLUME CONTROLS To adjust the treble: To adjust the main volume: Press the VOLUME + and/or - Press the TREBLE + and/or - button 1 on the remote (shown) or button on the remote to increase on the main unit to increase and/or and/or decrease the treble.
- Page 15 OPERATION (CONTINUED) USING THE RADIO Turn this unit on by pressing the If you are not already in Tuner Power button; the display will show mode, press the FUNCTION briefly “Hello” and the backlight will button to select Tuner mode. light blue.
- Page 16 OPERATION (CONTINUED) SETTING THE RADIO PRESETS (30 for FM, 10 for AM) Follow the steps on the previous Within five seconds, press the page to tune a station. Press the PRESET/FOLDER + or - button 1 PROG./MEMO./Clock Set button; to select a desired Preset. Press “MEM”...
- Page 17 OPERATION (CONTINUED) USING A CD WITH THIS UNIT Turn this unit on by pressing the Press the “Press to Open” area and gently press a CD onto the center Power button 1; the display will spindle with the label side facing up show briefly “Hello”...
- Page 18 OPERATION (CONTINUED) TO PAUSE A CD During playback, press Play/Pause (®p) button to pause playback and press yet again to resume playback. DISC PLAYBACK NOTES: • See page 22 for more information on MP3s. • If a disc is inserted incorrectly, dirty, damaged or not present at all, “NO DISC”...
- Page 19 OPERATION (CONTINUED) TO BEGIN PLAYBACK FROM A SPECIFIC TRACK When the desired track/file is While in Stop mode, you may press selected, press the Play/Pause either the Tune/Skip/Time Down (-) 1 or Up (+) 2 button to select a (®p) button. Playback will begin specific track for playback.
-
Page 20: Repeat Playback
OPERATION (CONTINUED) REPEAT PLAYBACK When the playback mode is While in the Stop mode, press the REPEAT button to cycle through the selected, press the Play/Pause following playback modes: “REP” (®p) button. Repeat One (will playback a single track/file continuously; see the NOTE: To stop and cancel Repeat previous page for how to select a playback, press the STOP/BAND... - Page 21 OPERATION (CONTINUED) TO PROGRAM THE MEMORY (UP TO 64 TRACKS) Programming is the ability to preselect the order in which a series of tracks will be played. While in the Stop mode, press the Select a track to be programmed PROG./MEMO./Clock Set button.
- Page 22 OPERATION (CONTINUED) NOTES ON PROGRAM PLAYBACK • You can review the program by pressing the PROG./MEMO./Clock Set button repeatedly while in the Stop mode. • To add a track to the program memory, while in the Stop mode, simply press the PROG./MEMO./Clock Set button repeatedly until the first empty Program number appears in the display.
- Page 23 OPERATION (CONTINUED) MP3 FAQs–Frequently Asked Questions Please read before playing a MP3 disc. Does the unit support packet write CD-RW? Yes, it can. You can add or delete MP3 files without reformatting. It appears like a PC hard drive. Can the unit read regular music CDs? Yes, it can.
- Page 24 OPERATION (CONTINUED) SELECTING SONGS BY MP3 FILE NAME You can search for a song by file name as follows: Select the first letter/number of a With a MP3 disc inserted, while in the Stop mode, press the FIND/ file you would like to listen to STEREO–MONO button on the using the Tune/Skip/Time Down remote;...
- Page 25 OPERATION (CONTINUED) SEARCHING THROUGH MP3 FOLDERS You can select a particular folder for playback as follows: With a MP3 disc inserted, while in Select the folder you would like to the Stop mode, press the FIND/ listen to using the Tune/Skip/Time STEREO–MONO button on the Down (-) 1 or Up (+) 2 button.
-
Page 26: Single Session
OPERATION (CONTINUED) SINGLE SESSION The chart below is an example of a Windows Explorer display that will appear on your computer monitor for a single session MP3 disc with directories/albums. Check the added notes to help you understand the MP3 disc unit display and the playback sequence of directories/albums and tracks on a single session MP3 disc. - Page 27 OPERATION (CONTINUED) TO SET THE TIMER With the unit off, press and hold Within a few seconds, press the Tune/Skip/Time Down (-) 1 or Up the TIMER button until the TIMER (+) 2 button to set the TIMER ON ON hour blinks in the display for a hour.
- Page 28 OPERATION (CONTINUED) SLEEP With the unit on, press the SLEEP button on the remote; the SLEEP indicator and "90" will appear in the display for approx. five seconds which indicates the unit will turn off after 90 minutes. Repeatedly press the SLEEP button to select the SLEEP time, 90-10 minutes (i.e.,...
- Page 29 OPERATION (CONTINUED) iPod UNIVERSAL DOCKS Locate your iPod in the chart on the next two pages and select the respective Universal Dock (the Universal Dock No. is engraved at the back of the Universal Docks as shown on the next page) to match with your iPod. Insert the corresponding Universal Dock and your iPod into the unit as described on page 11.
- Page 30 OPERATION (CONTINUED) iPod Type Memory Univ. Dock No. First 1 to No. 8 Generation (Part No. 0229- 0761908-0000*) iPod nano 30GB No. 9 Fifth (Part No. 0229- Generation 0761909-0000*) iPod (w/Video) 60GB/ No. 10 (Part No. 0229- 80GB 0761910-0000*) Second 2 to No.
-
Page 31: Troubleshooting Guide
TROUBLESHOOTING GUIDE If you experience a problem with this unit, check the chart below before calling for service. SYMPTOM CAUSE SOLUTION No sound. Volume is Increase volume. set to minimum. AM or FM, no sound. Not in Tuner mode. Press the Power button, then the FUNCTION button to select Tuner. -
Page 32: Care And Maintenance
CARE AND MAINTENANCE Caring for Compact Discs • Treat the compact disc carefully. Handle the compact disc only by its edges. Never allow your fingers to come in contact with shiny, unprinted side compact disc. • Do not attach adhesive tape, stickers, etc. to the compact disc label. •... -
Page 33: Specifications
PLEASE KEEP ALL PACKAGING MATERIAL FOR AT LEAST 90 DAYS IN CASE YOU NEED TO RETURN THIS PRODUCT YOUR PLACE OF PURCHASE OR MEMOREX. FOR CONSUMER REPLACEABLE PART(S), SEE PART NUMBER(S) ON PAGES 6, 7, 28 AND 29 AND THEN CONTACT FOX... -
Page 34: Medidas De Seguridad
MEDIDAS DE SEGURIDAD CUIDADO RIESGO DE DESCARGA ELÉCTRICA. NO ABRIR ADVERTENCIA: Para reducir el riesgo de descargas eléctricas no abra la cubierta o tapa posterior. Allí no hay partes que el usuario pueda reparar. Lleve su unidad a un Centro de Servicio Autorizado. (Esta etiqueta con marca de alerta y clasificación se encuentra en el gabinete inferior de la unidad.) ADVERTENCIA: La figura del rayo con punta de flecha... - Page 35 MEDIDAS DE SEGURIDAD INFORMACIÓN: Este equipo cumple con los reglamentos de un aparato digital de Clase B. Este equipo genera, usa y puede irradiar energía de radiofrecuencia y, si no se instala y usa conforme a las instrucciones, puede generar interferencia dañina con las radiocomunicaciones.
- Page 36 MEDIDAS DE SEGURIDAD Antes de usar este aparato asegúrese de leer líquidos cerca a ella. La unidad no deberá ser bien todos los puntos de este manual de instalada en un mueble empotrado, como una operaciones. Una vez leído, consérvelo a la repisa para libros, un estante o donde la mano para usarlo como referencia en el presencia de cortinas o mobiliario obstruya...
- Page 37 Asimismo, nunca deberá tocarlas ya que peligrosos. Lleve su unidad a un Centro de podría ser fatal. servicio autorizado. 15. Sobrecarga 19. Repuestos Nunca sobrecargue enchufes Cuando tenga necesidad de ordenar piezas, extensiones, ya que podría resultar en un asegúrese de que su centro de servicio use incendio las piezas especificadas por el fabricante, o cortocircuito.
- Page 38 Estimado Cliente: En el momento en que seleccionó un equipo de tan alta tecnología como el que usted acaba de comprar, su entretenimiento musical recién comenzó. Ahora es tiempo de pensar en cómo puede optimizar el entretenimiento que su equipo le ofrece. Este fabricante y la Asociación de Industrias Electrónicas del Grupo de Consumidores Electrónicos desean que usted obtenga el mejor resultado de su equipo, usándolo a un nivel seguro como es escuchar un sonido claro y sonoro, sin distorsión y, sobre todo, sin que afecte su sentido auditivo.
-
Page 39: Ubicación De Los Controles
UBICACIÓN DE LOS CONTROLES PARTE FRONTAL/SUPERIOR 1. Compartimiento del CD 13. Botones de VOLUMEN + / - 2. Botón de FUNCIÓN 14. Botón de DETENER/ BANDA (I) 3. Botón de TEMPORIZADOR 15. Botón de Sintonizar/ 4. Botón de PREDEFINIDOS/ Brincar/Hora Abajo (-) CARPETA + / - 16. -
Page 40: Control Remoto
UBICACIÓN DE LOS CONTROLES (CONTINÚA) CONTROL REMOTO 1. Botón de ENCENDIDO ESTÉREO–MONO 2. Botón de ALEATORIO 11. Botón de SILENCIO 3. Botón de TEMPORIZADOR 12. Botón de REPETIR 4. Botón de FUNCIÓN 13. Botón de DORMIR 5. Botón de REPRODUCIR/ 14. -
Page 41: Fuente De Energía
FUENTE DE ENERGÍA CONEXIÓN A CORRIENTE ELÉCTRICA Desenrolle el cable eléctrico y extiéndalo en toda su longitud. Inserte el enchufe de CA en cualquier contacto eléctrico de 120V, 60Hz doméstico conveniente. Tome en cuenta que esta unidad está equipada con una clavija polarizada que tiene una cuchilla más ancha que la otra. -
Page 42: Conexiones Opcionales
CONEXIONES OPCIONALES Conector de salida de A/V (Audio/Video) (ATRÁS EN LA UNIDAD) Si está usando un iPod con video (5a generación) o un iPod photo, puede conectar esta unidad a un televisor externo con el cable de audio/video incluido. Entonces podrá... -
Page 43: Operación
OPERACIÓN CÓMO AJUSTAR O REAJUSTAR LA HORA ACTUAL Con la unidad apagada, presione Presione el botón de Sintonizar/ el botón de PROG./MEMO./ Brincar/Hora Abajo (-) 1 o Arriba (+) 2 para configurar la unidad en el modo Ajuste de reloj y manténgalo de 24 horas (también conocido como presionado hasta que la hora “12”... - Page 44 CÓMO INSERTAR UN iPod pestañas apunten al frente Tabs facing front Ubique el puerto universal correcto para Introduzca el puerto y el adaptador de el iPod a ser usado como se muestra en puerto (A) en el conector (B) (como se las páginas 28 y 29.
- Page 45 OPERACIÓN CÓMO USAR UN iPod CON ESTA UNIDAD Con un iPod conectado (vea la página Si todavía no está en modo de iPod, presione el botón de FUNCIÓN para anterior), encienda esta unidad seleccionar el modo de iPod. Usted presionando el botón de Encendido; el puede operar el iPod usando los display mostrará...
- Page 46 OPERACIÓN (CONTINÚA) CÓMO AJUSTAR LOS CONTROLES DE VOLUMEN Para ajustar los agudos: Para ajustar el volumen principal: Presione el botón de AGUDOS + o Presione el botón de VOLUMEN + o - - en el control remoto para 1 en el control remoto (se muestra) o aumentar o disminuir los agudos.
- Page 47 OPERACIÓN (CONTINÚA) CÓMO USAR LA RADIO Encienda esta unidad presionando Si todavía no está en modo de el botón de Encendido; el display Sintonizador, presione el botón de FUNCIÓN para seleccionar el modo de mostrará brevemente la palabra Sintonizador. “Hello” [hola] y la luz de fondo se Vea la página anterior en cuanto a iluminará...
- Page 48 OPERACIÓN (CONTINÚA) CÓMO AJUSTAR LOS PREDEFINIDOS DE LA RADIO (30 de FM, 10 de AM) Siga los pasos en la página En menos de cinco segundos, presione anterior para sintonizar botón PREDEFINIDOS/ CARPETA + o - 1 para seleccionar un estación.
- Page 49 OPERACIÓN (CONTINÚA) CÓMO USAR UN CD CON ESTA UNIDAD Encienda esta unidad presionando el Presione área para abrir botón de Encendido 1; el display compartimiento de CD y coloque un CD mostrará brevemente la palabra “Hello” en el eje central, ejerciendo poca presión, con el lado de la etiqueta hacia arriba y [hola] y la luz de fondo se iluminará...
- Page 50 OPERACIÓN (CONTINÚA) PARA PAUSAR UN CD Durante la reproducción, presione el botón de Reproducir/Pausa (®p) para pausar la reproducción y presiónelo una vez más para reanudar la reproducción. NOTAS DE REPRODUCCIÓN DE DISCO: • Vea la página 22 en cuanto a información sobre los discos MP3. •...
- Page 51 OPERACIÓN (CONTINÚA) PARA INICIAR LA REPRODUCCIÓN DE UNA PISTA ESPECÍFICA Cuando seleccione la pista o Mientras está en modo de Paro, puede presione uno de los botones de archivo deseado, presione el Sintonizar/Brincar/Hora Abajo (-) 1 o botón de Reproducir/Pausa Arriba (+) 2 para seleccionar una pista (®p).
- Page 52 OPERACIÓN (CONTINÚA) REPRODUCCIÓN REPETIDA Cuando seleccione el modo de Mientras está en modo de Paro, presione reproducción deseado, presione el el botón de REPETIR para alternar entre los siguientes modos de reproducción: botón de Reproducir/Pausa (®p). “REP” Repetir uno (reproducirá una sola pista o archivo continuamente;...
- Page 53 OPERACIÓN (CONTINÚA) PARA PROGRAMAR LA MEMORIA (HASTA 64 PISTAS) Programar es la habilidad de seleccionar previamente el orden en el cual se reproducirá una serie de pistas. Seleccione una pista a programar Mientras está en modo de Paro, presione el botón PROG./MEMO./ usando el botón de Sintonizar/ Ajuste de reloj.
- Page 54 OPERACIÓN (CONTINÚA) NOTAS SOBRE CÓMO PROGRAMAR LA REPRODUCCIÓN • Puede revisar el programa presionando repetidamente el botón de PROG./MEMO./Ajuste de reloj mientras está en modo de Paro. • Para agregar una pista a la memoria del programa, mientras está en modo Paro, simplemente...
-
Page 55: Preguntas Frecuentes Sobre Mp3
OPERACIÓN (CONTINÚA) PREGUNTAS FRECUENTES SOBRE MP3 Lea esta sección antes de reproducir un disco MP3. ¿Qué es un archivo MP3? Un archivo MP3 es un formato de computadora que hace que un archivo de música bastante grande sea más pequeño, lo cual es más conveniente para descargarse y compartirlo. - Page 56 OPERACIÓN (CONTINÚA) SELECCIONAR CANCIONES POR MP3 NOMBRE DE ARCHIVO Puede buscar una canción por su nombre de archivo de la siguiente manera: Seleccione la primera letra o Con un disco MP3 adentro y mientras está en modo de Paro, presione el número del archivo que desee botón de ENCONTRAR/ESTÉREO escuchar usando el botón de...
- Page 57 OPERACIÓN (CONTINÚA) CÓMO BUSCAR EN LAS CARPETAS DE MP3 Usted puede seleccionar una carpeta en particular para reproducirla de la siguiente manera: Seleccione la carpeta que desee Con un disco MP3 adentro y mientras escuchar usando el botón de está en modo de Paro, presione dos veces el botón de ENCONTRAR/ Sintonizar/Brincar/Hora Abajo (-) ESTÉREO–MONO en el control...
-
Page 58: Sesiones Múltiples
OPERACIÓN (CONTINÚA) SESIÓN ÚNICA La tabla a continuación es un ejemplo de una ventana del Explorador de Windows que aparecerá en el monitor de su computadora para una sesión única de disco MP3 con directorios o álbumes. Revise las notas suplementarias para ayudarle a entender la pantalla de la unidad de disco MP3 y la secuencia de reproducción de los directorios o álbumes y pistas en una sesión única de disco MP3. - Page 59 OPERACIÓN (CONTINÚA) PARA AJUSTAR EL TEMPORIZADOR Con la unidad apagada, presione En unos segundos, presione el botón de el botón de TEMPORIZADOR y Sintonizar/Brincar/Hora Abajo (-) 1 o Arriba (+) 2 para ajustar la hora del TEMPORIZADOR manténgalo presionado hasta que ENCENDIDO.
- Page 60 OPERACIÓN (CONTINÚA) DORMIR Con la unidad encendida, presione el botón de DORMIR en el control remoto; el indicador de SLEEP [dormir] y “90” aparecerán en el display durante unos cinco segundos, lo cual indica que la unidad se apagará después de 90 minutos.
- Page 61 OPERACIÓN (CONTINÚA) PUERTOS UNIVERSALES DE iPod Ubique su iPod en la tabla en las siguientes dos páginas y seleccione el puerto universal respectivo (el número del puerto universal está grabado en la parte delantera de éstos, como se muestra en la siguiente página) que corresponde con su iPod.
- Page 62 OPERACIÓN (CONTINÚA) iPod Tipo Memoria N° puerto univ. First 1 a. No. 8 Generation (No. de pieza 0229-0761908- iPod 0000*) nano 30GB. No. 9 Fifth (No. de pieza Generation 0229-0761909- iPod 0000*) (c/Video) 60GB / No. 10 (No. de pieza 80GB 0229-0761910- 0000*)
-
Page 63: Guía De Diagnóstico
GUÍA DE DIAGNÓSTICO Si tiene problemas con esta unidad, revise la tabla a continuación antes de llamar a servicio. SÍNTOMA CAUSA SOLUCIÓN Sin sonido. El volumen está al Suba el volumen. mínimo. AM o FM, sin sonido. No en modo de Presione el botón de Sintonizador. -
Page 64: Cuidado Y Mantenimiento
CUIDADO Y MANTENIMIENTO Cuidado de los discos compactos • Trate el disco compacto con cuidado. Agarre el disco compacto sólo por sus orillas. Nunca permita que sus dedos toquen el lado brilloso y sin etiqueta del disco compacto. • No pegue cinta adhesiva, calcomanías u otra cosa en la etiqueta del disco compacto. -
Page 65: Especificaciones
CONSERVE EL EMPAQUE AL MENOS DURANTE 90 DÍAS POR SI ACASO NECESITARA REGRESAR PRODUCTO A SU DISTRIBUIDOR O A MEMOREX. PARA OBTENER PIEZAS REEMPLAZABLES POR EL CONSUMIDOR, CONSULTE EL NÚMERO DE PIEZA EN LAS PÁGINAS 6, 7, 28 Y 29 Y LUEGO COMUNÍQUESE... - Page 66 Memcorp, Inc. Weston, FL Printed in / Impreso en Hong Kong Visit our website at / Visite nuestro sitio web en www.memorexelectronics.com 0570-0761901-0000...