Table of Contents
Advertisement
Quick Links
Download this manual
See also:
User Manual
Advertisement
Table of Contents

Related Manuals for American Audio DCD-PRO610


Summary of Contents for American Audio DCD-PRO610
-
Page 1: Operating Instructions
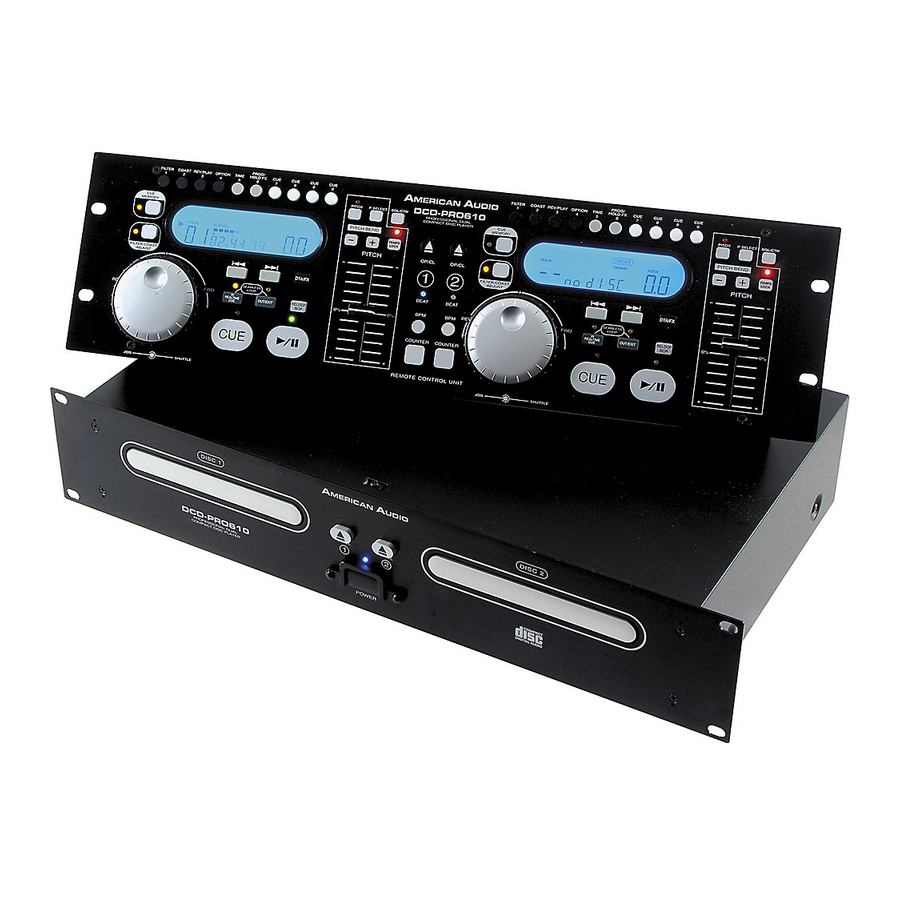
Operating Instructions DCD-PRO610 Professional Dual CD Player Featuring: FLIPFLOP 4295 Charter Street Los Angeles Ca. 90058 Rev. 3/05 www.americandj.com... -
Page 2: Table Of Contents
1. High quality CD-R Audio discs (should conform to the standards of the Orange Book 2). 2. Use a high quality bit rate when recording discs. (At least 160kbps) 3. Record discs in the slowest speed possible. (i.e. 2x or 4x speed) American Audio - www.americanaudio.us - DCD-PRO610™ Instruction Manual Page 2 © ®... -
Page 3: Cautions Regarding Handling
BE ADJUSTED OR REPAIRED BY ANYONE receiver is connected. EXCEPT PROPERLY QUALIFIED SERVICE – Consult the dealer or an experienced radio/ PERSONNEL. TV technician for help. American Audio - www.americanaudio.us - DCD-PRO610™ Instruction Manual Page 3 © ®... -
Page 4: Electrical Precautions
(NEC SECTION 810-21) used for a long period of time. EQUIPMENT GROUND CLAMPS POWER SERVICE GROUNDING ELECTRODE SYSTEM Fig. A (NEC ART 250, PART H) NEC — NATIONAL ELECTRICAL CODE American Audio - www.americanaudio.us - DCD-PRO610™ Instruction Manual Page 4 © ®... -
Page 5: Product Information
Please contact American Audio ® up lens, be sure to follow extreme caution customer support at (800) 322-6337 for a R.A. when using these types of cleaners. number. American Audio - www.americanaudio.us - DCD-PRO610™ Instruction Manual Page 5 © ®... -
Page 6: Customer Support
Be sure main power is connected last to prevent any electrical damage. AUDIO CONNECTIONS: Use the included RCA cable to connect the DCD-PRO610™ outputs to the line inputs of a mixer. Never connect a CD player's output to a mixers "phono" inputs. -
Page 7: Features
Start” control. Connect your DCD-PRO610’s as described in the set-up section of this manual. After set-up is completed, insert CD's in to both drives. By moving the mixer’s crossfader from left to right you can start and pause your DCD-PRO610 playback functions. -
Page 8: Remote Unit
If reverse play is not turned off the information on setting a cue point see page 20. disc will continue to play in reverse until it returns 3. FILTER - This button activates the FILTER American Audio - www.americanaudio.us - DCD-PRO610™ Instruction Manual Page 8 © ®... - Page 9 6. The LCD icons will be to cue mode after all tracks have played. This described in the next section. American Audio - www.americanaudio.us - DCD-PRO610™ Instruction Manual Page 9 © ®...
- Page 10 +2% pitch. The amount of pitch being American Audio - www.americanaudio.us - DCD-PRO610™ Instruction Manual Page 10 © ®...
- Page 11 1 remote connector. This will While in play mode the green play LED will glow, allow you to control player 1's functions. American Audio - www.americanaudio.us - DCD-PRO610™ Instruction Manual Page 11 © ®...
-
Page 12: Player Unit
Scratch Box to the to this jack. Be 38. DRIVE 2 OPEN/CLOSE (Transport Tray sure to use a dual stereo jack for proper function- American Audio - www.americanaudio.us - DCD-PRO610™ Instruction Manual Page 12 © ®... - Page 13 The red colored jack represents the right channel output and white jack represents 45. POWER CONNECTOR - This is the main the left channels output. American Audio - www.americanaudio.us - DCD-PRO610™ Instruction Manual Page 13 © ®...
-
Page 14: Liquid Crystal Display
61. TIME BAR INDICATOR - This bar visually 56. ELAPSE INDICATOR - This indicator is in details the time defined in the TIME METER (57, direct reference to the TIME METER (57, 58, & American Audio - www.americanaudio.us - DCD-PRO610™ Instruction Manual Page 14 © ®... - Page 15 REPEAT (69) and 1 (68) icons in the LCD (14). but is set and ready to be engaged. 66. TOTAL REMAIN INDICATOR - This indicator is in direct reference to the TIME METER (57, 58, American Audio - www.americanaudio.us - DCD-PRO610™ Instruction Manual Page 15 © ®...
-
Page 16: Basic Operation
2. LOADING DISCS 3 in. / 8cm disc The DCD-PRO610 can play both 3 inch (8 cm) and 5 inch (12 cm) compact discs (CD’s). Odd shaped and oval CD’s are not compatible. When loading a CD into the unit always hold the disc by its' edges and place it in the disc tray. -
Page 17: Frame Search
The flashing bar is a great visual reminder a track is about to end. The flashing bar will function regardless of which time mode the unit is in. Figure 12 American Audio - www.americanaudio.us - DCD-PRO610™ Instruction Manual Page 17 © ®... -
Page 18: Making Pitch Changes
(7) will indicate which pitch percentage mode the unit is operating in. Glowing green for +/-8%, glowing orange for +/-12%, or glowing red for +/-16%. Note, the pitch function must be activated to receive a LED reading. Figure 15 American Audio - www.americanaudio.us - DCD-PRO610™ Instruction Manual Page 18 © ®... - Page 19 The speed you rotate the JOG WHEEL (19) will determine pitch bend percentage (%). Figure 18 American Audio - www.americanaudio.us - DCD-PRO610™ Instruction Manual Page 19 © ®...
-
Page 20: Setting Cue Points
1) Create a cue point, press the CUE MEMORY BUTTON (6), as in Figure 20. The yellow Cue Memory LED will glow. This indicates a cue point is ready to be stored in to memory. Figure 21 American Audio • DCD-PRO610™ INSTRUCTION MANUAL • PAGE 20 ®... -
Page 21: Creating Seamless Loops
2) Press the IN REAL-TIME CUE BUTTON (26). This will set a loops starting point. The IN REAL-TIME CUE BUTTON (26) LED will briefly indicating a starting point has been set. Figure 24 American Audio • DCD-PRO610™ INSTRUCTION MANUAL • PAGE 21 ®... -
Page 22: Editing Loops
- FOR A SHORTER LOOP: Press the OUT/EXIT BUTTON (28) at sooner point in the track (Figure 26). - FOR LONGER LOOP: Press the OUT/EXIT BUTTON (28) at later point in the track (Figure 26). American Audio • DCD-PRO610™ INSTRUCTION MANUAL • PAGE 22 ®... -
Page 23: Programming And Program Play
30 tracks, and you can only add tracks not subtract them. 9) To cancel and clear the program press and hold down the DTA/ FX(22) and PRG/HOLD FX (13) for more than two seconds (see figure 28). Figure 31 American Audio • DCD-PRO610™ INSTRUCTION MANUAL • PAGE 23 ®... -
Page 24: Advanced Operation
If the reverse function is turned off at this point, the loop will continue in regular play. If the OUT/EXIT BUTTON (28) is pressed during reverse loop playback mode, playback will continue in reverse until the reverse function. Figure 35 American Audio • DCD-PRO610™ INSTRUCTION MANUAL • PAGE 24 ®... -
Page 25: Flip-Flop
Connecting your DCD-PRO610 to a “Q” Start mixer for “Q" Start control: Be sure to connect 1/8” mono mini plugs from the control connection on the rear your DCD-PRO610 to the 1/8” control jack on the rear of a American Audio “Q”... -
Page 26: Scratch
ADVANCED OPERATIONS BUILT-IN EFFECTS: The DCD-PRO610™ comes with two built in effects. Only one effect may be used at any given time. The Built-in effects include FILTER and Coast. When either effect is activated a corresponding icon will display in the LCD. For example when the FILTER EFFECT (3) is activated a "1"... -
Page 27: Filter
This parameter can be adjusted at any time once the filter effect has been activated, by turning the jog wheel in either direction. Figure 44 American Audio • DCD-PRO610™ INSTRUCTION MANUAL • PAGE 27 ®... -
Page 28: Optional Scratch Box Set-Up
Using mono ground cable to this connector to avoid hum and mini plugs may cause your CD to play in reverse. pops associated with phono cartridges. American Audio • DCD-PRO610™ INSTRUCTION MANUAL • PAGE 28 ®... -
Page 29: Shut Down Procedures
Do not place discs in the following areas: a) Areas exposed to direct sunlight for a considerable time. b) Areas subject to accumulation of dust or high humidity. c) Areas affected by heat from indoor heaters, etc. American Audio • DCD-PRO610™ INSTRUCTION MANUAL • PAGE 29 ®... -
Page 30: Warranty
® tive parts at its expense, and will absorb all expenses for warranty service and repair labor by reason of defects in material or workmanship. The sole responsibility of American Audio under ® this warranty shall be limited to the repair of the product, or replacement thereof, including parts, at the sole discretion of American Audio . -
Page 31: Specifications
TCD-731R PICK-UP System Object lens drive system optical pick-up Object lens drive system 2 dimensional parallel drive Tracking detection 3 spot beam detection Optical source Semiconductor laser Wave length 780nm American Audio • DCD-PRO610™ INSTRUCTION MANUAL • PAGE 31 ®... - Page 32 ©American Audio® A Division of the American DJ® Group of Companies American Audio® World Headquarters: 4295 Charter Street Los Angeles, CA 90058 USA Tel: 323-582-2650 Fax: 323-582-2610 Web: www.americanaudio.us E-mail: info@AmericanAudio.us...